DIY Blackout chrome headlight
 08-17-2009, 11:45 PM
#1
CL9 ABP
Thread Starter
iTrader: (1)
Join Date: Feb 2005
Location: Commack, Long Island -> Queens NY
Age: 37
Posts: 4,528
Received 245 Likes
on
112 Posts
DIY Blackout chrome headlight
So I was helping jon with his headlights today.
somethings you need
Philips screw driver
Flat head screwdriver
rachet set extension 10mm head
some kind of disposable knife or blade I used a flat blade for tiling
rtv sealant gasket/ silicon either black or clear
chalking gun helps resealing the headlight instead of the tube method.
Painters tape
news paper
5-6 spring clamps per headlight - we reused a few to rotate on each headlight.
an oven
oven mitts
newspaper
alcohol cleaning wipes / paper towels microfiber
primer
spray paint
Paint thinner ! * masking is impossible to be perfect but some paint thinner you can undo the boo boos.
A buddy sometimes help
------------------------------
diy videos that may help with some of the processes
Warning I am not responsible for you melting or breaking any part of your headlight. This is a guide to help you through the process. So please don't kill me or anyone else near you if you mess up. Have fun.

Open the hood. Start to remove the radiator clips
move them aside try not to lose any clips.


Go to each side and pop off the plastic rail that is hiding the headlight clip.


you will need a 10mm socket for these 2 bolts the headlight has 3 more bolts to the left and right. Do not loosen these yet since if you get the other two out the headlight might just fall out of the car sometimes. I usually do the top last since their the easier ones.

Then go to the tire well with a Philips and unscrew the screws on left and right. Doesn't matter the order just don't lose these screws later.
Next pop off the bumper to help you slide the bumper off. Complete bumper removal is not necessary.

Slide off the bumper you might need to remove the grill since it will pop out when you lower the bumper. Better than having it fall and getting scuffed up.

move to the right and left side where there is another 10mm bolt.


This one is tricky get a extension and line it up with the rail as shown in the picture theres kind of arrow point where the bolt is also 10mm.

Pull the headlight out slowly I do a left right and then up and down motion.


You need to yank off all the connections
highbeam hid turn signal parkinglight

opening up the hid contain to remove bulbs
Use a flat head smaller is preferred but all you need to do is push the screw around using the flat head and just get it out. I threw mine out after that since its such a pain to do it in the engine bay.
Remove the rest of the bulbs and make sure you do not touch any of the glass. It could cause premature bulb failure.
- moving to the kitchen !
So i'm super paranoid since my oven was a bit small to avoid it touch the walls or the tray i layed some towels with water I lightly ringed them out.

just lay another one for the other side.

preheat the oven to 200 degrees
I changed my diy this time since I was more confident about baking it longer.
Put the headlight in for 8 minutes each. I basically do 8 minutes each since i start hacking away at the headlight and then pry while one bakes for 8 minutes.
I don't suggest doing it longer due to possibility of melting people tell me 15-20 minutes is good but i heard horror stories since some people have circulating ovens or smaller overs.
mean while while one is in the oven set up a work station

ding 8 minutes done headlight 1

i used a flat metal tile tool to start splitting it. I do it a crude way as the headlight softens but i haven't had any melting with all the headlights i baked.
Not to quickest but definitely being safe.
I got the headlight open after 3 times in the oven at 8 minutes.

Basically when you get a corner you can slowly pry at it and cut away all the goop.
you either want to remove the projector now or later
4 screws you might have trouble reaching the by the silica packet but push it around or even remove it and you get access to the screw.

I did it now since i didn't want to damage or get the projector dirty.

again with the 10mm bolt you need to unscrew two bolts
this it the headlight aim rail
you will need to reaim your headlights later on
******(use a wall park 30 feet away from the wall and alight the two lights to about 3-4 feet high.)
One bolt is hidden under a plastic cap use a flat head to pry it off.

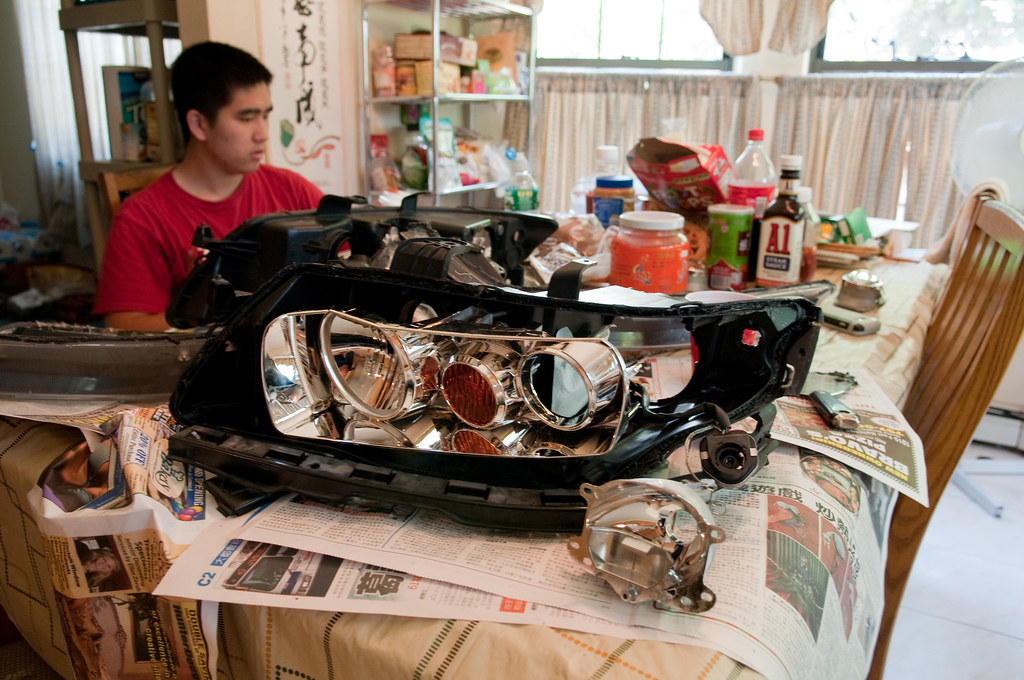
the projector has 2 parts once you remove it from the chrome housing. It is not held by anything else so be careful as it might drop.

once you got those two bolts off the chrome insert you can pull it off.
It might take awhile but it does come out be careful not to break the rail guide on the bottom.

our pretty projectors
------------ on to outside

prep the headlight with some wipes and clean it. No need to sand but you could do it.
Mask the parts that you dont want we wanted to keep the inner rings chrome so we masked the inside others will keep the outside chrome so mask how you like
Note ***** the masking does not need to be perfect you can wipe away some of the extra over spray since it moves the tape out of place with some paint thinner. I was able to do some handy work with the thinner and cleaned up a lot of the edges.
jon had brown primer to see what they did since he was blacking out the grill.
get the primer out shake well
shake in between ever time you spray light coats
let it sit for about 10-15 mins between 2 coats add a third if needed
its hard to get in some of the corners.

black paint or blue what ever color you want
same thing after the primer dried off you need to add paint.
Shake well and in between spray shot sprays light coats.
Make sure you get in those hard spots
we used the whole can up to give a nice solid black look.
gave 5 minute in between coats I went a bit crazy since it didn't really sink into the primer at the first few coats.

drying time leave about an hour or 2 to dry before working on them or even cleaning up the overspray.


over spray watch how clean i can get it.

i used a q-tip for some fine edges and dipped it in paint thinner then rubbed away it works well since we let it sit for only 1-1.5 hrs so the primer and paint was still soft in some areas but i head it in the back of the insert.

pretty darn sexy i might do this or paint it abp =)

looks clean right?
while we were waiting for the headlights to set
poor jon's car was dead


putting everything back is quite a pain. The projectors might give you some problem make sure you remember where the screws go it took us a bit.
Also remember to add the project and turn signal back before addin the insert back to the headlight.
Note the turn signal mounts with the projector to stay in place.
project has 3-4 screws i think turn signal has 3 holes but 2 screws one hole for a peg.
clean all surfaces and us a dust spray to get out the dust and shards of metal from the screws.
make sure you dry the lens clean no moisture.

Use the chauk gun to push out the silicon/rtv sealant the gun helps with filling in the lines I also use the clamps to push the tabs back and then use the gun to fill the tabs and cracks again.


This part i hate the most I needed more clips but jon was able to help with this process.
** note the headlight will get mess who cares as long as the seal is good the sealant is easily rubbed off after it dries but dont let it dry too long then it might get harder.
I basically used the gun to fill the spaces and use the clamps to apply pressure at all ends.
I slide the clamps and rotate them since some are stronger than others.
The clamps will slide off and snap at you i got hit by a few.
Just go around and put 2 clamps where the tabs are and lock the tab in.
When its harder to lock the tabs is press around the area or flush the headlight all around first then the tabs are easier.

its messy but dont worry the seal looks flawless we have silicon inside and outside.
clean up the headlight


all done =) enjoy
/
somethings you need
Philips screw driver
Flat head screwdriver
rachet set extension 10mm head
some kind of disposable knife or blade I used a flat blade for tiling
rtv sealant gasket/ silicon either black or clear
chalking gun helps resealing the headlight instead of the tube method.
Painters tape
news paper
5-6 spring clamps per headlight - we reused a few to rotate on each headlight.
an oven
oven mitts
newspaper
alcohol cleaning wipes / paper towels microfiber
primer
spray paint
Paint thinner ! * masking is impossible to be perfect but some paint thinner you can undo the boo boos.
A buddy sometimes help
------------------------------
diy videos that may help with some of the processes
Warning I am not responsible for you melting or breaking any part of your headlight. This is a guide to help you through the process. So please don't kill me or anyone else near you if you mess up. Have fun.
Open the hood. Start to remove the radiator clips
move them aside try not to lose any clips.
Go to each side and pop off the plastic rail that is hiding the headlight clip.
you will need a 10mm socket for these 2 bolts the headlight has 3 more bolts to the left and right. Do not loosen these yet since if you get the other two out the headlight might just fall out of the car sometimes. I usually do the top last since their the easier ones.
Then go to the tire well with a Philips and unscrew the screws on left and right. Doesn't matter the order just don't lose these screws later.
Next pop off the bumper to help you slide the bumper off. Complete bumper removal is not necessary.
Slide off the bumper you might need to remove the grill since it will pop out when you lower the bumper. Better than having it fall and getting scuffed up.
move to the right and left side where there is another 10mm bolt.
This one is tricky get a extension and line it up with the rail as shown in the picture theres kind of arrow point where the bolt is also 10mm.
Pull the headlight out slowly I do a left right and then up and down motion.
You need to yank off all the connections
highbeam hid turn signal parkinglight
opening up the hid contain to remove bulbs
Use a flat head smaller is preferred but all you need to do is push the screw around using the flat head and just get it out. I threw mine out after that since its such a pain to do it in the engine bay.
Remove the rest of the bulbs and make sure you do not touch any of the glass. It could cause premature bulb failure.
- moving to the kitchen !
So i'm super paranoid since my oven was a bit small to avoid it touch the walls or the tray i layed some towels with water I lightly ringed them out.
just lay another one for the other side.
preheat the oven to 200 degrees
I changed my diy this time since I was more confident about baking it longer.
Put the headlight in for 8 minutes each. I basically do 8 minutes each since i start hacking away at the headlight and then pry while one bakes for 8 minutes.
I don't suggest doing it longer due to possibility of melting people tell me 15-20 minutes is good but i heard horror stories since some people have circulating ovens or smaller overs.
mean while while one is in the oven set up a work station
ding 8 minutes done headlight 1
i used a flat metal tile tool to start splitting it. I do it a crude way as the headlight softens but i haven't had any melting with all the headlights i baked.
Not to quickest but definitely being safe.
I got the headlight open after 3 times in the oven at 8 minutes.
Basically when you get a corner you can slowly pry at it and cut away all the goop.
you either want to remove the projector now or later
4 screws you might have trouble reaching the by the silica packet but push it around or even remove it and you get access to the screw.
I did it now since i didn't want to damage or get the projector dirty.
again with the 10mm bolt you need to unscrew two bolts
this it the headlight aim rail
you will need to reaim your headlights later on
******(use a wall park 30 feet away from the wall and alight the two lights to about 3-4 feet high.)
One bolt is hidden under a plastic cap use a flat head to pry it off.
the projector has 2 parts once you remove it from the chrome housing. It is not held by anything else so be careful as it might drop.
once you got those two bolts off the chrome insert you can pull it off.
It might take awhile but it does come out be careful not to break the rail guide on the bottom.
our pretty projectors
------------ on to outside
prep the headlight with some wipes and clean it. No need to sand but you could do it.
Mask the parts that you dont want we wanted to keep the inner rings chrome so we masked the inside others will keep the outside chrome so mask how you like
Note ***** the masking does not need to be perfect you can wipe away some of the extra over spray since it moves the tape out of place with some paint thinner. I was able to do some handy work with the thinner and cleaned up a lot of the edges.
jon had brown primer to see what they did since he was blacking out the grill.
get the primer out shake well
shake in between ever time you spray light coats
let it sit for about 10-15 mins between 2 coats add a third if needed
its hard to get in some of the corners.
black paint or blue what ever color you want
same thing after the primer dried off you need to add paint.
Shake well and in between spray shot sprays light coats.
Make sure you get in those hard spots
we used the whole can up to give a nice solid black look.
gave 5 minute in between coats I went a bit crazy since it didn't really sink into the primer at the first few coats.
drying time leave about an hour or 2 to dry before working on them or even cleaning up the overspray.
over spray watch how clean i can get it.
i used a q-tip for some fine edges and dipped it in paint thinner then rubbed away it works well since we let it sit for only 1-1.5 hrs so the primer and paint was still soft in some areas but i head it in the back of the insert.
pretty darn sexy i might do this or paint it abp =)
looks clean right?
while we were waiting for the headlights to set
poor jon's car was dead
putting everything back is quite a pain. The projectors might give you some problem make sure you remember where the screws go it took us a bit.
Also remember to add the project and turn signal back before addin the insert back to the headlight.
Note the turn signal mounts with the projector to stay in place.
project has 3-4 screws i think turn signal has 3 holes but 2 screws one hole for a peg.
clean all surfaces and us a dust spray to get out the dust and shards of metal from the screws.
make sure you dry the lens clean no moisture.
Use the chauk gun to push out the silicon/rtv sealant the gun helps with filling in the lines I also use the clamps to push the tabs back and then use the gun to fill the tabs and cracks again.
This part i hate the most I needed more clips but jon was able to help with this process.
** note the headlight will get mess who cares as long as the seal is good the sealant is easily rubbed off after it dries but dont let it dry too long then it might get harder.
I basically used the gun to fill the spaces and use the clamps to apply pressure at all ends.
I slide the clamps and rotate them since some are stronger than others.
The clamps will slide off and snap at you i got hit by a few.
Just go around and put 2 clamps where the tabs are and lock the tab in.
When its harder to lock the tabs is press around the area or flush the headlight all around first then the tabs are easier.
its messy but dont worry the seal looks flawless we have silicon inside and outside.
clean up the headlight
all done =) enjoy

 woot.
woot. 08-22-2009, 07:01 PM
#6
CL9 ABP
Thread Starter
iTrader: (1)
Join Date: Feb 2005
Location: Commack, Long Island -> Queens NY
Age: 37
Posts: 4,528
Received 245 Likes
on
112 Posts
So my silica packets exploded so i needed to redo my headlights since shaking them out was not an option and plus i fixed the rails finally so my headlights can be aimed properly.
so i did something differnt i baked the paint on and i left the front out ring chrome.


so i did something differnt i baked the paint on and i left the front out ring chrome.
Trending Topics
08-23-2009, 02:05 AM
#12


Thread
Thread Starter
Forum
Replies
Last Post
MrHeeltoe
1G TSX Tires, Wheels, & Suspension
20
02-23-2023 01:54 PM
MrHeeltoe
2G TSX Tires, Wheels & Suspension
3
09-29-2015 10:43 PM