
Injen CAI installation photos - 56k beware
 12-23-2004, 04:32 PM
#1
Instructor
Thread Starter

Join Date: Mar 2004
Location: Raleigh, NC
Age: 43
Posts: 184
Likes: 0
Received 0 Likes
on
0 Posts
Injen CAI installation photos - 56k beware
Okay, here's the pictures from the install that I did Monday. Overall, it took me about 3 hours total but it was well worth it. This being my first mod, I think it went a little slower than normal as I was being carefull and trying to figure the stupid instructions that came with it. I tried to take as many pictures as I could along the way. So let me know if I'm missing anything.
The only tools I used were a jack, 10mm socket, socket extension and flat head screw driver. I have the new CAI that reuses the old EVAP housing.
Step 1: Disconnect the battery and cover to prevent accidental grounding.
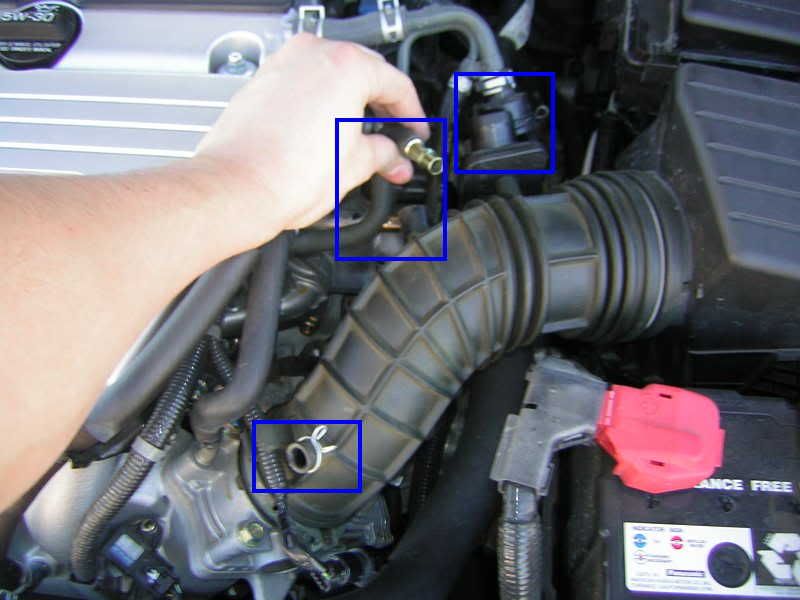
Step 2: Disconnect the EVAP vent hose, crank case vent hose, and intake air temperature sensor from the intake tube. In the picture, I only have the hose pulled off of the EVAP case but the entire thing will need to come off. Just pull it out. I didn't find that out till I was putting the new intake in.
Step 3: Remove the rubber intake tube from the throttle body and air filter. This comes off pretty easy with a little twisting motion.
Step 4: Remove the first bolt holding the air filter box in place using the 10mm socket. This bolt is in the upper right corner.
Step 5: The second bolt is in the lower left corner and is a royal pain in the ass to get to. The socket extension I was using just a little to short to reach past the plastic wiring clip. I took the four screws holding the top of the box off and removed the air filter and found that it was much more accessible.
View of the bolt and offending clip.
Remove the top of the air filter box and filter for easy access.
Step 8: Remove the air filter box. The wire harness has a zip-tie-ish clip holding it to the bottom of the air filter box. I had to turn the box over and used a set of needle nose pliers to unhook it. I tried to show what I mean in the following picture.
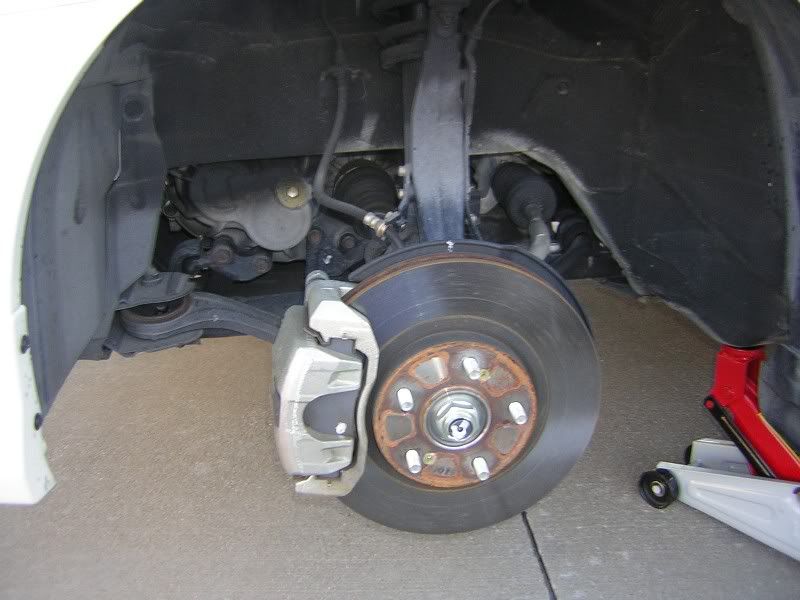
Step 9: Jack the car up and remove the front tire. I believe that you can just turn the tire and do the same thing but you'll have a lot more room this way.
Step 10: Remove the 3 clips inside the fenderwell. One in the "back" of the fender and two in the inside connecting the liner to the outside lip of the fender. There are more than 3 clips total inside the fender but only 3 are required to give you enough room to work.
Under the car there are two bolts that you have to remove. They are the only two bolts in the area. There are also two more clips on the underside that have to come out. I apologize for no photos of this. Maybe when I get home..
Just use a flathead screwdriver with a gentle touch pop out the centers of the clips and they'll pull out quite easily. The screws come off with the 10mm socket. Remember to put the clips and screws somewhere safe and note that the ones connecting to the outside fender are shorter that the ones connecting the bumper and inner fender.
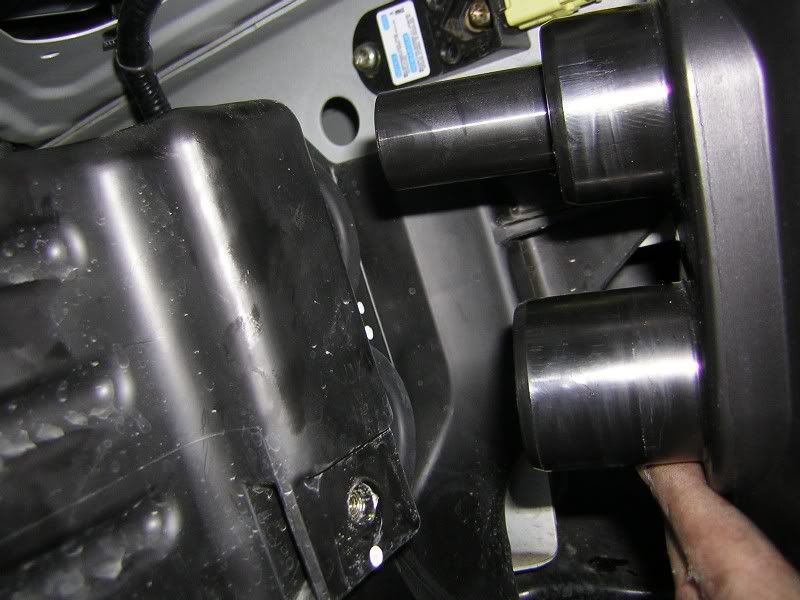
Here is liner pulled back and the resonator and intake downpipe exposed.
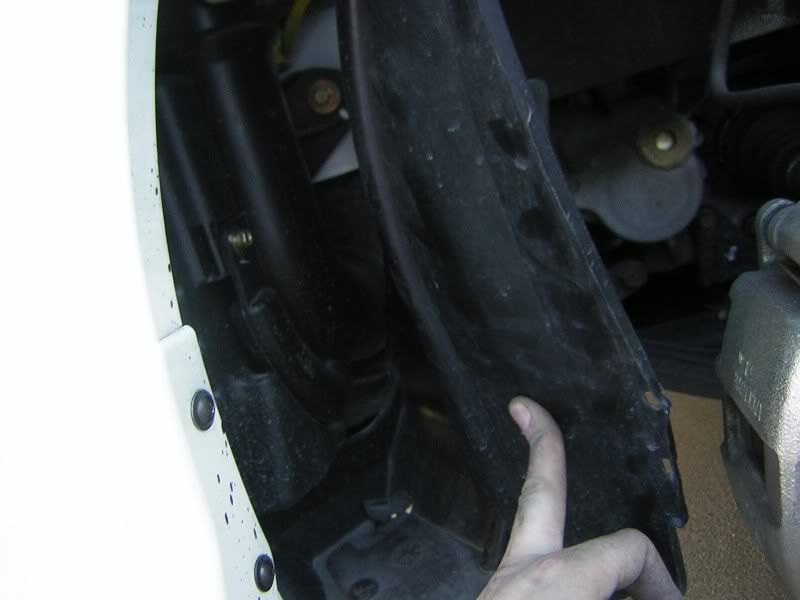
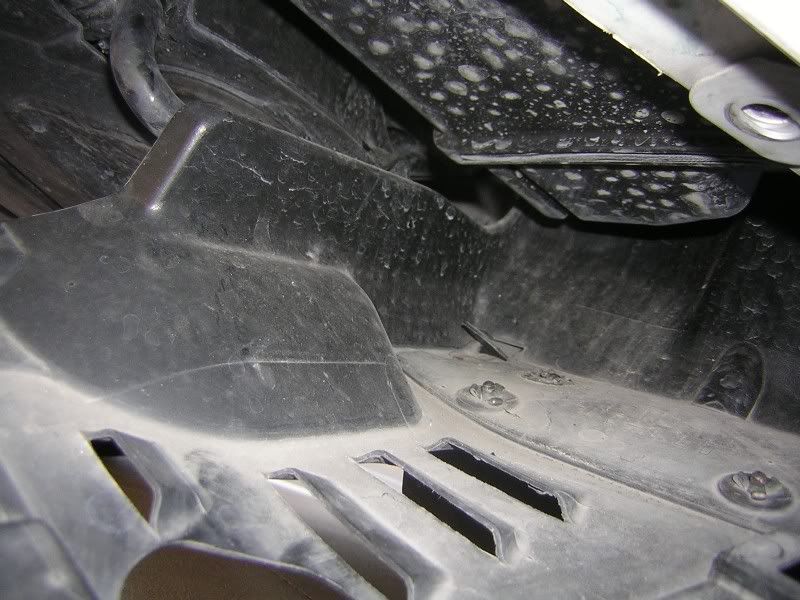
This is looking from the front of the car with the fenderwell pulled down. You can see the bottom of the resonator box.
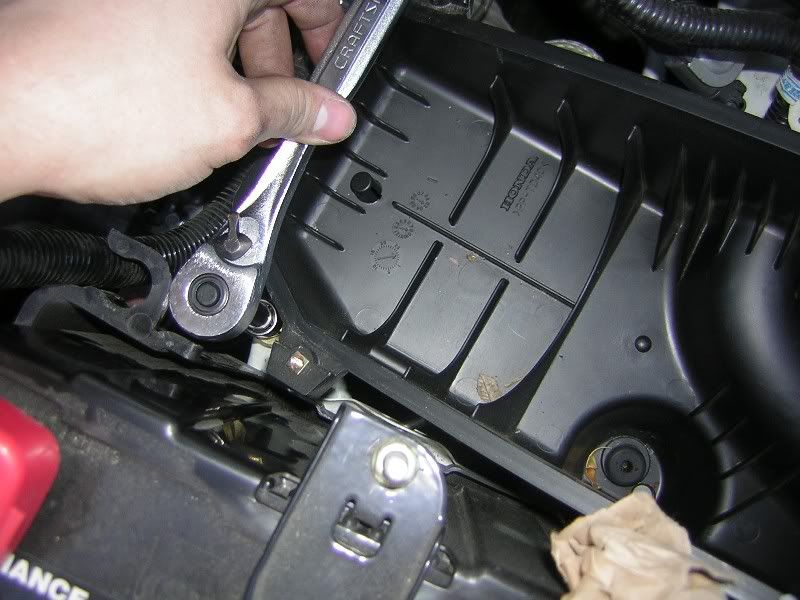
Step 11: Remove the first bolt connect the intake pipe to the resonator (not shown). This bolt is seen easily when the fender is pulled back. Remove the second bolt holding connecting to the innder fender. There was not alot of room to work so you have turn the rachet 2 clicks at a time until it comes out.
Removing the second bolt connecting to the inner fender.
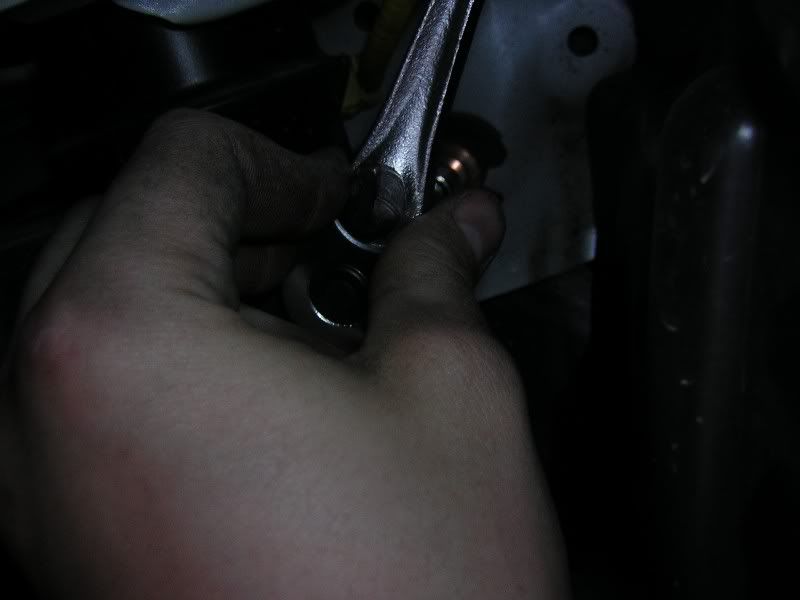
Step 12: Remove the bolt holding to resonator to the frame on the front of the car. This is the dreaded bolt that is so hard to get to. I popped off my foglight cover (just pull on it and it will pop out - no screws) and was able to see it. I foudn the easiest way to get to it was to lay on my back and look up though the bumper. I had to push on the resonator a bit to give my rachet enough room to turn. Its a tedious but not hard once you get it going. I think that its not necessary to even remove the foglight cover as long as you know the general location of the bolt as you can see it from under the car.
Looking up throught the bumber with rachet attached to the bolt. I'm pushing on the resonator to move it out of the way.
Step 13: Remove the instake pipe from the resonator. You have to use some elbow grease to get the pipe out. I kept thinking there was something else holding it until it suddenly popped out.
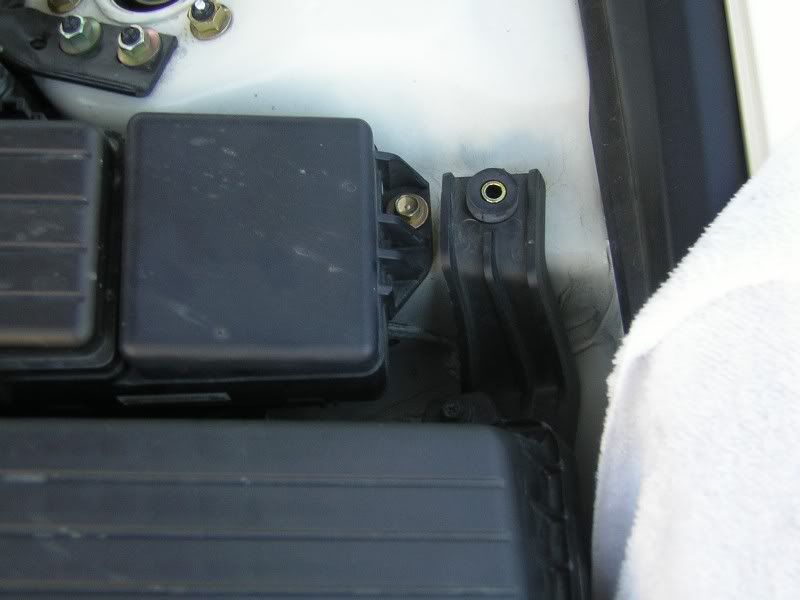
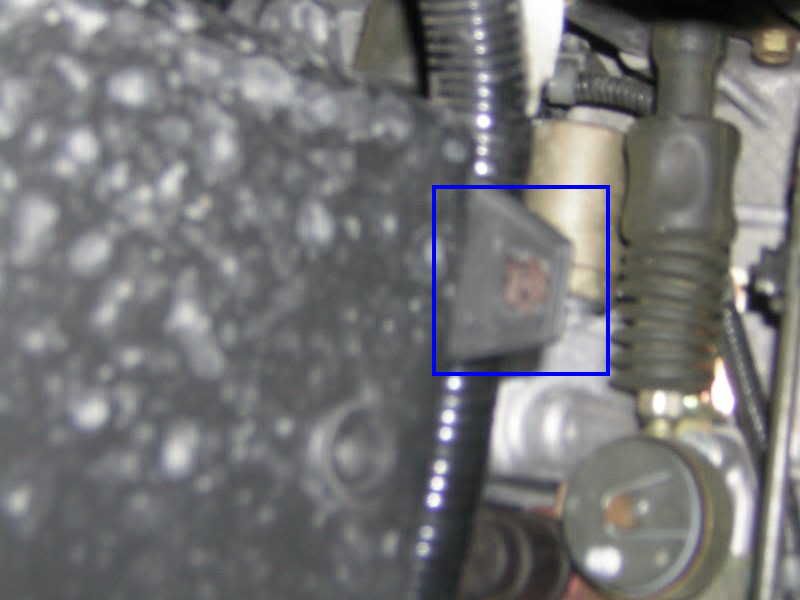
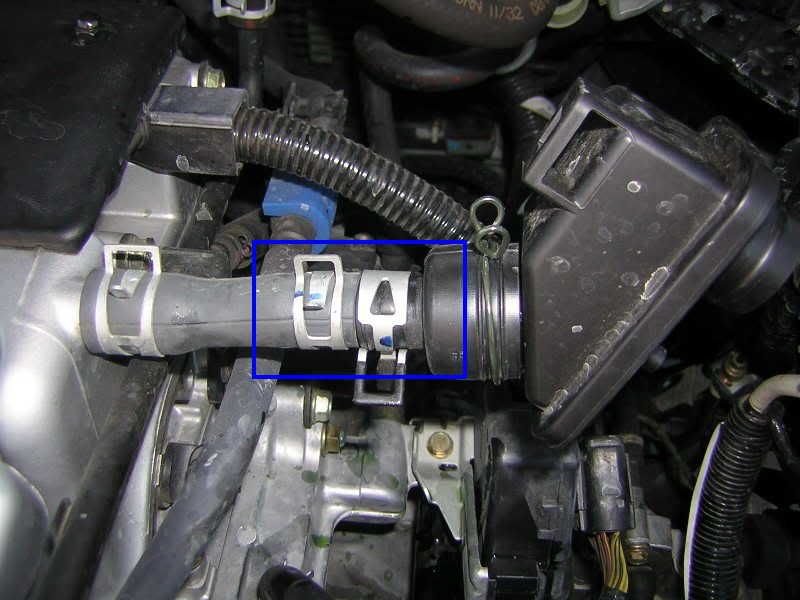
Step 14: Back to the engine bay, connect up the EVAP case as shown in the picture. As noted by the blue rectangle, there is a piece of alluminum pipe that comes in the kit to hold the tubes together. Just put it in and use the clips on each side. The rest of the parts can but set aside and will not be used.
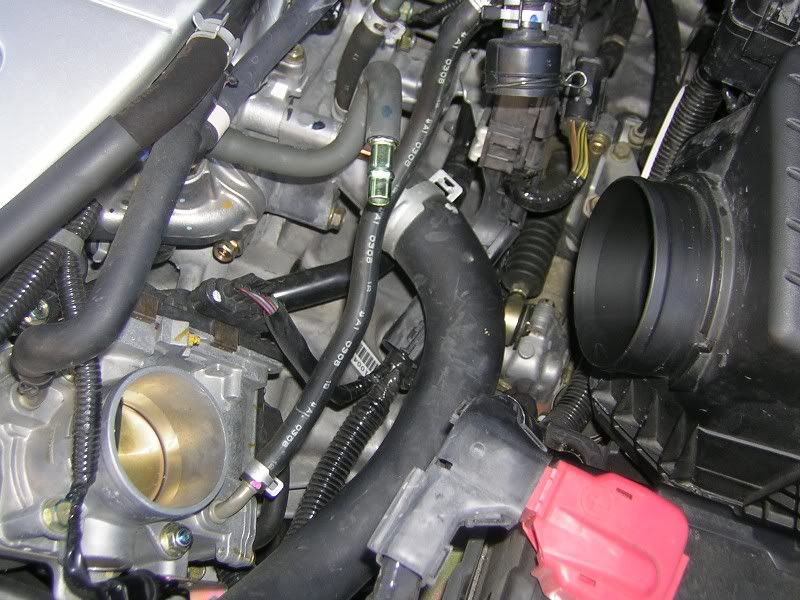
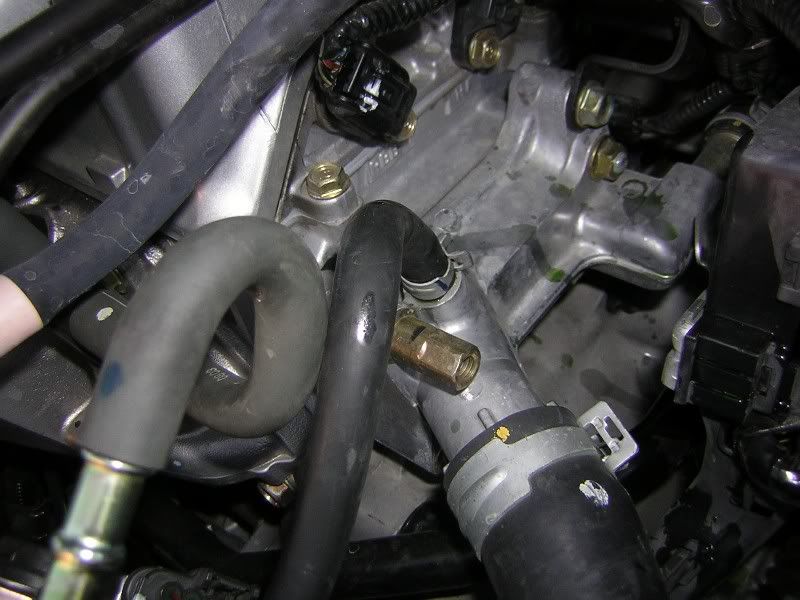
Step 15: Remove the short coolant line completely from the engine and set aside. Have some shop towels handy to handle the coolant that is left in the tubes. You can see the green coolant on the block. Take the long coolant line and run it into the input of the short coolant line. Use the stock clips to hold it in place.
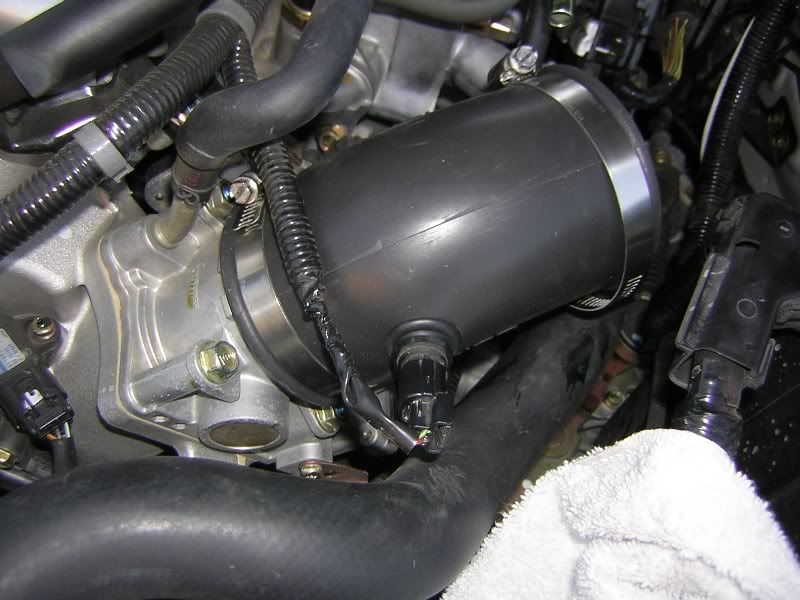
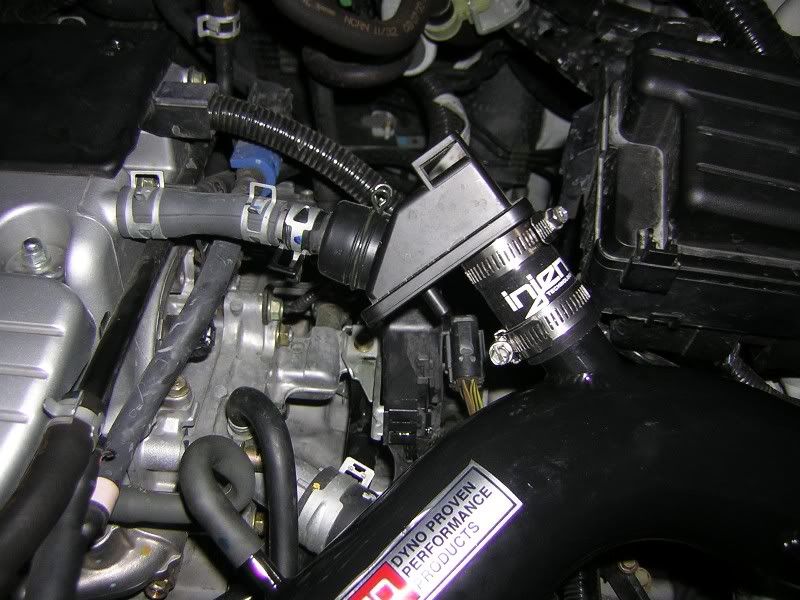
Step 16: Attach the rubber elblow to the throttle body. Don't screw this down tight yet as some adjustment will be necsrssary to get the angle right. Use a flat head screwdriver to tighten the provided screw clamps. I also went ahead and plugged in the air temperature sensor.
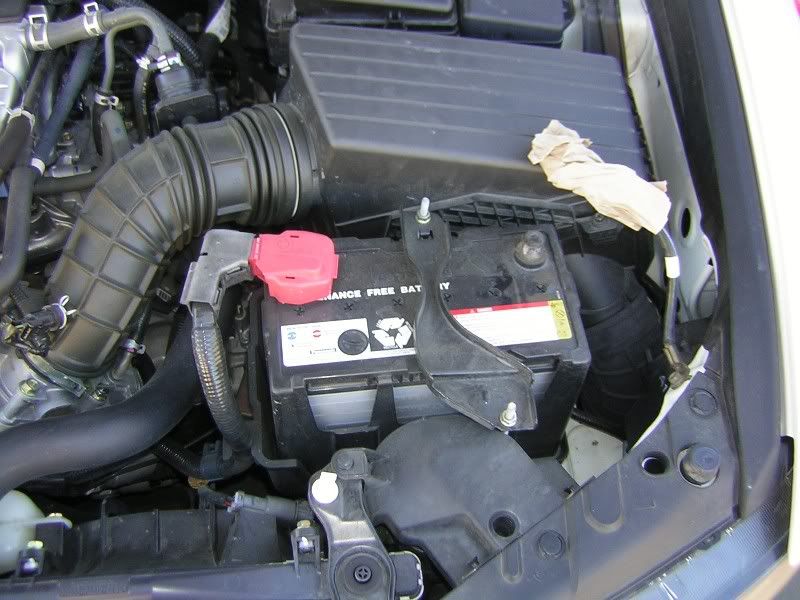
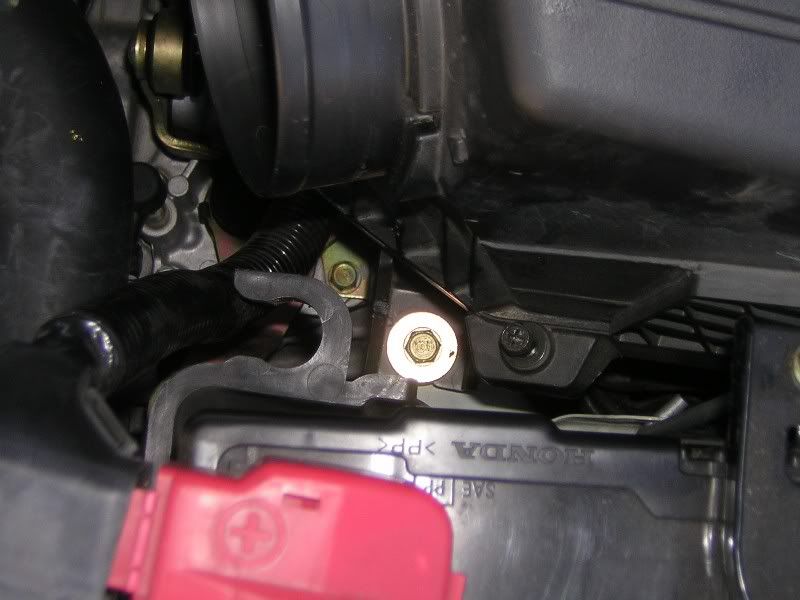
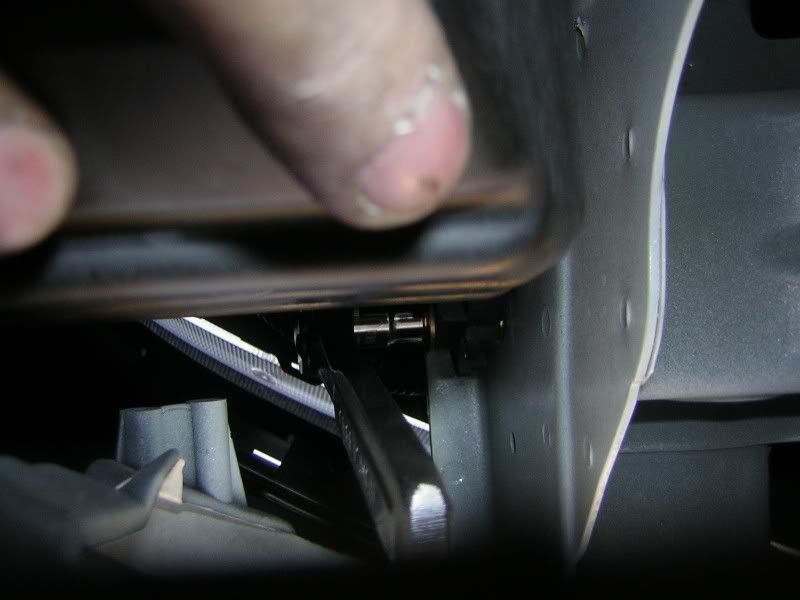
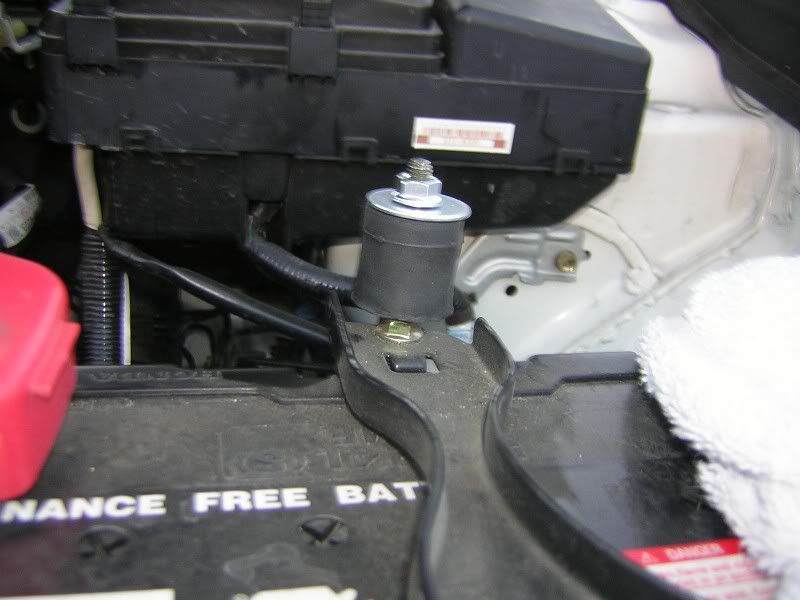
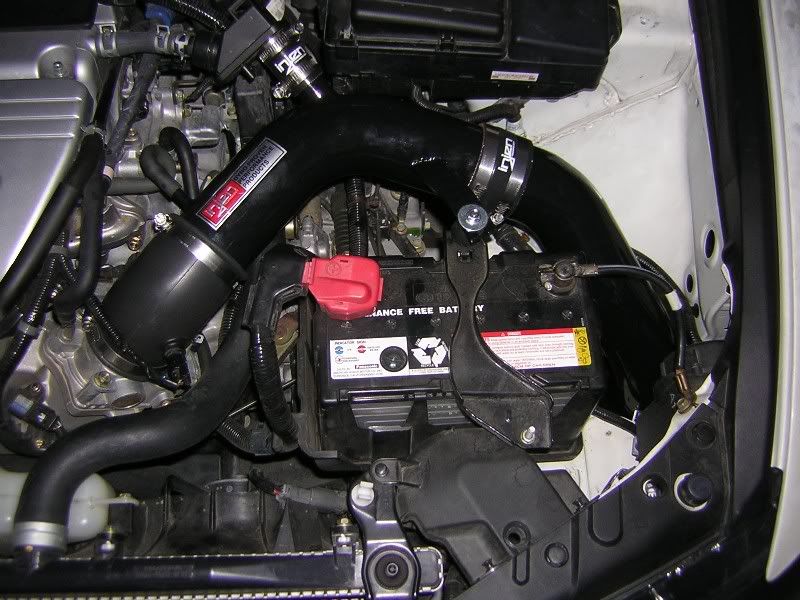
Step 17: Attach the female/mail vibration mount to the top of the battery case by screwing it down. Don't screw it down all the way though. Injen says 20 good turns should be more than enough. You will need to remove the nut and washer that are on top.
Step 18: Attach the next piece of the intake to the rubber elblow and bolt it to the vibration mount.
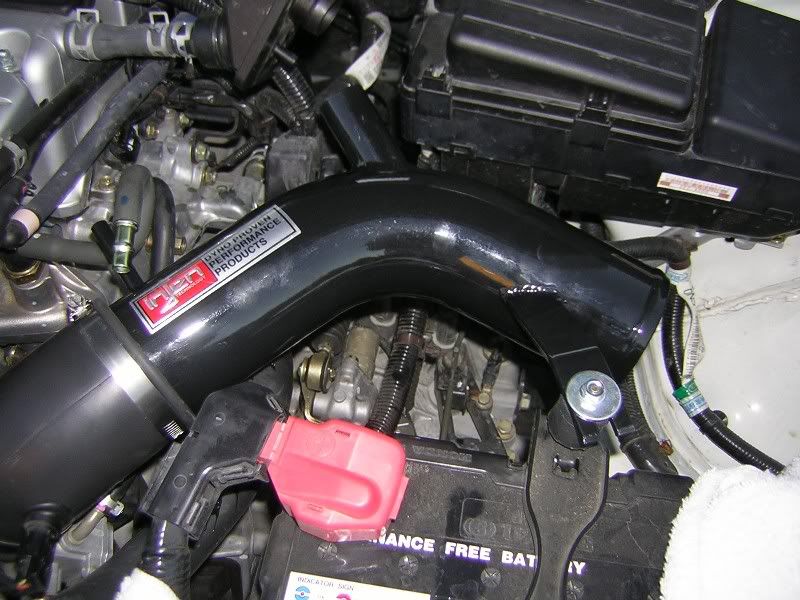
Step 19: Attach the male/male vibration mount to the hold next to where the intake passes through the engine bay. I also went ahead and attached the last piece of the take before I took this picture. You have to go throught the fender liner to access the other side of the vibration mount to secure it.

Step 20: Attach the EVAP vent to the intake tube using the two screw clamps and the provided tube.
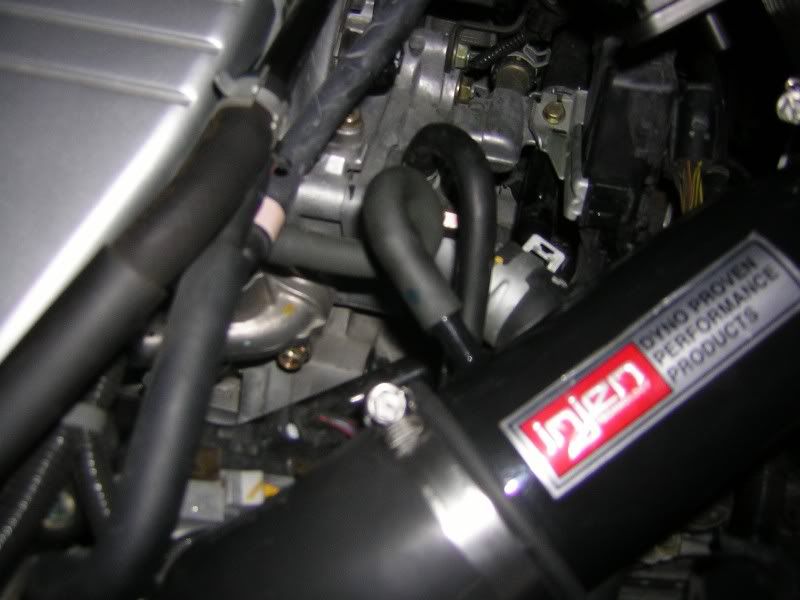
Step 21: Remove the metal nipple from the crank case vent hose and slide the hose over the intake tube. There is no clamp for this so you want to get it on there good. I used some spit to make it slide on easily.
Step 22: Attach the filter to the bottom of the intake tube. Go back and tighten all the clamps and make sure there is nothing loose. Put the fender back to gether and you wheel back on. Now you can start your car and check for leaks. For my testing, I used to cigarette to blow smoke around the intake to see if I could see any leaks. I'm sure there's a better way but thats what came to me at the time.
The completed install
The only tools I used were a jack, 10mm socket, socket extension and flat head screw driver. I have the new CAI that reuses the old EVAP housing.
Step 1: Disconnect the battery and cover to prevent accidental grounding.
Step 2: Disconnect the EVAP vent hose, crank case vent hose, and intake air temperature sensor from the intake tube. In the picture, I only have the hose pulled off of the EVAP case but the entire thing will need to come off. Just pull it out. I didn't find that out till I was putting the new intake in.
Step 3: Remove the rubber intake tube from the throttle body and air filter. This comes off pretty easy with a little twisting motion.
Step 4: Remove the first bolt holding the air filter box in place using the 10mm socket. This bolt is in the upper right corner.
Step 5: The second bolt is in the lower left corner and is a royal pain in the ass to get to. The socket extension I was using just a little to short to reach past the plastic wiring clip. I took the four screws holding the top of the box off and removed the air filter and found that it was much more accessible.
View of the bolt and offending clip.
Remove the top of the air filter box and filter for easy access.
Step 8: Remove the air filter box. The wire harness has a zip-tie-ish clip holding it to the bottom of the air filter box. I had to turn the box over and used a set of needle nose pliers to unhook it. I tried to show what I mean in the following picture.
Step 9: Jack the car up and remove the front tire. I believe that you can just turn the tire and do the same thing but you'll have a lot more room this way.
Step 10: Remove the 3 clips inside the fenderwell. One in the "back" of the fender and two in the inside connecting the liner to the outside lip of the fender. There are more than 3 clips total inside the fender but only 3 are required to give you enough room to work.
Under the car there are two bolts that you have to remove. They are the only two bolts in the area. There are also two more clips on the underside that have to come out. I apologize for no photos of this. Maybe when I get home..
Just use a flathead screwdriver with a gentle touch pop out the centers of the clips and they'll pull out quite easily. The screws come off with the 10mm socket. Remember to put the clips and screws somewhere safe and note that the ones connecting to the outside fender are shorter that the ones connecting the bumper and inner fender.
Here is liner pulled back and the resonator and intake downpipe exposed.
This is looking from the front of the car with the fenderwell pulled down. You can see the bottom of the resonator box.
Step 11: Remove the first bolt connect the intake pipe to the resonator (not shown). This bolt is seen easily when the fender is pulled back. Remove the second bolt holding connecting to the innder fender. There was not alot of room to work so you have turn the rachet 2 clicks at a time until it comes out.
Removing the second bolt connecting to the inner fender.
Step 12: Remove the bolt holding to resonator to the frame on the front of the car. This is the dreaded bolt that is so hard to get to. I popped off my foglight cover (just pull on it and it will pop out - no screws) and was able to see it. I foudn the easiest way to get to it was to lay on my back and look up though the bumper. I had to push on the resonator a bit to give my rachet enough room to turn. Its a tedious but not hard once you get it going. I think that its not necessary to even remove the foglight cover as long as you know the general location of the bolt as you can see it from under the car.
Looking up throught the bumber with rachet attached to the bolt. I'm pushing on the resonator to move it out of the way.
Step 13: Remove the instake pipe from the resonator. You have to use some elbow grease to get the pipe out. I kept thinking there was something else holding it until it suddenly popped out.
Step 14: Back to the engine bay, connect up the EVAP case as shown in the picture. As noted by the blue rectangle, there is a piece of alluminum pipe that comes in the kit to hold the tubes together. Just put it in and use the clips on each side. The rest of the parts can but set aside and will not be used.
Step 15: Remove the short coolant line completely from the engine and set aside. Have some shop towels handy to handle the coolant that is left in the tubes. You can see the green coolant on the block. Take the long coolant line and run it into the input of the short coolant line. Use the stock clips to hold it in place.
Step 16: Attach the rubber elblow to the throttle body. Don't screw this down tight yet as some adjustment will be necsrssary to get the angle right. Use a flat head screwdriver to tighten the provided screw clamps. I also went ahead and plugged in the air temperature sensor.
Step 17: Attach the female/mail vibration mount to the top of the battery case by screwing it down. Don't screw it down all the way though. Injen says 20 good turns should be more than enough. You will need to remove the nut and washer that are on top.
Step 18: Attach the next piece of the intake to the rubber elblow and bolt it to the vibration mount.
Step 19: Attach the male/male vibration mount to the hold next to where the intake passes through the engine bay. I also went ahead and attached the last piece of the take before I took this picture. You have to go throught the fender liner to access the other side of the vibration mount to secure it.
Step 20: Attach the EVAP vent to the intake tube using the two screw clamps and the provided tube.
Step 21: Remove the metal nipple from the crank case vent hose and slide the hose over the intake tube. There is no clamp for this so you want to get it on there good. I used some spit to make it slide on easily.
Step 22: Attach the filter to the bottom of the intake tube. Go back and tighten all the clamps and make sure there is nothing loose. Put the fender back to gether and you wheel back on. Now you can start your car and check for leaks. For my testing, I used to cigarette to blow smoke around the intake to see if I could see any leaks. I'm sure there's a better way but thats what came to me at the time.
The completed install


Trending Topics
12-23-2004, 05:29 PM
#8
Instructor
Thread Starter
Join Date: Mar 2004
Location: Raleigh, NC
Age: 43
Posts: 184
Likes: 0
Received 0 Likes
on
0 Posts
Thanks everybody! I'm glad you guys approve. And I finally get a rep point!
I'm thinking I'm gonna wait till it starts warming up again before I do the bypass mod. I did feel my throttle body one day after driving and it was hot as hell so I know that can't be good.
I think my next project will be a hondata heatshield. I'm starting to like taking my car apart.
I'm thinking I'm gonna wait till it starts warming up again before I do the bypass mod. I did feel my throttle body one day after driving and it was hot as hell so I know that can't be good.
I think my next project will be a hondata heatshield. I'm starting to like taking my car apart.
12-23-2004, 06:56 PM
#10
WAS HONDATAFIED IN
Originally Posted by Wolfpack_TSX_22
Thanks everybody! I'm glad you guys approve. And I finally get a rep point!
I'm thinking I'm gonna wait till it starts warming up again before I do the bypass mod. I did feel my throttle body one day after driving and it was hot as hell so I know that can't be good.
I think my next project will be a hondata heatshield. I'm starting to like taking my car apart.
I'm thinking I'm gonna wait till it starts warming up again before I do the bypass mod. I did feel my throttle body one day after driving and it was hot as hell so I know that can't be good.
I think my next project will be a hondata heatshield. I'm starting to like taking my car apart.


 05-13-2005, 08:18 PM
#21
8th Gear

Join Date: May 2005
Location: miami fl
Age: 46
Posts: 8
Likes: 0
Received 0 Likes
on
0 Posts
Great pictures, i'll be needing them i was a little shaky about doing this one myself, cuz i though you had to remove the bumper, but that sure is a lot of help noe that i don't have to go through that! thanks!

 01-20-2006, 07:35 PM
#29
Intermediate

Great tutorial man. Installed my Injen CAI today. $231 well spent. I enjoyed ripping out the old parts > I should of did the TB Coolant Bypass when I had everything off but those hoses are a pain in the ass.. I have the plastic peice and all to do the mod and the rubber booties. PEACE. Time to go get acquainted with a moded dutch master with a tabacco bypass w/ herbal gasket and celebrate the install.
I should of did the TB Coolant Bypass when I had everything off but those hoses are a pain in the ass.. I have the plastic peice and all to do the mod and the rubber booties. PEACE. Time to go get acquainted with a moded dutch master with a tabacco bypass w/ herbal gasket and celebrate the install.
08-21-2006, 08:07 AM
#30
Intermediate
Join Date: Mar 2006
Age: 39
Posts: 32
Likes: 0
Received 0 Likes
on
0 Posts
sorry to bring up an old post...
but can u explain the coolant line stuff? i have nfi about them and why we have to move it....
got my resonator out today...just waiting for my cai to come...
but can u explain the coolant line stuff? i have nfi about them and why we have to move it....
got my resonator out today...just waiting for my cai to come...
08-25-2006, 08:03 PM
#31
Instructor
Join Date: Jun 2006
Age: 41
Posts: 102
Likes: 0
Received 0 Likes
on
0 Posts
I never had this problem when I had an intake installed on my other car, but I just installed the Injen CAI on my 06 TSX today, following these awesome directions I might add.
Whenever I am normally accelerating, it sounds normal, but whenever I am at WOT it starts to sound as loud as an aftermarket exhaust, just really loud to the point where I am a little worried about drawing the attention of the law...
My other car never made a major sound increase like that, is this something that is normal or did I possibly do something wrong???
08-25-2006, 11:51 PM
#33
Revolutionary
Join Date: Aug 2004
Location: Tampa
Age: 40
Posts: 140
Likes: 0
Received 0 Likes
on
0 Posts
Originally Posted by roxxor
Whenever I am normally accelerating, it sounds normal, but whenever I am at WOT it starts to sound as loud as an aftermarket exhaust, just really loud to the point where I am a little worried about drawing the attention of the law...
My other car never made a major sound increase like that, is this something that is normal or did I possibly do something wrong???
My other car never made a major sound increase like that, is this something that is normal or did I possibly do something wrong???
if you're worried about the law then don't floor it everywhere you go
 08-27-2006, 09:39 PM
#35
Old Timer
Join Date: Jan 2002
Location: tampa florida/ grand cayman
Posts: 927
Likes: 0
Received 0 Likes
on
0 Posts
i just installed an AEM intake on my wifes car and i noticed that you really cant hear or feel when v-tec engages....
it sounds as if there is no v-tec.. is this normal?
the v-tec is very noticable in my friends rsx..
thanx
--D98
it sounds as if there is no v-tec.. is this normal?
the v-tec is very noticable in my friends rsx..
thanx
--D98
10-02-2006, 10:51 PM
#37
Racer
Join Date: Aug 2006
Location: CA
Posts: 486
Likes: 0
Received 0 Likes
on
0 Posts
Sorry about bringing up such an old post, but I figured that this would be the most relevent place to ask the question. Lets say you purchase the Injen intake, and want to run it in short ram mode instead of full out CAI. You wouldn't have to take off the wheel to do it right?

 10-03-2006, 12:54 PM
#40
Master Graphic Artist
Join Date: Oct 2004
Location: Northbrook, IL
Age: 40
Posts: 2,859
Received 0 Likes
on
0 Posts
Originally Posted by zot09
Sorry about bringing up such an old post, but I figured that this would be the most relevent place to ask the question. Lets say you purchase the Injen intake, and want to run it in short ram mode instead of full out CAI. You wouldn't have to take off the wheel to do it right?
But yes you have to access under the car to remove the filter in order to get the extended part of the pipe out. I find that it's easier to take it out of CAI mode then to get it back into CAI... about 20-30 min for me.