
Gas Trunk Springs Replacement
 06-19-2005, 09:56 PM
#1
Moderator
Regional Coordinator (Southeast)
Regional Coordinator (Southeast)
Thread Starter
Join Date: Dec 2003
Location: Mooresville, NC
Age: 38
Posts: 43,640
Received 3,860 Likes
on
2,580 Posts
I found this is the audio & video section and thought that some of you might be interested in it, so that you could get rid of the rattles of the trunk springs. I am going to place my order for parts tonight.
https://acurazine.com/forums/1g-tsx-2004-2008-124/gas-springs-replacement-tsx-trunk-write-up-finally-finished-310278/
for those looking to do this mod i have located an error in the part numbers. The gas springs that he used are part number 9416k15 and you need 2 of them. the ball socket fittings are part number 9416k74 and you need 4 of them.
Also I do not believe that the trunk weights anywhere near 160lbs so I am ordering two 40lbs springs instead. I could probably use two 30's or even two 20's but I dont want to be to under wait since for shows I have to video screens on the trunk. The total cost is actually really cheap as my total came to 47 something before shipping.
https://acurazine.com/forums/1g-tsx-2004-2008-124/gas-springs-replacement-tsx-trunk-write-up-finally-finished-310278/
Originally Posted by Solaris94
Hello Guys,
Here's the write up. Sorry it took so long. I actually reengineered the entire install since my last post. I wanted the installation to be simpler, and easier. I also decided to hide the gas springs between the hinge and rear panel, so it would not rub against the carpeted surrounds. I also redesigned the mounting point on the hinge, using the factory thru hole of the torsion springs to mount the ball studs. I have created a PDF file but don't know a place that would host it. So here it is in plain form.
Torsion Springs Replacement in
2005 TSX Trunk with Gas Springs
Author: Nick Ha
June 17, 2005
Disclaimer:
The following instructions are provided free of charge. Perform the following procedure at your own risk. All precautions must be taken. Use protective gloves and eyewear to prevent injuries to yourself and those around you. Read all instructions carefully before starting work. I will not be responsible for any injuries, void of warrantee, or none functioning trunk as a result of performing the following modifications. Now that we got the disclaimer out of the way, let�s begin. Good luck.
Parts You Will Need:
Most of the following parts can be found at www.mcmaster.com. Just type in the part number in the search box, then click find. The part number and description of the part will be highlighted in the right frame, and you can order the part on the left frame. Other more common parts can be found at Home Depot, or any hardware store.
Parts to Mount to the Trunk Hinge:
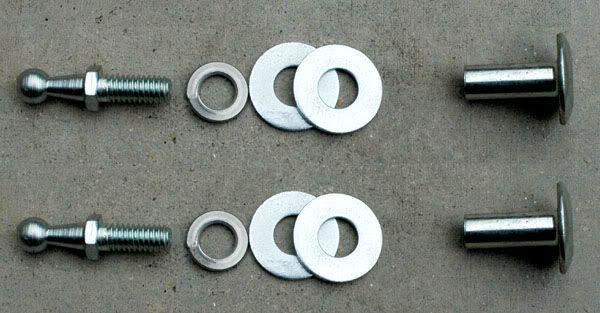
Figure 1: Hinge Hardware
2X - Zinc-Plated Ball Stud with 10 mm ball - McMaster Carr P/N 9512K63
2X � 3/8� Locking Washers � Home Depot
4X � 3/8� Flat Washer (0.7� THK) � Home Depot
2X � Barrels, 1� Long, 5/16�-18 Thread � McMaster Carr P/N 90216A350
Parts to Mount to the Back Wall:
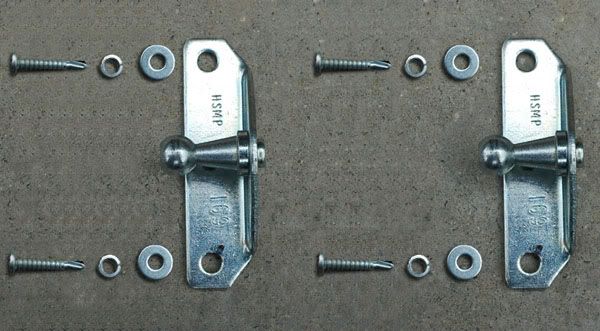
Figure 2: Back Wall Hardware
4X - #10 Self-Tapping Sheet Metal Screw, �� long � Home Depot
4X - #10 Locking Washer � Home Depot
4X - #10 Flat Washer � Home Depot
2X � Ball Bracket with 10 mm Ball � McMaster Carr P/N 9512K95
The Gas Springs:
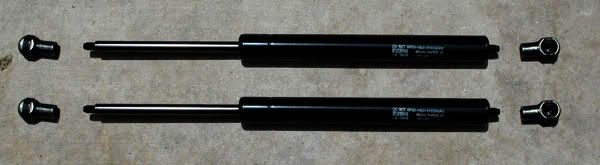
Figure 3: Gas Springs Hardware
2X � Gas Springs, 80 lbs Strength � McMaster Carr P/N 9416K74
4X � Ball Socket Fittings � Black Steel Chromate � McMaster Carr P/N 9416K15
Note:
If you have a trunk spoiler or heavy application of Dynamat to your trunk lid, you have to use a stronger set of gas springs. In those cases, I would recommend ordering a range of gas springs to test which will fit your trunk best. I would start with 80LB and go up.
Installation:
The following illustrations show the gas spring replacement to the right hinge (passenger side) of the TSX. The installation to the left side (driver side) is the mirror image of these photographs.
Remove Torsion Springs:
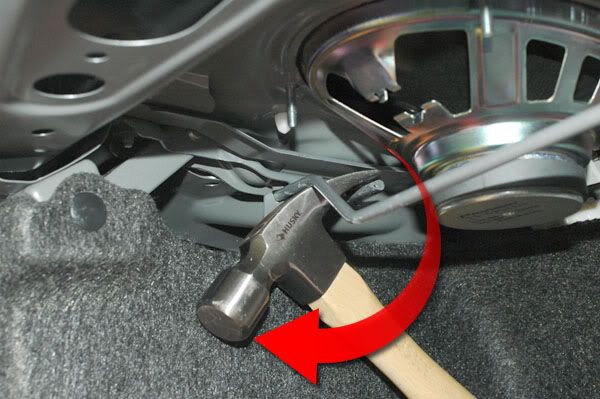
Figure 4: Remove Torsion Springs
If you have a special tool to remove the torsion springs, use it. If not, do what I did.
1. Remove the plastic piece that holds the two springs together at the center of the rear deck.
2. Use a hammer and wedge it between one end of the spring, and twist it right out.
3. Do the same to remove the other spring.
4. Use the spring to prop up the trunk while you work.
Remove the Carpeted Surround:
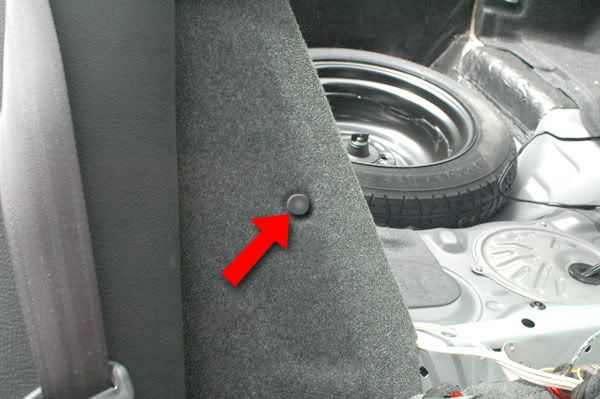
Figure 5: Remove Carpeted Surround
Tilt back the backrest and the remove the pin shown by the red arrow. Do the same other side.
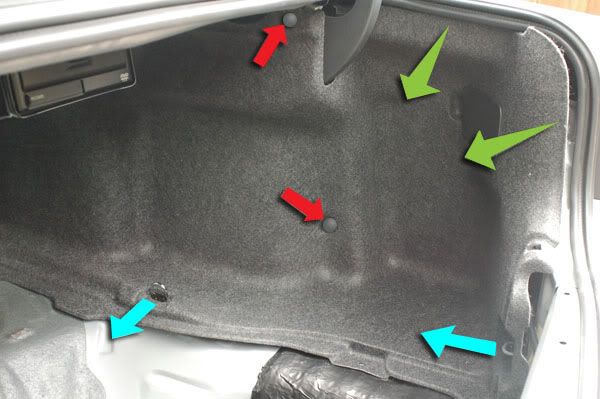
Figure 6: Remove Carpeted Surround (cont.)
Remove the tire cover, the tool panel, the plastic panel over the threshold, and the spare tire before removing the carpeted surrounds.
1. Remove the pins shown by the red arrows.
2. Unsnap the hidden attachments following the direction of the green arrows.
3. Pull the surround out of the strap mountings shown by the blue arrows.
4. Place the surround in a safe place.
5. Do the same to the other side.
Install the Ball Stud to the Trunk Hinge:
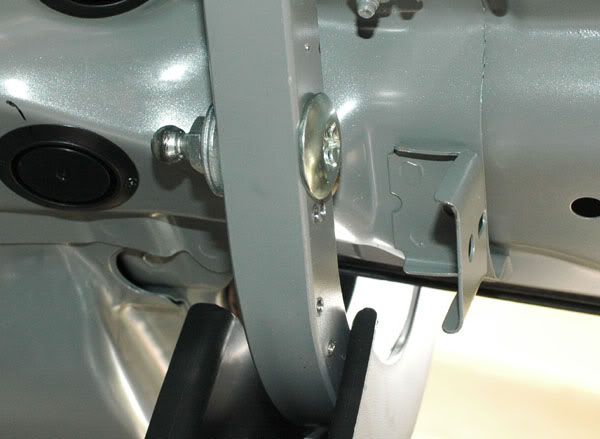
Figure 7: Install Ball Stud
Install the ball stud as shown. Picture was taken from underneath of the right hinge. The Ball stud should be pointing to the outside of the car, not the center of the car. In another word, it should be between the hinge and the rear panel of the car.
1. Insert the barrel nut thru the factory hole for the torsion spring.
2. Install ball stud, locking washer, and two flat washers on the other side.
3. Tighten the ball stud with a �� wrench. Use a pair of pliers to hold the barrel nut while you are tightening the ball stud.
4. Do the same to the other hinge. Remember, the ball stud to point outside the car.
Install Ball Bracket to Back Wall:
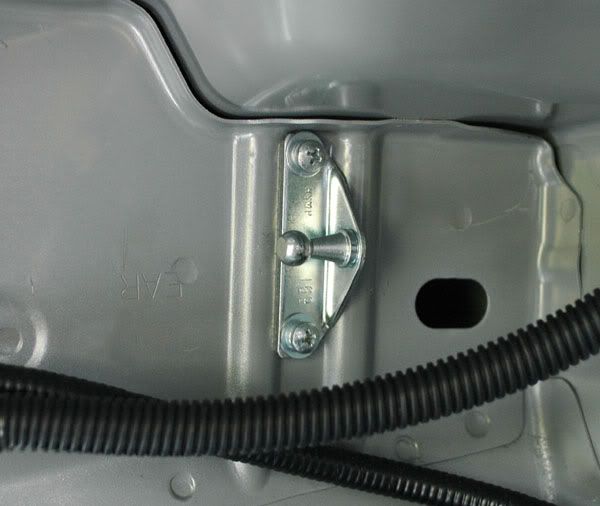
Figure 8: Install Ball Bracket
Install the Ball Bracket as shown.
1. Locate the ball bracket between the two gussets in the back wall. Point the ball stub to the center of the car. Slide it to the top of the gussets. I used double-sided tape behind the bracket to let me use both hands to install the screws.
2. Insert the #10 self-tapping screws through the #10 locking and flat washers. Install the screws through the top and bottom holes of the bracket. Do not over tighten, or you will strip the holes.
3. Install the other bracket to the other side with the ball stud pointing toward the center of the car.
Install the Gas Springs:
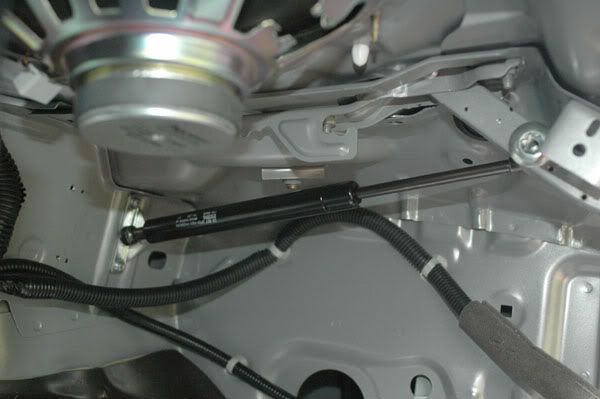
Figure 9: Install Gas Spring
Install the gas springs as shown.
1. Screw the ball sockets to both ends of the gas spring.
2. Install the socket over the ball studs at both ends. Position the opening of the socket over the ball stud and snap it in place.
3. Do the same for the other side.
4. Test the operation of the trunk before replacing the carpeted surrounds.
5. Once the surrounds are reinstalled, test the operation of the trunk again to make sure there is no interference.
It should look like this when you are done:
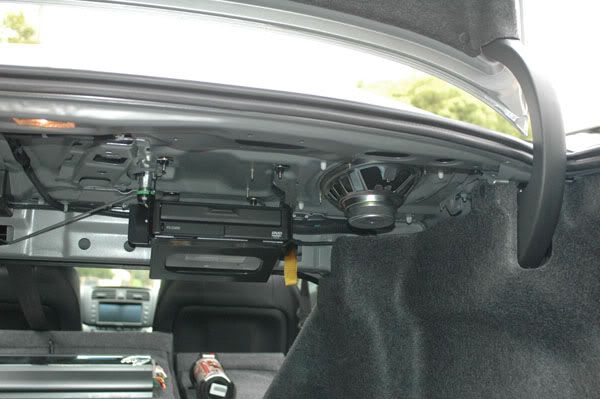
Figure 10: Finished Installation, Right Side
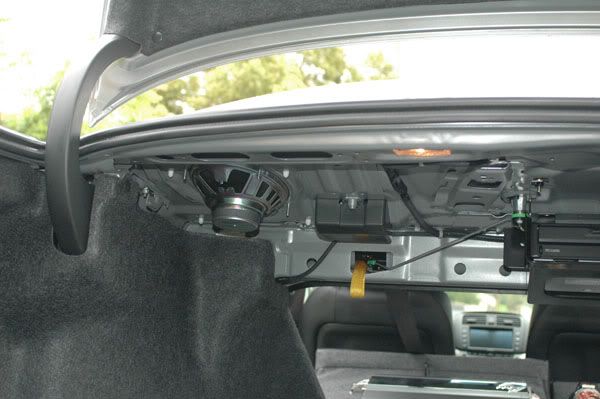
Figure 11: Finished Installation, Left Side
Here's the write up. Sorry it took so long. I actually reengineered the entire install since my last post. I wanted the installation to be simpler, and easier. I also decided to hide the gas springs between the hinge and rear panel, so it would not rub against the carpeted surrounds. I also redesigned the mounting point on the hinge, using the factory thru hole of the torsion springs to mount the ball studs. I have created a PDF file but don't know a place that would host it. So here it is in plain form.
Torsion Springs Replacement in
2005 TSX Trunk with Gas Springs
Author: Nick Ha
June 17, 2005
Disclaimer:
The following instructions are provided free of charge. Perform the following procedure at your own risk. All precautions must be taken. Use protective gloves and eyewear to prevent injuries to yourself and those around you. Read all instructions carefully before starting work. I will not be responsible for any injuries, void of warrantee, or none functioning trunk as a result of performing the following modifications. Now that we got the disclaimer out of the way, let�s begin. Good luck.
Parts You Will Need:
Most of the following parts can be found at www.mcmaster.com. Just type in the part number in the search box, then click find. The part number and description of the part will be highlighted in the right frame, and you can order the part on the left frame. Other more common parts can be found at Home Depot, or any hardware store.
Parts to Mount to the Trunk Hinge:
Figure 1: Hinge Hardware
2X - Zinc-Plated Ball Stud with 10 mm ball - McMaster Carr P/N 9512K63
2X � 3/8� Locking Washers � Home Depot
4X � 3/8� Flat Washer (0.7� THK) � Home Depot
2X � Barrels, 1� Long, 5/16�-18 Thread � McMaster Carr P/N 90216A350
Parts to Mount to the Back Wall:
Figure 2: Back Wall Hardware
4X - #10 Self-Tapping Sheet Metal Screw, �� long � Home Depot
4X - #10 Locking Washer � Home Depot
4X - #10 Flat Washer � Home Depot
2X � Ball Bracket with 10 mm Ball � McMaster Carr P/N 9512K95
The Gas Springs:
Figure 3: Gas Springs Hardware
2X � Gas Springs, 80 lbs Strength � McMaster Carr P/N 9416K74
4X � Ball Socket Fittings � Black Steel Chromate � McMaster Carr P/N 9416K15
Note:
If you have a trunk spoiler or heavy application of Dynamat to your trunk lid, you have to use a stronger set of gas springs. In those cases, I would recommend ordering a range of gas springs to test which will fit your trunk best. I would start with 80LB and go up.
Installation:
The following illustrations show the gas spring replacement to the right hinge (passenger side) of the TSX. The installation to the left side (driver side) is the mirror image of these photographs.
Remove Torsion Springs:
Figure 4: Remove Torsion Springs
If you have a special tool to remove the torsion springs, use it. If not, do what I did.
1. Remove the plastic piece that holds the two springs together at the center of the rear deck.
2. Use a hammer and wedge it between one end of the spring, and twist it right out.
3. Do the same to remove the other spring.
4. Use the spring to prop up the trunk while you work.
Remove the Carpeted Surround:
Figure 5: Remove Carpeted Surround
Tilt back the backrest and the remove the pin shown by the red arrow. Do the same other side.
Figure 6: Remove Carpeted Surround (cont.)
Remove the tire cover, the tool panel, the plastic panel over the threshold, and the spare tire before removing the carpeted surrounds.
1. Remove the pins shown by the red arrows.
2. Unsnap the hidden attachments following the direction of the green arrows.
3. Pull the surround out of the strap mountings shown by the blue arrows.
4. Place the surround in a safe place.
5. Do the same to the other side.
Install the Ball Stud to the Trunk Hinge:
Figure 7: Install Ball Stud
Install the ball stud as shown. Picture was taken from underneath of the right hinge. The Ball stud should be pointing to the outside of the car, not the center of the car. In another word, it should be between the hinge and the rear panel of the car.
1. Insert the barrel nut thru the factory hole for the torsion spring.
2. Install ball stud, locking washer, and two flat washers on the other side.
3. Tighten the ball stud with a �� wrench. Use a pair of pliers to hold the barrel nut while you are tightening the ball stud.
4. Do the same to the other hinge. Remember, the ball stud to point outside the car.
Install Ball Bracket to Back Wall:
Figure 8: Install Ball Bracket
Install the Ball Bracket as shown.
1. Locate the ball bracket between the two gussets in the back wall. Point the ball stub to the center of the car. Slide it to the top of the gussets. I used double-sided tape behind the bracket to let me use both hands to install the screws.
2. Insert the #10 self-tapping screws through the #10 locking and flat washers. Install the screws through the top and bottom holes of the bracket. Do not over tighten, or you will strip the holes.
3. Install the other bracket to the other side with the ball stud pointing toward the center of the car.
Install the Gas Springs:
Figure 9: Install Gas Spring
Install the gas springs as shown.
1. Screw the ball sockets to both ends of the gas spring.
2. Install the socket over the ball studs at both ends. Position the opening of the socket over the ball stud and snap it in place.
3. Do the same for the other side.
4. Test the operation of the trunk before replacing the carpeted surrounds.
5. Once the surrounds are reinstalled, test the operation of the trunk again to make sure there is no interference.
It should look like this when you are done:
Figure 10: Finished Installation, Right Side
Figure 11: Finished Installation, Left Side
Also I do not believe that the trunk weights anywhere near 160lbs so I am ordering two 40lbs springs instead. I could probably use two 30's or even two 20's but I dont want to be to under wait since for shows I have to video screens on the trunk. The total cost is actually really cheap as my total came to 47 something before shipping.

 06-19-2005, 11:09 PM
#4
Moderator
Regional Coordinator (Southeast)
Regional Coordinator (Southeast)
Thread Starter
Join Date: Dec 2003
Location: Mooresville, NC
Age: 38
Posts: 43,640
Received 3,860 Likes
on
2,580 Posts
Originally Posted by JTso
Looks like a clean install.  However, I would use nuts and bolts instead of self tapping screws for long term durability.
However, I would use nuts and bolts instead of self tapping screws for long term durability.
06-20-2005, 12:01 AM
#7
Moderator
Regional Coordinator (Southeast)
Regional Coordinator (Southeast)
Thread Starter
Join Date: Dec 2003
Location: Mooresville, NC
Age: 38
Posts: 43,640
Received 3,860 Likes
on
2,580 Posts
Originally Posted by xizor
clean install but anyone care to explain what the benefit is?
Trending Topics
06-20-2005, 02:39 PM
#8
Master in Science
Join Date: Aug 2003
Age: 44
Posts: 3,845
Likes: 0
Received 0 Likes
on
0 Posts
Originally Posted by xizor
clean install but anyone care to explain what the benefit is?
06-21-2005, 12:44 PM
#9
Senior Moderator
Originally Posted by xizor
clean install but anyone care to explain what the benefit is?
 06-23-2005, 08:24 AM
#10
Moderator
Regional Coordinator (Southeast)
Regional Coordinator (Southeast)
Thread Starter
Join Date: Dec 2003
Location: Mooresville, NC
Age: 38
Posts: 43,640
Received 3,860 Likes
on
2,580 Posts
the two 40lb springs i choose hold the trunk up but do not allow it to close very slowly it slams shut to be exact. the trunk is actually really heavy once you take off the factory springs. I am now going to add 100lbs and go with two 90lb springs. no pictures cause my camera battery was dead.
06-23-2005, 09:20 AM
#11
Photography Nerd
Originally Posted by CCColtsicehockey
the two 40lb springs i choose hold the trunk up but do not allow it to close very slowly it slams shut to be exact. the trunk is actually really heavy once you take off the factory springs. I am now going to add 100lbs and go with two 90lb springs. no pictures cause my camera battery was dead.
06-23-2005, 09:30 AM
#12
Suzuka Master
Join Date: Jul 2003
Location: Cincinnati, OH
Age: 49
Posts: 7,594
Likes: 0
Received 4 Likes
on
3 Posts
Originally Posted by CCColtsicehockey
the two 40lb springs i choose hold the trunk up but do not allow it to close very slowly it slams shut to be exact. the trunk is actually really heavy once you take off the factory springs. I am now going to add 100lbs and go with two 90lb springs. no pictures cause my camera battery was dead.
If you could, post an mpg so we can see the operation once you get it complete.
06-23-2005, 10:26 AM
#13
Moderator
Regional Coordinator (Southeast)
Regional Coordinator (Southeast)
Thread Starter
Join Date: Dec 2003
Location: Mooresville, NC
Age: 38
Posts: 43,640
Received 3,860 Likes
on
2,580 Posts
Originally Posted by moda_way
Thanks for the response. As someone who will be doing this, I wait for your input.
If you could, post an mpg so we can see the operation once you get it complete.
If you could, post an mpg so we can see the operation once you get it complete.

Thread
Thread Starter
Forum
Replies
Last Post
cycdaniel
1G TSX Performance Parts & Modifications
8
12-17-2019 10:58 AM
TLDude876
Car Talk
134
12-28-2016 03:18 PM
sockr1
Car Parts for Sale
22
10-01-2015 01:31 AM