how i replaced my rotors and brake pads
 10-14-2007, 10:40 PM
#1
Advanced
Thread Starter

Join Date: Apr 2005
Posts: 54
Likes: 0
Received 0 Likes
on
0 Posts
how i replaced my rotors and brake pads
for some reason the brake rotors on the tsx have a tendency to develop a vibration, either due to uneven brake pad material deposits or improper torqueing of wheels etc.
so i decided to go with some simple brembo blanks and Satisfied brand ceramic brake pads from tirerack.com... $190 shipped for the front rotors and pads.
i wrote this for those who are mechanically inclined and have automotive knowledge beyond that of the average person, i.e. how to properly place a car on jack stands, safety precautions, knowledge of how brake systems work etc. if u dont feel comfortable doing this then by all means let someone who knows what theyre doing take care of it for you.
i decided to replace the rotor first, start by undoing the brake line bracket bolts shown loosend below:

then undo the bolt shown by the arrow (not the one that is loose) and another one just like it on the upper end of the caliper. these are very tight, i recommend a breaker bar.

then u can remove the caliper off the rotor and rest it like so:

removing the rotor screws was pretty difficult with an ordinary screwdriver, seems the screws are set really tight at the factory, also the constant hot/cold cycling of the rotor has probably frozen the screws a bit as well. an impact driver does the trick here:

make sure to clean the new rotor with brake cleaner before putting it on. once that is done, use the new screws supplied with the rotor and tighten them down with the impact driver. then put the caliper back and put the mounting bolts back and tighten them down (i used 80 ft/lbs. not sure of what factory spec is).
then undo the bottom caliper bolt only using a ratchet and wrench as shown here, be careful not to rip the rubber boot:

then flip up the inner caliper portion to reveal the pads:

remove the old pads, make sure to note the position of the wear indicator on the inner pad. apply brake grease to the shims as indicated by the manual, do not let any grease get on the pads or the rotors!

the inner pad has an outer shim that is re-used, dont toss it! insert the new pads:

push the piston back in with a c-clamp as shown below, keep an eye on the brake fluid level as u are pushing fluid back into the reservoir:

slide the caliper back down over the pads and tighten the bottom bolt.
break in procedure is 10-20 stops from 40-10 mph with 30 seconds in between, no hard braking or sitting on the pedal when stopped for the first 100 miles or so.
good luck!
so i decided to go with some simple brembo blanks and Satisfied brand ceramic brake pads from tirerack.com... $190 shipped for the front rotors and pads.
i wrote this for those who are mechanically inclined and have automotive knowledge beyond that of the average person, i.e. how to properly place a car on jack stands, safety precautions, knowledge of how brake systems work etc. if u dont feel comfortable doing this then by all means let someone who knows what theyre doing take care of it for you.
i decided to replace the rotor first, start by undoing the brake line bracket bolts shown loosend below:
then undo the bolt shown by the arrow (not the one that is loose) and another one just like it on the upper end of the caliper. these are very tight, i recommend a breaker bar.
then u can remove the caliper off the rotor and rest it like so:
removing the rotor screws was pretty difficult with an ordinary screwdriver, seems the screws are set really tight at the factory, also the constant hot/cold cycling of the rotor has probably frozen the screws a bit as well. an impact driver does the trick here:
make sure to clean the new rotor with brake cleaner before putting it on. once that is done, use the new screws supplied with the rotor and tighten them down with the impact driver. then put the caliper back and put the mounting bolts back and tighten them down (i used 80 ft/lbs. not sure of what factory spec is).
then undo the bottom caliper bolt only using a ratchet and wrench as shown here, be careful not to rip the rubber boot:
then flip up the inner caliper portion to reveal the pads:
remove the old pads, make sure to note the position of the wear indicator on the inner pad. apply brake grease to the shims as indicated by the manual, do not let any grease get on the pads or the rotors!
the inner pad has an outer shim that is re-used, dont toss it! insert the new pads:
push the piston back in with a c-clamp as shown below, keep an eye on the brake fluid level as u are pushing fluid back into the reservoir:
slide the caliper back down over the pads and tighten the bottom bolt.
break in procedure is 10-20 stops from 40-10 mph with 30 seconds in between, no hard braking or sitting on the pedal when stopped for the first 100 miles or so.
good luck!
 10-15-2007, 02:47 AM
#3
Driver/Detailer
You can just remove that single bolt that is next to the brake line to achieve the same thing:

You should put the old brake pad on the piston and then push on the pad instead. Doing it with the C-clamp direct on the piston edge risks damage to the internal seals because of uneven movement and also risks tearing the boot around the piston.

You should put the old brake pad on the piston and then push on the pad instead. Doing it with the C-clamp direct on the piston edge risks damage to the internal seals because of uneven movement and also risks tearing the boot around the piston.
 10-17-2007, 10:15 AM
#6
Advanced
Thread Starter
Join Date: Apr 2005
Posts: 54
Likes: 0
Received 0 Likes
on
0 Posts
Originally Posted by HI OFECR
Rears Please ? lol useing the special tool is kinda making me think twice about doing it my self.
thanks for the tip on the clamp part aaronng. will do that next time.
10-17-2007, 10:34 AM
#7

Originally Posted by nzk
have never done the rears, although i imagine they cant be that different. i think the parking brake is going to be the only major difference. also that special tool is $20 at sears, u just twist and hammer it, not much to it really.
thanks for the tip on the clamp part aaronng. will do that next time.
thanks for the tip on the clamp part aaronng. will do that next time.
Trending Topics
10-17-2007, 12:05 PM
#8
Senior Moderator
For the back breaks there is a special metal box that you on a socket wrench to turn and compress the caliper. Not sure what it's called. But I used one to do my brakes.
10-17-2007, 12:06 PM
#9
Suzuka Master
Join Date: Jul 2003
Location: Cincinnati, OH
Age: 48
Posts: 7,594
Likes: 0
Received 4 Likes
on
3 Posts
Originally Posted by chhimp
In the rear, you don't use a clamp. You''ll need a big flat screw driver and turn the the caliper clockwise to compress.

http://www.thetoolwarehouse.net/shop/KD-3163.html
http://www.thetoolwarehouse.net/shop/LIS-28600.html
You just put a 3/8" socket extention and wrench in there and turn. No chance of messing up the piston with a slipping flathead.
10-17-2007, 04:40 PM
#10
Driver/Detailer
Get that rear piston tool. The screwdriver can slip and tear the piston boot. And no, you don't hammer the piston in. Just release the parking brake, turn and push (at teh same time) the rear piston in.
10-17-2007, 09:30 PM
#11
Instructor

Join Date: Jul 2007
Location: Trenton, WI
Posts: 230
Likes: 0
Received 0 Likes
on
0 Posts
Originally Posted by aaronng
Get that rear piston tool. The screwdriver can slip and tear the piston boot. And no, you don't hammer the piston in. Just release the parking brake, turn and push (at teh same time) the rear piston in.
I put R1-concepts zinc rotors and Okebono ceramic pads on at about 200 miles, no dust, no rust. Also put clear caliper paint on the calipers to help them clean up easier.
10-18-2007, 06:12 AM
#14
Three Wheelin'
Join Date: Jun 2006
Location: Philadelphia Burbs
Age: 40
Posts: 1,727
Likes: 0
Received 0 Likes
on
0 Posts
I am pretty mechanically inclinded however, this make me hesitant about doing it. I have a long way to go before needed them, but i can do pads, but i don't know about the rotors now that i have seen this.
Can some one explain why the clamp is needed again and how you insert the pads while the clamp in on?
Can some one explain why the clamp is needed again and how you insert the pads while the clamp in on?
10-18-2007, 03:20 PM
#15
Advanced
Thread Starter
Join Date: Apr 2005
Posts: 54
Likes: 0
Received 0 Likes
on
0 Posts
Originally Posted by jwood_06TSX
I am pretty mechanically inclinded however, this make me hesitant about doing it. I have a long way to go before needed them, but i can do pads, but i don't know about the rotors now that i have seen this.
Can some one explain why the clamp is needed again and how you insert the pads while the clamp in on?
Can some one explain why the clamp is needed again and how you insert the pads while the clamp in on?
when u put in new pads, this piston will stick out a bit and needs to be pushed back in to where it started since the new pads are thicker than the old ones.
once the piston is pushed back in, it stays there. u remove the clamp, put the pads in the bracket, slide the caliper on the pads.
10-18-2007, 09:49 PM
#16
Driver/Detailer
Originally Posted by jwood_06TSX
I am pretty mechanically inclinded however, this make me hesitant about doing it. I have a long way to go before needed them, but i can do pads, but i don't know about the rotors now that i have seen this.
Can some one explain why the clamp is needed again and how you insert the pads while the clamp in on?
Can some one explain why the clamp is needed again and how you insert the pads while the clamp in on?
10-19-2007, 05:39 AM
#17
Suzuka Master
Join Date: Jul 2003
Location: Cincinnati, OH
Age: 48
Posts: 7,594
Likes: 0
Received 4 Likes
on
3 Posts
Originally Posted by aaronng
Get that rear piston tool. The screwdriver can slip and tear the piston boot. And no, you don't hammer the piston in. Just release the parking brake, turn and push (at teh same time) the rear piston in.
Also, make sure to use some sort of lubricant, I use a little bit of lithium, on the piston boot so the piston turning doesn't bind the boot and tear it too.
10-19-2007, 05:41 AM
#18
Suzuka Master
Join Date: Jul 2003
Location: Cincinnati, OH
Age: 48
Posts: 7,594
Likes: 0
Received 4 Likes
on
3 Posts
Originally Posted by nzk
once the piston is pushed back in, it stays there. u remove the clamp, put the pads in the bracket, slide the caliper on the pads.
10-19-2007, 06:37 AM
#19

Also, not sure if it's true or not as i've done it both ways and never hurt anything BUT when you push the piston back, crack open the bleeder screw on the caliper so that the brake fluid doesn't force it's way backwards through the brake system and cause possible problems with ABS or any other system.
This may be for older abs systems, I just know I was told that in auto school like 5 or 6 years ago and honestly, if it's true about the damage, i'd rather add a little work to clean the fluid up and pay for brake fluid then a brake system part.
This may be for older abs systems, I just know I was told that in auto school like 5 or 6 years ago and honestly, if it's true about the damage, i'd rather add a little work to clean the fluid up and pay for brake fluid then a brake system part.
10-19-2007, 07:10 AM
#20
Three Wheelin'
Join Date: Feb 2007
Location: Rockville, MD
Age: 39
Posts: 1,554
Likes: 0
Received 0 Likes
on
0 Posts
nzk, great writeup! I have been contemplating replacing the rusted rotors with new slotted rotors. this writeup will come in handy when I decide to do so.
10-19-2007, 07:16 AM
#21
Three Wheelin'
Join Date: Jun 2006
Location: Philadelphia Burbs
Age: 40
Posts: 1,727
Likes: 0
Received 0 Likes
on
0 Posts
Thanks for the clarification aarong and Ryan, i appreciate it. And great write up to the OP 
I may have some questions when i start this but that won't be for a while....
I may have some questions when i start this but that won't be for a while....
10-22-2007, 12:42 PM
#22
Drifting
Join Date: May 2006
Location: Mississauga, Canada
Age: 40
Posts: 2,355
Likes: 0
Received 1 Like
on
1 Post
Rear Brakes
So I changed my rear brake pads over the weekend and took some pics for those of you that haven't before.
I apologize in advance for the rotation of these pics, I'll try to change them when I get home but stupid photobucket doesn't give you an option once they're uploaded and I was in a rush this morning before I left for work.
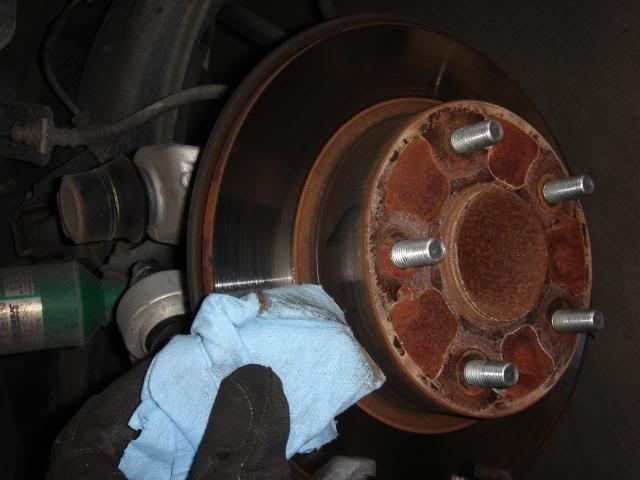
Here is the rear caliper - you'll have to remove both bolts pictured. It doesn't swing up like the fronts too.
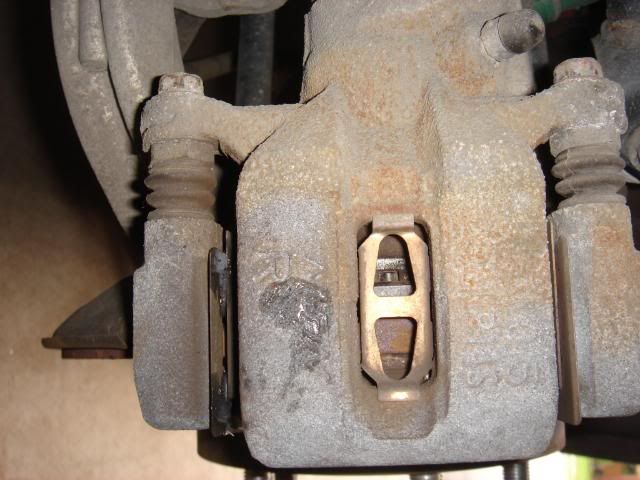
Make sure you hold the part in front of the rubber boot with a wrench when you're removing and reinstalling the bolt so you don't mess anything up.
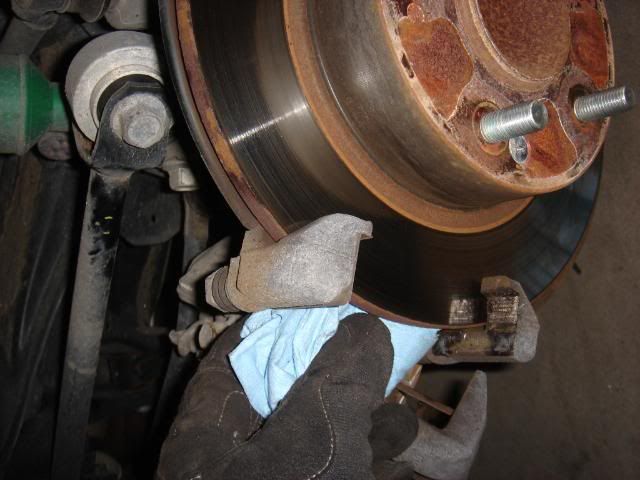
Here you can see the piston for the rear brakes. Looks much different from the one in the front.
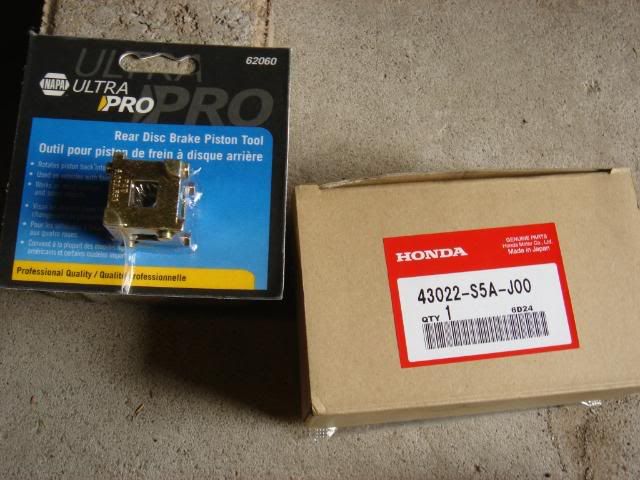
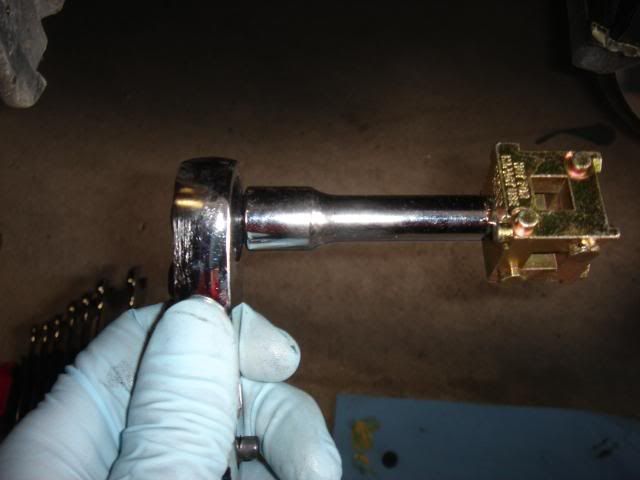
The 'cube' ... found it @ NAPA for $9 - I would DEFINITELY 100% recommend getting this, it was enough of an annoyance to do this with the cube, nevermind with a screwdriver I would go insane.
Old Pads & New Pads - 47,000 KM

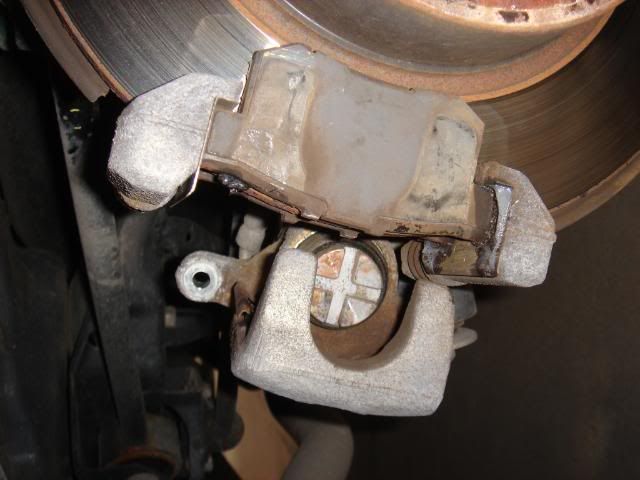
I cleaned the brake rotors before installing the new pads - sprayed on brake cleaner and then wiped off the excess residue after it dried (put something underneath your brakes at this point unless you like stains on your garage floor I just used a shop towel)
I also cleaned the rear side by turning the axle while spraying lightly and then turning while holding a shop towel there.
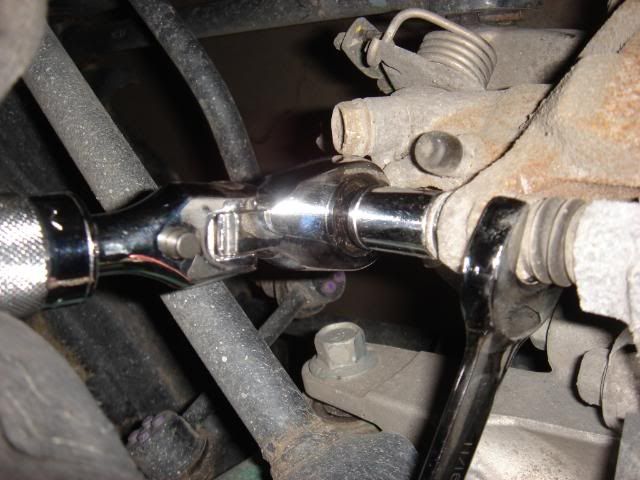
Picture of the 'cube' on a short extension which is how I retracted the piston.
Sorry I don't have any picture of actually retracting the piston as I only had two hands and the damn thing wouldn't stay put for me to be able to take a pic. Basically you hold the caliper with one hand, and set the tool into the piston with the other and then in a clockwise direction turn the piston while applying pressure. Easy to do with one hand if you're using a ratchet.
I found the hardest part at first was applying enough pressure, you definitely have to push on it - not only to make sure it goes in, but if you don't the cube will jump out of the grooves and at one point I ended up with it sorta wedged in the caliper and had to get it loose. Not fun.
Hope these pics help a bit.
I apologize in advance for the rotation of these pics, I'll try to change them when I get home but stupid photobucket doesn't give you an option once they're uploaded
and I was in a rush this morning before I left for work. Here is the rear caliper - you'll have to remove both bolts pictured. It doesn't swing up like the fronts too.
Make sure you hold the part in front of the rubber boot with a wrench when you're removing and reinstalling the bolt so you don't mess anything up.
Here you can see the piston for the rear brakes. Looks much different from the one in the front.
The 'cube' ... found it @ NAPA for $9 - I would DEFINITELY 100% recommend getting this, it was enough of an annoyance to do this with the cube, nevermind with a screwdriver I would go insane.
Old Pads & New Pads - 47,000 KM
I cleaned the brake rotors before installing the new pads - sprayed on brake cleaner and then wiped off the excess residue after it dried (put something underneath your brakes at this point unless you like stains on your garage floor I just used a shop towel)
I also cleaned the rear side by turning the axle while spraying lightly and then turning while holding a shop towel there.
Picture of the 'cube' on a short extension which is how I retracted the piston.
Sorry I don't have any picture of actually retracting the piston as I only had two hands and the damn thing wouldn't stay put for me to be able to take a pic. Basically you hold the caliper with one hand, and set the tool into the piston with the other and then in a clockwise direction turn the piston while applying pressure. Easy to do with one hand if you're using a ratchet.
I found the hardest part at first was applying enough pressure, you definitely have to push on it - not only to make sure it goes in, but if you don't the cube will jump out of the grooves and at one point I ended up with it sorta wedged in the caliper and had to get it loose. Not fun.
Hope these pics help a bit.
10-22-2007, 12:49 PM
#23
Drifting
Join Date: May 2006
Location: Mississauga, Canada
Age: 40
Posts: 2,355
Likes: 0
Received 1 Like
on
1 Post
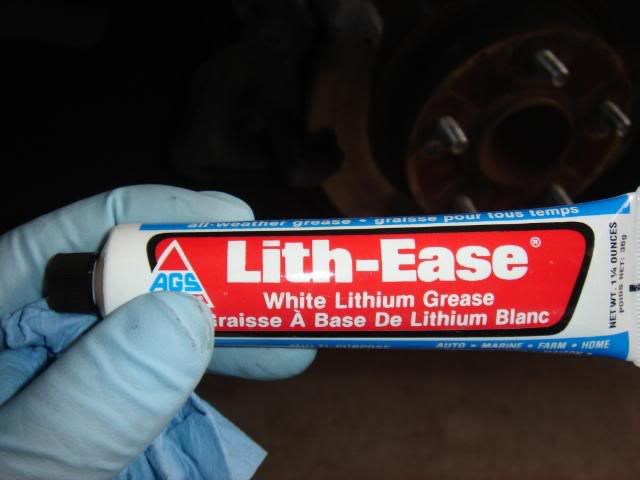
Missed the edit window: Also if you buy the genuine honda part they include shims for the inside pads which they apparently don't install from the factory just do the same by using the grease they give you between the pad and the shim.
I used a different kind of lube for the edges of the pads, but you can use the same stuff if you want.
I used a different kind of lube for the edges of the pads, but you can use the same stuff if you want.
 10-22-2007, 02:01 PM
#25
Drifting
Join Date: May 2006
Location: Mississauga, Canada
Age: 40
Posts: 2,355
Likes: 0
Received 1 Like
on
1 Post
See if it was a trust issue I'd rather do it myself because I know I'll do it right... namely due to the fact that I have a vested interest in the outcome.
Mechanics on the other hand just want to get the job done as fast as possible seeing as they bill and get paid per job... the more jobs they do the more they make...
Mechanics on the other hand just want to get the job done as fast as possible seeing as they bill and get paid per job... the more jobs they do the more they make...
10-24-2007, 05:29 PM
#26
Advanced
Thread Starter
Join Date: Apr 2005
Posts: 54
Likes: 0
Received 0 Likes
on
0 Posts
thanks cibs for posting the how to on the rears, seems pretty straightforward. i was preplexed by the "cube" but finally get it now. can the mods put this in faq/diy for future reference for all members, including myself.
11-03-2007, 02:20 PM
#27
Intermediate
Join Date: Jun 2007
Location: FL
Age: 41
Posts: 46
Likes: 0
Received 0 Likes
on
0 Posts
Just finished replacing my rear pads and by far, this was the easiest brake job I've ever done. I wish I had done a little research first before venturing out to get it done. I got a little frustrated when i couldn't retract the piston. But after finding this post, I drove down to the part store and bought the special tool. From there, it was a breeze.
12-31-2007, 10:07 AM
#28
Cruisin'
Join Date: Apr 2007
Age: 44
Posts: 22
Likes: 0
Received 0 Likes
on
0 Posts
I just did the brakes on my car and it was not too tough but not too easy either. My problems stemmed from a stuck rotor (I removed the fronts in order to get them re-surfaced). I searched the forums on here and could not find anything pertaining to the best way to remove. I did find on an Odyssey forum a very easy way to accomplish removing a stuck (rusted on) rotor. On the rotor there are two screw holes. (not the above mentioned rotor screws, but two other "blank" holes). Go to auto zone or the like and buy two 8 MM bolts. Screw both in at the same time and this will pop the rotor off.
I have changed the brakes on many cars and I have never experienced a rotor stuck as bad as this one was. I live in Atlanta and my car has been down here in the south it's entire life. I am guessing you northerners experience this much more frequently.
Note: my car has 70,000 miles.
2nd Note: This thread was very helpful, even for someone like myself whom is semi-mechanically inclined. I would recommend posting this thread under the FAQ and DIY section (ATTN: mods). This thread just gives you a certain amount of confidince in making sure you are covering all the bases (i.e, the inside shims that need to be re-used, etc.).
12-31-2007, 12:14 PM
#29
Drifting

Join Date: Aug 2007
Location: Pittsburgh, PA
Age: 46
Posts: 2,548
Likes: 0
Received 5 Likes
on
5 Posts
I've done this on several Honda/Acura vehicles as well as a few others. For some reason the OEM Honda rotors always seem to bind to the hub/bearing like that. There's almost always a bracket of some sort with the right sized bolt you can "borrow" to pop the disc off as you described. It takes very little effort once you figure out what your supposed to do. I like to put a thin layer of antiseize between the rotor and the hub when I put everything back together.
Also, in the write up it's mentioned you should use the torque driver to put the screws back in the rotor. That's way overkill, they don't need be much more than snug. They're just there to keep the rotor in place while the wheel is off. Once you torque down the wheel, the rotor is sandwiched between the wheel and the hub. The lug nut studs are what keep it locked to the rotor.
Also, in the write up it's mentioned you should use the torque driver to put the screws back in the rotor. That's way overkill, they don't need be much more than snug. They're just there to keep the rotor in place while the wheel is off. Once you torque down the wheel, the rotor is sandwiched between the wheel and the hub. The lug nut studs are what keep it locked to the rotor.
02-15-2008, 01:02 PM
#31
3.2 VTEC
Join Date: Sep 2005
Location: Sin City
Age: 37
Posts: 878
Likes: 0
Received 0 Likes
on
0 Posts
you didn't need to do that:
http://i159.photobucket.com/albums/t...0/DSCN3529.jpg
to replace the pads, you already had them ready here:
http://i159.photobucket.com/albums/t...0/DSCN3520.jpg
all you needed to do is change out the pads as they're sitting right there, didn't need to put the calper back on, then disassemble it to change the pads
02-15-2008, 02:52 PM
#32
Originally Posted by vincethe1
you didn't need to do that:
http://i159.photobucket.com/albums/t...0/DSCN3529.jpg
to replace the pads, you already had them ready here:
http://i159.photobucket.com/albums/t...0/DSCN3520.jpg
all you needed to do is change out the pads as they're sitting right there, didn't need to put the calper back on, then disassemble it to change the pads
http://i159.photobucket.com/albums/t...0/DSCN3529.jpg
to replace the pads, you already had them ready here:
http://i159.photobucket.com/albums/t...0/DSCN3520.jpg
all you needed to do is change out the pads as they're sitting right there, didn't need to put the calper back on, then disassemble it to change the pads
02-15-2008, 03:06 PM
#33
I think the OP wanted to show not only the way to change out the rotors, but also the way to change out the pads. Of course you can change out the pads if you take out the entire caliper and brackets, but if you just wanted to change pads, then use the "unbolt lower end and swing caliper up" method.
 03-16-2008, 04:58 AM
#36
Originally Posted by Un-Kut
i wanna do this by myself too, but the local shop said they'd do it for $65 for rotors and pad replacement. should i let him do it and just learn by watching
03-16-2008, 05:22 AM
#37
Token Scot
Join Date: Feb 2007
Location: Bonnybridge, Scotland
Age: 39
Posts: 35
Likes: 0
Received 0 Likes
on
0 Posts
Just don't do what I did and remove the entire caliper to access your front pads.
So much easier if I'd realised you could simply swing up the access hatch thingy.
So much easier if I'd realised you could simply swing up the access hatch thingy.
03-16-2008, 01:43 PM
#38
Advanced
Thread Starter
Join Date: Apr 2005
Posts: 54
Likes: 0
Received 0 Likes
on
0 Posts
for just the pads u dont have to remove the caliper, just swing it up.
i was replacing rotors as well, which requires removing the entire caliper.
i was trying to show both methods.
i was replacing rotors as well, which requires removing the entire caliper.
i was trying to show both methods.

