
DIY VSA/Moonroof/Heater/ Gear shift lights
 07-16-2008, 09:57 PM
#1
CL9 ABP
Thread Starter
iTrader: (1)
Join Date: Feb 2005
Location: Commack, Long Island -> Queens NY
Age: 37
Posts: 4,528
Received 245 Likes
on
112 Posts
DIY VSA/Moonroof/Heater/ Gear shift lights
So today i was really bored at home and decided to replace all my lights that are out for my 2005 tsx.
97,093 miles...
So all i needed was:
Screwdriver set
tweezers
sissors or nailclipper
4 radioshack bulbs
#7219 microlamp 12volt 50Ma

or
acura
35852-SDA-A01
35853-SDA-A01 ( HI / LO heat button)
#74 bulb for gear shift light same as the glovebox.
got a #74H from superbrightleds, its a bit too big but i modified it to fit. (electrical tape)
So first you pull out your center console and disconnect the wiring, then flip it over you will see the heater switches with screws.
unscrew the 4 screws. I took the whole center console inside with me...

Pry off the vsa and moonroof block with a flathead. Carefully so you don't scratch your car!!!!!!
Unplug the harness you won't have the extra wire since that led is for my alarm system.


This moonroof button is hard, you need to press the top clip with the screwdriver since you can't reach it with your finger.

The other one push both sides it slides out from the front of the plate.


To avoid losing any pieces or parts i brought everything inside.
Look at all the 4 switches.

This is how all the switches are it needs a flathead to unlock it. Carefully do it or you can strip the plastic.

The moonroof light is the hardest it gets stuck sometimes so use a small flathead to pry it out.

The others are pretty easy just don't force it out.

4 bulbs out and the rubber caps remove
CAREFULLY REMOVE THEM, i broke 3 of them... so i have amber lights in my car right now.
I really don't care but its fine
Wow almost 100,000 miles and 4 bulbs burnt out.
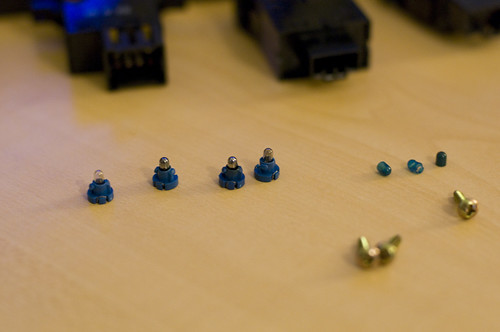
Okay heres where the tweezers come in handy i spent 10 mins trying pry these bulbs off, but realize the wires is what holds it down.
Use the tweezer to pry at the loose wires. The bulb should slide out as soon as its free.


Open your bulbs and hold them with your thumb and finger line it up to the 2 small tiny holes. You have little room to miss but its like putting a thread through a needle...


Now here is a tricky part not too hard, but just mimic all the bulbs if you didn't remove them all yet...

you need to pull the bulb down into the blue holder, than pull the wires up through that opening then curve around that nudge and come down.


Then the wire comes inwards and cut the left over. Don't worry about the end, the important part is up at top where it hits the metal on the switch.
If your good you won't have those 4 rubber caps shredded up...

Easy part put everything back together, i screwed up the rubber caps so i can't use them anymore.
Put those back on push the blue housing back into the switch then use the flat head to lock them in.
Then screw the the two heater switches back on the center console. Note you can't mix them up thank god for acura making them curve in. They won't fit if you tried.
Back to the car now-------------------------------------------------
So plug back the two harness for the moonroof and vsa and make sure you do that cuz i forgot and thought none of my bulbs worked....
Push firmly and foward the plate will snap in.

Center console light
I replaced the bulb and couldnt get the #74H to fit its a bit too big. Used electrical tape to get it held in place.
Now its a screw style so i only put a little layer of electrical tape on so i still was able screw it back in. This is a bright led, I tried it instead of an amber, since I always felt my gearshift light was too warm...

After you put that light in you can plug back the heater switches and put back in the center console.
This is the finish product.

Yea i know its amber... DON'T SCREW UP THE BLUE CAPS!

Oh got the Brockway obd2 scan tool =)

I wasn't expecting the center console to come out whiteblueish. Even with the Superbright led there has to be a slight blue flim for the amber bulb to shine white....
So lesson learned don't mess up the blue rubber caps!!!!
Enjoy =)
97,093 miles...
So all i needed was:
Screwdriver set
tweezers
sissors or nailclipper
4 radioshack bulbs
#7219 microlamp 12volt 50Ma
or
acura
35852-SDA-A01
35853-SDA-A01 ( HI / LO heat button)
#74 bulb for gear shift light same as the glovebox.
got a #74H from superbrightleds, its a bit too big but i modified it to fit. (electrical tape)
So first you pull out your center console and disconnect the wiring, then flip it over you will see the heater switches with screws.
unscrew the 4 screws. I took the whole center console inside with me...
Pry off the vsa and moonroof block with a flathead. Carefully so you don't scratch your car!!!!!!
Unplug the harness you won't have the extra wire since that led is for my alarm system.
This moonroof button is hard, you need to press the top clip with the screwdriver since you can't reach it with your finger.
The other one push both sides it slides out from the front of the plate.
To avoid losing any pieces or parts i brought everything inside.
Look at all the 4 switches.
This is how all the switches are it needs a flathead to unlock it. Carefully do it or you can strip the plastic.
The moonroof light is the hardest it gets stuck sometimes so use a small flathead to pry it out.
The others are pretty easy just don't force it out.
4 bulbs out and the rubber caps remove
CAREFULLY REMOVE THEM, i broke 3 of them... so i have amber lights in my car right now.
I really don't care but its fine
Wow almost 100,000 miles and 4 bulbs burnt out.
Okay heres where the tweezers come in handy i spent 10 mins trying pry these bulbs off, but realize the wires is what holds it down.
Use the tweezer to pry at the loose wires. The bulb should slide out as soon as its free.
Open your bulbs and hold them with your thumb and finger line it up to the 2 small tiny holes. You have little room to miss but its like putting a thread through a needle...
Now here is a tricky part not too hard, but just mimic all the bulbs if you didn't remove them all yet...
you need to pull the bulb down into the blue holder, than pull the wires up through that opening then curve around that nudge and come down.
Then the wire comes inwards and cut the left over. Don't worry about the end, the important part is up at top where it hits the metal on the switch.
If your good you won't have those 4 rubber caps shredded up...
Easy part put everything back together, i screwed up the rubber caps so i can't use them anymore.
Put those back on push the blue housing back into the switch then use the flat head to lock them in.
Then screw the the two heater switches back on the center console. Note you can't mix them up thank god for acura making them curve in. They won't fit if you tried.
Back to the car now-------------------------------------------------
So plug back the two harness for the moonroof and vsa and make sure you do that cuz i forgot and thought none of my bulbs worked....
Push firmly and foward the plate will snap in.
Center console light
I replaced the bulb and couldnt get the #74H to fit its a bit too big. Used electrical tape to get it held in place.
Now its a screw style so i only put a little layer of electrical tape on so i still was able screw it back in. This is a bright led, I tried it instead of an amber, since I always felt my gearshift light was too warm...
After you put that light in you can plug back the heater switches and put back in the center console.
This is the finish product.
Yea i know its amber... DON'T SCREW UP THE BLUE CAPS!
Oh got the Brockway obd2 scan tool =)
I wasn't expecting the center console to come out whiteblueish. Even with the Superbright led there has to be a slight blue flim for the amber bulb to shine white....
So lesson learned don't mess up the blue rubber caps!!!!
Enjoy =)

The following users liked this post:
alxlxiv (02-16-2014)
 Still running strong Jeff.
 07-16-2008, 11:39 PM
#4
Racer
Join Date: Jan 2007
Location: Portland OR
Age: 41
Posts: 270
Likes: 0
Received 0 Likes
on
0 Posts
I did the same a while ago, but I just spent the extra 5 to 10 bucks and go the repalcement lights from acura. Way easier, only took me a coulpe minuest to do the job. Good work though
07-16-2008, 11:48 PM
#5
CL9 ABP
Thread Starter
iTrader: (1)
Join Date: Feb 2005
Location: Commack, Long Island -> Queens NY
Age: 37
Posts: 4,528
Received 245 Likes
on
112 Posts
They wanted to charge me 10 bucks per bulb and 150 for labor....
So i told them i'll do it myself, then they said we don't have any around...
not to mention they thought there were different bulbs...
So i told them i'll do it myself, then they said we don't have any around...
not to mention they thought there were different bulbs...
12-29-2008, 10:16 AM
#6
Wanted to say thanks to lcrazyaznl for doing this DIY. My passenger and driver's heater switch light went out, thankfully one after the other. This post helped a lot. The center console removal was difficult. I used the reverse method; prying from the rear rather than the front to get the console removed.
Out of pocket cost - $2 for 2 bulbs at Radio Shack.
Out of pocket cost - $2 for 2 bulbs at Radio Shack.
12-29-2008, 10:34 AM
#7
Detail Cars in Philly in
hahah after looking at this thread i just realized that both my heated seats switches are no lighting up. guess i didnt realize it since both of them have always been out  I'll be doing this very soon
I'll be doing this very soon
Trending Topics
01-07-2009, 12:42 PM
#8
CL9 ABP
Thread Starter
iTrader: (1)
Join Date: Feb 2005
Location: Commack, Long Island -> Queens NY
Age: 37
Posts: 4,528
Received 245 Likes
on
112 Posts
Yea I realized the easiest way is to pull out the back near the e-brake. Slowly pry all the clips.
Anyone know how to take apart the hazard light... thats been troubling me.
Anyone know how to take apart the hazard light... thats been troubling me.
01-07-2009, 01:05 PM
#9

Great thread. My passenger side bulb seat heater is out. Might have to try this when I get home.
01-07-2009, 01:48 PM
#12
Hey nice writeup 
I have a solution if one breaks the blue rubber covers aka condoms off:

Use Testors transparent spray paint, but spray it into a cup and just paint a coat of it on the bulb. I've done this before with my Prelude's gauge lights.
good shit man.
I have a solution if one breaks the blue rubber covers aka condoms off:
Use Testors transparent spray paint, but spray it into a cup and just paint a coat of it on the bulb. I've done this before with my Prelude's gauge lights.
good shit man.
01-07-2009, 04:41 PM
#13
Mike D from Ohio
Join Date: Nov 2007
Location: Ohio
Age: 43
Posts: 435
Likes: 0
Received 0 Likes
on
0 Posts
I don't understand why there has to be a blue film if you used LEDs. If I use blue LEDs, will the color still be amber?
Anyway, here's another question.....
Here's the superbrightleds page, look at the 4th one down called "NeoWedge Instrument LED bulb"
http://www.superbrightleds.com/cgi-b...6.7107&next=50
can they replace these here:

I was wondering if I could just buy these instead of re-wiring each bulb like you did in your write-up? And if so, what kind of work is required to hook them up?
Anyway, here's another question.....
Here's the superbrightleds page, look at the 4th one down called "NeoWedge Instrument LED bulb"
http://www.superbrightleds.com/cgi-b...6.7107&next=50
can they replace these here:
I was wondering if I could just buy these instead of re-wiring each bulb like you did in your write-up? And if so, what kind of work is required to hook them up?
Last edited by miked8887; 01-07-2009 at 04:44 PM.
01-07-2009, 05:57 PM
#14
I don't understand why there has to be a blue film if you used LEDs. If I use blue LEDs, will the color still be amber?
Anyway, here's another question.....
Here's the superbrightleds page, look at the 4th one down called "NeoWedge Instrument LED bulb"
http://www.superbrightleds.com/cgi-b...6.7107&next=50
can they replace these here:
I was wondering if I could just buy these instead of re-wiring each bulb like you did in your write-up? And if so, what kind of work is required to hook them up?
Glancing over the LED's on the link you put up, sounds like these guys would be a direct replacment, cause it says "Twist Lock Instrument Cluster and Gauge". Uncertain which size to choose from.
01-07-2009, 06:58 PM
#15
Mike D from Ohio
Join Date: Nov 2007
Location: Ohio
Age: 43
Posts: 435
Likes: 0
Received 0 Likes
on
0 Posts
Rewiring the replacement bulb is easy work. lcrazyaznl did an excellent write up on how to replace the bulbs once you get the switches out. The tough part is removing the center console.
Glancing over the LED's on the link you put up, sounds like these guys would be a direct replacment, cause it says "Twist Lock Instrument Cluster and Gauge". Uncertain which size to choose from.
Glancing over the LED's on the link you put up, sounds like these guys would be a direct replacment, cause it says "Twist Lock Instrument Cluster and Gauge". Uncertain which size to choose from.
01-07-2009, 07:02 PM
#16
01-07-2009, 10:27 PM
#17
CL9 ABP
Thread Starter
iTrader: (1)
Join Date: Feb 2005
Location: Commack, Long Island -> Queens NY
Age: 37
Posts: 4,528
Received 245 Likes
on
112 Posts
I found out how pull the hazard light out same style as all the other bulbs
except red cover !
Just pull from the side with your finger slowly and it pops out.
I;ll do a video on both tomorrow.
except red cover !
Just pull from the side with your finger slowly and it pops out.
I;ll do a video on both tomorrow.
01-08-2009, 02:10 PM
#18
CL9 ABP
Thread Starter
iTrader: (1)
Join Date: Feb 2005
Location: Commack, Long Island -> Queens NY
Age: 37
Posts: 4,528
Received 245 Likes
on
112 Posts
http://www.youtube.com/watch?v=b0M0VMWLIFk
posted the video on how remove the center console
vsa/moonroof button
hazard light button
and center cubby
enjoy sorry if it stinks it just a quick vid
posted the video on how remove the center console
vsa/moonroof button
hazard light button
and center cubby
enjoy sorry if it stinks it just a quick vid
The following users liked this post:
MaverikDS (01-24-2012)
01-08-2009, 03:10 PM
#20
CL9 ABP
Thread Starter
iTrader: (1)
Join Date: Feb 2005
Location: Commack, Long Island -> Queens NY
Age: 37
Posts: 4,528
Received 245 Likes
on
112 Posts
Well the center console i pulled it out so many times that the clips don't hold it tight like a virgin anymore. The first time i did it I think i almost broke the thing. (the plastic near the ebrake is the softest so watch out that will give first. )
I have a huge crack there after years... need to replace it one these days haha.
I have a huge crack there after years... need to replace it one these days haha.
01-08-2009, 03:15 PM
#21
Yea, I kinda figured you were messing around in those parts so much that she became loose.
I was yanking on my knees on the passenger seat to get the center to come out!
I was yanking on my knees on the passenger seat to get the center to come out!
01-08-2009, 03:29 PM
#22
Drifting

Join Date: Aug 2007
Location: Pittsburgh, PA
Age: 46
Posts: 2,548
Likes: 0
Received 5 Likes
on
5 Posts
I put a little bit of grease on the metal clips the first time I took mine out. It pops right out when I want it to now but it's still firmly in place otherwise. The metal had a good bit of corrosion on it that was the source of most the resistance.
01-08-2009, 06:53 PM
#23
Mike D from Ohio
Join Date: Nov 2007
Location: Ohio
Age: 43
Posts: 435
Likes: 0
Received 0 Likes
on
0 Posts
Are the lights for the radio/AC buttons the same as the lights in the VSA/moonroof buttons? I'm just wondering if the swap for the radio/AC buttons will be similar to this one you did here... and also if I can use the same twist-lock replacements I mentioned from superbrightleds?
01-08-2009, 08:58 PM
#24
Drifting
Join Date: Aug 2007
Location: Pittsburgh, PA
Age: 46
Posts: 2,548
Likes: 0
Received 5 Likes
on
5 Posts
Sadly no. Those are surface mount soldered on jobbies. Quite the chore to replace. The dealer will just replace the whole center are of the dash from the top of cubby up to the clock because it's all one big piece. It's easier than fixing the lights if that gives you any hint as to how much of a pain in the ass it is.
01-09-2009, 01:05 PM
#25
CL9 ABP
Thread Starter
iTrader: (1)
Join Date: Feb 2005
Location: Commack, Long Island -> Queens NY
Age: 37
Posts: 4,528
Received 245 Likes
on
112 Posts
Yea wickedfx did a bunch of them but i think hes a bit more crafty the most of us. These light bulbs werent hard to install but think a dealer wanted charge me 30 per bulb or so...
10-09-2009, 03:03 PM
#26
CL9 ABP
Thread Starter
iTrader: (1)
Join Date: Feb 2005
Location: Commack, Long Island -> Queens NY
Age: 37
Posts: 4,528
Received 245 Likes
on
112 Posts
At the dealer you can get them 2-5 bucks.
So you don't need the blue caps you just can replace the whole piece all together.
Warning when buying the heaterseats they say those bulbs comes with all the lights including the high and low bulbs so its a bit more costly i bought a few biaccident since he failed to mention they were a bundle.
So you don't need the blue caps you just can replace the whole piece all together.
Warning when buying the heaterseats they say those bulbs comes with all the lights including the high and low bulbs so its a bit more costly i bought a few biaccident since he failed to mention they were a bundle.
10-09-2009, 08:51 PM
#27
Burning Brakes
At the dealer you can get them 2-5 bucks.
So you don't need the blue caps you just can replace the whole piece all together.
Warning when buying the heaterseats they say those bulbs comes with all the lights including the high and low bulbs so its a bit more costly i bought a few biaccident since he failed to mention they were a bundle.
So you don't need the blue caps you just can replace the whole piece all together.
Warning when buying the heaterseats they say those bulbs comes with all the lights including the high and low bulbs so its a bit more costly i bought a few biaccident since he failed to mention they were a bundle.
10-10-2009, 12:39 PM
#28
CL9 ABP
Thread Starter
iTrader: (1)
Join Date: Feb 2005
Location: Commack, Long Island -> Queens NY
Age: 37
Posts: 4,528
Received 245 Likes
on
112 Posts
Yea only had this problem when I bought lights from the dealer for the ehated seats I was wondering why the total was 40 bucks and the person said oh we ordered the whole set for each light in the heater seat.
10-10-2009, 06:51 PM
#29
Burning Brakes
You don't happen to have the part # for the necessary parts do you for the heated seats button?
10-10-2009, 09:56 PM
#30
 12-29-2010, 04:26 PM
#33
Instructor
Join Date: Jul 2005
Location: Calgary, Canada
Posts: 186
Likes: 0
Received 0 Likes
on
0 Posts
Has anyone had any issues with the Radio Shack bulb being too hot or two bright? (Or overloading any circuits?) I ask because this bulb is 60mA, and the original Honda/Acura part appears to be 40mA. (For a Canadian source of a bulb that appears to be the same as the Radio Shack one, see here.)
01-11-2011, 09:21 AM
#34
Cruisin'

Join Date: Feb 2010
Posts: 16
Likes: 0
Received 0 Likes
on
0 Posts
Has anyone had any issues with the Radio Shack bulb being too hot or two bright? (Or overloading any circuits?) I ask because this bulb is 60mA, and the original Honda/Acura part appears to be 40mA. (For a Canadian source of a bulb that appears to be the same as the Radio Shack one, see here.)
01-11-2011, 08:14 PM
#37
Cruisin'
Join Date: Feb 2010
Posts: 16
Likes: 0
Received 0 Likes
on
0 Posts
11-13-2011, 06:03 PM
#40
Geez, I was starting to think I was the only one with burnt bulbs, I've had to replace the seat heater ones twice already (I seem to have to replace them everytime I pop the center console out), but today I realized my "VSA" and sunroof switches are out. I tested the continuity just to make sure there is current and sure enough it's the bulbs.
By the way, thanks for the photo of the VSA switch, as there are two locations for the bulb on the switch and your photo confirms it is indeed on the bottom hole.
By the way, thanks for the photo of the VSA switch, as there are two locations for the bulb on the switch and your photo confirms it is indeed on the bottom hole.