DIY - Headlight Housing Removal for Shipment
 06-27-2009, 11:15 AM
#1
Instructor
Thread Starter
DIY - Headlight Housing Removal for Shipment
I got my headlights back from AAC.
First, I'm going to post pictures/description of how to remove the headlight units, all the bulbs, etc, along with the reassembly.
I will update this thread after wiring the halos. I am still waiting for electrical supplies to arrive in the mail. When they do, I will post my wiring method as well as pictures of the halos illuminated.
This thread can serve to show what you have to go through to have headlight work done with AAC. It will also give good details and pictures for changing HID bulbs and what the inside of the HID assembly looks like.
Even though AAC does the installation for you, the disassembly/reassembly required can be enough of a job itself (especially for novices). I personally think its easy in general, but you know how the first time goes.
Disclaimer: By agreeing to attempt this task with any of my instructions, you automatically agree to claim full responsibility for all damages or injuries that occur. This method working for me does not necessarily imply that it will work identically for you. Use my instructions only in conjunction with other advice as well as your own care and judgment.
Safety: Here are general safety guidelines for working with the HID system.
1) Ensure key is out of ignition, headlight stalk switch is off, and doors are unlocked but closed.
2) Disconnect the battery before touching the HID system.
3) Unplug the gray plastic electrical connector UNDER the HID container BEFORE opening the HID container.
4) When you do open the HID container, be extra cautious of heat. If hot or warm, wait until it cools.
5) Wear gloves and eye protection
6) I personally would wait a few hours with the HIDs turned off before touching any HID stuff. I usually wait overnight.
7) Wear rubber gloves and eye protection.
There are more safety guidelines elsewhere too. You can check that. But these above are what I find really important.
Before I start, I want to thank the following members for making things possible:
Thanks to MMsTSX for answering for me a PM about male/female connectors. By the way, I got a few different kinds from autolum and we�ll see which works best. Also, check out MMsTSX's thread from a while back with his halo pics.
Thanks to nbtx for answering a question about whether isopropyl alcohol can substitute denatured when cleaning headlights:
https://acurazine.com/forums/1g-tsx-2004-2008-124/denatured-alcohol-730860/
So let's start:
To take the headlights out, you should first remove the front bumper completely. Instructions on that can be found somewhere. If I don�t find an AZ thread on this for the TSX, I�ll post my DIY on bumper removal and link to it on this thread later. I didn't post my bumper thread on AZ for some reason, but I might as well now.
By the way, also take a look at lcrazyaznl�s headlight removal and bumper removal videos. I�m sure he posted them on AZ too. I'll link to them on this thread later.
After the bumper is off, disconnect the battery. If you're new at this, look up battery safety first.
Each headlight unit is bolted to the chassis with four 10mm bolts. Their locations are in the pics below. One of the top ones is under the side trim- you have to pop it upward to get to the bolt.

Take this plastic clip out so it doesn�t fling when you move the side trim. That happened to me twice.

Have someone hold the housing unit while the last bolt comes out so it doesn't fall. Then pull it out a little (not too far) and unplug the four electrical connectors coming out of the back. One of these four is the gray HID connector mentioned in safety guideline #3 above (underneath the HID unit). NOTE: do not open the back HID lid until the gray connector has been unplugged.
Just to better see where the gray HID connector is located, here is a pic of it from the side. You can see it with the bumper off:

After all the bolts are removed, the headlights comes right out frontward.
So now the headlight unit is completely detached.

You don't have to send your bulbs to AAC with the headlight housings, so take them out. It is easiest to put the headlights on a table or work bench to remove the bulbs.
Removal of all the bulbs except the HID is in the owner's manual.
To take the HID bulb out, open the gray lid (twist counter-clockwise). Again, never open this lid until you�ve unplugged the aforementioned plastic gray HID connector like I already have.
Here's the inside. I pointed out the swivel pins you have to move before the bulb comes out:

Push each pin inward, then all the way to the side to latch it behind the metal part. I forgot to snap a pic of the pin latched, but here are the metal projections to latch them behind:

Pull the connector STRAIGHT out with the bulb attached to it. If you pull it out any other way than straight or touch it against the sides, the bulb can be scratched:

Others like to remove the connector from the bulb while the bulb is still inside the housing. I take the connector and bulb together out of the housing first. It doesn't matter.
Twist the bulb counter-clockwise (with gloves) to pull it off the connector. I had to twist pretty hard. I would recommend putting the HID lids and weather seals back on before shipping to protect the sockets.
Store the bulbs individually wrapped in soft cloth.
Store the car in shelter. Check your manual about storage. Nine days have elapsed from the time AAC received my lights until the time they shipped them back out.
I used a 30x30x16 inch box. The 30x30 length/width dimensions seemed to be just big enough (if not bigger) for both headlights. The 16 inch height was way too big though. My package with both headlights weighed about 25 lbs. with padding and everything. They're not that heavy, but they�re big.
(reassembly continued next)
First, I'm going to post pictures/description of how to remove the headlight units, all the bulbs, etc, along with the reassembly.
I will update this thread after wiring the halos. I am still waiting for electrical supplies to arrive in the mail. When they do, I will post my wiring method as well as pictures of the halos illuminated.
This thread can serve to show what you have to go through to have headlight work done with AAC. It will also give good details and pictures for changing HID bulbs and what the inside of the HID assembly looks like.
Even though AAC does the installation for you, the disassembly/reassembly required can be enough of a job itself (especially for novices). I personally think its easy in general, but you know how the first time goes.
Disclaimer: By agreeing to attempt this task with any of my instructions, you automatically agree to claim full responsibility for all damages or injuries that occur. This method working for me does not necessarily imply that it will work identically for you. Use my instructions only in conjunction with other advice as well as your own care and judgment.
Safety: Here are general safety guidelines for working with the HID system.
1) Ensure key is out of ignition, headlight stalk switch is off, and doors are unlocked but closed.
2) Disconnect the battery before touching the HID system.
3) Unplug the gray plastic electrical connector UNDER the HID container BEFORE opening the HID container.
4) When you do open the HID container, be extra cautious of heat. If hot or warm, wait until it cools.
5) Wear gloves and eye protection
6) I personally would wait a few hours with the HIDs turned off before touching any HID stuff. I usually wait overnight.
7) Wear rubber gloves and eye protection.
There are more safety guidelines elsewhere too. You can check that. But these above are what I find really important.
Before I start, I want to thank the following members for making things possible:
Thanks to MMsTSX for answering for me a PM about male/female connectors. By the way, I got a few different kinds from autolum and we�ll see which works best. Also, check out MMsTSX's thread from a while back with his halo pics.
Thanks to nbtx for answering a question about whether isopropyl alcohol can substitute denatured when cleaning headlights:
https://acurazine.com/forums/1g-tsx-2004-2008-124/denatured-alcohol-730860/
So let's start:
To take the headlights out, you should first remove the front bumper completely. Instructions on that can be found somewhere. If I don�t find an AZ thread on this for the TSX, I�ll post my DIY on bumper removal and link to it on this thread later. I didn't post my bumper thread on AZ for some reason, but I might as well now.
By the way, also take a look at lcrazyaznl�s headlight removal and bumper removal videos. I�m sure he posted them on AZ too. I'll link to them on this thread later.
After the bumper is off, disconnect the battery. If you're new at this, look up battery safety first.
Each headlight unit is bolted to the chassis with four 10mm bolts. Their locations are in the pics below. One of the top ones is under the side trim- you have to pop it upward to get to the bolt.
Take this plastic clip out so it doesn�t fling when you move the side trim. That happened to me twice.
Have someone hold the housing unit while the last bolt comes out so it doesn't fall. Then pull it out a little (not too far) and unplug the four electrical connectors coming out of the back. One of these four is the gray HID connector mentioned in safety guideline #3 above (underneath the HID unit). NOTE: do not open the back HID lid until the gray connector has been unplugged.
Just to better see where the gray HID connector is located, here is a pic of it from the side. You can see it with the bumper off:
After all the bolts are removed, the headlights comes right out frontward.
So now the headlight unit is completely detached.
You don't have to send your bulbs to AAC with the headlight housings, so take them out. It is easiest to put the headlights on a table or work bench to remove the bulbs.
Removal of all the bulbs except the HID is in the owner's manual.
To take the HID bulb out, open the gray lid (twist counter-clockwise). Again, never open this lid until you�ve unplugged the aforementioned plastic gray HID connector like I already have.
Here's the inside. I pointed out the swivel pins you have to move before the bulb comes out:
Push each pin inward, then all the way to the side to latch it behind the metal part. I forgot to snap a pic of the pin latched, but here are the metal projections to latch them behind:
Pull the connector STRAIGHT out with the bulb attached to it. If you pull it out any other way than straight or touch it against the sides, the bulb can be scratched:
Others like to remove the connector from the bulb while the bulb is still inside the housing. I take the connector and bulb together out of the housing first. It doesn't matter.
Twist the bulb counter-clockwise (with gloves) to pull it off the connector. I had to twist pretty hard. I would recommend putting the HID lids and weather seals back on before shipping to protect the sockets.
Store the bulbs individually wrapped in soft cloth.
Store the car in shelter. Check your manual about storage. Nine days have elapsed from the time AAC received my lights until the time they shipped them back out.
I used a 30x30x16 inch box. The 30x30 length/width dimensions seemed to be just big enough (if not bigger) for both headlights. The 16 inch height was way too big though. My package with both headlights weighed about 25 lbs. with padding and everything. They're not that heavy, but they�re big.
(reassembly continued next)
 06-27-2009, 11:16 AM
#2
Instructor
Thread Starter
Now, I'll show the reassembly after getting the headlight housings back. Putting the stuff back together can be tricky to some people, especially the HID.
Below are the headlights the way they come back. Notice the ballasts and wires that were added:

Important: before wiring the halos, put everything back together and make sure all your lights work. There’s always the chance something was damaged during shipping or disassembly. Wait until you know that everything works correctly before starting on the wiring or driving to avoid confounds.
Also, don’t drive until you mount the ballasts and wires down securely (I mention it again below).
Put all the bulbs, lids, and weather seals back on before putting the housing unit back into the car. It’s easier when the headlight is out. In fact, I'm taking the entire housing out to change the HIDs from now on. Its easier.
If anything about this reassembly causes you trouble, it will be the HIDs, so here is a few notes about putting them back in:
On the bulb, if the brown rod on the return lead (lead that runs aside the bulb) is loose and freely moves along the lead, then (with gloves) gently push it back down like the arrow is pointing and it should stay:

Right before putting the bulbs back in, wash them with denatured or isopropyl alcohol even if you didn't touch them. It doesn't hurt to be safe. Also check the bulbs for lint or hairs stuck in the tip. I didn't have rubber gloves, so I used cloth ones and therefore had to pull a piece of lint out of the bulb tip.
You also have to put the HID bulbs in right-side-up. If you look at the black base of the bulb, there are holes that need to match up with tabs on the back of the housing (picture below). If done correctly, the return lead should face downward when the bulb is in the housing. I pointed out the parts that have to match up below with color coded arrows:

When you put the bulb onto the connector. Make sure the tab twists ALL the way over as in the below picture. Make sure you twist it on tightly (my bulb is in upside-down in the below pic; mistake, but you can see the tab locking):

^yea, I had to turn it around. I don’t have another pic with the bulb in right AND the tab clearly visible.
I thought it was kind of tricky to lock the swivel pins. Just make sure the pins lock behind the black plastic on the bulb base, and the tops of the pins lock behind the metal hooks on top.
Double check the battery is disconnected before putting the headlights back in.
Putting the headlight back in is easy, but here are a few pointers:
Plug all the connectors back in before pushing the headlight in all the way. Have someone hold it partially put in and plug the connectors in. Then push the unit in.
The black metal piece in the below pic must be attached to the headlight properly before putting the bumper back on. Make sure the tabs stick through the holes as in this pic below:

^^also, make sure that part goes on the outside of the chassis piece when sliding the headlight into place.
Before driving, the halo ballasts must be mounted sturdily, and the halo wire terminals must be insulated (even though they are not attached to a power source) and held down. I would also waterproof the ballasts. I am still looking for a way to do it, but no luck yet. Any suggestions anyone?
I mounted the halos to the side of the HID with velcro adhesives. Only use the velcro strips meant for automotive use.

I’ll post my satisfaction with AAC’s work, but it was mostly good. Here are pics of the halos (off). After wiring, there’ll be pics of them ON:


Stay tuned to see how I wire them. Again, I am waiting for my connectors in the mail. It'll be a little while.
Below are the headlights the way they come back. Notice the ballasts and wires that were added:
Important: before wiring the halos, put everything back together and make sure all your lights work. There’s always the chance something was damaged during shipping or disassembly. Wait until you know that everything works correctly before starting on the wiring or driving to avoid confounds.
Also, don’t drive until you mount the ballasts and wires down securely (I mention it again below).
Put all the bulbs, lids, and weather seals back on before putting the housing unit back into the car. It’s easier when the headlight is out. In fact, I'm taking the entire housing out to change the HIDs from now on. Its easier.
If anything about this reassembly causes you trouble, it will be the HIDs, so here is a few notes about putting them back in:
On the bulb, if the brown rod on the return lead (lead that runs aside the bulb) is loose and freely moves along the lead, then (with gloves) gently push it back down like the arrow is pointing and it should stay:
Right before putting the bulbs back in, wash them with denatured or isopropyl alcohol even if you didn't touch them. It doesn't hurt to be safe. Also check the bulbs for lint or hairs stuck in the tip. I didn't have rubber gloves, so I used cloth ones and therefore had to pull a piece of lint out of the bulb tip.
You also have to put the HID bulbs in right-side-up. If you look at the black base of the bulb, there are holes that need to match up with tabs on the back of the housing (picture below). If done correctly, the return lead should face downward when the bulb is in the housing. I pointed out the parts that have to match up below with color coded arrows:
When you put the bulb onto the connector. Make sure the tab twists ALL the way over as in the below picture. Make sure you twist it on tightly (my bulb is in upside-down in the below pic; mistake, but you can see the tab locking):
^yea, I had to turn it around. I don’t have another pic with the bulb in right AND the tab clearly visible.
I thought it was kind of tricky to lock the swivel pins. Just make sure the pins lock behind the black plastic on the bulb base, and the tops of the pins lock behind the metal hooks on top.
Double check the battery is disconnected before putting the headlights back in.
Putting the headlight back in is easy, but here are a few pointers:
Plug all the connectors back in before pushing the headlight in all the way. Have someone hold it partially put in and plug the connectors in. Then push the unit in.
The black metal piece in the below pic must be attached to the headlight properly before putting the bumper back on. Make sure the tabs stick through the holes as in this pic below:
^^also, make sure that part goes on the outside of the chassis piece when sliding the headlight into place.
Before driving, the halo ballasts must be mounted sturdily, and the halo wire terminals must be insulated (even though they are not attached to a power source) and held down. I would also waterproof the ballasts. I am still looking for a way to do it, but no luck yet. Any suggestions anyone?
I mounted the halos to the side of the HID with velcro adhesives. Only use the velcro strips meant for automotive use.
I’ll post my satisfaction with AAC’s work, but it was mostly good. Here are pics of the halos (off). After wiring, there’ll be pics of them ON:
Stay tuned to see how I wire them. Again, I am waiting for my connectors in the mail. It'll be a little while.
06-27-2009, 05:00 PM
#3
Instructor
Thread Starter
Here are some good pics of front bumper removal. I posted this on other forums but forgot AZ for some reason. So here it is:
https://acurazine.com/forums/showthr...8#post11051628
https://acurazine.com/forums/showthr...8#post11051628
07-22-2009, 10:11 PM
#5
Instructor
Thread Starter
My friend and I finally wired up the halos tuesday night. They're 8000K Oracles on my high beams. I have to say that AAC did an excellent job on these.


Of course, they look waaaaay better in person
Of course, they look waaaaay better in person
07-22-2009, 10:12 PM
#6
Instructor
Thread Starter
So here's how I wired them:
Warning: do not attempt something like this unless you know what you're doing with electronics.
Supplies:
- RED 18AWG Extension Wire
- BLACK 18AWG Extension Wire
- Mate Connectors (male/female)
- Wire Strippers that include 18-20AWG
- 18-20AWG Heat Shrink Tubing
- Heat Retardant Tubing
- Soldering Iron
- Rosin Solder
- Electrical Tape
- Mini-Blade Fuse Holder
- Several 2-3 Amp Mini-Blade Fuses (I used a 3 amp)
- Velcro Adhesive Strips
- Digital Multimeter or Continuity Tester (optional but convenient)
- Tools for bumper and headlight housing removal
Optional:
- Lighted LED Switch (small enough to fit the switch panel)
- 1 3-Pin Connector 20AWG or thicker
Here are the pigtail bullet connectors I got from autolumination. The part number is PL-08
http://autolumination.com/connectors.htm
The PL-08 bullet connector comes like this:

Cut the insulation off and there are two of these:

And I cut it in half:


The bullet connectors allow me to unplug the headlight unit from the power supply without having to cut and re-solder.
Here are AAC's wiring suggestions. We used the ‘simple halo wiring.’
http://www.automotivelightstore.com/...S&Category=907
So the way we did it is generally the same as AAC's except for the inline switch. For now, my halos only operate with the side markers. I plan to put a switch on the panel later. When I get to it, all I'll have to do is cut the positive wire and run it through the firewall to the panel.
Anyway, here is the wiring diagram of what we did:
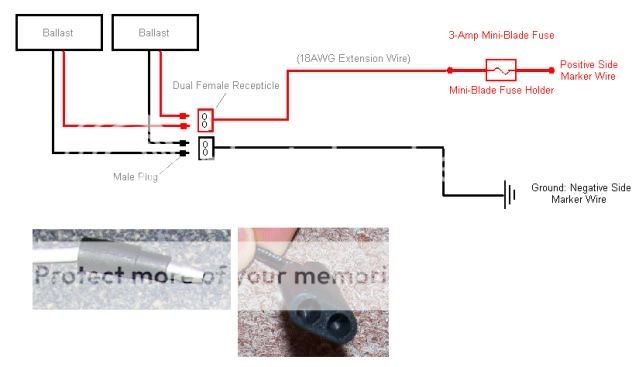
All the wire connections were properly soldered, heat shrunk, and electrical taped. No quick connects or crimpers were used. Most of the extension wire was covered in the protective tubing especially right behind the engine where it gets hot.
Warning: do not attempt something like this unless you know what you're doing with electronics.
Supplies:
- RED 18AWG Extension Wire
- BLACK 18AWG Extension Wire
- Mate Connectors (male/female)
- Wire Strippers that include 18-20AWG
- 18-20AWG Heat Shrink Tubing
- Heat Retardant Tubing
- Soldering Iron
- Rosin Solder
- Electrical Tape
- Mini-Blade Fuse Holder
- Several 2-3 Amp Mini-Blade Fuses (I used a 3 amp)
- Velcro Adhesive Strips
- Digital Multimeter or Continuity Tester (optional but convenient)
- Tools for bumper and headlight housing removal
Optional:
- Lighted LED Switch (small enough to fit the switch panel)
- 1 3-Pin Connector 20AWG or thicker
Here are the pigtail bullet connectors I got from autolumination. The part number is PL-08
http://autolumination.com/connectors.htm
The PL-08 bullet connector comes like this:
Cut the insulation off and there are two of these:
And I cut it in half:
The bullet connectors allow me to unplug the headlight unit from the power supply without having to cut and re-solder.
Here are AAC's wiring suggestions. We used the ‘simple halo wiring.’
http://www.automotivelightstore.com/...S&Category=907
So the way we did it is generally the same as AAC's except for the inline switch. For now, my halos only operate with the side markers. I plan to put a switch on the panel later. When I get to it, all I'll have to do is cut the positive wire and run it through the firewall to the panel.
Anyway, here is the wiring diagram of what we did:
All the wire connections were properly soldered, heat shrunk, and electrical taped. No quick connects or crimpers were used. Most of the extension wire was covered in the protective tubing especially right behind the engine where it gets hot.

Thread
Thread Starter
Forum
Replies
Last Post
cycdaniel
1G TSX Performance Parts & Modifications
8
12-17-2019 10:58 AM