
2.5TL Starter Replacement?

Thread Starter
Three Wheelin'
Joined: Nov 2007
Posts: 1,452
Likes: 90
From: New Orleans, LA
2.5TL Starter Replacement?
I may need to replace my starter in the near future because it was not turning over at all this morning until I tap the starter with a wrench. The problem has not come back, but has anyone ever attempted to replace a starter on 2.5TL? If so, any tips and advices appreciated! 

Thread Starter
Three Wheelin'
Joined: Nov 2007
Posts: 1,452
Likes: 90
From: New Orleans, LA
I'll try to remember to take some pics when I get to doing it. Probably not going to be anytime soon, as I still haven't found the time to install my 3.2 bumper, struts, and springs yet.
In the meantime, any tips from anyone who has done this before would be nice.
In the meantime, any tips from anyone who has done this before would be nice.

Advanced

Joined: Jan 2007
Posts: 85
Likes: 2
You will be accessing the starter from the driver's side in the area of the brake cylinder.
1. Disconnect battery
2. Remove wires and brackets that are bolted to the body on the driver's side. This give some room.
3. Remove bracket from under the exhaust manifold, 2 bolts, 12mm I believe.
4. Unplug wire connector from the starter
5. This might be the toughest part. You have to remove the 14mm bolt from the starter. It is accessible above through the exhaust manifold, or in from the side behind the exhaust manifold and between various hoses. You can remove some hoses to give you extra room, just have something to catch coolant in and try not to spill coolant in the area. If the bolt is on tight you'll have a fun time trying to break it with the limited room. Once I got mine off the first time I only tighten it by hand afterward. The bigger bolt holds the starter on just fine.
6. Remove the bigger but easier to reach 17mm bolt.
7. With the starter loose pull it out toward the front of the car, then once clear of the hole turn it towards yourself and get it through the space you made.
8. Unbolt the starter cable from it and it's free. I had trouble once when I put the starter cable on 180 degrees wrong and it would not fit so try to remember which way the cable is connected before you unbolt it.
Trending Topics
Thread Starter
Three Wheelin'
Joined: Nov 2007
Posts: 1,452
Likes: 90
From: New Orleans, LA
So I got around to removing the two mounting bolts today after 3 hrs of fighting and figuring out how to get to it. Put everthing away due to no more daylight. Will try to take it out and install the new one tomorrow.
Thread Starter
Three Wheelin'
Joined: Nov 2007
Posts: 1,452
Likes: 90
From: New Orleans, LA
Done! I took another 3 hrs today getting it out, and then putting it back in. It was pretty tricky due to the limited space I had to work with. The car has been sitting for nearly a week. So happy for it to start up like a charm. Pics to come...
Last edited by main70072; Dec 15, 2011 at 09:40 PM.
Thread Starter
Three Wheelin'
Joined: Nov 2007
Posts: 1,452
Likes: 90
From: New Orleans, LA
DIY 2.5TL Starter Replacement
DIY 2.5TL Starter Replacement
I would like to thank all the members who have help provide me with the info in order to perform this task. This DIY is in collaboration/in reference to PSC�s written instructions. Do at your own risk!
Tools used:
-rags
-3/8� drive ratchet
-cheater pipe
-10mm socket
-14mm socket
-17mm socket
-10mm open end wrench
-12mm open end wrench
-14mm open end wrench
Note: You will be accessing the starter from the driver�s side in the area of the brake cylinder. It is located in a concealed area under the intake manifold, and is held on by two bolts 14mm and 17mm.
1. Disconnect the battery (negative first, then positive) using 10mm and 12mm open end wrench, and wrap the terminals in a rag to prevent contact to battery posts.
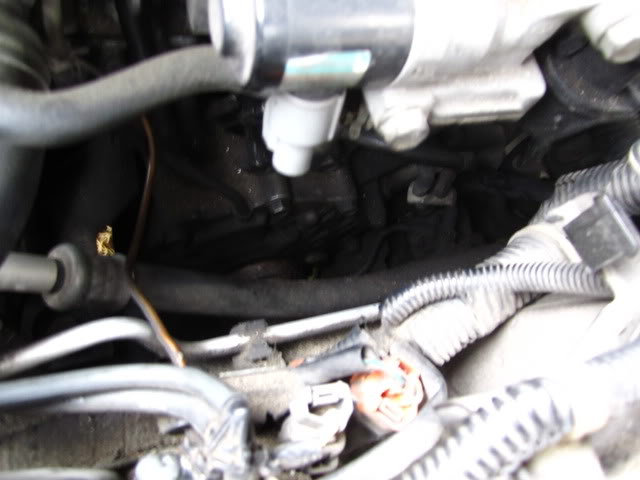
2. Remove wires, hoses, brackets that are bolted to the body/intake manifold on the driver's side and move them out of the way. This gives some room.
Also remove this:
What you did earlier will give you some room that will come in handy later on while installing the replacement starter.
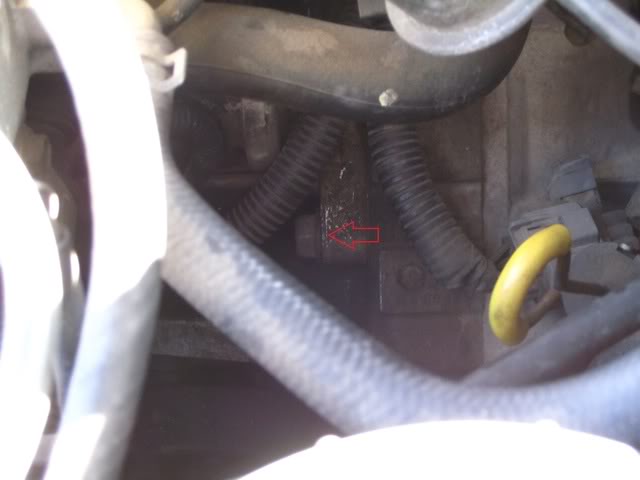
3. Remove bracket from under the intake manifold, (2) 12mm bolts. I actually tried to remove this bracket, but was unsuccessful so I left it on throughout the whole process. It made the space a little tighter to work with.
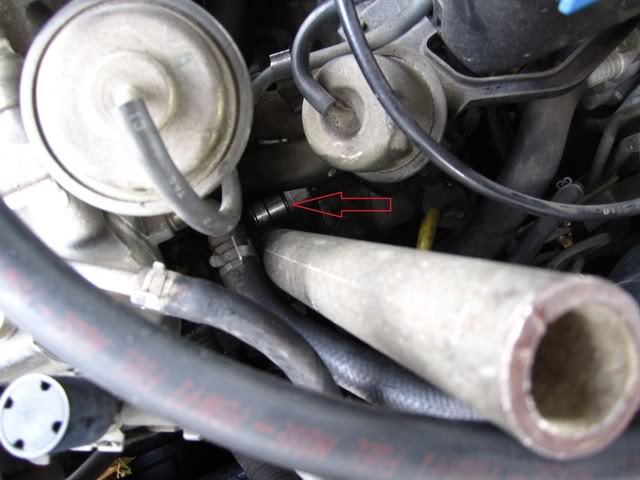
4. Unplug the wire connector from the starter. I couldn�t get a picture of this because it was under the intake manifold, but here�s a picture of another wire connector that I had to unplug which gave me room to remove the hidden 14mm bolt in the next step.

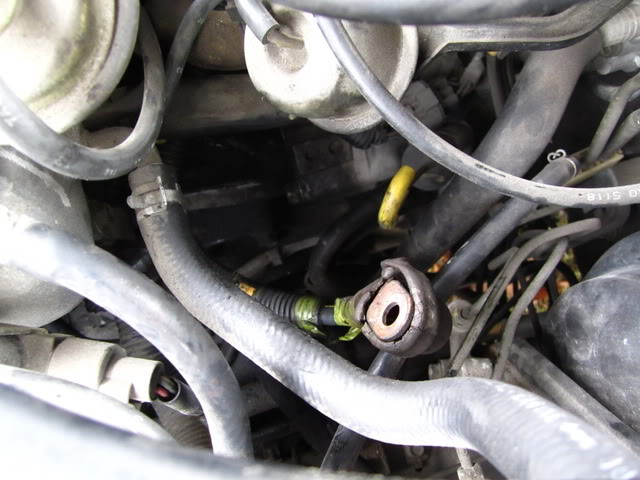
5. This is the toughest part. You have to remove the 14mm bolt from the starter. It is accessible above through the intake manifold, or in from the side behind the intake manifold in between various hoses. You can remove some hoses to give you extra room, just have something to catch coolant in and try not to spill coolant in the area, but I didn�t have to remove any coolant hoses. Just push all other hoses/wires away and don�t be afraid to apply a little force. I tried to go through the intake manifold between the 4th and 5th cylinder on top with a ratchet and 2� extension, but couldn�t break it loose due to limited area. Instead, I accessed it from behind the intake manifold with a socket and ratchet as follows:

After you break it loose, the ratchet will be of no help as it will just move the bolt back and forth. You will have to use a 14mm open end wrench to work the rest of the bolt out. This process took nearly 20 minutes! When you feel that the bolt is about to come out, try to squeeze a couple of fingers through the area that you�ve created for the socket to go in and pull the bolt out.
6. Remove the bigger, but easier to reach 17mm bolt.
I used a cheater pipe to break it loose like this:
Then I pulled on the cheater pipe standing on the passenger side, pulling towards myself.

7. With the starter loose, pull it out towards the front of the car and then once clear of the hole turn it towards yourself, but leave it down there. I disconnected the wire while it was still in the engine compartment because the wire was not long enough to pull all the way up. There�s a 14mm nut that�s holding on the wire to the starter. IMPORTANT, remember the direction that the wire was held onto the starter as this will be the only way to get enough room for the starter to go back in later. I had to remove the wire and resituated it a couple of times in order for it to go in correctly because I didn�t realize what PSC was talking about earlier. (PSC�s note: Unbolt the starter cable from it and it's free. I had trouble once when I put the starter cable on 180 degrees wrong and it would not fit so try to remember which way the cable is connected before you unbolt it.)
Here�s a pic of that wire disconnected:
8. Next, get it through the space you�ve made. This will be tricky as there will be just enough room to barely get things moving around under there. Here it is coming out:
9. Once the starter is out, remove this wiring harness from the old starter and install on the replacement starter.

Old starter:

Another shot:

Comparison of new and old starter. They have a slight different design as you can see here:
10. Put the new starter back in and reverse the steps above.
11. Reconnect all brackets, plugs, and wires that you took out during the removal process. Double check just to make sure you didn�t leave anything where they are not supposed to be and that everything is reconnected!
12. Reconnect the battery, clean your hands then start the car and hope that it turns over.
It took me about 6 hours altogether trying to figure out how to approach the starter without removing too many things. The longest part I�d say would be removing and installing the 14mm bolt. Enjoy!
Mods: If you want to sticky this to the DIY database it would make it easier for future members to locate how to replace the starter on their 2.5TLs.
I would like to thank all the members who have help provide me with the info in order to perform this task. This DIY is in collaboration/in reference to PSC�s written instructions. Do at your own risk!
Tools used:
-rags
-3/8� drive ratchet
-cheater pipe
-10mm socket
-14mm socket
-17mm socket
-10mm open end wrench
-12mm open end wrench
-14mm open end wrench
Note: You will be accessing the starter from the driver�s side in the area of the brake cylinder. It is located in a concealed area under the intake manifold, and is held on by two bolts 14mm and 17mm.
1. Disconnect the battery (negative first, then positive) using 10mm and 12mm open end wrench, and wrap the terminals in a rag to prevent contact to battery posts.
2. Remove wires, hoses, brackets that are bolted to the body/intake manifold on the driver's side and move them out of the way. This gives some room.
Also remove this:
What you did earlier will give you some room that will come in handy later on while installing the replacement starter.
3. Remove bracket from under the intake manifold, (2) 12mm bolts. I actually tried to remove this bracket, but was unsuccessful so I left it on throughout the whole process. It made the space a little tighter to work with.
4. Unplug the wire connector from the starter. I couldn�t get a picture of this because it was under the intake manifold, but here�s a picture of another wire connector that I had to unplug which gave me room to remove the hidden 14mm bolt in the next step.
5. This is the toughest part. You have to remove the 14mm bolt from the starter. It is accessible above through the intake manifold, or in from the side behind the intake manifold in between various hoses. You can remove some hoses to give you extra room, just have something to catch coolant in and try not to spill coolant in the area, but I didn�t have to remove any coolant hoses. Just push all other hoses/wires away and don�t be afraid to apply a little force. I tried to go through the intake manifold between the 4th and 5th cylinder on top with a ratchet and 2� extension, but couldn�t break it loose due to limited area. Instead, I accessed it from behind the intake manifold with a socket and ratchet as follows:
After you break it loose, the ratchet will be of no help as it will just move the bolt back and forth. You will have to use a 14mm open end wrench to work the rest of the bolt out. This process took nearly 20 minutes! When you feel that the bolt is about to come out, try to squeeze a couple of fingers through the area that you�ve created for the socket to go in and pull the bolt out.
6. Remove the bigger, but easier to reach 17mm bolt.
I used a cheater pipe to break it loose like this:
Then I pulled on the cheater pipe standing on the passenger side, pulling towards myself.
7. With the starter loose, pull it out towards the front of the car and then once clear of the hole turn it towards yourself, but leave it down there. I disconnected the wire while it was still in the engine compartment because the wire was not long enough to pull all the way up. There�s a 14mm nut that�s holding on the wire to the starter. IMPORTANT, remember the direction that the wire was held onto the starter as this will be the only way to get enough room for the starter to go back in later. I had to remove the wire and resituated it a couple of times in order for it to go in correctly because I didn�t realize what PSC was talking about earlier. (PSC�s note: Unbolt the starter cable from it and it's free. I had trouble once when I put the starter cable on 180 degrees wrong and it would not fit so try to remember which way the cable is connected before you unbolt it.)
Here�s a pic of that wire disconnected:
8. Next, get it through the space you�ve made. This will be tricky as there will be just enough room to barely get things moving around under there. Here it is coming out:
9. Once the starter is out, remove this wiring harness from the old starter and install on the replacement starter.
Old starter:
Another shot:
Comparison of new and old starter. They have a slight different design as you can see here:
10. Put the new starter back in and reverse the steps above.
11. Reconnect all brackets, plugs, and wires that you took out during the removal process. Double check just to make sure you didn�t leave anything where they are not supposed to be and that everything is reconnected!
12. Reconnect the battery, clean your hands then start the car and hope that it turns over.
It took me about 6 hours altogether trying to figure out how to approach the starter without removing too many things. The longest part I�d say would be removing and installing the 14mm bolt. Enjoy!
Mods: If you want to sticky this to the DIY database it would make it easier for future members to locate how to replace the starter on their 2.5TLs.
Last edited by main70072; Dec 16, 2011 at 03:55 PM.
Thread Starter
Three Wheelin'
Joined: Nov 2007
Posts: 1,452
Likes: 90
From: New Orleans, LA
Yours lasted quite long time. From the receipts found in my car that were left by the previous owner, it shows that my starter has been replaced back in 03. So I'm guessing it has a life span of about 8 years. Did you replaced it yourself as well?

10th Gear
Joined: Sep 2008
Posts: 14
Likes: 0
From: Raleigh, NC
Great job on the DIY Main! Looks fairly straightforward with the right tools and some grunt and sweat.
Mine is still original after 14 years, but I can see a replacement sometime soon. Did yours just completely fail or slowly start sounding funny/not turn over quickly before you had to replace it?
Mine is still original after 14 years, but I can see a replacement sometime soon. Did yours just completely fail or slowly start sounding funny/not turn over quickly before you had to replace it?
Thread Starter
Three Wheelin'
Joined: Nov 2007
Posts: 1,452
Likes: 90
From: New Orleans, LA
Great job on the DIY Main! Looks fairly straightforward with the right tools and some grunt and sweat.
Mine is still original after 14 years, but I can see a replacement sometime soon. Did yours just completely fail or slowly start sounding funny/not turn over quickly before you had to replace it?
Mine is still original after 14 years, but I can see a replacement sometime soon. Did yours just completely fail or slowly start sounding funny/not turn over quickly before you had to replace it?
One cold night it would not start, no signs of it failing. I get nothing when I turn the key. Long story short, I located the starter the next morning after looking for awhile, tapped it with a long adjustable wrench and it started up. It has been fine for a week or two after that, and started acting up again thereafter. I had to tap on the starter more frequently and would noticed slow/jumping turning over of the engine before it completely died. Are you the original owner of your car?
Burning Brakes
Joined: Sep 2004
Posts: 921
Likes: 2
From: Auburn, GA
Don't get me wrong, I replaced my steering wheel and the clock sping inside the steering wheel housing.
The starter job looked out of my comfort level than.
Thread Starter
Three Wheelin'
Joined: Nov 2007
Posts: 1,452
Likes: 90
From: New Orleans, LA
You are absolutely right! At first I couldn't even locate the starter myself. Then I thought that the intake manifold has to come off in order to get to it. I couldn't have done it without PSC's instructions.
Thread Starter
Three Wheelin'
Joined: Nov 2007
Posts: 1,452
Likes: 90
From: New Orleans, LA
UPDATE: I took this starter back out and exchanged it for another today. I was so happy when everything was back in and noticed the ignition signal wire came loose from the solenoid upon last check. There's no room to put it back without taking the whole starter back out so will be doing this tomorrow. 
aka romeo da kid
Joined: Nov 2009
Posts: 251
Likes: 2
From: i live north of knoxville, TN and south of Bristol, TN
my starter is beginning to go. sux. the diy is great but it also seems to be out of my comfort zone. the local shop said they'd charge me $75 to install one. I think thats not bad if this takes 6-9hrs.
Thread Starter
Three Wheelin'
Joined: Nov 2007
Posts: 1,452
Likes: 90
From: New Orleans, LA
$75 is a good deal, my local shop wanted $400 parts and labor.


1st Gear
Joined: Jul 2024
Posts: 1
Likes: 0
From: FL
about 10 years later and this saved my life 😮💨
DIY 2.5TL Starter Replacement
I would like to thank all the members who have help provide me with the info in order to perform this task. This DIY is in collaboration/in reference to PSC�s written instructions. Do at your own risk!
Tools used:
-rags
-3/8� drive ratchet
-cheater pipe
-10mm socket
-14mm socket
-17mm socket
-10mm open end wrench
-12mm open end wrench
-14mm open end wrench
Note: You will be accessing the starter from the driver�s side in the area of the brake cylinder. It is located in a concealed area under the intake manifold, and is held on by two bolts 14mm and 17mm.
1. Disconnect the battery (negative first, then positive) using 10mm and 12mm open end wrench, and wrap the terminals in a rag to prevent contact to battery posts.
2. Remove wires, hoses, brackets that are bolted to the body/intake manifold on the driver's side and move them out of the way. This gives some room.
Attachment 88551
Attachment 88552
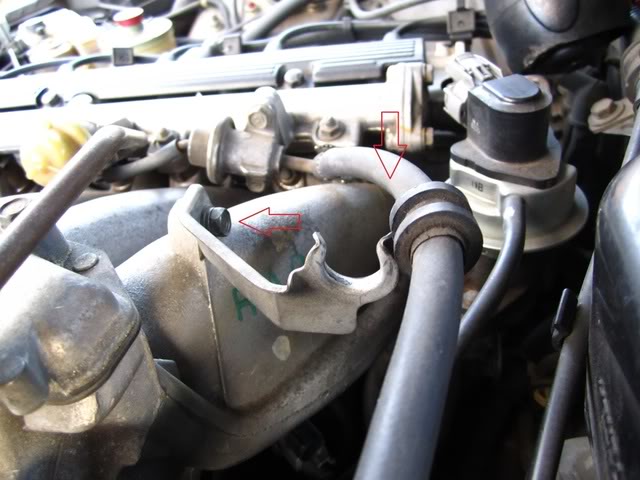
Also remove this:
Attachment 88553
What you did earlier will give you some room that will come in handy later on while installing the replacement starter.
Attachment 88554
3. Remove bracket from under the intake manifold, (2) 12mm bolts. I actually tried to remove this bracket, but was unsuccessful so I left it on throughout the whole process. It made the space a little tighter to work with.
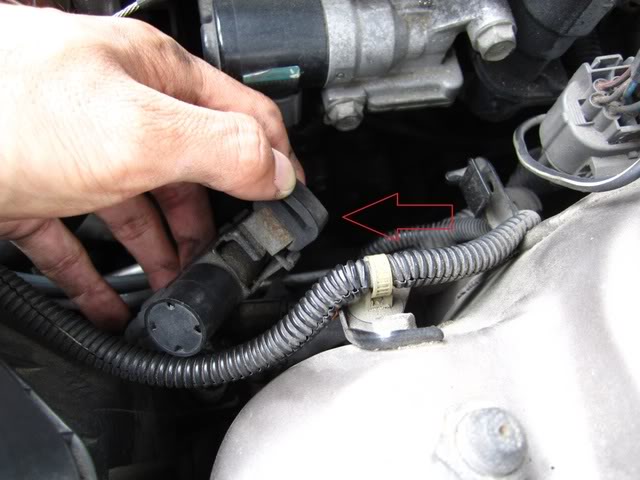
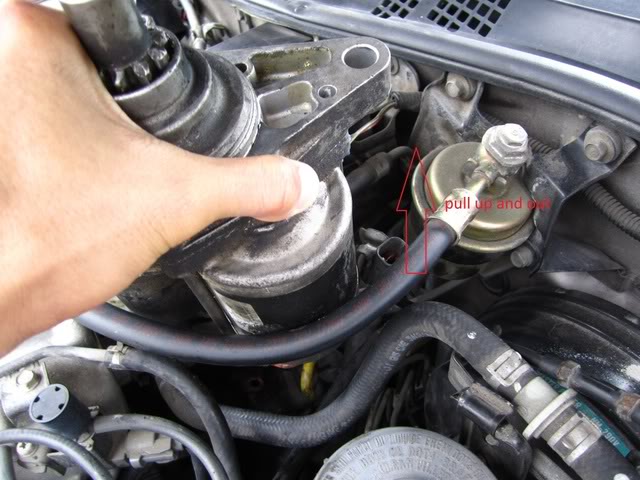
4. Unplug the wire connector from the starter. I couldn�t get a picture of this because it was under the intake manifold, but here�s a picture of another wire connector that I had to unplug which gave me room to remove the hidden 14mm bolt in the next step.
Attachment 88555
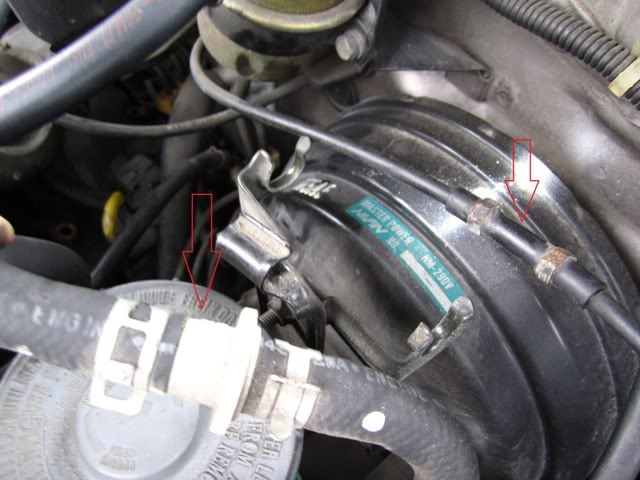
5. This is the toughest part. You have to remove the 14mm bolt from the starter. It is accessible above through the intake manifold, or in from the side behind the intake manifold in between various hoses. You can remove some hoses to give you extra room, just have something to catch coolant in and try not to spill coolant in the area, but I didn�t have to remove any coolant hoses. Just push all other hoses/wires away and don�t be afraid to apply a little force. I tried to go through the intake manifold between the 4th and 5th cylinder on top with a ratchet and 2� extension, but couldn�t break it loose due to limited area. Instead, I accessed it from behind the intake manifold with a socket and ratchet as follows:
Attachment 88556
After you break it loose, the ratchet will be of no help as it will just move the bolt back and forth. You will have to use a 14mm open end wrench to work the rest of the bolt out. This process took nearly 20 minutes! When you feel that the bolt is about to come out, try to squeeze a couple of fingers through the area that you�ve created for the socket to go in and pull the bolt out.
6. Remove the bigger, but easier to reach 17mm bolt.
Attachment 88557
I used a cheater pipe to break it loose like this:
Attachment 88558
Then I pulled on the cheater pipe standing on the passenger side, pulling towards myself.
Attachment 88559
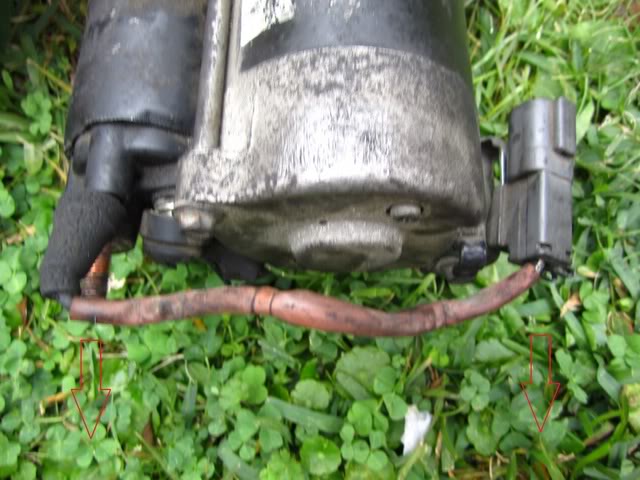
7. With the starter loose, pull it out towards the front of the car and then once clear of the hole turn it towards yourself, but leave it down there. I disconnected the wire while it was still in the engine compartment because the wire was not long enough to pull all the way up. There�s a 14mm nut that�s holding on the wire to the starter. IMPORTANT, remember the direction that the wire was held onto the starter as this will be the only way to get enough room for the starter to go back in later. I had to remove the wire and resituated it a couple of times in order for it to go in correctly because I didn�t realize what PSC was talking about earlier. (PSC�s note: Unbolt the starter cable from it and it's free. I had trouble once when I put the starter cable on 180 degrees wrong and it would not fit so try to remember which way the cable is connected before you unbolt it.)
Here�s a pic of that wire disconnected:
Attachment 88560
8. Next, get it through the space you�ve made. This will be tricky as there will be just enough room to barely get things moving around under there. Here it is coming out:
Attachment 88561
9. Once the starter is out, remove this wiring harness from the old starter and install on the replacement starter.
Attachment 88562
Attachment 88563
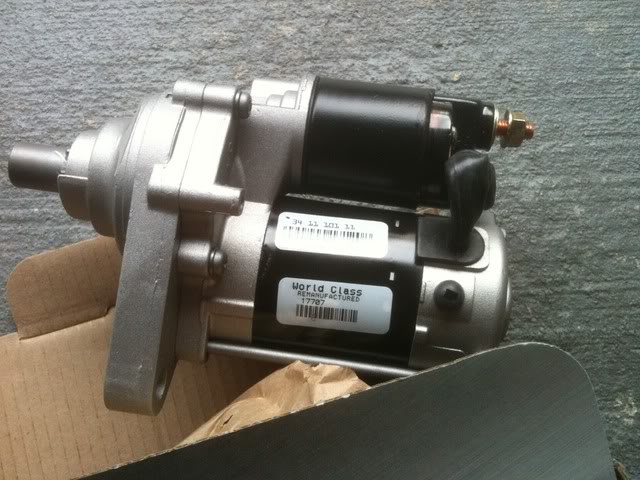
Old starter:
Attachment 88564
Another shot:
Attachment 88565
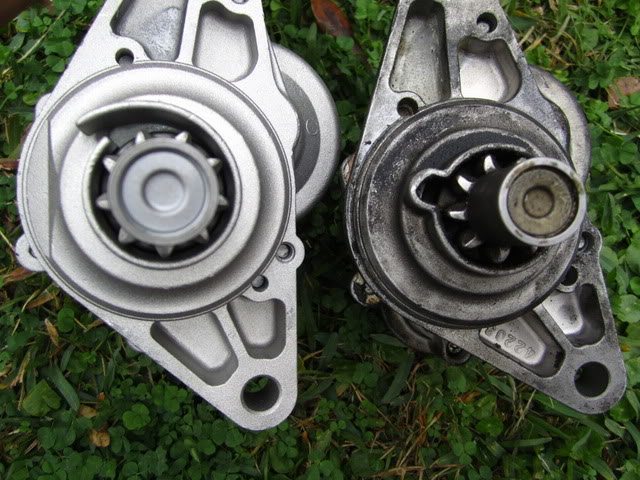
Comparison of new and old starter. They have a slight different design as you can see here:
Attachment 88566
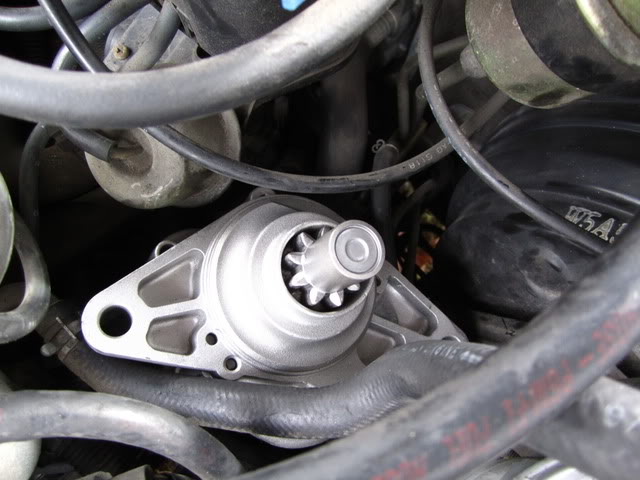
10. Put the new starter back in and reverse the steps above.
Attachment 88567
11. Reconnect all brackets, plugs, and wires that you took out during the removal process. Double check just to make sure you didn�t leave anything where they are not supposed to be and that everything is reconnected!
12. Reconnect the battery, clean your hands then start the car and hope that it turns over.
It took me about 6 hours altogether trying to figure out how to approach the starter without removing too many things. The longest part I�d say would be removing and installing the 14mm bolt. Enjoy!
Mods: If you want to sticky this to the DIY database it would make it easier for future members to locate how to replace the starter on their 2.5TLs.
I would like to thank all the members who have help provide me with the info in order to perform this task. This DIY is in collaboration/in reference to PSC�s written instructions. Do at your own risk!
Tools used:
-rags
-3/8� drive ratchet
-cheater pipe
-10mm socket
-14mm socket
-17mm socket
-10mm open end wrench
-12mm open end wrench
-14mm open end wrench
Note: You will be accessing the starter from the driver�s side in the area of the brake cylinder. It is located in a concealed area under the intake manifold, and is held on by two bolts 14mm and 17mm.
1. Disconnect the battery (negative first, then positive) using 10mm and 12mm open end wrench, and wrap the terminals in a rag to prevent contact to battery posts.
2. Remove wires, hoses, brackets that are bolted to the body/intake manifold on the driver's side and move them out of the way. This gives some room.
Attachment 88551
Attachment 88552
Also remove this:
Attachment 88553
What you did earlier will give you some room that will come in handy later on while installing the replacement starter.
Attachment 88554
3. Remove bracket from under the intake manifold, (2) 12mm bolts. I actually tried to remove this bracket, but was unsuccessful so I left it on throughout the whole process. It made the space a little tighter to work with.
4. Unplug the wire connector from the starter. I couldn�t get a picture of this because it was under the intake manifold, but here�s a picture of another wire connector that I had to unplug which gave me room to remove the hidden 14mm bolt in the next step.
Attachment 88555
5. This is the toughest part. You have to remove the 14mm bolt from the starter. It is accessible above through the intake manifold, or in from the side behind the intake manifold in between various hoses. You can remove some hoses to give you extra room, just have something to catch coolant in and try not to spill coolant in the area, but I didn�t have to remove any coolant hoses. Just push all other hoses/wires away and don�t be afraid to apply a little force. I tried to go through the intake manifold between the 4th and 5th cylinder on top with a ratchet and 2� extension, but couldn�t break it loose due to limited area. Instead, I accessed it from behind the intake manifold with a socket and ratchet as follows:
Attachment 88556
After you break it loose, the ratchet will be of no help as it will just move the bolt back and forth. You will have to use a 14mm open end wrench to work the rest of the bolt out. This process took nearly 20 minutes! When you feel that the bolt is about to come out, try to squeeze a couple of fingers through the area that you�ve created for the socket to go in and pull the bolt out.
6. Remove the bigger, but easier to reach 17mm bolt.
Attachment 88557
I used a cheater pipe to break it loose like this:
Attachment 88558
Then I pulled on the cheater pipe standing on the passenger side, pulling towards myself.
Attachment 88559
7. With the starter loose, pull it out towards the front of the car and then once clear of the hole turn it towards yourself, but leave it down there. I disconnected the wire while it was still in the engine compartment because the wire was not long enough to pull all the way up. There�s a 14mm nut that�s holding on the wire to the starter. IMPORTANT, remember the direction that the wire was held onto the starter as this will be the only way to get enough room for the starter to go back in later. I had to remove the wire and resituated it a couple of times in order for it to go in correctly because I didn�t realize what PSC was talking about earlier. (PSC�s note: Unbolt the starter cable from it and it's free. I had trouble once when I put the starter cable on 180 degrees wrong and it would not fit so try to remember which way the cable is connected before you unbolt it.)
Here�s a pic of that wire disconnected:
Attachment 88560
8. Next, get it through the space you�ve made. This will be tricky as there will be just enough room to barely get things moving around under there. Here it is coming out:
Attachment 88561
9. Once the starter is out, remove this wiring harness from the old starter and install on the replacement starter.
Attachment 88562
Attachment 88563
Old starter:
Attachment 88564
Another shot:
Attachment 88565
Comparison of new and old starter. They have a slight different design as you can see here:
Attachment 88566
10. Put the new starter back in and reverse the steps above.
Attachment 88567
11. Reconnect all brackets, plugs, and wires that you took out during the removal process. Double check just to make sure you didn�t leave anything where they are not supposed to be and that everything is reconnected!
12. Reconnect the battery, clean your hands then start the car and hope that it turns over.
It took me about 6 hours altogether trying to figure out how to approach the starter without removing too many things. The longest part I�d say would be removing and installing the 14mm bolt. Enjoy!
Mods: If you want to sticky this to the DIY database it would make it easier for future members to locate how to replace the starter on their 2.5TLs.

Thread
Thread Starter
Forum
Replies
Last Post
siularbar
1/2G MDX (2001-2013)
2
Sep 11, 2015 10:40 AM