
Stock intake mods


Thread Starter
Cruisin'
Joined: Jul 2013
Posts: 19
Likes: 2
From: Beaverton Oregon
Stock intake mods
Just wanted to post up a few mods I did to the factory intake over the weekend. The factory intake piping to the airbox is extremely convoluted with twists and turns as well as extra chambers and baffling. All this extra piping and chambers appears to curtail smooth airflow to the stock box. Although it does almost eliminate turbo sound I love the sound of turbo spool so it was a no brainer for me.
1. I removed the perpendicular plastic bars in the lower airbox housing. These appear to have no function other than slowing down/restricting airflow.
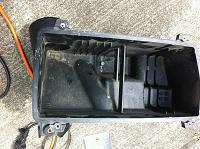
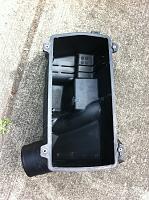
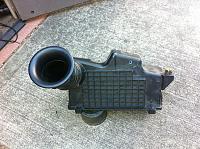
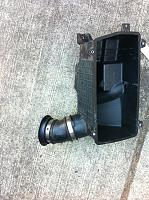
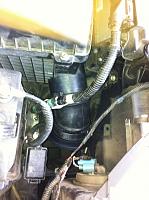
2. After removing all the piping and chambers that feed the stock airbox I utilized a 3" rubber elbow and a 3" port. In this configuration it draws air from the wheel well area.
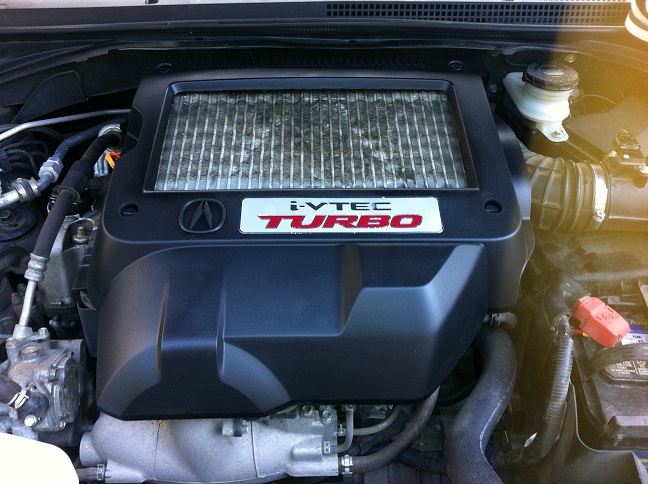
3. As an afterthought I decided to clean up the intercooler shroud. I removed the plastic mesh and added weather stripping to the underside of the shroud for a better seal. Coated it with some plasti-dip...

1. I removed the perpendicular plastic bars in the lower airbox housing. These appear to have no function other than slowing down/restricting airflow.


2. After removing all the piping and chambers that feed the stock airbox I utilized a 3" rubber elbow and a 3" port. In this configuration it draws air from the wheel well area.


3. As an afterthought I decided to clean up the intercooler shroud. I removed the plastic mesh and added weather stripping to the underside of the shroud for a better seal. Coated it with some plasti-dip...
Last edited by bcrow; Aug 14, 2013 at 06:28 PM.
Thread Starter
Cruisin'
Joined: Jul 2013
Posts: 19
Likes: 2
From: Beaverton Oregon
Yeah- there is already a plastic grill on the outlet of the underhood air scoop so I felt it was redundant and only served to reduced surface cooling area of the intercooler. Hack saw and some sand paper was all it took......the plasti-dip is nice because it is pretty forgiving when it come to prep.
Thread Starter
Cruisin'
Joined: Jul 2013
Posts: 19
Likes: 2
From: Beaverton Oregon
BTW- I see you own a 190E. I used to have an 85 with factory AMG body kit, lowered etc. I kinda miss that car!
Last edited by bcrow; Aug 16, 2013 at 01:31 PM.

Pro


Joined: Dec 2007
Posts: 567
Likes: 3
Mine was my dad's that he bought new in '86. I currently have 137k mi on it. It took me a while to find a complete Gen 1 AMG body kit. I'm running it with 17 x 8 Aero I (Hammers). The wheels need to be restored and still haven't put the kit on yet. I love my 190e but it is just a bit slow......
Last edited by SinCity; Aug 16, 2013 at 06:25 PM.
Trending Topics
Thread Starter
Cruisin'
Joined: Jul 2013
Posts: 19
Likes: 2
From: Beaverton Oregon
I assume you are talking about cutting out the plastic bars located in the bottom section of the airbox housing? I used a hacksaw blade and cleaned it up with a dremel sanding bit but that is not imperative so a box cutter may work if you want to whittle away at it. For reference I used a left over 3" inside port from a home theater subwoofer project for the inlet port- they can be had for cheap at partsexpress.com or you could use any 3" velocity stack etc.
Thread Starter
Cruisin'
Joined: Jul 2013
Posts: 19
Likes: 2
From: Beaverton Oregon
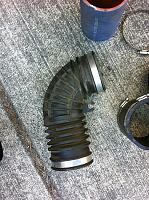
It feels like the turbo spools a bit quicker and comes on harder but as with any intake i'm sure my perception is easily skewed by the fact I can now hear the turbo. I have been keeping an eye on air intake temps measured at the maf and they look good. I also have the peace of mind that I have removed most of the restrictions on the intake side. Next up I need to replace the 90 degree corrugated elbow- definitely not the smoothest design....


Thread Starter
Cruisin'
Joined: Jul 2013
Posts: 19
Likes: 2
From: Beaverton Oregon
Pro
Joined: Dec 2007
Posts: 567
Likes: 3
Next up I need to replace the 90 degree corrugated elbow- definitely not the smoothest design....
Attachment 15434
Attachment 15434
Instructor
Joined: Mar 2012
Posts: 190
Likes: 9
I did this today with a box cutter and sandpaper. I didn't bother making an elbow or anything cause well I didn't have anything lol. This is just a tide me over till I can get a K&N intake kit. I notice not really any difference until you hit hard boost and even then the girlfriend cant tell so its worthwhile in my books and the throttle response has improved as well as spool up. I am sure an actual intake will be louder.
Thread Starter
Cruisin'
Joined: Jul 2013
Posts: 19
Likes: 2
From: Beaverton Oregon
I did this today with a box cutter and sandpaper. I didn't bother making an elbow or anything cause well I didn't have anything lol. This is just a tide me over till I can get a K&N intake kit. I notice not really any difference until you hit hard boost and even then the girlfriend cant tell so its worthwhile in my books and the throttle response has improved as well as spool up. I am sure an actual intake will be louder.
Racer
Joined: Jul 2012
Posts: 372
Likes: 36
From: Houston, TX
I just did the airbox mod and its the easiest thing ever, took 5 min. I just took a box cutter and cut down the middle through both "bars" and broke off each side with my hand very easily. It was a pretty clean break and I didn't see a need to do any sanding.
Now that I actually looked at it I do see how it can prevent airflow to the motor which makes me wonder why they would design a blockage. Maybe they wanted it to be as quiet as possible.
Now that I actually looked at it I do see how it can prevent airflow to the motor which makes me wonder why they would design a blockage. Maybe they wanted it to be as quiet as possible.

Racer
Joined: Aug 2013
Posts: 269
Likes: 11
From: PA
I took all the piping off after the airbox, removed the factory filter and popped a 3.5" filter I had from my car onto the airbox end. I only did this til I make an intake for it, which is soon. Can hear the spool a lot better.

3rd Gear
Joined: Aug 2012
Posts: 3
Likes: 0
From: Little Rock, AR
I assume you are talking about cutting out the plastic bars located in the bottom section of the airbox housing? I used a hacksaw blade and cleaned it up with a dremel sanding bit but that is not imperative so a box cutter may work if you want to whittle away at it. For reference I used a left over 3" inside port from a home theater subwoofer project for the inlet port- they can be had for cheap at partsexpress.com or you could use any 3" velocity stack etc.
I haven't been on here since July and had a similar vision as yours. Yesterday I removed the unneeded parts and went to home depot. With turbo noticeably louder in a good way. I measured 3 3/8" (Kenw 3" would fit was concerned 4" wouldnt seal good) on the pipe out the bottom of the airbox and was deciding on trying to put a short tube into the opening of the wheel well or do like you did. Well this morning something told me to search this topic again. Thanks for the post I'm going to be using the 3" port ("velocity stack") idea thats great thinking!

Advanced
Joined: Oct 2013
Posts: 74
Likes: 3
From: Aurora, CO
Nice work on the intake guys...
I decided to take me a bit further and make my own cold air intake. I bought 3in flexible aluminum ducting from Home Depot, purchased a MAF adapter from Auto Zone (had to modify it for the MAF to fit and seal properly), mounted the air filter under the headlight, cut out the plastic piece attached to the front of the radiator so air could flow in from the bumper (but not water if it rained), wrapped the duct with 2" exhaust wrap and painted it with the exhaust wrap coating (made it hard and sealed the exhaust wrap). I need to find black hose clamps now to clean it up.
U can definitely hear the air coming into the intake now and also when the blow off valve opens to release the pressure back into the system... Sounds great and if the stereo is on it is barely noticeable... here are a few pics.
As far as the air flow increase and lower temp... the cpu will adjust for those.
Last edited by MrBlue; Nov 23, 2013 at 07:03 PM.
Advanced
Joined: Oct 2013
Posts: 74
Likes: 3
From: Aurora, CO
This setup will allow more Air Flow into the intake, the ECU calibrates how much fuel to provide each injector based on the readings from the MAF; it reads the flow rate of the incoming air and tells the ECU how much fuel to provide to each cylinder based on predetermined values programmed into the ECU. The IAT will also adjust fuel based on air temp as well; the more dense and cold the air is the more fuel can be added to increase the combustion process if desired... Hence why we all want a Cold Air Intake ;-)
If this system uses the MAF in conjunction with the O2 sensor during "Open Loop" then it will affect the A/F ratio however the ECU should adjust accordingly from the O2 readings.
The aluminum is semi ridged and since i wrapped it with the exhaust cloth and spray coated it the setup is rigid and doesn't flex at all; very solid however can be removed easily to clean the filter.

Intermediate
Joined: Jan 2013
Posts: 37
Likes: 4
From: Victoria BC
I've got the Hondata reflash and removed the baffles and incoming duct into the air box with a K&N filter in the stock box (can really hear the spool and bov but not really that loud). Goes 0-60 in about 7.5s in S mode and 9.5s in drive without using the brakes for a launch. Pulls about 0.7g off the line. Did some aggressive driving on a hilly, windy road, and pulled about 0.8g in the corners, pretty sweet. I used an accelerometer on my tablet that outputs a txt file that is easily graphed in excel. Fun stuff!
Advanced
Joined: Oct 2013
Posts: 74
Likes: 3
From: Aurora, CO
Do you know what UR HP is now with the reflash? Did U dyno after? I was just curios if you had any additional info like IAT after you removed the baffles and installed the K & N filter. Interesting about the accelerometer ;i would like that when i start Ice Racing at Georgetown lake this winter... is it just an app? or is additional hardware required?
7.5 is not bad for a CUV... The roads have been snow packed the last few days here so i have been practicing Boosted Launches and feeling how the SH-AWD is responding (VSA off of course); its awesome to feel the SH system work and the traction and control it gives you. I have been impressed with the stock performance of this setup and looking forward to upgrading and increasing the HP...
7.5 is not bad for a CUV... The roads have been snow packed the last few days here so i have been practicing Boosted Launches and feeling how the SH-AWD is responding (VSA off of course); its awesome to feel the SH system work and the traction and control it gives you. I have been impressed with the stock performance of this setup and looking forward to upgrading and increasing the HP...
Intermediate
Joined: Jan 2013
Posts: 37
Likes: 4
From: Victoria BC
hey mr. blue, sorry no dyno tune after the mods, not in the budget! the accelerometer is a free app on my samsung tablet, kuel i think. hondata has a good chart of the before and after dyno. have fun on the ice, cheers, kp
Advanced
Joined: Oct 2013
Posts: 74
Likes: 3
From: Aurora, CO
It was actually a very simple inexpensive mod and it is a 3" Aluminum Flex Pipe as the core. I still enjoy hearing the air rushing in and BOV releasing pressure as i drive.
Last edited by MrBlue; Dec 15, 2013 at 11:49 PM.
Advanced
Joined: Oct 2013
Posts: 74
Likes: 3
From: Aurora, CO
I dont think so due to its design and the materials i used in its construction... The core is aluminum ducting and its wrapped tight with several layers of duct tape to keep the core shape bent properly and also provide first layer of insulation and rigidity to the duct. I applied only one layer of exhaust wrapping however its two layers by the way I over lapped the material. I then used an entire can of the exhaust wrap spray adhesive so it has a layer of the sealant as well. It most likely does get some heat inside however it is thicker than any of the preformed ducts u buy in a cold air intake kit and mine actually gets the majority of its air from outside the engine bay where its cooler.

8th Gear
Joined: Feb 2014
Posts: 8
Likes: 0
I dont think so due to its design and the materials i used in its construction... The core is aluminum ducting and its wrapped tight with several layers of duct tape to keep the core shape bent properly and also provide first layer of insulation and rigidity to the duct. I applied only one layer of exhaust wrapping however its two layers by the way I over lapped the material. I then used an entire can of the exhaust wrap spray adhesive so it has a layer of the sealant as well. It most likely does get some heat inside however it is thicker than any of the preformed ducts u buy in a cold air intake kit and mine actually gets the majority of its air from outside the engine bay where its cooler.


2nd Gear
Joined: Nov 2023
Posts: 2
Likes: 0
2nd Gear
Joined: Nov 2023
Posts: 2
Likes: 0
Just wanted to post up a few mods I did to the factory intake over the weekend. The factory intake piping to the airbox is extremely convoluted with twists and turns as well as extra chambers and baffling. All this extra piping and chambers appears to curtail smooth airflow to the stock box. Although it does almost eliminate turbo sound I love the sound of turbo spool so it was a no brainer for me.
1. I removed the perpendicular plastic bars in the lower airbox housing. These appear to have no function other than slowing down/restricting airflow.
Attachment 15358
Attachment 15359
2. After removing all the piping and chambers that feed the stock airbox I utilized a 3" rubber elbow and a 3" port. In this configuration it draws air from the wheel well area.
Attachment 15360
Attachment 15361
Attachment 15362
3. As an afterthought I decided to clean up the intercooler shroud. I removed the plastic mesh and added weather stripping to the underside of the shroud for a better seal. Coated it with some plasti-dip...
Attachment 15363


Thread
Thread Starter
Forum
Replies
Last Post
BOOSTED6IX-S
Member Cars for Sale
2
Feb 22, 2016 01:53 PM
sockr1
Car Parts for Sale
22
Oct 1, 2015 01:31 AM
Abe_Froman
Car Parts for Sale
1
Sep 16, 2015 01:27 PM
oyayjoe
Member Cars for Sale
1
Sep 12, 2015 04:40 PM