
Built a 3" downpipe (cat deletes)

Thread Starter
Advanced
Joined: Dec 2006
Posts: 57
Likes: 3
From: Mile high city, CO
Built a 3" downpipe (cat deletes)
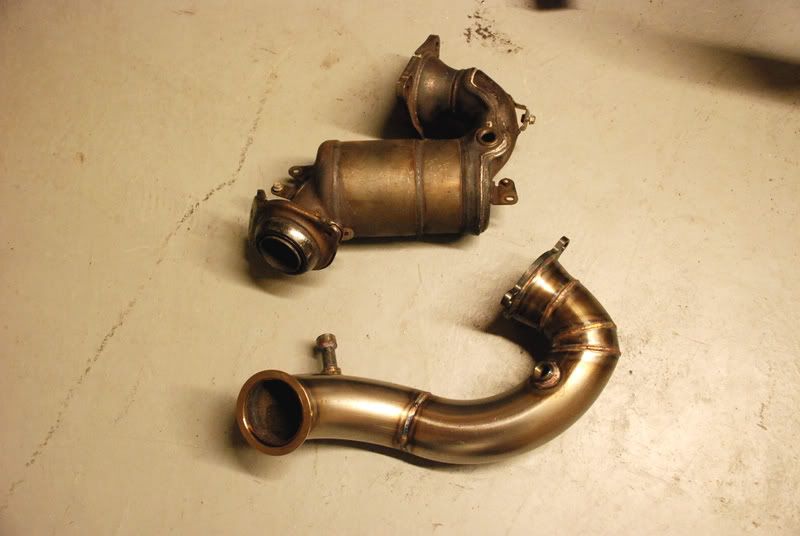
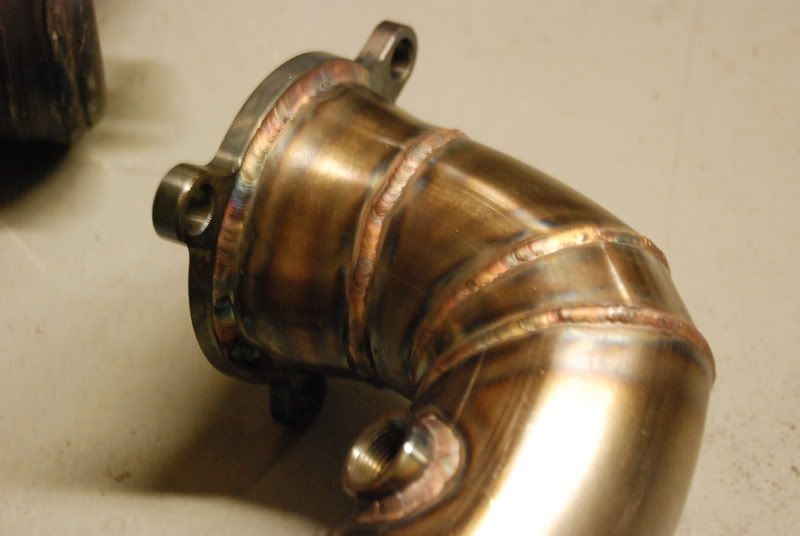
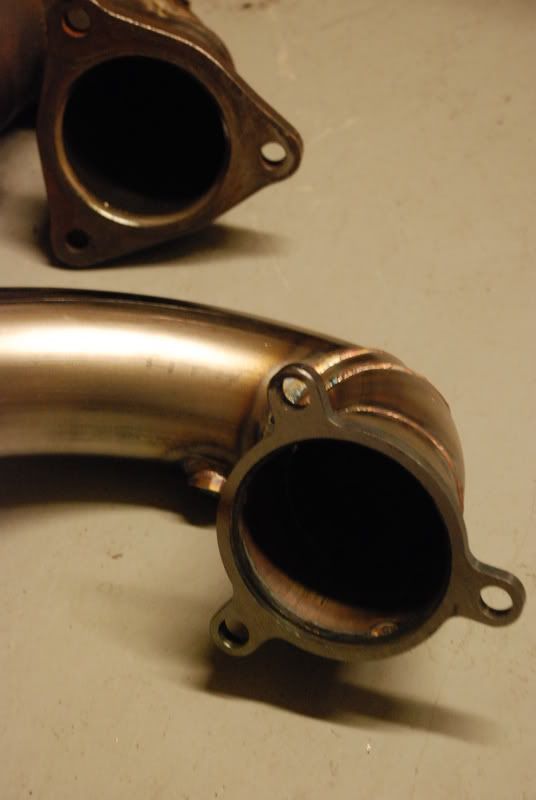
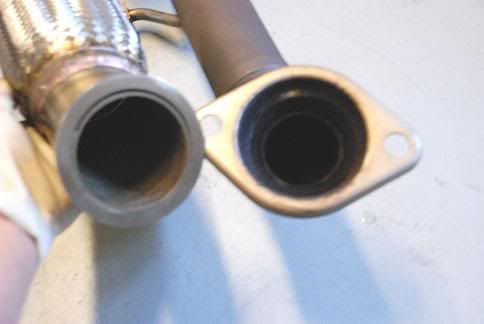
Built a replacement 3" downpipe and B-pipe for the family go getter (Acura RDX). The OEM pieces are a huge restriction. Going off the turbine discharge at 3.5" then bottle necks to 2" through the cats then to a 2.25 catback. Right now I have the 3" reduced to mate with the 2.25 OEM catback until I decide further on what to replace it with (has to stay quiet). Still a huge difference can be felt. Floor it from a dead stop and the front tires squeal till the rear wheels kick. Cruising at steady speeds are effortless. Also installed a gauge to monitor boost spike/creep, boost stays rock solid. No pesky check engine lights as well. Next is Hondata and to the dyno. Enjoy 
Here it is installed before the OEM heatshield was put back in place.

Here it is installed before the OEM heatshield was put back in place.

Advanced
Joined: May 2008
Posts: 93
Likes: 4
Originally Posted by PANG_CO
Built a replacement 3" downpipe and B-pipe for the family go getter (Acura RDX). The OEM pieces are a huge restriction. Going off the turbine discharge at 3.5" then bottle necks to 2" through the cats then to a 2.25 catback. Right now I have the 3" reduced to mate with the 2.25 OEM catback until I decide further on what to replace it with (has to stay quiet). Still a huge difference can be felt. Floor it from a dead stop and the front tires squeal till the rear wheels kick. Cruising at steady speeds are effortless. Also installed a gauge to monitor boost spike/creep, boost stays rock solid. No pesky check engine lights as well. Next is Hondata and to the dyno. Enjoy
Here it is installed before the OEM heatshield was put back in place.
Here it is installed before the OEM heatshield was put back in place.
Thread Starter
Advanced
Joined: Dec 2006
Posts: 57
Likes: 3
From: Mile high city, CO
Thanks guys. I do fabwork daily so its nothing new to me. I work for pfabrications_dot_com. There are no plans to produce or sell these at the moment (mods I can edit my post if theres a issue please PM me).
Total time with removing old parts, fabbing new pieces and installing was near 8-9 hours. I would say 3 hours tops for install time if the pieces were already premade.
Tips for anyone looking to attempt this. The OEM Cat right off the turbo is a pain to remove, there is absolutely no space to squeeze it out. You either have to drop the transfercase to remove from the bottom or pull intercooler and surrounding brackets to remove from the above. I went with removing the intercooler mainly because I didn't have fluid around to refill the transfercase nor did I want to lol. It is very important to heatwrap or ceramic coat the downpipe because it emits alot of heat.
Cashmere your correct. The connection from the downpipe to the b-pipe is v-band. I'll post a couple more pics with the OEM heatshield back in place and underneath shortly to give a better idea.
Trending Topics


Thread Starter
Advanced
Joined: Dec 2006
Posts: 57
Likes: 3
From: Mile high city, CO
Sorry guys, as much as I would like to produce them my workload/schedule is very tight to take this on. Plus I would need to gauge enough interest..at least 10 orders to start because a jig will need to be built and test fitted over and over to ensure fitment. Afterwards it will need to be sent to my coater for a heat barrier coating.
DanRDX - Tools that were used are: Socket & box end wrenches, phillips & flat drivers, needle nose plyers, pick, and a air rachet. Your pretty basic hand tools. All were done with the car on jackstands.
DanRDX - Tools that were used are: Socket & box end wrenches, phillips & flat drivers, needle nose plyers, pick, and a air rachet. Your pretty basic hand tools. All were done with the car on jackstands.
Thread Starter
Advanced
Joined: Dec 2006
Posts: 57
Likes: 3
From: Mile high city, CO
Looks like it was a bit of both. Removing the OEM pieces take the longest. Install goes much quicker as its not bulky. Definitely worth the upgrade and probally the best noticable power mod next to Hondata.
Advanced
Joined: May 2008
Posts: 93
Likes: 4
Originally Posted by PANG_CO
Sorry guys, as much as I would like to produce them my workload/schedule is very tight to take this on. Plus I would need to gauge enough interest..at least 10 orders to start because a jig will need to be built and test fitted over and over to ensure fitment. Afterwards it will need to be sent to my coater for a heat barrier coating.
DanRDX - Tools that were used are: Socket & box end wrenches, phillips & flat drivers, needle nose plyers, pick, and a air rachet. Your pretty basic hand tools. All were done with the car on jackstands.
DanRDX - Tools that were used are: Socket & box end wrenches, phillips & flat drivers, needle nose plyers, pick, and a air rachet. Your pretty basic hand tools. All were done with the car on jackstands.
Great work! How intense was the removal part of the OE cat? We actually are planning to create a DP with out exhaust system, but weren't certain how many RDX-owners would be eager to dive into all this labor.
Maybe you could enlighten us about the removal process?
Maybe you could enlighten us about the removal process?
Thread Starter
Advanced
Joined: Dec 2006
Posts: 57
Likes: 3
From: Mile high city, CO
The IC and surround brackets/ shields need to be removed to uninstall from above. From the bottom you will need to drop the transfer case to remove the primary. Thats about all. Reinstall process is same except it goes alot faster.


big shot.
Joined: Sep 2007
Posts: 2,706
Likes: 10
i think, knowing now about the DP setup, this engine has alot of intentional hold backs for further MMC's or redesign headroom (its dyno's already prove it to be underrated). these "bottle necks" are simply resolveable issues if done at the factory with minor tweaking (increase a pipe .25 of an inch etc), and thus seeming the DP is how it is from the factory, a slight tweak in size/connection yields very easy power and an incr in specs whala tons of headroom for further models ('10, '11 etc) i wonder why its so restrained (my guess is to keep its power rating underneath the MDX/TL to keep it mid pack in the line up, which i dont agree with)
Pro
Joined: May 2007
Posts: 748
Likes: 3
From: Edmonton, Alberta
I would guess the easiest way to limit power would simply be to limit boost, some thing which can be programmed in the ECU. It would save manufacturing a new exhaust to gain a few ponies.
So many cars have horrible exhaust systems from the factory to try and get the cat as close to the engine as possible for emissions. I just wish this was an easy one to change.
So many cars have horrible exhaust systems from the factory to try and get the cat as close to the engine as possible for emissions. I just wish this was an easy one to change.

Burning Brakes
Joined: Apr 2007
Posts: 1,181
Likes: 3
From: DFW
How are you dealing with the engine management? I assume that deleting the cat results in a CEL eventually--maybe not at first. It took about 100 miles sometimes in a WRX. Are you monitoring boost with a real boost gauge to make sure there is no creep, etc.? Are you monitoring EGT or A/F somehow to make sure you are not running too lean? Does anyone know what kind of duty cycle the injectors are running (how much fueling overhead is there)?
Just raising a point--in general you can't just slap on a down pipe and call it a day. For one thing, you may damage the engine. For another, you are probably missing 50% of the potential power gains by not making adjustments to the boost map, fuel trims, etc.
There is lots of stuff we don't really know about this motor. I'm sure Hondata knows the answer to most of these questions.
I just wanted everyone to know that the DP is not the end of the story--that your trip to Hondata is the important part.
Pro
Joined: May 2007
Posts: 748
Likes: 3
From: Edmonton, Alberta
Almost any turbo car can do a turboback exhaust without any real need for tuning or fuel adjustments. It's been done for a long time on almost every car, though the WRX is one of the few that boost creep when cold was an issue, but that was typically with a full 3" catless turboback and caused by the tiny wastegate.
With 10:1 AFR on the stock engine, I wouldn't be too worried about fuel, except to trim it back.
The CEL is something I'm curious about though.
With 10:1 AFR on the stock engine, I wouldn't be too worried about fuel, except to trim it back.
The CEL is something I'm curious about though.

Pro


Joined: Dec 2007
Posts: 567
Likes: 3
He may not even get a CEL since he retained the O2. I ran a DP for over a month before I got the Stage II reflash on my '07 GTI. What it did on my GTI was change the power curve and added a little more on the top. You really need a reflash to take advantage of the extra boost provided with a DP. But phuk, getting it off is such a PITA.
Thread Starter
Advanced
Joined: Dec 2006
Posts: 57
Likes: 3
From: Mile high city, CO
So far about 200 miles, everything still going good. I have installed a real boost gauge to monitor spike/boost and haven't seen anything unusal(first post). Weather here has been 40-95F lately. I did the mechincal fix to take care of the secondary o2 and no check engine light. Hoping to get it on the dyno here before my 2500+ mile trip with the vehicle next month so it will see some good testing.


... the CaSH ...
Joined: Feb 2008
Posts: 63
Likes: 0
From: So Cal
Originally Posted by PANG_CO
Nothing ruled out yet but dyno is scheduled for tommorrow afternoon. Will report back with result shortly after, thanks.
excited about the results !!! hopefully, it unleashed MASSIVE potential!
Thread Starter
Advanced
Joined: Dec 2006
Posts: 57
Likes: 3
From: Mile high city, CO
Originally Posted by CaSHMeRe
meachanical o2 fix ... did you use spark plug non-foulers ?!?!?
excited about the results !!! hopefully, it unleashed MASSIVE potential!
excited about the results !!! hopefully, it unleashed MASSIVE potential!
Spark plug foulers were use in addition to the extended o2 bung. The foulers by themselves aren't enough with how upstream the 2nd o2 is on the downpipe.
Dyno got rescheduled on me for next friday. Right as I left the door, got a call from the dyno facility informing me there is a huge accident and that most likely won't make it down there on time before they left to the track. Its about a 1.5 hour drive each way..sorry fellas.
Thread Starter
Advanced
Joined: Dec 2006
Posts: 57
Likes: 3
From: Mile high city, CO
Basically positions the secondary o2 sensor out of the exhaust stream and shields it enough to fool the ecu in thinking the cat is there and functioning so it won't trip the check engine light.

Intermediate
Joined: May 2008
Posts: 29
Likes: 0
From: Melbourne, FL
Originally Posted by PANG_CO
Basically positions the secondary o2 sensor out of the exhaust stream and shields it enough to fool the ecu in thinking the cat is there and functioning so it won't trip the check engine light.
Cat stands for Catalyser?
After this mod, would the RDX still pass the emission control in California?
In Florida (where I live now) there is no such control but for exemple in France (where i am from) any car older than 3 year has to go trough a "Technical Control" every year. They check you break balance, your lights, your emissions, your shocks and your catalyser (for models who come with one). Those who mod their cars and get rid of the catalyser have to bribe or "be friend with" the guy or company who runs the control to get his car approved...
So yeah, in Florida no problem with cat delete, but I am not sure how it works in other states...
2008 Acura RDX
Joined: May 2008
Posts: 1,227
Likes: 58
From: Jamaica W.I.
Originally Posted by PANG_CO
Basically positions the secondary o2 sensor out of the exhaust stream and shields it enough to fool the ecu in thinking the cat is there and functioning so it won't trip the check engine light.

The front wheels peel until the sh-awd kicks in wow, I need one of these things... The only deterent would be mechanical issues if any and the installation (sounds dangerous) but if your making some kind of list for people interested you can put down VeNeNO for one!
Thread Starter
Advanced
Joined: Dec 2006
Posts: 57
Likes: 3
From: Mile high city, CO
Update
Hp gain with downpipe & midpipe 36.5whp
Tq gain with downpipe & midpipe 23.1wtq
Hp gain with K&N conical filter mod, downpipe, midpipe 39.9whp
Hp gain with K&N conical filter mod, downpipe, midpipe 25wtq
Pics and vid to come
Hp gain with downpipe & midpipe 36.5whp
Tq gain with downpipe & midpipe 23.1wtq
Hp gain with K&N conical filter mod, downpipe, midpipe 39.9whp
Hp gain with K&N conical filter mod, downpipe, midpipe 25wtq
Pics and vid to come
Intermediate
Joined: Jun 2008
Posts: 48
Likes: 0
From: Apex, NC
So your K&N Filter Mod only made about 3 hp and 2 tq. I didn't expect that. That has me questioning getting the cp-e air intake. Does anyone know what the "real" numbers are on that? Amazing numbers on the downpipe though.
Hope to see the videos soon
Chris
Hope to see the videos soon
Chris
Advanced
Joined: May 2008
Posts: 93
Likes: 4
Originally Posted by pinnaclecustoms
So your K&N Filter Mod only made about 3 hp and 2 tq. I didn't expect that. That has me questioning getting the cp-e air intake. Does anyone know what the "real" numbers are on that? Amazing numbers on the downpipe though.
Hope to see the videos soon
Chris
Hope to see the videos soon
Chris