
DIY - Replace Leaking Rear Damper (Shock Absorber)

Thread Starter
haole kama'a-ina
Joined: Jan 2007
Posts: 593
Likes: 125
From: south of here
DIY - Replace Leaking Rear Damper (Shock Absorber)
This is to replace the leaking rear damper common to 2007 RDXs. The replacement damper is the same for left and right.
Perform Do-It-Yourself auto maintenance at your own risk. You can kill or injure someone or damage the car. Raise an auto only on a level, concrete floor. Do not go under any auto unless you are completely certain that it is secure. You and only you, are responsible for your work and safety.
There are many ways to raise an auto for service. Jacks, ramps, scissor lifts and stands, etc. All auto lifts share a few traits, though: they are cunning -- they hate you -- and they want you dead! The RDX weighs 3950 pounds. If it falls on you, that's 3850 more than it needs to crush your skull and emboss the phrase "engine oil" in mirror image on your forehead . DO NOT go under an auto unless you are completely certain it is secure!
Front and rear, left and right is ALWAYS related to the car itself, NOT how you are facing it:
LEFT is always the DRIVER side.
RIGHT is always the PASSENGER side.
Text relates to the picture below the text.
Tools and parts needed:
1. RDX Rear Damper part# 52610-STK-A03
2. allen wrench, 5 mm
3. dogbone wrench, metric with 14 mm socket
4. open end wrench, 10 mm
5. breaker bar and short extension
6. socket, 17 mm
7. socket, 19 mm
8. torque wrench
9. ratcheting speed wrench, 14 mm (preferred)
10. ratcheting speed wrench, 17 mm (preferred)
11. Eye protection, face protection, gloves and protective clothes.
Disconnect the negative battery cable using the 10 mm wrench. This safety precaution always applies to auto maintenance:

Engage the parking brake. Raise the car and support it securely. Using the 19 mm socket and breaker bar, remove the rear wheel. The rear damper on the 2007 RDX is prone to leaking. An intact damper may be dirty, but should be dry. A leaking damper is evident by the shiny, greasy wet dirt below the plastic shroud:

Access the upper damper attachment through the panel in the cargo compartment. Pry gently at the top to open it:

NOTE: The upper mount has 2 rubber cushions. One is above the frame in the cargo compartment. The other is below the frame in the wheel well. The upper cushion is not replaced; it remains with the car. The lower cushion is discarded; a new one comes with the damper.
This is the upper mount. Note that there is about 18-19 mm of exposed thread above the nut and that the mounting washer lip is upturned. This will be important when it is re-installed:

Use the 14 mm dogbone wrench to loosen the nylock nut while holding the damper shaft with the 5 mm allen. This is why the dogbone is needed. The socket must be open at the top to allow holding the shaft with the allen. If needed, pull the sidewall trim away for better access. Loosen, but do not remove the nut:

The damper is attached to the lower suspension link by one 17 mm bolt on the rear of the link. Spray under the bolt head with PB Blaster, to help free it:

Locate where the bolt protrudes through the front of the link. There are 2 bolts on the front. The damper lower bushing is the inboard bolt:

The bolt has a fixed nut collar welded to the link. Spray the threads with PB Blaster. In preparation for raising the suspension, place a floor jack under the suspension link below the damper bushing:

Raise the floor jack just until the suspension begins to compress. Using the 17 mm socket and breaker bar, loosen the lower bushing bolt. Orient the breaker bar so you can use it STANDING BESIDE the car, NOT from underneath it. Note the use of the jack handle on the breaker bar for extra leverage:

If available, use the 17 mm speed wrench to remove the bolt. Clean and dry the bolt threads:

Use the 5 mm allen and (if available) the 14 mm speed wrench to remove the upper mount nylock nut. Remove the mounting washer, noting the up-turned lip. Leave the rubber mounting cushion in place:

The damper is now ready to come out. Grasp it by the lower portion and push upwards to compress it, pulling the bushing up out of the lower suspension link. Hold it compressed:

Holding the damper compressed, pull it down out of the upper mount and lift it out. The rubber mounting cushion should come out with it. If it doesn't, you may have to gently pry it out of the mount:

Check the upper mount in the wheel well. Wipe it clean and make sure the rubber mounting cushion is removed and discarded. The new damper comes with a replacement cushion:

Now check the upper mount inside the cargo compartment. The original rubber cushion here stays (as you left it earlier). This one is not replaced:

Here are the new and old dampers. The new damper part# 52610-STK-A03 has superceded the the old damper, which was -A02. The plastic shroud is cut away to show the leakage on the old damper:


The new damper should have the wheel well mounting cushion attached. Compress and install the new damper. Guide the shaft into the upper mount and then let it extend into the lower suspension link. The new rubber cushion should be against the wheel well frame. Ensure that the shaft has protruded throught the upper rubber cushion in the cargo compartment. Align the lower bushing holes and install the bolt loosely. (I put some blue threadlocker on it.)
Use the jack under the suspension link to raise the suspension just enough to lift the car off the support stands at that corner:

Orient the torque wrench to use it STANDING BESIDE the car, NOT under it and torque the lower bushing bolt to 103 N-m (76 ft-lb).

In the cargo compartment, replace the mounting washer (with lip upturned) over the rubber cushion and install the nylock nut. Using the 5 mm allen, the 14 mm speed wrench and the 14 mm dogbone, tighten the nylock nut. This may take a little while as the shaft is still pushing through the rubber cushion as you tighten. There will be a definite stop felt when the metal damper shaft contacts the metal frame. Do not over-tighten. Torque is 29 N-m (22 ft-lb). There should be about 18-19 mm exposed thread:

Lower the suspension until the car is securely back on the support stands. Here is the installed damper:

Install the wheel and torque the lugnuts in a star pattern to 109 N-m (80 ft-lb).
In the cargo compartment, snap the upper mount cover in place.
Lower the RDX and connect the battery negative terminal.
Test drive the car for turning feel. I did not find it necessary to replace the other rear damper.
Perform Do-It-Yourself auto maintenance at your own risk. You can kill or injure someone or damage the car. Raise an auto only on a level, concrete floor. Do not go under any auto unless you are completely certain that it is secure. You and only you, are responsible for your work and safety.
There are many ways to raise an auto for service. Jacks, ramps, scissor lifts and stands, etc. All auto lifts share a few traits, though: they are cunning -- they hate you -- and they want you dead! The RDX weighs 3950 pounds. If it falls on you, that's 3850 more than it needs to crush your skull and emboss the phrase "engine oil" in mirror image on your forehead
. DO NOT go under an auto unless you are completely certain it is secure!Front and rear, left and right is ALWAYS related to the car itself, NOT how you are facing it:
LEFT is always the DRIVER side.
RIGHT is always the PASSENGER side.
Text relates to the picture below the text.
Tools and parts needed:
1. RDX Rear Damper part# 52610-STK-A03
2. allen wrench, 5 mm
3. dogbone wrench, metric with 14 mm socket
4. open end wrench, 10 mm
5. breaker bar and short extension
6. socket, 17 mm
7. socket, 19 mm
8. torque wrench
9. ratcheting speed wrench, 14 mm (preferred)
10. ratcheting speed wrench, 17 mm (preferred)
11. Eye protection, face protection, gloves and protective clothes.
Disconnect the negative battery cable using the 10 mm wrench. This safety precaution always applies to auto maintenance:
Engage the parking brake. Raise the car and support it securely. Using the 19 mm socket and breaker bar, remove the rear wheel. The rear damper on the 2007 RDX is prone to leaking. An intact damper may be dirty, but should be dry. A leaking damper is evident by the shiny, greasy wet dirt below the plastic shroud:
Access the upper damper attachment through the panel in the cargo compartment. Pry gently at the top to open it:
NOTE: The upper mount has 2 rubber cushions. One is above the frame in the cargo compartment. The other is below the frame in the wheel well. The upper cushion is not replaced; it remains with the car. The lower cushion is discarded; a new one comes with the damper.
This is the upper mount. Note that there is about 18-19 mm of exposed thread above the nut and that the mounting washer lip is upturned. This will be important when it is re-installed:
Use the 14 mm dogbone wrench to loosen the nylock nut while holding the damper shaft with the 5 mm allen. This is why the dogbone is needed. The socket must be open at the top to allow holding the shaft with the allen. If needed, pull the sidewall trim away for better access. Loosen, but do not remove the nut:
The damper is attached to the lower suspension link by one 17 mm bolt on the rear of the link. Spray under the bolt head with PB Blaster, to help free it:
Locate where the bolt protrudes through the front of the link. There are 2 bolts on the front. The damper lower bushing is the inboard bolt:
The bolt has a fixed nut collar welded to the link. Spray the threads with PB Blaster. In preparation for raising the suspension, place a floor jack under the suspension link below the damper bushing:
Raise the floor jack just until the suspension begins to compress. Using the 17 mm socket and breaker bar, loosen the lower bushing bolt. Orient the breaker bar so you can use it STANDING BESIDE the car, NOT from underneath it. Note the use of the jack handle on the breaker bar for extra leverage:
If available, use the 17 mm speed wrench to remove the bolt. Clean and dry the bolt threads:
Use the 5 mm allen and (if available) the 14 mm speed wrench to remove the upper mount nylock nut. Remove the mounting washer, noting the up-turned lip. Leave the rubber mounting cushion in place:
The damper is now ready to come out. Grasp it by the lower portion and push upwards to compress it, pulling the bushing up out of the lower suspension link. Hold it compressed:
Holding the damper compressed, pull it down out of the upper mount and lift it out. The rubber mounting cushion should come out with it. If it doesn't, you may have to gently pry it out of the mount:
Check the upper mount in the wheel well. Wipe it clean and make sure the rubber mounting cushion is removed and discarded. The new damper comes with a replacement cushion:
Now check the upper mount inside the cargo compartment. The original rubber cushion here stays (as you left it earlier). This one is not replaced:
Here are the new and old dampers. The new damper part# 52610-STK-A03 has superceded the the old damper, which was -A02. The plastic shroud is cut away to show the leakage on the old damper:
The new damper should have the wheel well mounting cushion attached. Compress and install the new damper. Guide the shaft into the upper mount and then let it extend into the lower suspension link. The new rubber cushion should be against the wheel well frame. Ensure that the shaft has protruded throught the upper rubber cushion in the cargo compartment. Align the lower bushing holes and install the bolt loosely. (I put some blue threadlocker on it.)
Use the jack under the suspension link to raise the suspension just enough to lift the car off the support stands at that corner:
Orient the torque wrench to use it STANDING BESIDE the car, NOT under it and torque the lower bushing bolt to 103 N-m (76 ft-lb).
In the cargo compartment, replace the mounting washer (with lip upturned) over the rubber cushion and install the nylock nut. Using the 5 mm allen, the 14 mm speed wrench and the 14 mm dogbone, tighten the nylock nut. This may take a little while as the shaft is still pushing through the rubber cushion as you tighten. There will be a definite stop felt when the metal damper shaft contacts the metal frame. Do not over-tighten. Torque is 29 N-m (22 ft-lb). There should be about 18-19 mm exposed thread:
Lower the suspension until the car is securely back on the support stands. Here is the installed damper:
Install the wheel and torque the lugnuts in a star pattern to 109 N-m (80 ft-lb).
In the cargo compartment, snap the upper mount cover in place.
Lower the RDX and connect the battery negative terminal.
Test drive the car for turning feel. I did not find it necessary to replace the other rear damper.
Last edited by 737 Jock; Oct 14, 2010 at 01:28 PM.


4th Gear
Joined: Dec 2006
Posts: 4
Likes: 0
Excellent DIY instructions! Thank you!!!
I have the same problem with my 2007 RDX with 57K miles and will be replacing the rear damper soon. Once I replace the rear shock absorber do I need to get the wheel alignment done?
Any chance this might be covered under Acura standard warranty?
I have the same problem with my 2007 RDX with 57K miles and will be replacing the rear damper soon. Once I replace the rear shock absorber do I need to get the wheel alignment done?
Any chance this might be covered under Acura standard warranty?
Thread Starter
haole kama'a-ina
Joined: Jan 2007
Posts: 593
Likes: 125
From: south of here
I do my own work. I've never been to the dealer for anything, but I think the warranty is 4 years, 50000 miles.
The alignment is not affected, as none of the alignment fasteners are loosened to do this.
The alignment is not affected, as none of the alignment fasteners are loosened to do this.
4th Gear
Joined: Dec 2006
Posts: 4
Likes: 0
Today I successfully changed my right rear damper that was leaking. Thank you 737Jock without these clear steps I wouldn't have been well prepared.
I still hear a short squeak from the rear right side of my car when the road is bumpy which I thought would be gone after the damper replacement.
Any idea what could be causing this squeak? Could it be the top rubber mounting cushion inside the cargo compartment that doesn't come with the damper needing replacement or the spring need to be replaced as well?
Trending Topics
Thread Starter
haole kama'a-ina
Joined: Jan 2007
Posts: 593
Likes: 125
From: south of here
Apparently the squeak preceeded the damper replacement, so it wasn't necessarily anything you did (you were just hoping the new damper would fix it  )
)
Well, dampers don't usually squeak very much. Other than insuring that the upper mount damper shaft is firm against the frame and the nylock nut is secure, it's probably not the damper. (If it was loose enough for the cushion to be squeaking it would probably be clunking as well -- that would get your attention.)
It's not lkely the spring either as that is under way too much pressure to be shifting around.
Anti-roll bar bushings are common sources of squeaks and fairly easy to replace (more common in VWs than Hondas though).
Interior trim panels often squeak. Sometimes they are not snapped in right. Otherwise, glue some felt at the rubbing point.
You may have to get back there and isolate it while someone drives.
)Well, dampers don't usually squeak very much. Other than insuring that the upper mount damper shaft is firm against the frame and the nylock nut is secure, it's probably not the damper. (If it was loose enough for the cushion to be squeaking it would probably be clunking as well -- that would get your attention.)
It's not lkely the spring either as that is under way too much pressure to be shifting around.
Anti-roll bar bushings are common sources of squeaks and fairly easy to replace (more common in VWs than Hondas though).
Interior trim panels often squeak. Sometimes they are not snapped in right. Otherwise, glue some felt at the rubbing point.
You may have to get back there and isolate it while someone drives.
4th Gear
Joined: Dec 2006
Posts: 4
Likes: 0
Most likely the squeak was there before the damper leak 
Watching the following video by scottykilmer I ordered some AT-205 Re-Seal. I am planning on spraying this on all the rubber bushings and will reply back how it goes.
http://www.youtube.com/watch?v=-wSVr4I5PLE
Watching the following video by scottykilmer I ordered some AT-205 Re-Seal. I am planning on spraying this on all the rubber bushings and will reply back how it goes.
http://www.youtube.com/watch?v=-wSVr4I5PLE

Pro
Joined: Apr 2013
Posts: 546
Likes: 113
Hi 737 Jock.
According to KYB, that upper cupped washer is supposed to be facing "down", not "up".
Good write up. I have a 20123 RDX that will be using rear shocks from a first generation RDX. Second generation RDX shocks are awful.
According to KYB, that upper cupped washer is supposed to be facing "down", not "up".
Good write up. I have a 20123 RDX that will be using rear shocks from a first generation RDX. Second generation RDX shocks are awful.
Thread Starter
haole kama'a-ina
Joined: Jan 2007
Posts: 593
Likes: 125
From: south of here
I suppose you are referring to KYB aftermarket struts. Perhaps this has something to do with their parts.
The OEM washer is clearly depicted with the lip upturned in the RDX Service Manual.
The OEM washer is clearly depicted with the lip upturned in the RDX Service Manual.
Advanced
Joined: Feb 2012
Posts: 72
Likes: 10
After Thoughts
I did this job after reading 737 Jock's most excellent description of the process. Nicely done sir! I did a couple of things differently so here is my 2 cents worth!
I installed a new upper damper mounting cushion(inside the vehicle) since I assumed it must also be as compressed/dried out/worn out as the other cushion on top of the damper. Even though the shop manual doesn't call for replacing it, I thought why not? The part only cost $1.55 so no biggy there cost wise. The inside and outside cushions are the same part number.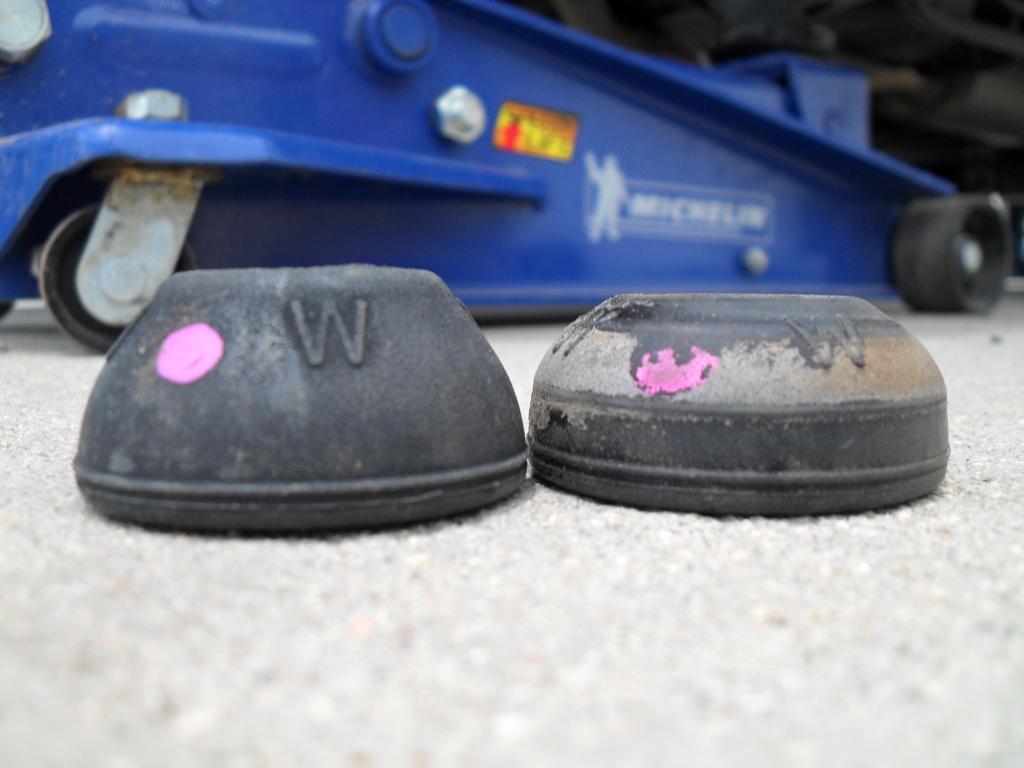
Can you tell which is the old cushion? Hint, it is the one on the right after 7 years of service. Which one do you think will give you a better cushion?
I also noted that the allen bolt would remain stationary and not rotate after sufficiently snugging the locking nut to the top of the damper so I was able to put 22 ft-lbf torque on the nut without holding the allen wrench simultaneously! I also put some blue marking paint on the nut and bolt to check for rotation later.
I am including a picture of the lower arm flange bolt to compare for those who consider saving $2 for a new bolt. It is not worth the risk! The old bolt had been on the car for 7 years. Ditto for the locking nut. Just replace them and be happy! I also used an impact wrench to remove these bolts.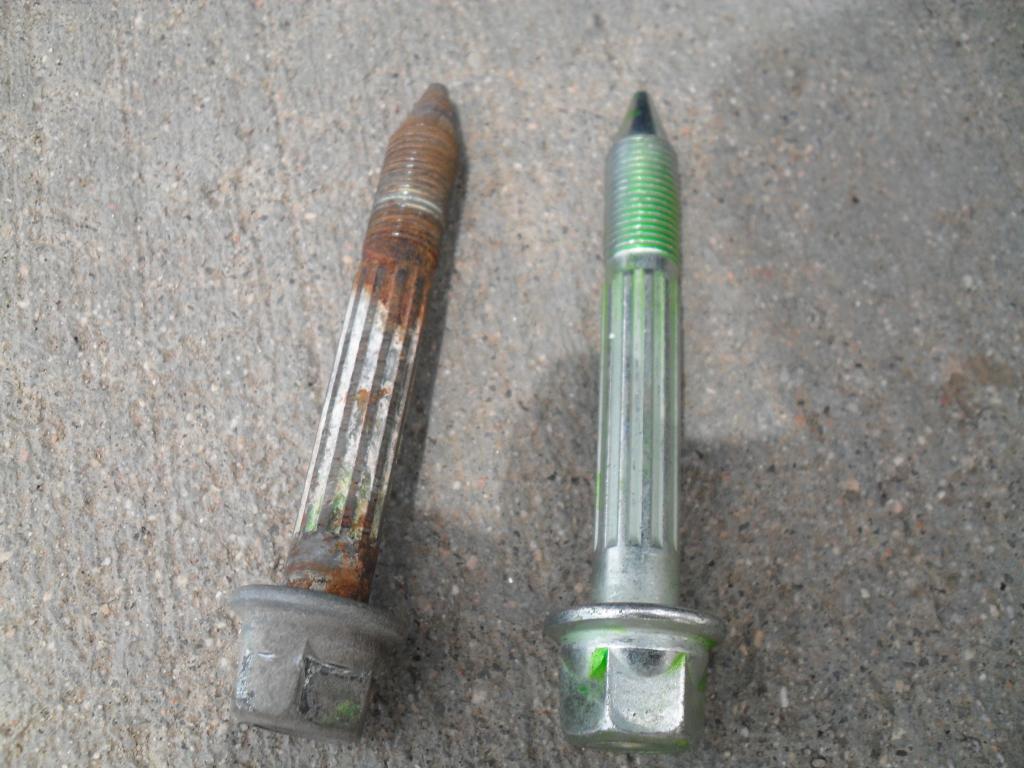
I installed a new upper damper mounting cushion(inside the vehicle) since I assumed it must also be as compressed/dried out/worn out as the other cushion on top of the damper. Even though the shop manual doesn't call for replacing it, I thought why not? The part only cost $1.55 so no biggy there cost wise. The inside and outside cushions are the same part number.
Can you tell which is the old cushion? Hint, it is the one on the right after 7 years of service. Which one do you think will give you a better cushion?
I also noted that the allen bolt would remain stationary and not rotate after sufficiently snugging the locking nut to the top of the damper so I was able to put 22 ft-lbf torque on the nut without holding the allen wrench simultaneously! I also put some blue marking paint on the nut and bolt to check for rotation later.
I am including a picture of the lower arm flange bolt to compare for those who consider saving $2 for a new bolt. It is not worth the risk! The old bolt had been on the car for 7 years. Ditto for the locking nut. Just replace them and be happy!
I also used an impact wrench to remove these bolts.
Last edited by RangeRider49er; Jul 6, 2014 at 02:16 PM.
Advanced
Joined: Feb 2012
Posts: 72
Likes: 10

10th Gear
Joined: Apr 2014
Posts: 13
Likes: 1
From: Raleigh, NC
Just wanted to say thanks for another great DIY!
My wife's car had a nice clunk sound coming from the right rear tire every time it would go over a hard bump. I figured it was the shock, but didn't know for sure until I was putting new rear brake pads on yesterday and noticed the right rear shock shat fluid all over itself.
I looked at aftermarket options, but none were in stock locally. The local acura dealership had the updated part (52610-STK-A03) in stock. It was a bit more than what I found for the same part online...but it was local and I could finish the job the same day so I bought it.
The dealership only had one in stock, but like you I didn't see the need to replace the other side anyway. It wasn't damaged or leaking so it should be fine...for now anyway.


Intermediate
Joined: Jun 2013
Posts: 49
Likes: 1
From: Ottawa, ON

Qualified Observer
Joined: Oct 2019
Posts: 150
Likes: 25
From: In the woods, in the Mitten

Instructor


Joined: Feb 2005
Posts: 157
Likes: 5
From: Toronto, ON
To help others, don't get Monroe OE Spectrum shocks. I purchased all 4 from RockAuto in 2021 and one was defective (no shock absorbing) immediately after installing it and the other was marginal at best. The front quick struts are still on the vehicle though and seem to be OK.
Just replaced the rears with OE and it's night and day. Same your $, just buy OEM when replacing.
Just replaced the rears with OE and it's night and day. Same your $, just buy OEM when replacing.
Last edited by dP-; Aug 2, 2023 at 11:53 PM.


Thread
Thread Starter
Forum
Replies
Last Post
vtr1000sp2
2G RL Tires, Wheels & Suspension
32
Jul 15, 2022 06:38 AM
TheSauceBoss
3G TL (2004-2008)
2
Jun 16, 2019 09:54 AM
myTaLizaS3.2
2G TL Tires, Wheels & Suspension
84
Jan 31, 2013 11:43 AM
DONZ3.2TL
2G TL Tires, Wheels & Suspension
3
Apr 15, 2010 01:54 PM
It's Clutch
2G TL Tires, Wheels & Suspension
13
Sep 1, 2009 11:05 AM