Black Housing Headlights w/front bumper removal
 07-06-2005, 06:56 PM
#1
Senior Moderator
Thread Starter
Join Date: Jul 2002
Location: Bay Area, CA
Age: 39
Posts: 12,005
Likes: 0
Received 9 Likes
on
8 Posts
Black Housing Headlights w/front bumper removal
Disclaimer: by using these guides, you are removing me from any liability that is related to any injury that might occur. I would suggest having a friend help you on these installs, if you are unsure about your abilities for any of these projects, get a professional to do it.
Credit goes to vxcl (mrk183@psu.edu) for the original write up, thanks also goes to 97acura3.0cl (jgiguere17@yahoo.com) for additional info
Black housing headlight install
Estimated Time: ~4 hours (not including dry-time)
Tools:
Wrench / ratchet
Cloth
Flathead screwdriver
Primer (spray can)
High temp paint (spray can)
Silicon sealant
Instructions:
1. Front bumper removal:
get a 12mm socket and 2 extension wands, and a srewdriver, stubby and long screwdriver
there are 1 screw on each side that hold the lender liner to the bumper towards the bottom some have it towards the top, then there should be a hole on the inside of the lower grill next to the inside part of the turn signal, take a screw driver and unscrew this screw
pop out the turn signals, look inside and up to your top left inside if you are on the driver side there is a bolt, use the 2 wands and the 12mm socket and undo this bolt, then go to the inside of the grill on the other side of that screw there is another 12mm bolt, it will be on the other side of the plate next to the first bolt, take off the other one, repeat to the other side
when this is down it will be loose, lift up and pull away, this is the easiest part, when you put it back on it will be a little tricky to align it but put it the same way you got it off
LENS REMOVAL
2. Unbolt the headlamps. (6 bolts each, impossible to do without taking the bumper off)
3. Remove all bulbs from headlamps.
4. Use a heat gun or bake the headlamps in the oven. Work on only one headlamp at a time. Set the oven to 200 degrees for about 5 minutes. Put the headlights in and BAKE them for 8-10 minutes, try to avoid opening the oven every 30 seconds to check on them. Make sure you put foil on the baking sheet if you use one. The housing on the bare metal will probably melt. Don't worry about the small black venting tubes. Just make sure none fall if into the oven.
5. While baking or before heating place a soft cloth or towel down on your work area. This is so you don't scratch headlamp when you�re working on it with the clear lens face down.
6. If you baked them use an over mitt on your secondary hand to hold the headlamp from moving. The metal parts are going to be hot. I find that a medium flat head screw driver works best. Slowly pry apart the front lens from the back housing, starting at the BOTTOM. Go SLOW, make sure you don�t crack the grey plastic clips that help hold the lens to the housing. If it seems hard to pry apart then the sealant isn't hot enough yet. You will just end up bending the housing up all along the edge and this does not help when you reseal them.
7. Remove the chrome piece that you're going to paint, set the other pieces somewhere safe.
PAINTING
8. Sand the chrome off. This prevents the paint from chipping easily and makes the primer stick a bit easier. Nothing worse then chipping the paint trying to get the trim piece back inside the lens.
9. Take your time and mask everything carefully. Be sure to cover the bulb opening in the back of the corner lens. If you don�t overspray will end up on the corner reflector.
10. Using a high temp paint put about 2-3 coats on with about 15 minutes between them. The number of coats depends, use your judgment. I would use a flat not a gloss. The first coat is most important. The paint will not cover it the first time. Don�t worry. All you want to do is get some color on it. The next coat will completely cover the plastic. Don�t put too much paint on! It will run easily because of all the steep angles.
11. Le the paint dry, preferably overnight. You don�t want to chip the paint reassembling the trim back into the lens or pulling off the paint when you take the masking off.
12. Finally, make sure you pre-bake them or heat them. Most high temp paints will change color and release chemicals. This will make your headlamps foggy inside or make a rainbow like film inside. This is another reason to use a flat color. It will typically turn into a semi-gloss once it�s exposed to heat. Now you're ready to seal them back up.
13. When you do pull the lens off and you get strings of grey OEM sealant don�t push it back into the housing! You'll just end up making it hard to push completely back together again. As long as you put enough new sealant in you'll be fine. Squeeze a good bead in the housing. Make sure you heat the housing back up first if you don't have a heat gun. Then just push the lens on. The sealant will glob out. DO NOT SMEAR IT OR WIPE IT!!! LET IT DRY!!!! When it does you can pull it right off with no damage to the lens. Never ever use Goo Gone to clean up any silicone sealant. You will make a huge mess and ruin the housing. It just smears the silicone everywhere.
14. Using a few clamps so that you ensure maximum seal, clamp the headlights up tight and let them dry for about 4 hours, the longer the better, if you can, leave it overnight. If the headlights don't seal up fully (you'll know cause the sealant wont feel wet) then you'll run the risk of the headlights FOGGING. Which you do NOT want and it the biggest risk in doing this project. As long as you use enough sealant and seal it up right, you will be fine.
15. Reinstall the lights back on your car and put back on your bumper. Over the next few days make sure to check if the headlights fog up, especially when its wet, or in the morning. If they do fog up, you probably didn't use enough sealant and/or didn't seal long enough.
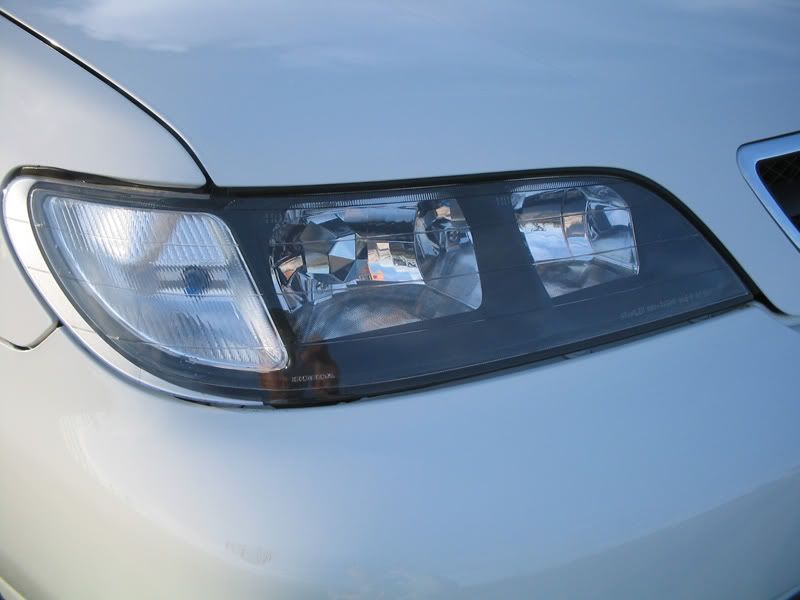
Before
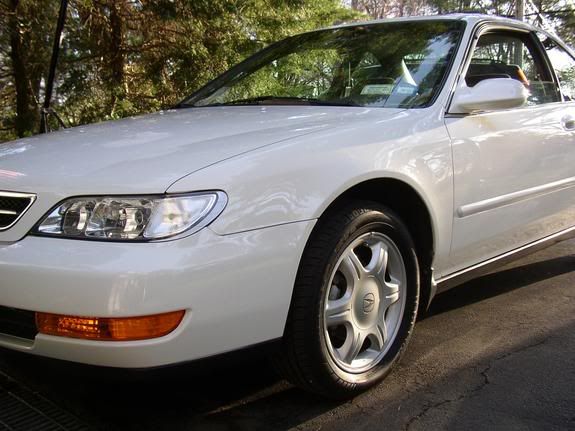
After
EDIT 6/1/08 with updated quide from ghettoninja06
Credit goes to vxcl (mrk183@psu.edu) for the original write up, thanks also goes to 97acura3.0cl (jgiguere17@yahoo.com) for additional info
Black housing headlight install
Estimated Time: ~4 hours (not including dry-time)
Tools:
Wrench / ratchet
Cloth
Flathead screwdriver
Primer (spray can)
High temp paint (spray can)
Silicon sealant
Instructions:
1. Front bumper removal:
get a 12mm socket and 2 extension wands, and a srewdriver, stubby and long screwdriver
there are 1 screw on each side that hold the lender liner to the bumper towards the bottom some have it towards the top, then there should be a hole on the inside of the lower grill next to the inside part of the turn signal, take a screw driver and unscrew this screw
pop out the turn signals, look inside and up to your top left inside if you are on the driver side there is a bolt, use the 2 wands and the 12mm socket and undo this bolt, then go to the inside of the grill on the other side of that screw there is another 12mm bolt, it will be on the other side of the plate next to the first bolt, take off the other one, repeat to the other side
when this is down it will be loose, lift up and pull away, this is the easiest part, when you put it back on it will be a little tricky to align it but put it the same way you got it off
LENS REMOVAL
2. Unbolt the headlamps. (6 bolts each, impossible to do without taking the bumper off)
3. Remove all bulbs from headlamps.
4. Use a heat gun or bake the headlamps in the oven. Work on only one headlamp at a time. Set the oven to 200 degrees for about 5 minutes. Put the headlights in and BAKE them for 8-10 minutes, try to avoid opening the oven every 30 seconds to check on them. Make sure you put foil on the baking sheet if you use one. The housing on the bare metal will probably melt. Don't worry about the small black venting tubes. Just make sure none fall if into the oven.
5. While baking or before heating place a soft cloth or towel down on your work area. This is so you don't scratch headlamp when you�re working on it with the clear lens face down.
6. If you baked them use an over mitt on your secondary hand to hold the headlamp from moving. The metal parts are going to be hot. I find that a medium flat head screw driver works best. Slowly pry apart the front lens from the back housing, starting at the BOTTOM. Go SLOW, make sure you don�t crack the grey plastic clips that help hold the lens to the housing. If it seems hard to pry apart then the sealant isn't hot enough yet. You will just end up bending the housing up all along the edge and this does not help when you reseal them.
7. Remove the chrome piece that you're going to paint, set the other pieces somewhere safe.
PAINTING
8. Sand the chrome off. This prevents the paint from chipping easily and makes the primer stick a bit easier. Nothing worse then chipping the paint trying to get the trim piece back inside the lens.
9. Take your time and mask everything carefully. Be sure to cover the bulb opening in the back of the corner lens. If you don�t overspray will end up on the corner reflector.
10. Using a high temp paint put about 2-3 coats on with about 15 minutes between them. The number of coats depends, use your judgment. I would use a flat not a gloss. The first coat is most important. The paint will not cover it the first time. Don�t worry. All you want to do is get some color on it. The next coat will completely cover the plastic. Don�t put too much paint on! It will run easily because of all the steep angles.
11. Le the paint dry, preferably overnight. You don�t want to chip the paint reassembling the trim back into the lens or pulling off the paint when you take the masking off.
12. Finally, make sure you pre-bake them or heat them. Most high temp paints will change color and release chemicals. This will make your headlamps foggy inside or make a rainbow like film inside. This is another reason to use a flat color. It will typically turn into a semi-gloss once it�s exposed to heat. Now you're ready to seal them back up.
13. When you do pull the lens off and you get strings of grey OEM sealant don�t push it back into the housing! You'll just end up making it hard to push completely back together again. As long as you put enough new sealant in you'll be fine. Squeeze a good bead in the housing. Make sure you heat the housing back up first if you don't have a heat gun. Then just push the lens on. The sealant will glob out. DO NOT SMEAR IT OR WIPE IT!!! LET IT DRY!!!! When it does you can pull it right off with no damage to the lens. Never ever use Goo Gone to clean up any silicone sealant. You will make a huge mess and ruin the housing. It just smears the silicone everywhere.
14. Using a few clamps so that you ensure maximum seal, clamp the headlights up tight and let them dry for about 4 hours, the longer the better, if you can, leave it overnight. If the headlights don't seal up fully (you'll know cause the sealant wont feel wet) then you'll run the risk of the headlights FOGGING. Which you do NOT want and it the biggest risk in doing this project. As long as you use enough sealant and seal it up right, you will be fine.
15. Reinstall the lights back on your car and put back on your bumper. Over the next few days make sure to check if the headlights fog up, especially when its wet, or in the morning. If they do fog up, you probably didn't use enough sealant and/or didn't seal long enough.
Before
After
EDIT 6/1/08 with updated quide from ghettoninja06
Originally Posted by GhettoNinja06
Disclaimer: by using these guides, you are removing me from any liability that is related to any injury that might occur. I would suggest having a friend help you on these installs, if you are unsure about your abilities for any of these projects, get a professional to do it.
Credit goes to vxcl (mrk183@psu.edu) for the original write up, thanks also goes to 97acura3.0cl (jgiguere17@yahoo.com) for additional info and GhettoNinja06 (fredman_002@satx.rr.com) for additional pictures.
Black housing headlight install
Estimated Time: ~4 hours (not including dry-time)
Tools:
Wrench / ratchet
Cloth
Flathead screwdriver
Primer (spray can)
High temp paint (spray can)
Silicon sealant
Instructions:
1. Front bumper removal:
get a 12mm socket and 2 extension wands, and a screwdriver, stubby and long screwdriver
there is 1 screw on each side that hold the fender liner to the bumper towards the bottom some have it towards the top, then there should be a hole on the inside of the lower grill next to the inside part of the turn signal, take a screw driver and unscrew this screw
pop out the turn signals, look inside and up to your top left inside if you are on the driver side there is a bolt, use the 2 wands and the 12mm socket and undo this bolt, then go to the inside of the grill on the other side of that screw there is another 12mm bolt, it will be on the other side of the plate next to the first bolt, take off the other one, repeat to the other side
when this is down it will be loose, lift up and pull away, this is the easiest part, when you put it back on it will be a really tricky to align it but put it the same way you got it off and pay attention to stationary mounting bolts.
For additional help, check out Orlando3.0�s Bumper Removal DIY guide:
https://acurazine.com/forums/showthr...bumper+removal
LENS REMOVAL
2. Unbolt the headlamps. (5 bolts each, impossible to do without taking the bumper off)


3. Remove all bulbs from headlamps. (look in your manual on detailed information on how to do this)
4. Use a heat gun or bake the headlamps in the oven. Work on only one headlamp at a time. Set the oven to 200 degrees for about 5 minutes. Put the headlights in and BAKE them for 8-10 minutes, try to avoid opening the oven every 30 seconds to check on them. Make sure you put foil on the baking sheet if you use one. The housing on the bare metal will probably melt. Don't worry about the small black venting tubes. Just make sure none fall if into the oven.

5. While baking or before heating place a soft cloth or towel down on your work area. This is so you don't scratch headlamp when you�re working on it with the clear lens face down.
6. If you baked them use an over mitt on your secondary hand to hold the headlamp from moving. The metal parts are going to be hot. I find that a medium flat head screw driver works best. Slowly pry apart the front lens from the back housing, starting at the BOTTOM. Go SLOW, make sure you don�t crack the grey plastic clips that help hold the lens to the housing. If it seems hard to pry apart then the sealant isn't hot enough yet. You will just end up bending the housing up all along the edge and this does not help when you reseal them.


7. Remove the chrome piece that you're going to paint by unscrewing 2 screws each and set the other pieces somewhere safe.

PAINTING
8. Pop out the corner lens and take time to carefully mask off the corners. Be sure to cover the bulb opening in the back of the corner.


9. Sand the chrome off. This prevents the paint from chipping easily and makes the primer stick a bit easier. Nothing worse then chipping the paint trying to get the trim piece back inside the lens.

10. Using a high temp paint put about 2-3 coats on with about 15 minutes between them. The number of coats depends, use your judgment. I would use a flat not a gloss. The first coat is most important. The paint will not cover it the first time. Don�t worry. All you want to do is get some color on it. The next coat will completely cover the plastic. Don�t put too much paint on! It will run easily because of all the steep angles.

(3rd coat)
11. Let the paint dry, preferably overnight. You don�t want to chip the paint reassembling the trim back into the lens or pulling off the paint when you take the masking off.

(carefully took off the masking tape)
12. Finally, make sure you pre-bake them for about 8-10 minutes on 200 degrease or heat them with a heat gun. Most high temp paints will change color and release chemicals. This will make your headlamps foggy inside or make a rainbow like film inside if not preheated. This is another reason to use a flat color. It will typically turn into a semi-gloss once it�s exposed to heat. Now you're ready to seal them back up.
13. When you do pull the lens off and you get strings of grey OEM sealant. Take off as much of the old sealant as possible.

As long as you put enough new sealant in you'll be fine. Squeeze a good bead in the housing. Make sure you heat the housing back up first if you don't have a heat gun. Then just push the lens on. The sealant will glob out. DO NOT SMEAR IT OR WIPE IT!!! LET IT DRY!!!! When it does you can pull it right off with no damage to the lens. Never ever use Goo Gone to clean up any silicone sealant. You will make a huge mess and ruin the housing. It just smears the silicone everywhere.
14. Using a few clamps so that you ensure maximum seal, clamp the headlights up tight and let them dry for about 4 hours, the longer the better, if you can, leave it overnight. If the headlights don't seal up fully (you'll know cause the sealant wont feel wet) then you'll run the risk of the headlights FOGGING. Which you do NOT want and it the biggest risk in doing this project. As long as you use enough sealant and seal it up right, you will be fine.

15. Reinstall the lights back on your car and put your bumper back on. Over the next few days make sure to check if the headlights fog up, especially when it�s wet, or in the morning. If they do fog up, you probably didn't use enough sealant and/or didn't seal long enough.
BEFORE/AFTER


Credit goes to vxcl (mrk183@psu.edu) for the original write up, thanks also goes to 97acura3.0cl (jgiguere17@yahoo.com) for additional info and GhettoNinja06 (fredman_002@satx.rr.com) for additional pictures.
Black housing headlight install
Estimated Time: ~4 hours (not including dry-time)
Tools:
Wrench / ratchet
Cloth
Flathead screwdriver
Primer (spray can)
High temp paint (spray can)
Silicon sealant
Instructions:
1. Front bumper removal:
get a 12mm socket and 2 extension wands, and a screwdriver, stubby and long screwdriver
there is 1 screw on each side that hold the fender liner to the bumper towards the bottom some have it towards the top, then there should be a hole on the inside of the lower grill next to the inside part of the turn signal, take a screw driver and unscrew this screw
pop out the turn signals, look inside and up to your top left inside if you are on the driver side there is a bolt, use the 2 wands and the 12mm socket and undo this bolt, then go to the inside of the grill on the other side of that screw there is another 12mm bolt, it will be on the other side of the plate next to the first bolt, take off the other one, repeat to the other side
when this is down it will be loose, lift up and pull away, this is the easiest part, when you put it back on it will be a really tricky to align it but put it the same way you got it off and pay attention to stationary mounting bolts.
For additional help, check out Orlando3.0�s Bumper Removal DIY guide:
https://acurazine.com/forums/showthr...bumper+removal
LENS REMOVAL
2. Unbolt the headlamps. (5 bolts each, impossible to do without taking the bumper off)
3. Remove all bulbs from headlamps. (look in your manual on detailed information on how to do this)
4. Use a heat gun or bake the headlamps in the oven. Work on only one headlamp at a time. Set the oven to 200 degrees for about 5 minutes. Put the headlights in and BAKE them for 8-10 minutes, try to avoid opening the oven every 30 seconds to check on them. Make sure you put foil on the baking sheet if you use one. The housing on the bare metal will probably melt. Don't worry about the small black venting tubes. Just make sure none fall if into the oven.
5. While baking or before heating place a soft cloth or towel down on your work area. This is so you don't scratch headlamp when you�re working on it with the clear lens face down.
6. If you baked them use an over mitt on your secondary hand to hold the headlamp from moving. The metal parts are going to be hot. I find that a medium flat head screw driver works best. Slowly pry apart the front lens from the back housing, starting at the BOTTOM. Go SLOW, make sure you don�t crack the grey plastic clips that help hold the lens to the housing. If it seems hard to pry apart then the sealant isn't hot enough yet. You will just end up bending the housing up all along the edge and this does not help when you reseal them.
7. Remove the chrome piece that you're going to paint by unscrewing 2 screws each and set the other pieces somewhere safe.
PAINTING
8. Pop out the corner lens and take time to carefully mask off the corners. Be sure to cover the bulb opening in the back of the corner.
9. Sand the chrome off. This prevents the paint from chipping easily and makes the primer stick a bit easier. Nothing worse then chipping the paint trying to get the trim piece back inside the lens.
10. Using a high temp paint put about 2-3 coats on with about 15 minutes between them. The number of coats depends, use your judgment. I would use a flat not a gloss. The first coat is most important. The paint will not cover it the first time. Don�t worry. All you want to do is get some color on it. The next coat will completely cover the plastic. Don�t put too much paint on! It will run easily because of all the steep angles.
(3rd coat)
11. Let the paint dry, preferably overnight. You don�t want to chip the paint reassembling the trim back into the lens or pulling off the paint when you take the masking off.
(carefully took off the masking tape)
12. Finally, make sure you pre-bake them for about 8-10 minutes on 200 degrease or heat them with a heat gun. Most high temp paints will change color and release chemicals. This will make your headlamps foggy inside or make a rainbow like film inside if not preheated. This is another reason to use a flat color. It will typically turn into a semi-gloss once it�s exposed to heat. Now you're ready to seal them back up.
13. When you do pull the lens off and you get strings of grey OEM sealant. Take off as much of the old sealant as possible.
As long as you put enough new sealant in you'll be fine. Squeeze a good bead in the housing. Make sure you heat the housing back up first if you don't have a heat gun. Then just push the lens on. The sealant will glob out. DO NOT SMEAR IT OR WIPE IT!!! LET IT DRY!!!! When it does you can pull it right off with no damage to the lens. Never ever use Goo Gone to clean up any silicone sealant. You will make a huge mess and ruin the housing. It just smears the silicone everywhere.
14. Using a few clamps so that you ensure maximum seal, clamp the headlights up tight and let them dry for about 4 hours, the longer the better, if you can, leave it overnight. If the headlights don't seal up fully (you'll know cause the sealant wont feel wet) then you'll run the risk of the headlights FOGGING. Which you do NOT want and it the biggest risk in doing this project. As long as you use enough sealant and seal it up right, you will be fine.
15. Reinstall the lights back on your car and put your bumper back on. Over the next few days make sure to check if the headlights fog up, especially when it�s wet, or in the morning. If they do fog up, you probably didn't use enough sealant and/or didn't seal long enough.
BEFORE/AFTER


 06-28-2006, 01:08 PM
#5
Instructor

Join Date: Feb 2005
Location: MIAMI,FL
Age: 42
Posts: 102
Likes: 0
Received 0 Likes
on
0 Posts
Hey guys does the paint have to be high heat paint? because the color i am looking for i can not find. I asked a buddy of mine and he said he used regular spray paint and he never had a problem..
 that would be correct

Trending Topics
06-30-2006, 02:27 AM
#10
I SMELL NAWZ
Join Date: Oct 2004
Location: East Side San Jose, CA
Age: 38
Posts: 1,546
Likes: 0
Received 1 Like
on
1 Post
so there are 6 bolts total? to remove the bumper cover?
2 bolts - 1 on each side by the fender well holding the bumper to the fender well
4 bolts - 2 bolts each side after removal of the corner light? there above the corner light?
these 6 bolts are all it takes to take the bumper off?
from looking at it i think i see another screw under my head light ?
or is that something else

 05-08-2007, 12:56 AM
#14
Instructor

Join Date: May 2006
Location: Phoenix,AZ
Age: 38
Posts: 203
Likes: 0
Received 0 Likes
on
0 Posts
what kinda silicon sealant do you use? Will the $5 tube at autozone work well enough. Anyone have any problems with moisture becuase of low quality sealants, not becuase of a shaddy job putting it back together?
12-09-2007, 10:35 PM
#15
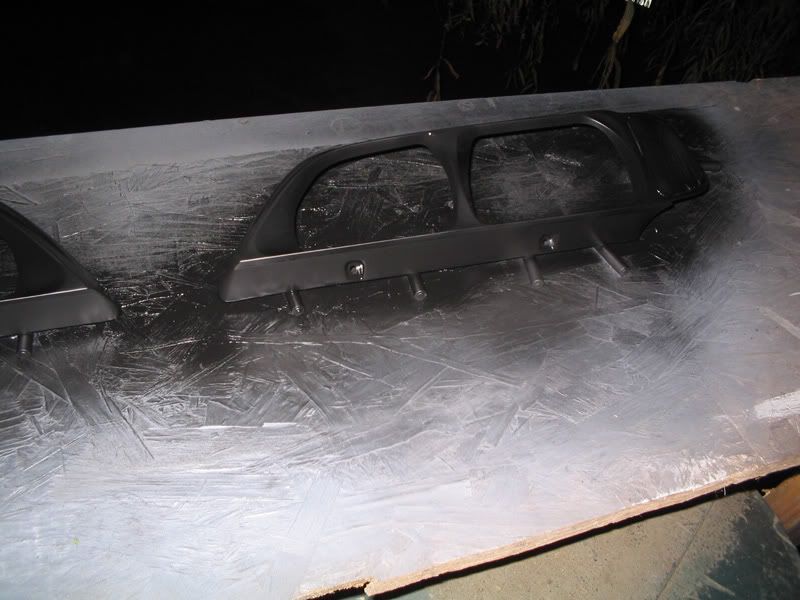
Here's some pictures to help with the removal of the bumper.
First, remove the corner lenses. After that,when you look inside you should see this. There is another bolt on top that needs to be removed that isn't visible from the picture. You can get it when a short socket, 12mm for both. The top bolt is pretty hard to get to, just keep trying if you can't get it.

Then, more towards the center of the lower grill, there's another bolt, also 12mm, that need to removed. It's in line with the bottom bolt. See pictures below for the arrangement.

Next, there's two screws underneath the fender on each side. One is on what looks like the stock lip, the other is pointing upwards into the fender it self. It's easier if you take them off with a 9mm socket. Driver's side:

Passenger's side (the bottom screw was stripped out so it didn't need to be removed):

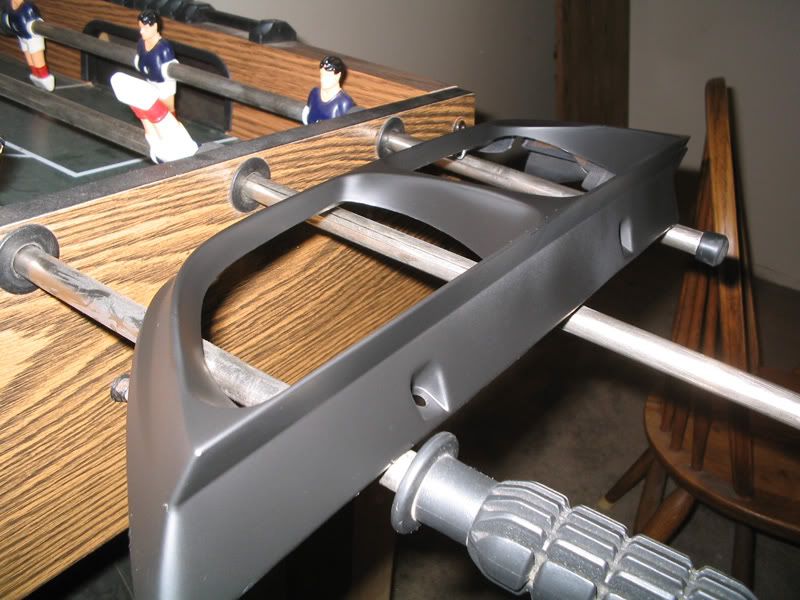
Here's the arrangement of the 3 bolts that need to be taken off from above (passenger side). It's reversed for the other side.

Now you can lift and pull the bumper off.

The hardest part is getting the bumper back on. You have to get it to line up on both sides next to the fender in order to not have a huge gap. I had to bolt and unbolt 3 times before I got it to line up properly.
Good luck!
First, remove the corner lenses. After that,when you look inside you should see this. There is another bolt on top that needs to be removed that isn't visible from the picture. You can get it when a short socket, 12mm for both. The top bolt is pretty hard to get to, just keep trying if you can't get it.
Then, more towards the center of the lower grill, there's another bolt, also 12mm, that need to removed. It's in line with the bottom bolt. See pictures below for the arrangement.
Next, there's two screws underneath the fender on each side. One is on what looks like the stock lip, the other is pointing upwards into the fender it self. It's easier if you take them off with a 9mm socket. Driver's side:
Passenger's side (the bottom screw was stripped out so it didn't need to be removed):
Here's the arrangement of the 3 bolts that need to be taken off from above (passenger side). It's reversed for the other side.
Now you can lift and pull the bumper off.
The hardest part is getting the bumper back on. You have to get it to line up on both sides next to the fender in order to not have a huge gap. I had to bolt and unbolt 3 times before I got it to line up properly.
Good luck!
12-11-2007, 09:27 PM
#17
Instructor
Join Date: May 2006
Location: Phoenix,AZ
Age: 38
Posts: 203
Likes: 0
Received 0 Likes
on
0 Posts
what kinda silicon sealant do you use? Will the $5 tube at autozone work well enough. Anyone have any problems with moisture becuase of low quality sealants?
12-11-2007, 09:42 PM
#18
Originally Posted by unlewser
what kinda silicon sealant do you use? Will the $5 tube at autozone work well enough. Anyone have any problems with moisture becuase of low quality sealants?
02-05-2008, 08:08 PM
#19
8th Gear

Join Date: Jan 2008
Location: Monterey Park, CA
Age: 35
Posts: 8
Likes: 0
Received 0 Likes
on
0 Posts
for silicon, i used some clear one that I bought off home depot, worked fine.
hardest part is putting the bumper back on. maybe because my car was in an accident and the bodyshop that fixed it took the cheap way, it was a real PITA putting the bumper back on.
hardest part is putting the bumper back on. maybe because my car was in an accident and the bodyshop that fixed it took the cheap way, it was a real PITA putting the bumper back on.
07-09-2008, 01:47 PM
#22
W WHIP.
Join Date: Jun 2006
Location: 412, PA & always ballin in FLO RIDA.
Age: 35
Posts: 3,859
Likes: 0
Received 1 Like
on
1 Post
My lights have moisture in them, im guessing the old sealant is falling apart. I dont want to black house them, although now would probably be a good time, i just dont have time to do that right now. So what kind of sealant can i use? I was just gonna pop the hood and see if i can find any breaks in the sealant so i dont have to take off my bumper. What sealant did you use ghettoninja? or anyone else? thanks.
07-09-2008, 04:07 PM
#23
Senior Moderator
Regional Coordinator
(Mid-Atlantic)
Regional Coordinator
(Mid-Atlantic)
iTrader: (6)
Surprised I didn't get a text about this, use clear silicone sealant from home depot
07-09-2008, 08:25 PM
#24
W WHIP.
Join Date: Jun 2006
Location: 412, PA & always ballin in FLO RIDA.
Age: 35
Posts: 3,859
Likes: 0
Received 1 Like
on
1 Post
haha, alright ill try but i just looked at my headlight and there doesnt seem to be any room for sealant unless i put it on top of the cracks rather than in between. I have the assumption that maybe the sealant is deteriorating on the bottom side of the headlight. well this sucks.
07-09-2008, 08:52 PM
#25
I forgot the exact brand but just go to Auto Zone or Advance auto parts or just about any auto store or any home improvement store and ask for some clear silicone sealant. I got mine from Advance Auto. You might as well blackhouse them. Putting the bumper back on is the hardest part and you have to do that anyway. Also, use enough sealant to where a little gushes out when you clamp em. I had to redo mine because I didn't put enough sealant.
07-10-2008, 09:54 PM
#26
For Life
Join Date: Jun 2008
Location: Tampa Bay
Posts: 724
Likes: 0
Received 0 Likes
on
0 Posts
Permatex Clear RTV Silicone if youre looking at auto zone or advance, which is where i would go since they sell the little squeeze tube. I just did mine last night and i think it was worth the effort to do it. Im keeping an eye on mine to make sure they are sealed up good. dont want any issues with the HID's.
07-11-2008, 06:20 PM
#30
For Life
Join Date: Jun 2008
Location: Tampa Bay
Posts: 724
Likes: 0
Received 0 Likes
on
0 Posts
Originally Posted by GhettoNinja06
Naw, I didn't. It's basicly usless since it's covered. Just make sure you give the freshly painted blackhousings to dry well before puting them back in. Nothing worse then chiping the paint at that stage.
yea thats what i was assuming too. i thought the clear might have a funny reaction to being heated up by HID's. i also didnt have any time to do it since i was painting as the rain rolled in
07-14-2008, 09:50 PM
#31
Racer
Join Date: Dec 2006
Location: ATX
Age: 33
Posts: 386
Likes: 0
Received 0 Likes
on
0 Posts
on step 12 what do you exactly put in the oven, the housing, or the whole head lamp with hosing??? im confused
12. Finally, make sure you pre-bake them for about 8-10 minutes on 200 degrease or heat them with a heat gun. Most high temp paints will change color and release chemicals. This will make your headlamps foggy inside or make a rainbow like film inside if not preheated. This is another reason to use a flat color. It will typically turn into a semi-gloss once it�s exposed to heat. Now you're ready to seal them back up.
12. Finally, make sure you pre-bake them for about 8-10 minutes on 200 degrease or heat them with a heat gun. Most high temp paints will change color and release chemicals. This will make your headlamps foggy inside or make a rainbow like film inside if not preheated. This is another reason to use a flat color. It will typically turn into a semi-gloss once it�s exposed to heat. Now you're ready to seal them back up.
07-15-2008, 12:33 PM
#32
For Life
Join Date: Jun 2008
Location: Tampa Bay
Posts: 724
Likes: 0
Received 0 Likes
on
0 Posts
heat the inner part of the headlight that you painted (the part that was chrome you just sanded for the past half hour) not the whole headlight. unless you like rainbows on your headlights and youre a little  otherwise bake the painted part by itself.
otherwise bake the painted part by itself.
07-15-2008, 07:12 PM
#34
For Life
Join Date: Jun 2008
Location: Tampa Bay
Posts: 724
Likes: 0
Received 0 Likes
on
0 Posts
Originally Posted by ckrowland
now i get it thanks
whats wrong with rainbows in your headlights .....
whats wrong with rainbows in your headlights
.....nothings wrong with rainbows :theghey: no seriously take your time with this and have a friend line up your bumper with you (mines still a little off) and most imortantly dont forget to take pictures and post them after your done
11-30-2008, 06:43 PM
#35
Instructor
Join Date: Nov 2008
Location: Morrow, OH
Age: 33
Posts: 147
Likes: 0
Received 0 Likes
on
0 Posts
When i put everything back together my right side (sitting in the car) low beam light would not work. I took it out, checked the wires and all but seemed fine. It's still not working though, should i buy another bulb and check?
11-30-2008, 07:25 PM
#36
CL in lawnmower status
^first check the fuse, just to make sure, it should be in the fuse box in your engine bay, in the upper passenger side of the bay, i don't know what else you can troubleshoot besides that
 02-19-2009, 11:36 AM
#39
Senior Moderator
Regional Coordinator
(Mid-Atlantic)
Regional Coordinator
(Mid-Atlantic)
iTrader: (6)
No
