
2.2 Intake Install


Joined: Jan 2005
Posts: 92,764
Likes: 4,682
From: ShitsBurgh
Originally Posted by KLepTo
i dont know, but AEM claims to be 50 state carb legal. it comes with the carb sticker
 AEM and K&N intakes pass inspection, mine passed when I had my SRI spaceship hum
Mmmm...
Joined: Feb 2007
Posts: 1,329
Likes: 0
From: Raleigh, NC
Originally Posted by ninetysevencl
step 9:
that little canister has a rubber hose connected to it that connects to a little battery type thing (says 12V on it so im assuming it powers something) . am i supposed to just rip out the canister and leave the hose or rip out the canister with the hose?
that little canister has a rubber hose connected to it that connects to a little battery type thing (says 12V on it so im assuming it powers something) . am i supposed to just rip out the canister and leave the hose or rip out the canister with the hose?
i got to here and theres more stuff that cant be attached to the evay intake that were attached to the stock one...

Mmmm...
Joined: Feb 2007
Posts: 1,329
Likes: 0
From: Raleigh, NC
got better pics comin but while they are on their way... does the end with the filter just chill out there... are there no supports for it? and does the filter not connect to ne thing it just chills there too?


Mmmm...
Joined: Feb 2007
Posts: 1,329
Likes: 0
From: Raleigh, NC
the first one is like it with the step 9 piece in there still for reference.. horned... is that what u are talkin about... it looks like it goes to the fuse box... is it not important? and does the filter just chilll liek i asked?
Instructor
Joined: Mar 2006
Posts: 112
Likes: 0
From: Mississauga, ON CANADA
i just took it all out and disconnected the long skinny tube up at the firewall. it is a vacuum line so i plugged it and all seems fine. i saved EVERYTHING in case i did it wrong...but so far so good!
Mmmm...
Joined: Feb 2007
Posts: 1,329
Likes: 0
From: Raleigh, NC
Originally Posted by pjosh
i just took it all out and disconnected the long skinny tube up at the firewall. it is a vacuum line so i unplugged it and all seems fine. i saved EVERYTHING in case i did it wrong...but so far so good!
you UNplugged it?
Mmmm...
Joined: Feb 2007
Posts: 1,329
Likes: 0
From: Raleigh, NC
ah good idea... i just screwed it into one of the old holes of the box filter... that way it doesnt rattle around in there... also... i still have it ghetto rigged... anyone wanna post pics of how they have it mounted...?
see the zip tie...
see the zip tie...
Instructor
Joined: Mar 2006
Posts: 112
Likes: 0
From: Mississauga, ON CANADA
Good call on keeping the 'thing' plugged in - any idea what it does?? i opened up the other 'thing' that it was plugged into and it had another throttle body in it....my gsr, accord, civic was never that complex!!
hey - when you painted your valve cover did you just take it off clean it out and paint it without changing the gasket - or did you have to change the gasket?? i just painted my intake tube wrinkle red and want to do the valve cover as well - however, i'm leary of taking it off...don't wanna mess anything up...what about torquing the bolts - i've heard horror stories of overtightening...do you know the torque rating??
hey - when you painted your valve cover did you just take it off clean it out and paint it without changing the gasket - or did you have to change the gasket?? i just painted my intake tube wrinkle red and want to do the valve cover as well - however, i'm leary of taking it off...don't wanna mess anything up...what about torquing the bolts - i've heard horror stories of overtightening...do you know the torque rating??
Mmmm...
Joined: Feb 2007
Posts: 1,329
Likes: 0
From: Raleigh, NC
Originally Posted by pjosh
Good call on keeping the 'thing' plugged in - any idea what it does?? i opened up the other 'thing' that it was plugged into and it had another throttle body in it....my gsr, accord, civic was never that complex!!
hey - when you painted your valve cover did you just take it off clean it out and paint it without changing the gasket - or did you have to change the gasket?? i just painted my intake tube wrinkle red and want to do the valve cover as well - however, i'm leary of taking it off...don't wanna mess anything up...what about torquing the bolts - i've heard horror stories of overtightening...do you know the torque rating??
hey - when you painted your valve cover did you just take it off clean it out and paint it without changing the gasket - or did you have to change the gasket?? i just painted my intake tube wrinkle red and want to do the valve cover as well - however, i'm leary of taking it off...don't wanna mess anything up...what about torquing the bolts - i've heard horror stories of overtightening...do you know the torque rating??


Instructor
Joined: Mar 2006
Posts: 112
Likes: 0
From: Mississauga, ON CANADA
i'll take some pics when i clean my engine bay and do my valve cover - then it will hopefully be exactly what i'm hoping for. BTW if anyone is ever using VHT wrinkle paint the best finish is when you put it in the oven at 200 degrees farenheit for 45-60 min. the wrinkles comes out as close to oem as possible!!
Suzuka Master
Joined: Jul 2005
Posts: 6,777
Likes: 39
From: Virginia
Originally Posted by CLpwner
ok so... valve cover... i changed the valve cover... no need and its a bitch if its never been change before :me: <--... and pics of the tube... please... and i didnt torque it back down... no tengo una touque wrench... i just put it on really f-ing tight... i hope its not too tight...

Man, you coulda pm'd me home boy, I have a torque wrench, and I live like 20 minutes away.
Hope you didn't over-torque, cause that bad boy won't wanna come out

1999 Acura 2.3 CL
Joined: Aug 2007
Posts: 80
Likes: 0
From: Pennsylvania
Alright I just bought one of these:
http://cgi.ebay.com/ebaymotors/ws/eB...159219467&rd=1
I'm installing this on a 1999 2.3. is there anything else I need to do that isn't listed in these instructions. In the instructions that came with it, it says some accords have a air intake resonater valve that has to be plugged up..
Do I have to worry about pluging anything up or can I just pull everything out like in the DIY and install the intake connecting the one vacume line in my car?

5th Gear
Joined: Sep 2007
Posts: 5
Likes: 0
Originally Posted by KLepTo
Disclaimer: by using these guides, you are removing me from any liability that is related to any injury that might occur. I would suggest having a friend help you on these installs, if you are unsure about your abilities for any of these projects, get a professional to do it.
Credit goes to wes (llwesman@yahoo.com) for the original guide and pics
AEM V2 Intake install
Estimated Time: ~1 hour
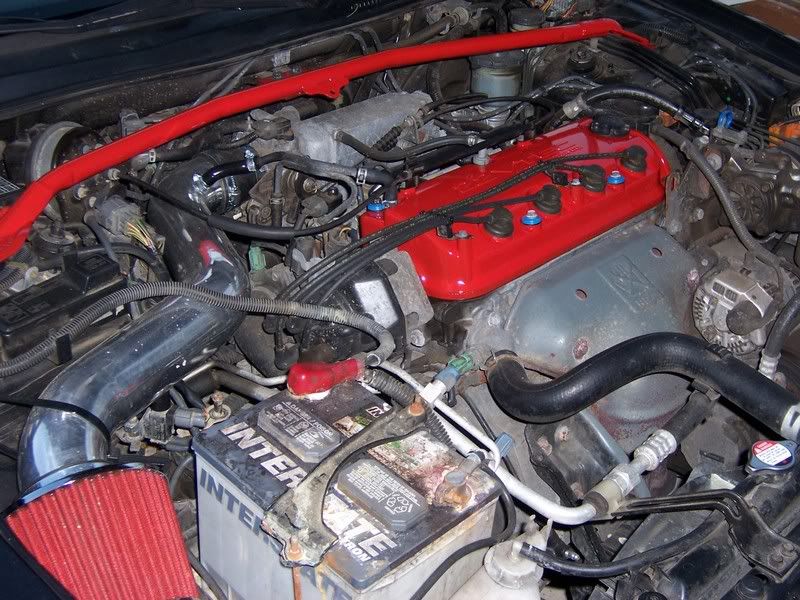
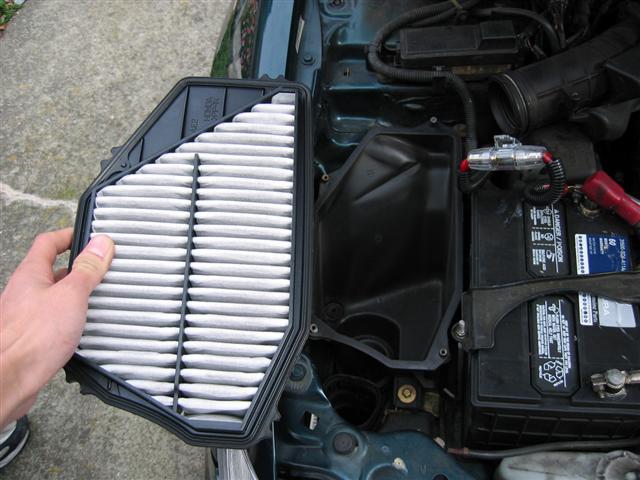
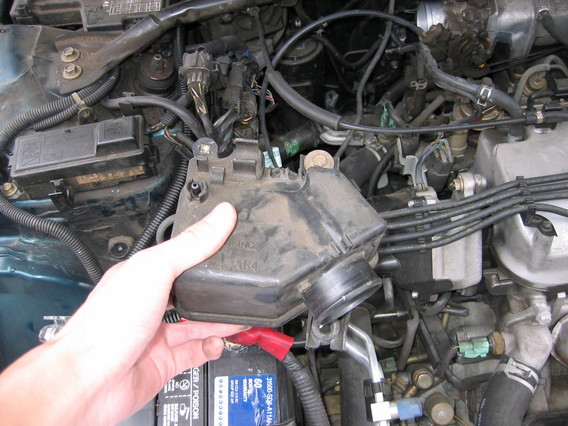
1. Here's your engine bay, if you've got a 2.2/2.3 CL. Start by lifting up your hood
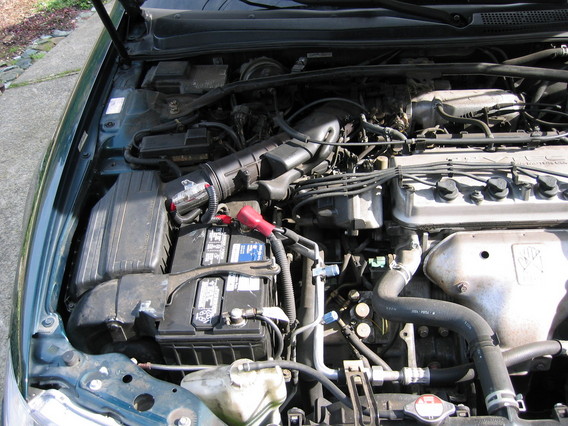
2. Next, remove this little piece of plastic, it should pull right out.

3. Disconnect these two pieces next.
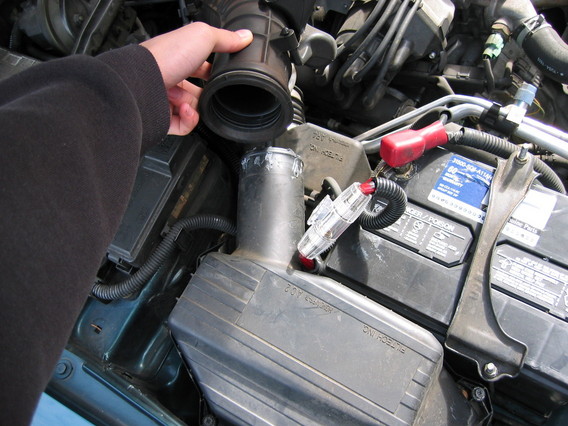
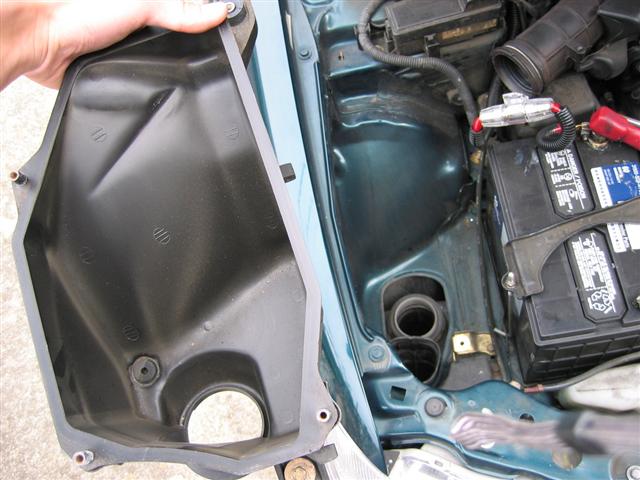
4. Remove this cover with a screwdriver.
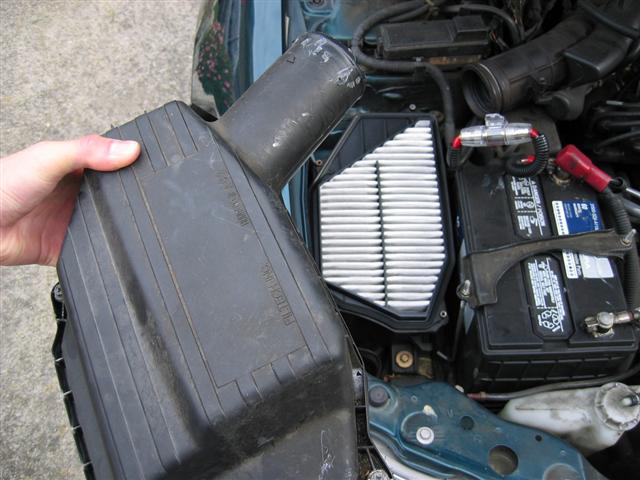
5. Remove the stock filter next, it should pull right out.
6. Next, pull this piece out.
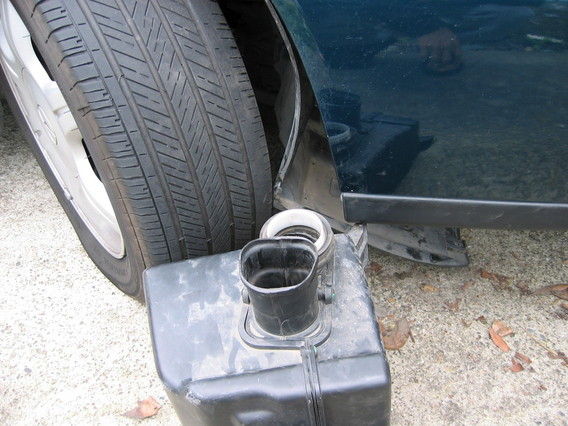
7. Then, carefully pull out the plastic plugs under the wheel well in order to access the stock air box. Be careful not to break the plugs. The wheel well should allow you to pull the air box out easily. It makes it easier if you turn the wheel away from the car as shown in the picture. If you are installing a Cold Air Intake (CAI), then leave the wheel well open, if you are installing a short ram or V2, go ahead and close it up with the plastic plugs.
8. Next, remove this piece of plastic piping.
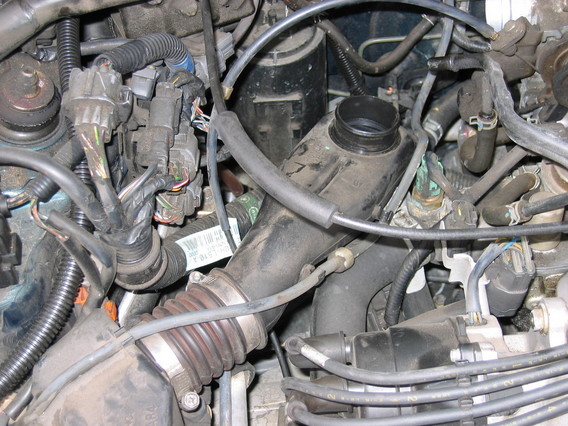
9. Then rip out this piece.
10. To finish, plug the rubber piping into the intake. It's the only thing that attaches to the intake and there's really only one place you can put it.
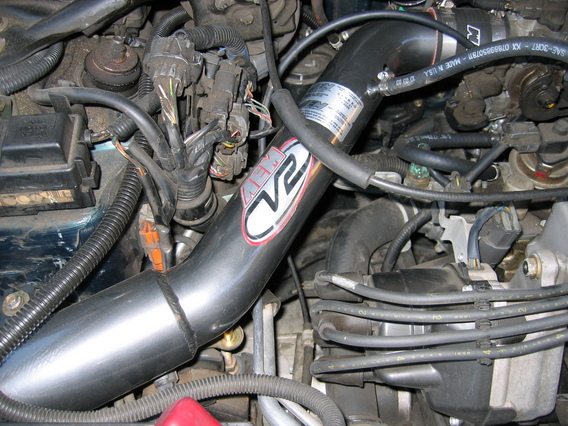
11. Next, clamp the intake to the engine bay as shown at the top of this picture. A screw/washer combination is usually included and attaches to the forked spot on the intake. In this picture the connection is partially covered by wiring.
12. Viola, there you go. Reset your ECU if you like by disconnecting the battery for about 10 min, or just leave it as is and your car will adjust in a couple weeks.
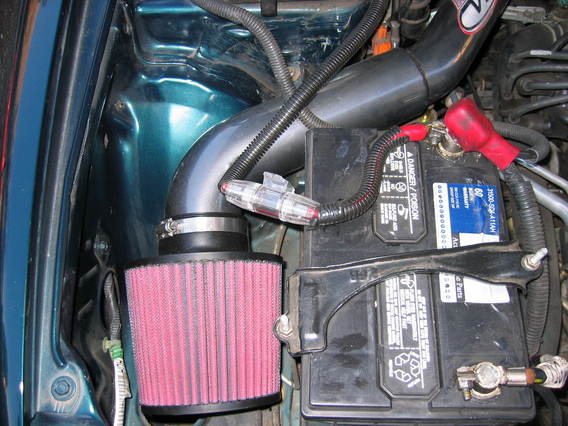
If you are installing a Cold Air Intake (CAI), install the piping as indicated, then attach the filter which sits inside the wheel well. The intake feeds directly into the hole where the old filter sat atop.
Credit goes to wes (llwesman@yahoo.com) for the original guide and pics
AEM V2 Intake install
Estimated Time: ~1 hour
1. Here's your engine bay, if you've got a 2.2/2.3 CL. Start by lifting up your hood
2. Next, remove this little piece of plastic, it should pull right out.
3. Disconnect these two pieces next.
4. Remove this cover with a screwdriver.
5. Remove the stock filter next, it should pull right out.
6. Next, pull this piece out.
7. Then, carefully pull out the plastic plugs under the wheel well in order to access the stock air box. Be careful not to break the plugs. The wheel well should allow you to pull the air box out easily. It makes it easier if you turn the wheel away from the car as shown in the picture. If you are installing a Cold Air Intake (CAI), then leave the wheel well open, if you are installing a short ram or V2, go ahead and close it up with the plastic plugs.
8. Next, remove this piece of plastic piping.
9. Then rip out this piece.
10. To finish, plug the rubber piping into the intake. It's the only thing that attaches to the intake and there's really only one place you can put it.
11. Next, clamp the intake to the engine bay as shown at the top of this picture. A screw/washer combination is usually included and attaches to the forked spot on the intake. In this picture the connection is partially covered by wiring.
12. Viola, there you go. Reset your ECU if you like by disconnecting the battery for about 10 min, or just leave it as is and your car will adjust in a couple weeks.
If you are installing a Cold Air Intake (CAI), install the piping as indicated, then attach the filter which sits inside the wheel well. The intake feeds directly into the hole where the old filter sat atop.
Mmmm...
Joined: Feb 2007
Posts: 1,329
Likes: 0
From: Raleigh, NC
Could someone please post a pic of how they have the filter part of it mounted... scroll up and see that mine is STILL zip tied... I just can't exactly remember how 5-Speed had his so I need a little mind refresher... thanks
Mmmm...
Joined: Feb 2007
Posts: 1,329
Likes: 0
From: Raleigh, NC
Originally Posted by CLpwner
Could someone please post a pic of how they have the filter part of it mounted... scroll up and see that mine is STILL zip tied... I just can't exactly remember how 5-Speed had his so I need a little mind refresher... thanks
where is....
Joined: Feb 2006
Posts: 8,376
Likes: 1
From: palmyra,pa
in the circled red area you took a bolt off of the old intake, put a bracket there and bolt the bracket down. it'll hold the intake up. but my bracket is a little bit too long and i have to move it to the side because the battery is in the way.


98 2.3 CL
Joined: Oct 2007
Posts: 73
Likes: 0
IAR solenoid
Originally Posted by CLpwner

it supposedly opens a valve between 2900 rpm and 3700 rpm and it let some air flows from the "box" to the intake manifold...possibly for tuning out some engine noise
where is....
Joined: Feb 2006
Posts: 8,376
Likes: 1
From: palmyra,pa
Originally Posted by CLpwner
So you put the bracket around the metal part of the intake... I thought it went around the rubber near the filter... hmmm I'm confused
 But If you could explain it as if you were to a 5 year old, that'd be great.