
D-094: DIY Complete Brake Job with Pics
 08-18-2007 | 09:48 PM
#1
Well after the lug nut incident (https://acurazine.com/forums/ramblings-12/tahoe-new-years-165027/) I finally got around to doing my brakes today, rotors and pads all the way around, Painted the rear calipers too. I have also run into a problem at 1 Corner which you can see at the end, which i'm not sure how to solve.
Disclaimer: These are merely my suggestions on how to replace your brakes, I am not a professional and this should only be taken as advice. I will not be held liable for anything you mess up as a result from following these directions.
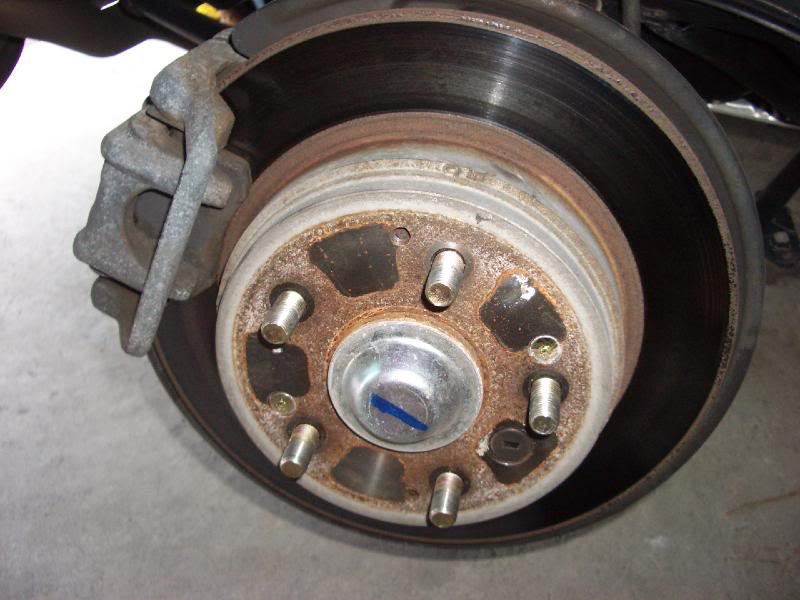
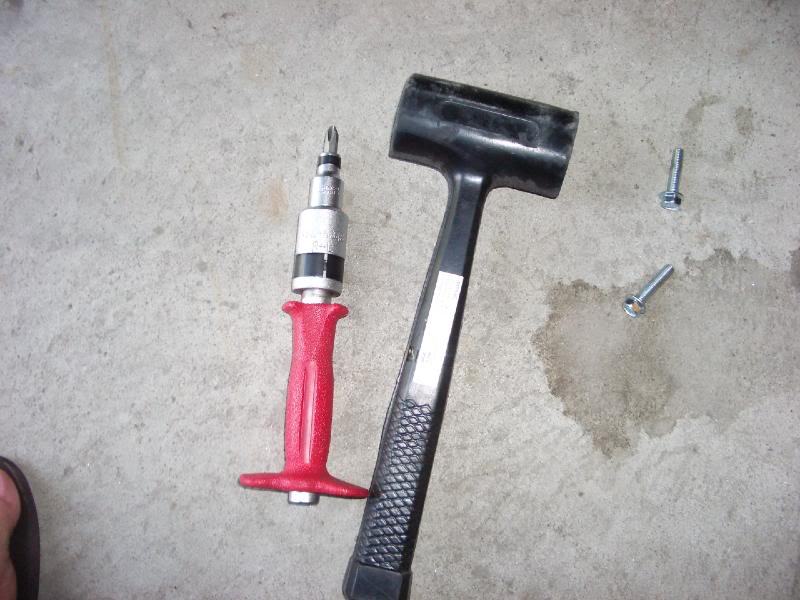
1.Remove screws from rotors, Impact driver will make this possible.
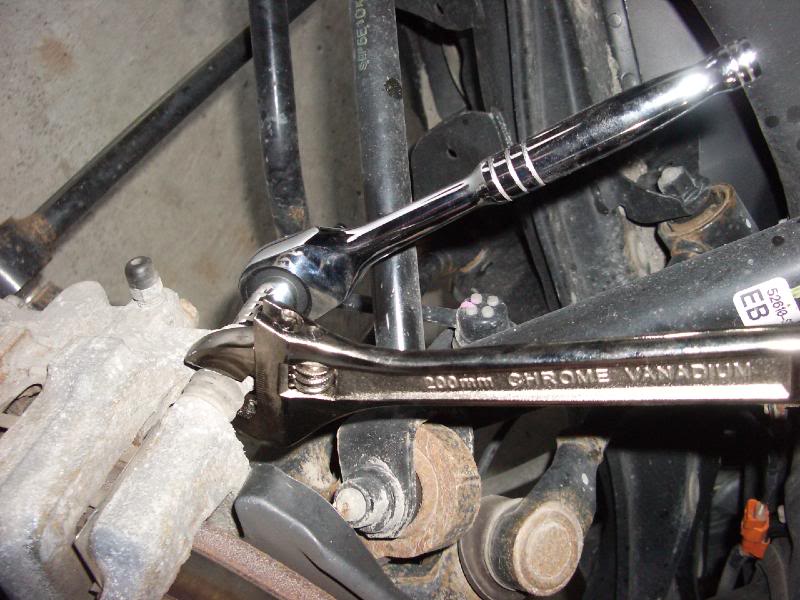
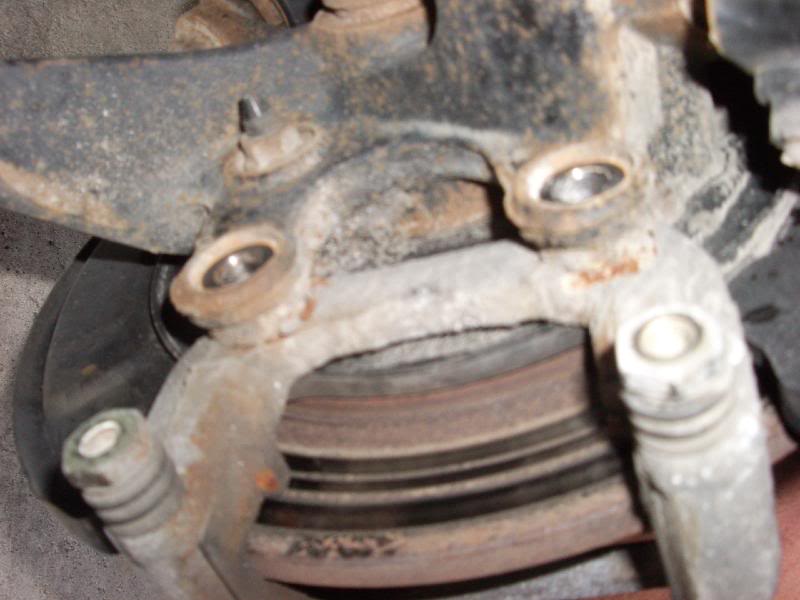
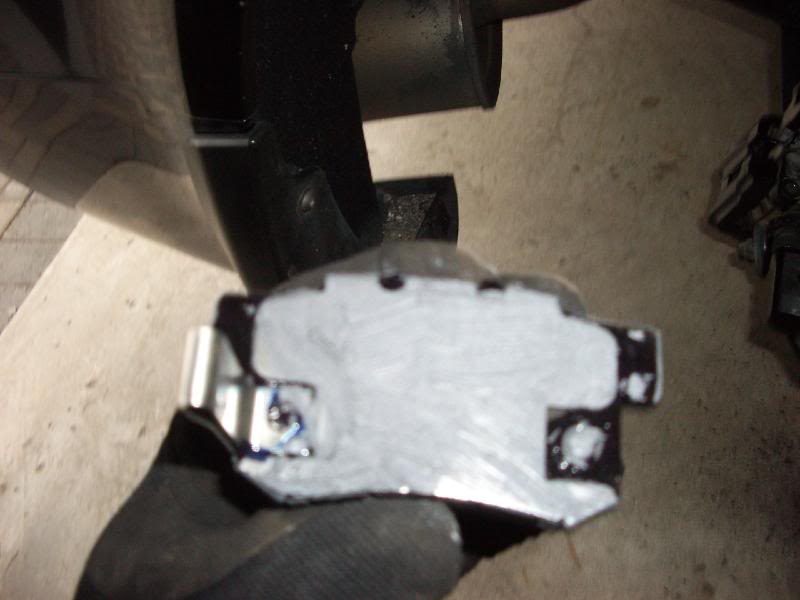
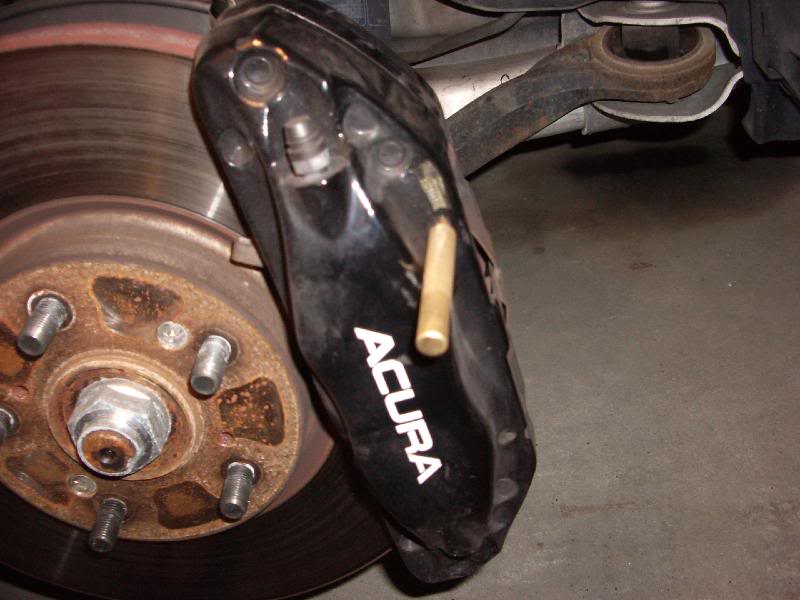
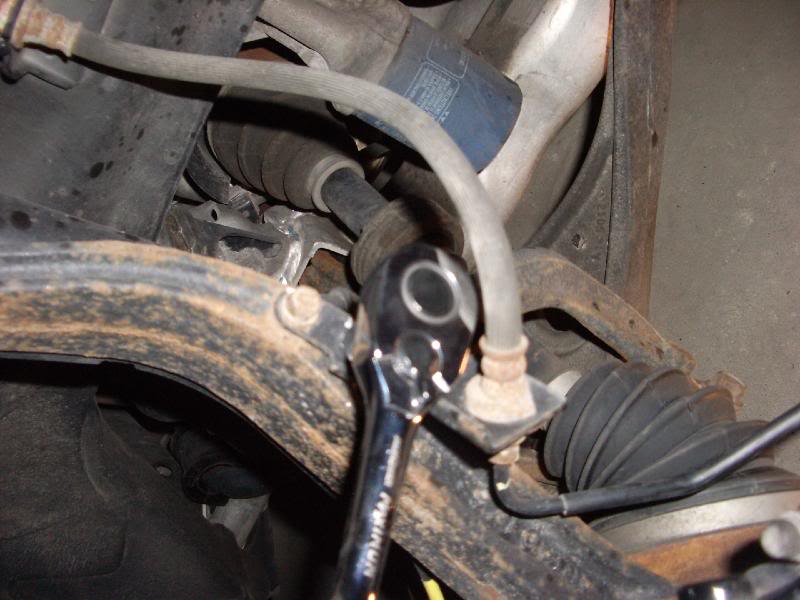
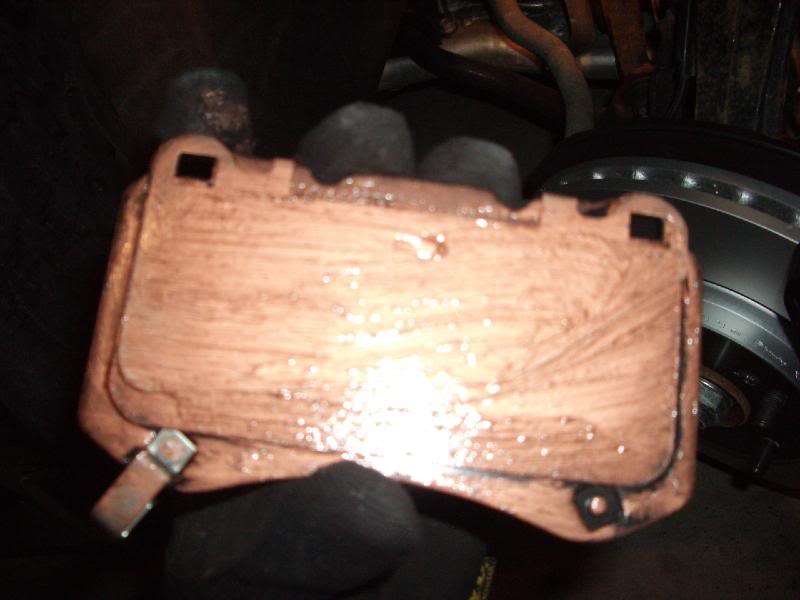
2. Remove the Caliper bolts (12mm) pictured here. Use a wrench to stop the pins from rotating. Swing caliper away and rest of control arm.
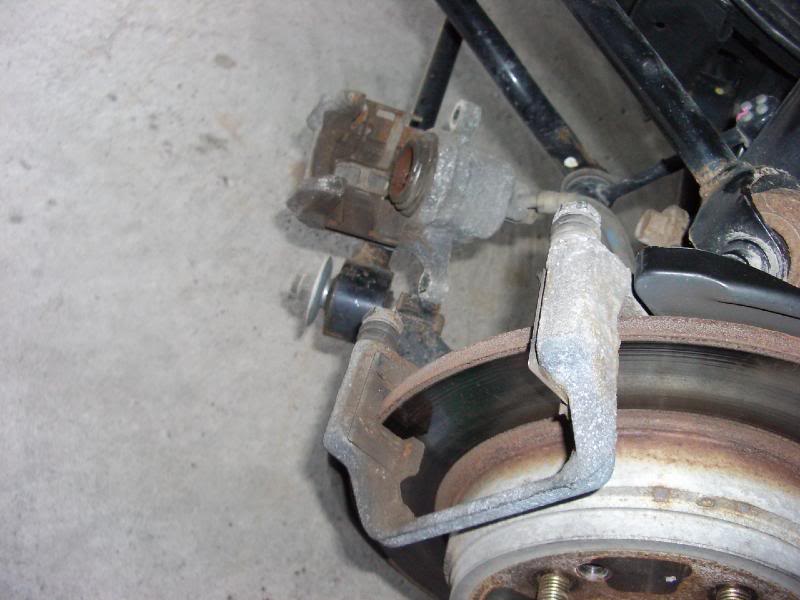
3. Remove the caliper bracket bolts (14mm)
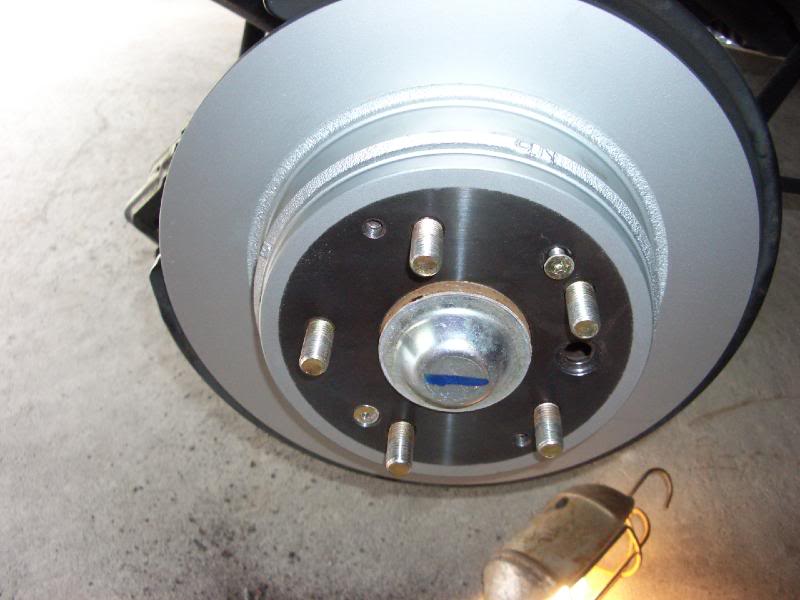
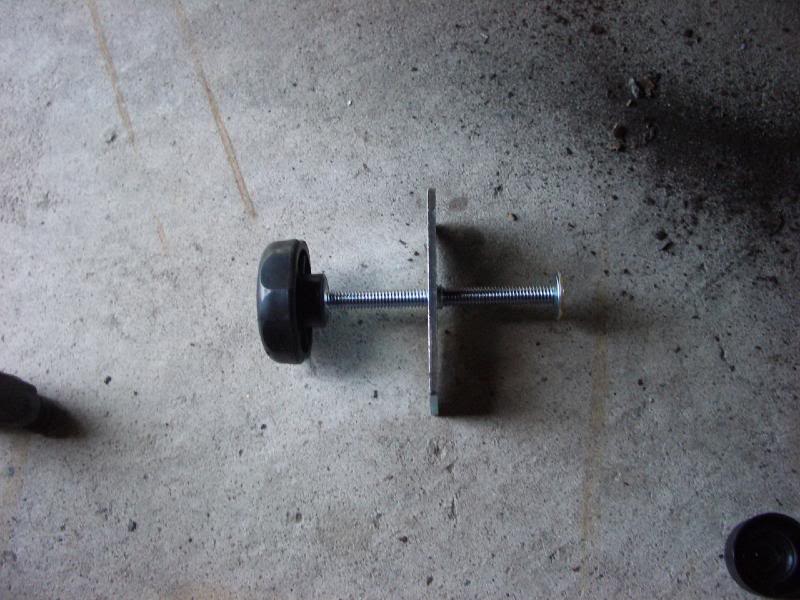
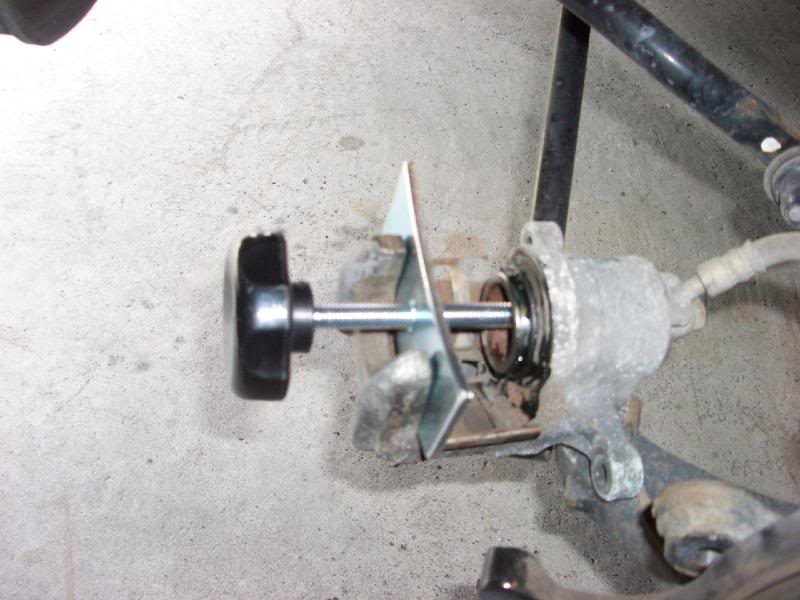
4. Use 2 8X1.25 bolts to push to rotor off the hub.
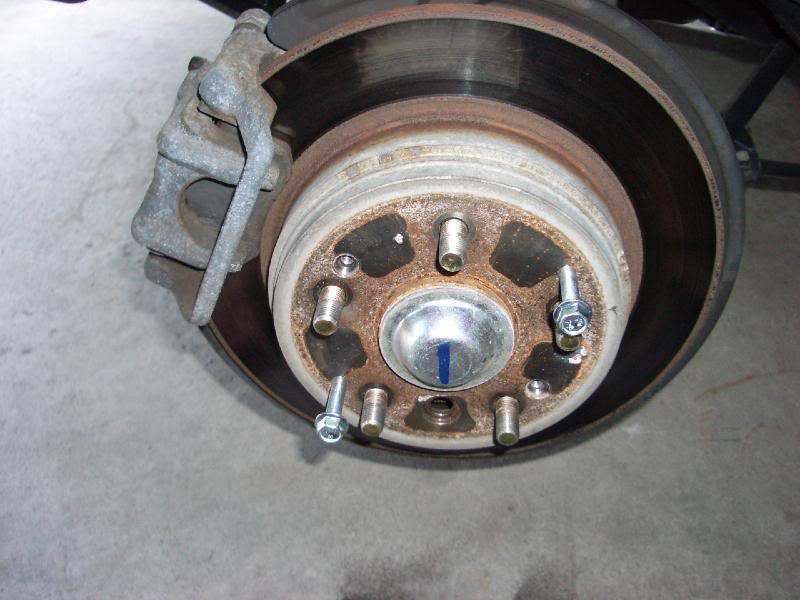
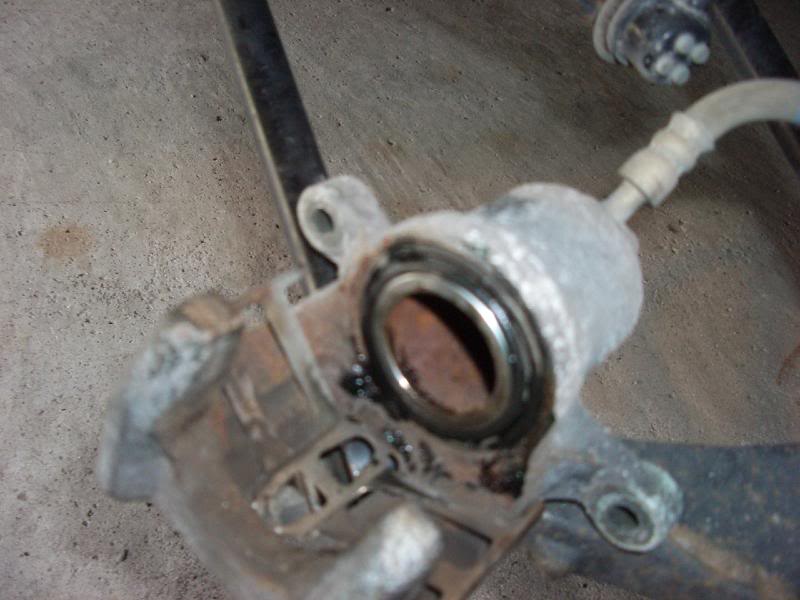
5. Clean up the hub a little with a wire brush. Then at the bottom of the hub rotate the little spike wheel up until it is fully retracted, this is so the e-brake shoes do not rub.
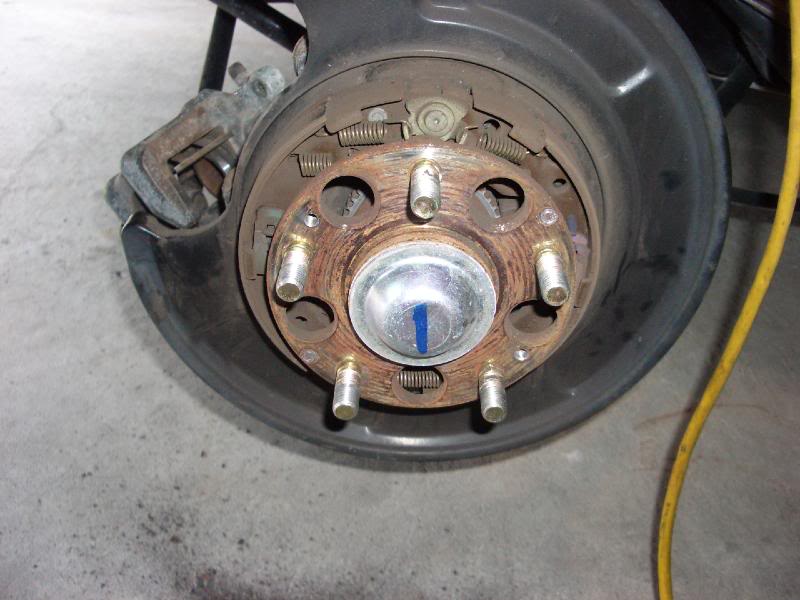
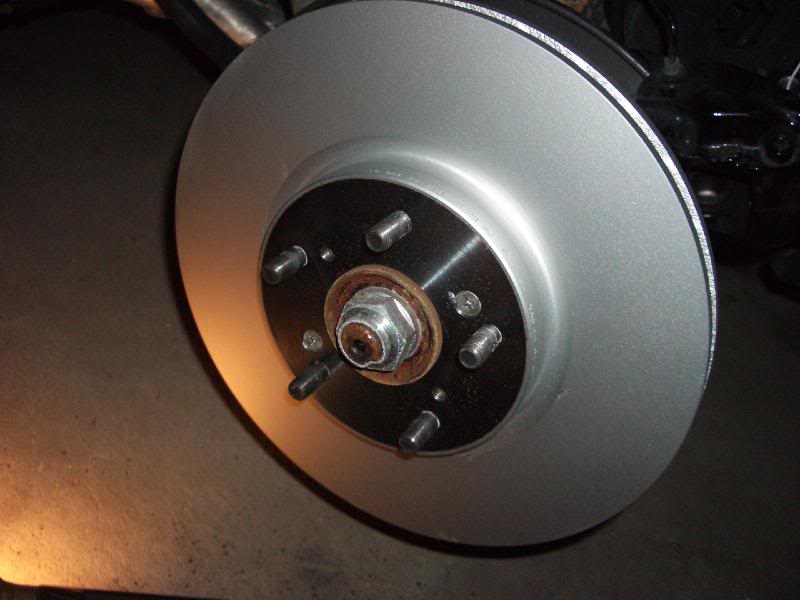
6. Install new rotor. Replace those screws if you wish, use lots of anti seize. If you use the screws it really helps when you dialing in the ebrake shoes. There is a little rubber plug that you have to remove from the old rotors. Once your new one is screwed on there is a little access hole that lets you adjust the spikey ebrake adjuster. This time you want to turn the spike wheel towards the ground until there is friction against the rotors, then turn it 6 clicks up. Replace the rubber plug.
7. With that all done, you want to lubricate the slider pins on the caliper bracket. Hold the rubber boot at the bottom and pull the pin up. Give it a little bit of grease. Push it back down so the boot full seats. Bolt up the caliper bracket to 41 ft-lbs.
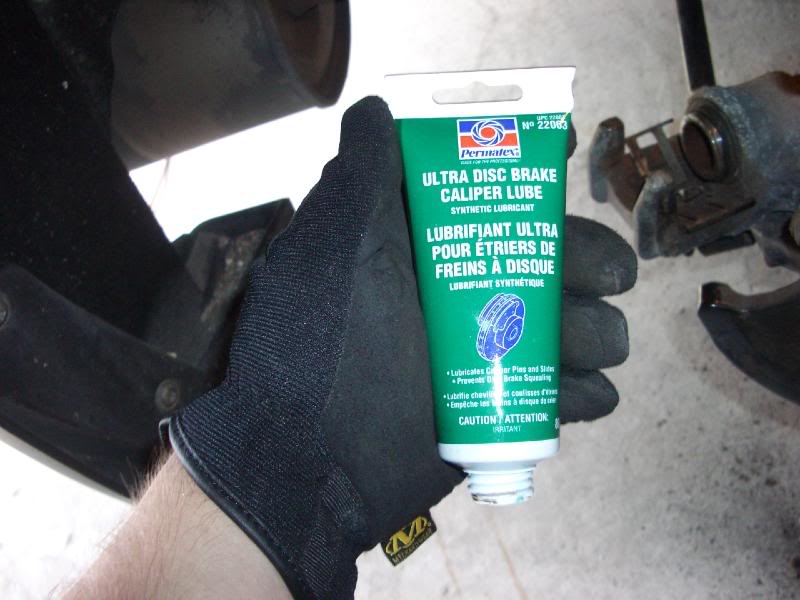
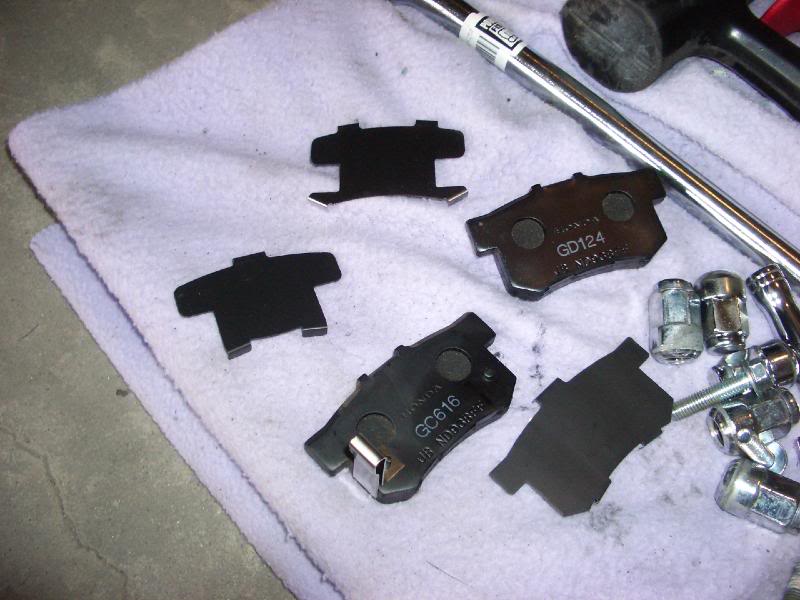
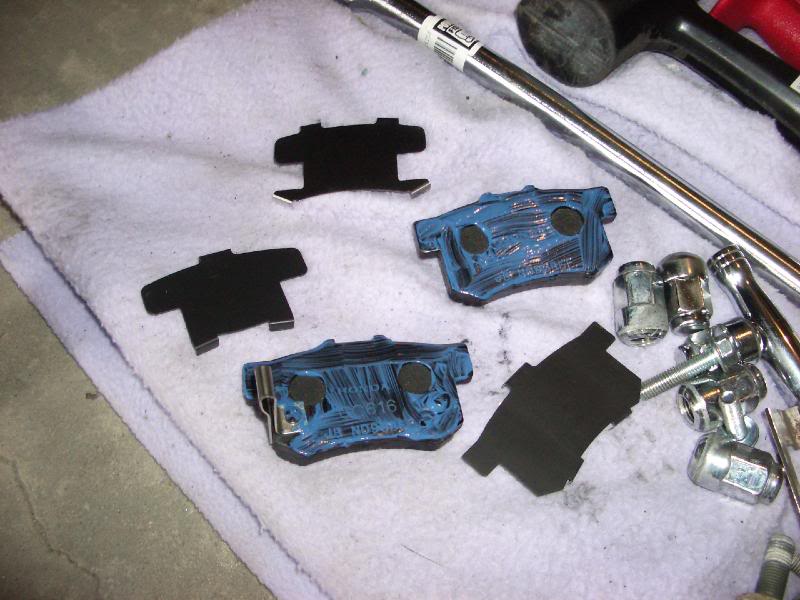
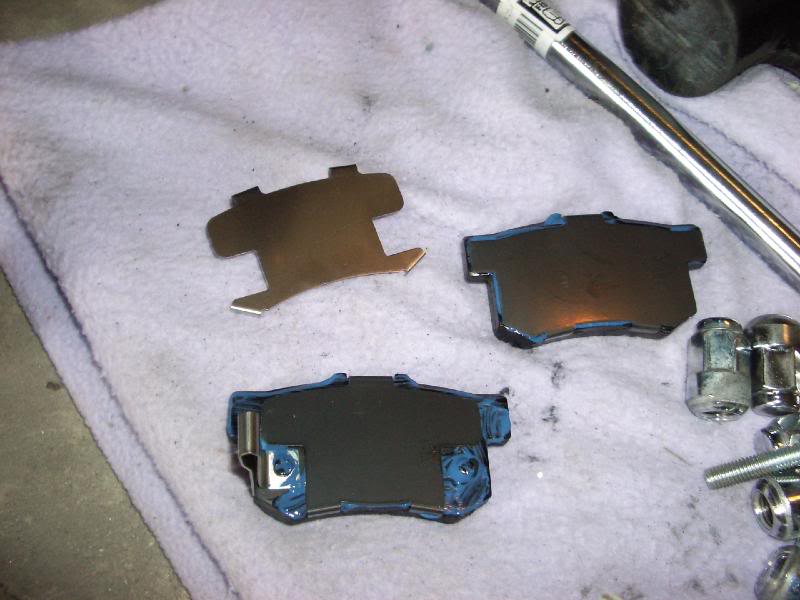
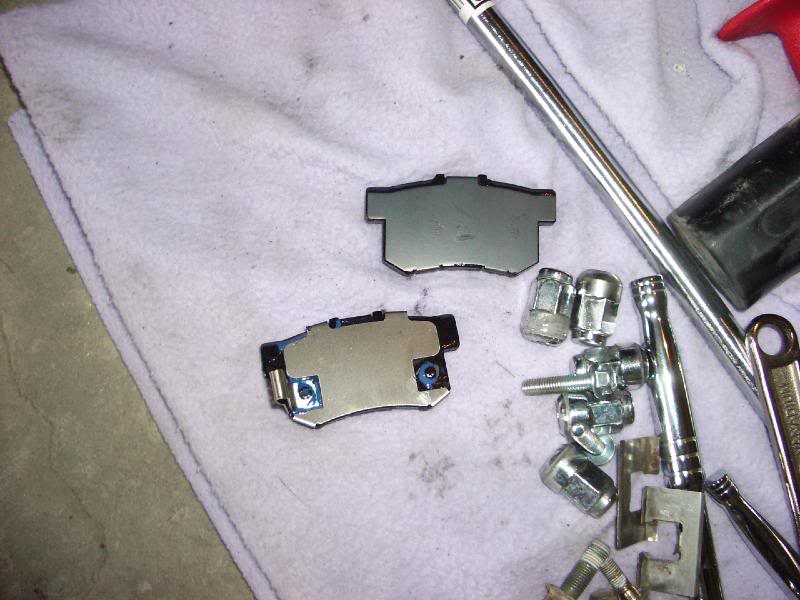
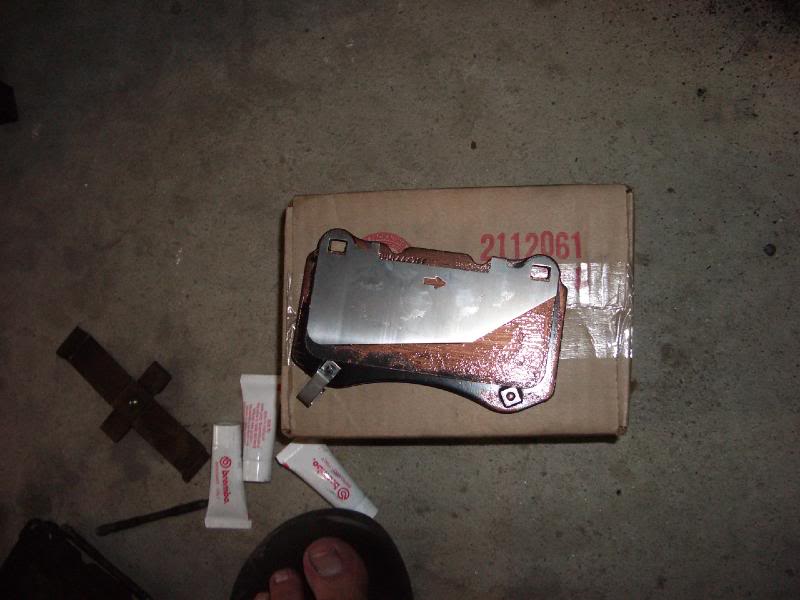
8. On the caliper bracket there should be a metal clip on the top and bottom that the pads sit on. Lube those with the little packet of grease that comes with the pads, use sparingly. Remove the shims from the back of the pads and spread the grease over the back of the pad. Replace shim, grease back of shim. Slide the pads into the caliper bracket.
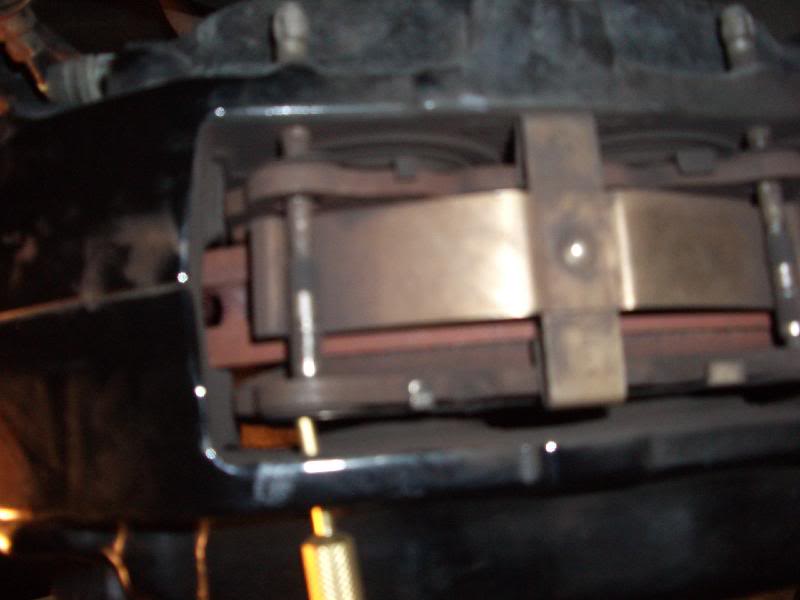
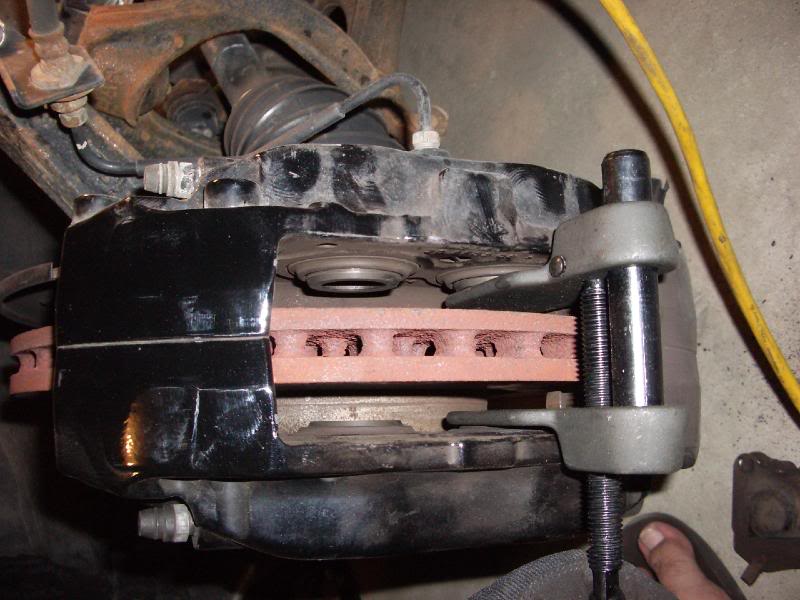
9. Prepare the caliper, clean around the seal with a toothbrush to remove all the crud. The grease the part of the piston that is exposed with the same grease as you used on the pins. Use a piston compressor tool to reset the piston in its bore. Slide the caliper over the pads and install the 2 12mm bolts with anti seize and torque to 17ft-lbs.
You can repeat these for all 4 if you have an AT for those of us with Brembos Read on.
1. Remove those danged screws with the impact driver again.
2. Turn the wheel towards you for better access, drive out the pins with a 3.5mm punch.
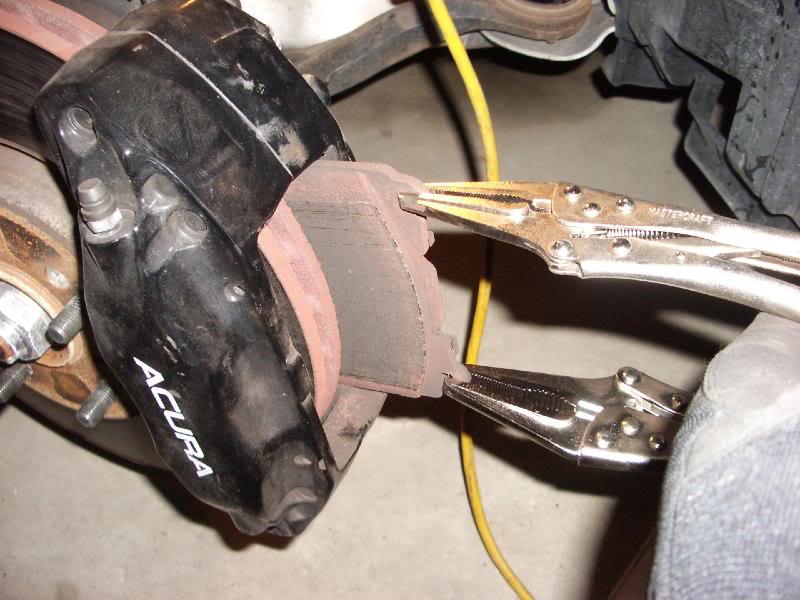
3. Pull pads out with vice grips. Clean caliper interior with tooth brush. Using a differnt piston compressor reset all 4 pistons in their bore.
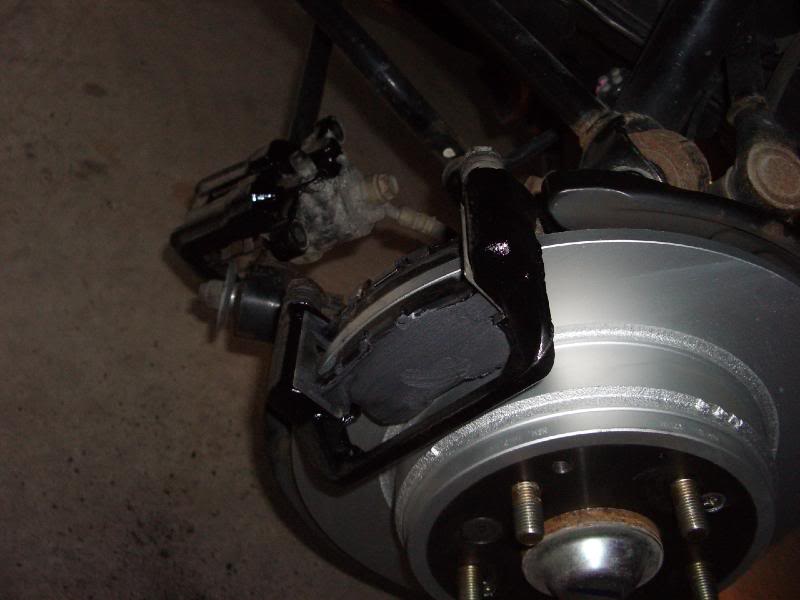
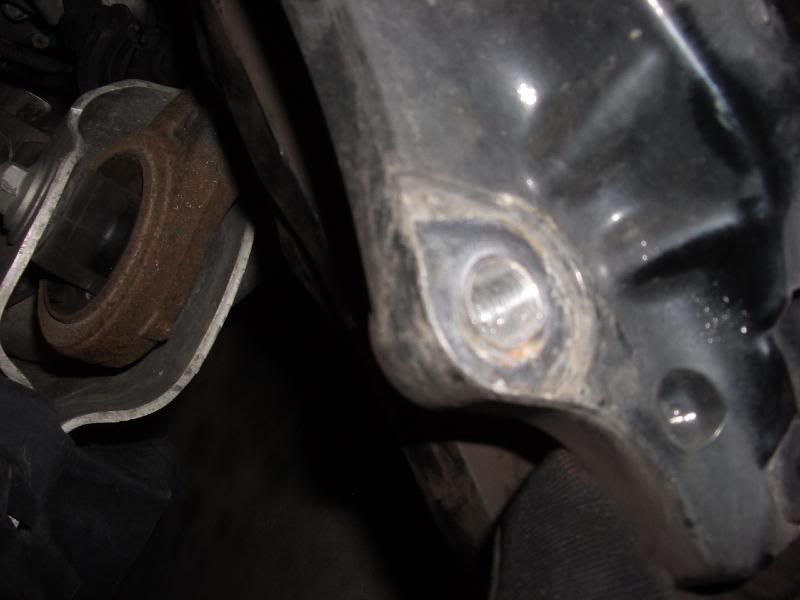
4.Remove the brake line bracket on the spindle, 2 10mm bolts. Remove the caliper bolts on the back 2 20mm bolts. Hang the caliper on a coat hanger from the upper control arm.
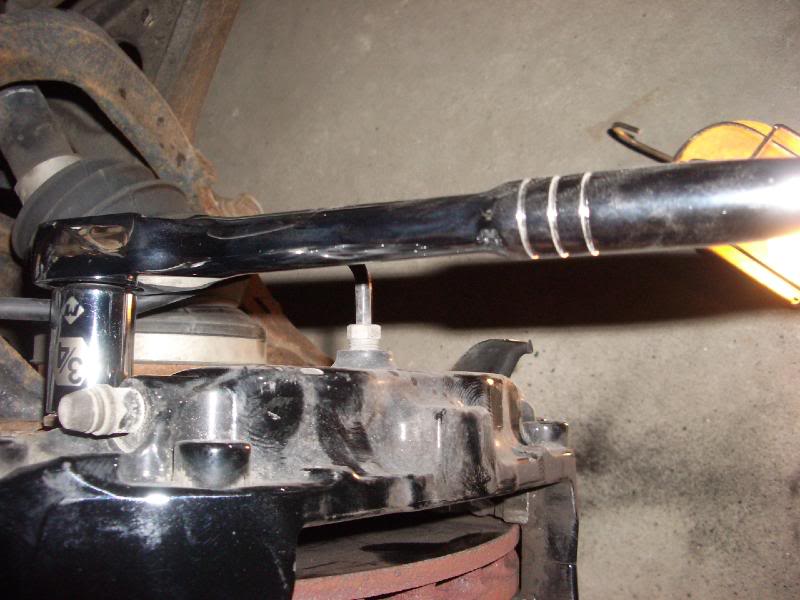
5. Use the 2 8x1.25 bolts again to pull the rotor from the hub. Replace the rotor, put the 2 screws back in with anti-seize.
6. Re attach the caliper, anti-seize the bolts and torque to 125 ft-lbs. I forgot to take pic.
7. Grease the pads,, shims. Make sure you line up all the arrows with the direction of wheel motion.

8. Slide the pads back into the caliper. Slide the first pin through and punch back into place. Slip the spring under the one you just installed and hold the bottom part down while you slide the second pin through the bottom, and punch into place. It should look like this.
9. GO HAVE A BEER you just did you BRAKES. P.S. Torgue all your lugs to 81ft-lbs.
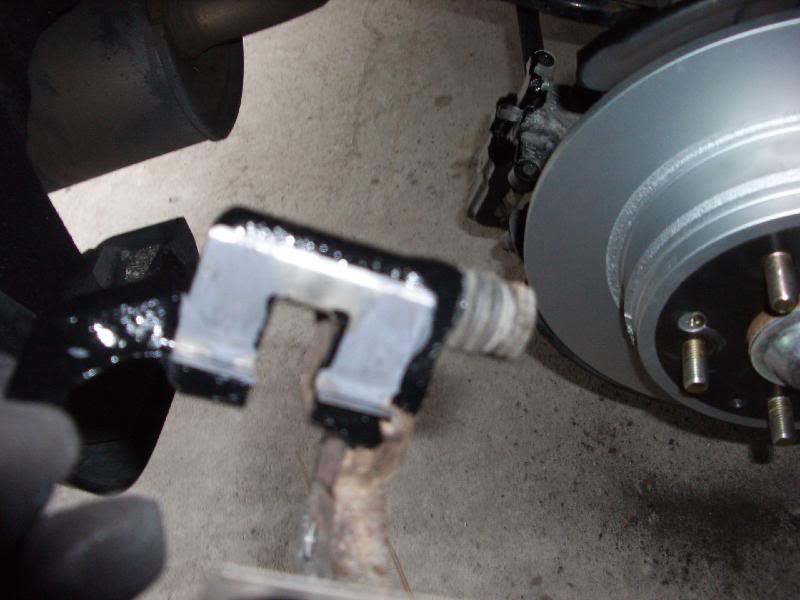
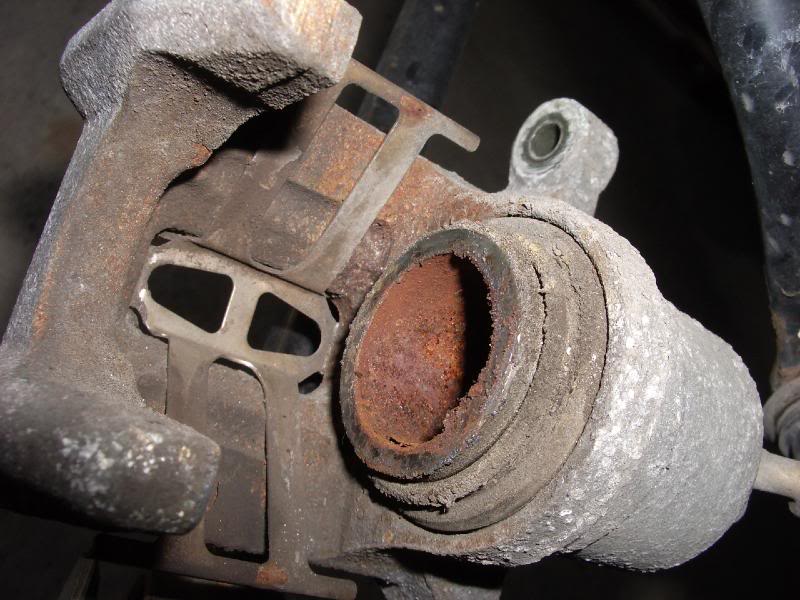
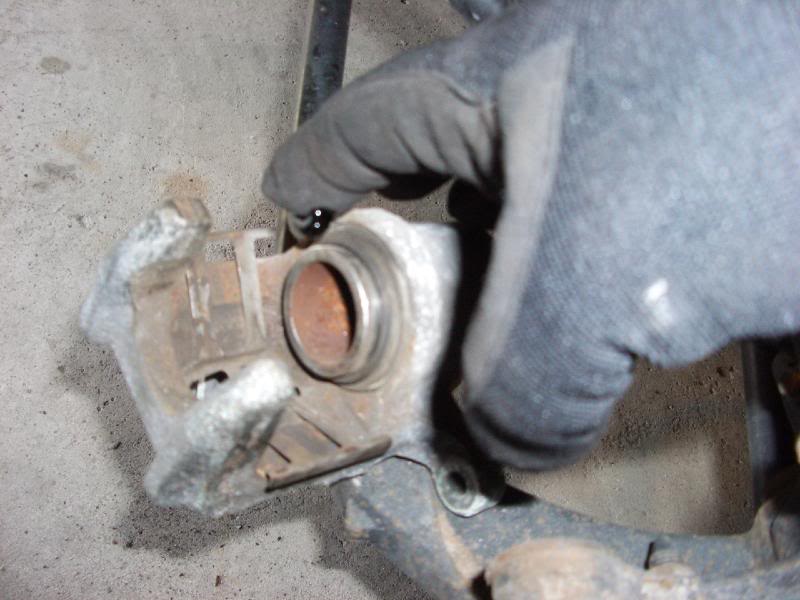
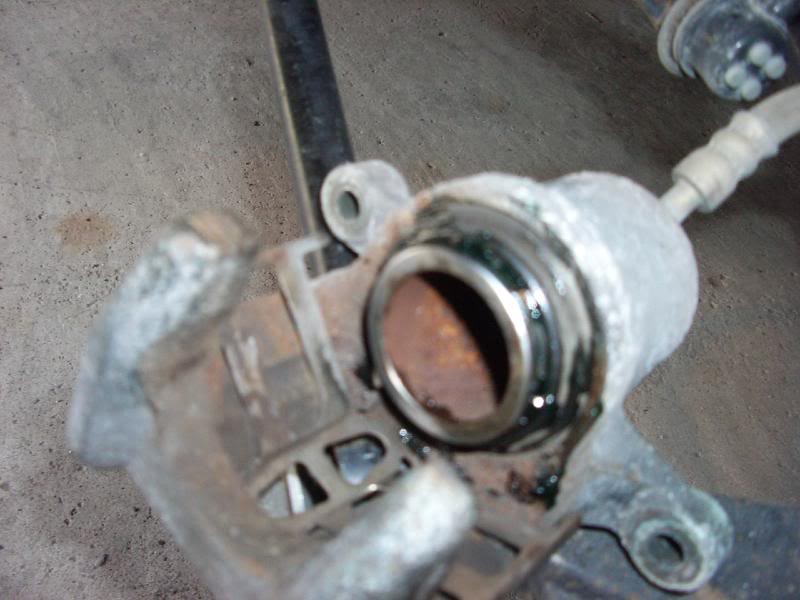
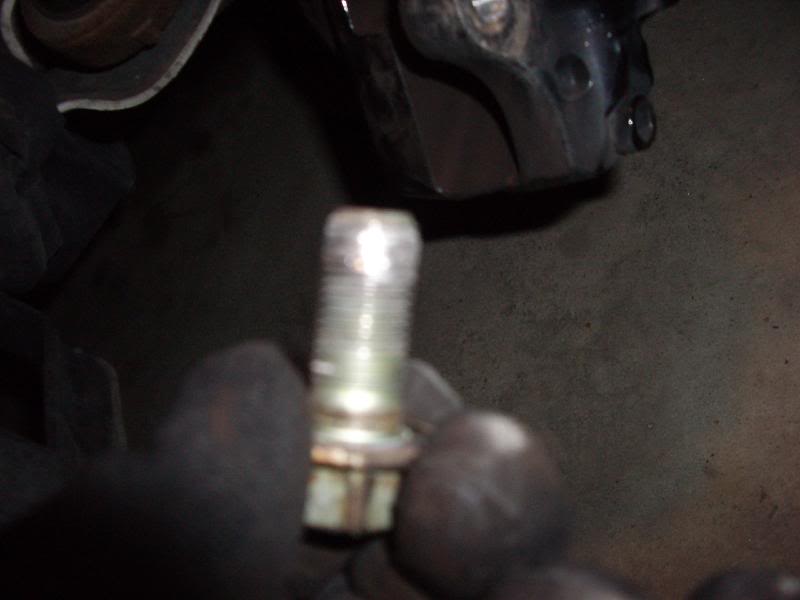
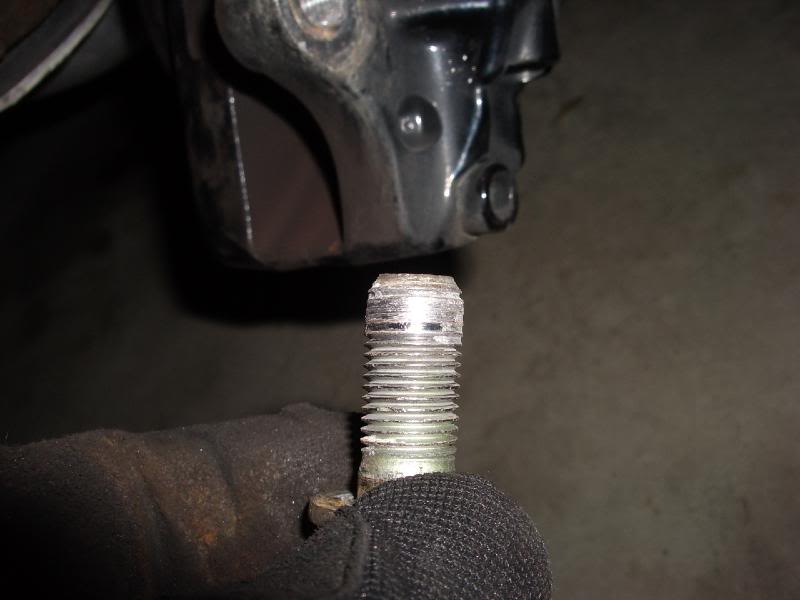
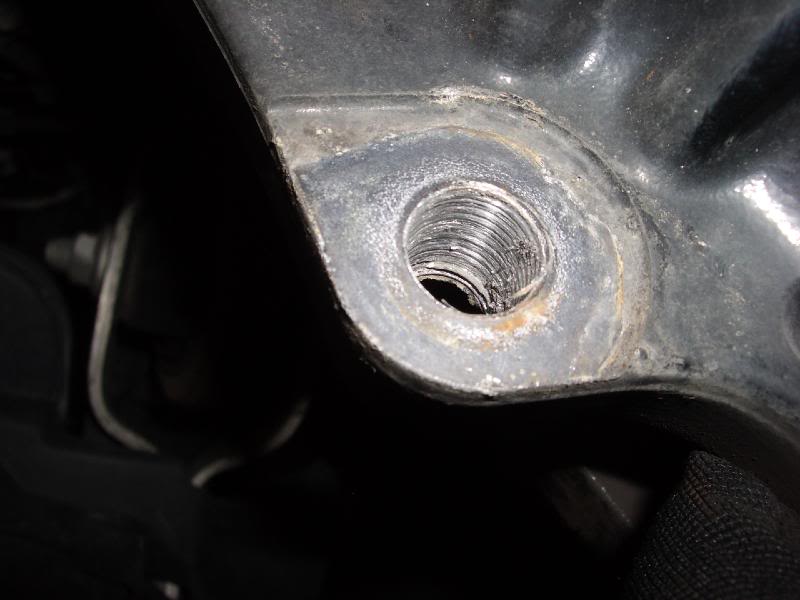
My dilema happened on the drivers side from caliper. The lower caliper bolt was cross thread from the factory or dealer. I'm still not sure how this is going to get fixed but i'm not happy. here's some pics.
Disclaimer: These are merely my suggestions on how to replace your brakes, I am not a professional and this should only be taken as advice. I will not be held liable for anything you mess up as a result from following these directions.
1.Remove screws from rotors, Impact driver will make this possible.
2. Remove the Caliper bolts (12mm) pictured here. Use a wrench to stop the pins from rotating. Swing caliper away and rest of control arm.
3. Remove the caliper bracket bolts (14mm)
4. Use 2 8X1.25 bolts to push to rotor off the hub.
5. Clean up the hub a little with a wire brush. Then at the bottom of the hub rotate the little spike wheel up until it is fully retracted, this is so the e-brake shoes do not rub.
6. Install new rotor. Replace those screws if you wish, use lots of anti seize. If you use the screws it really helps when you dialing in the ebrake shoes. There is a little rubber plug that you have to remove from the old rotors. Once your new one is screwed on there is a little access hole that lets you adjust the spikey ebrake adjuster. This time you want to turn the spike wheel towards the ground until there is friction against the rotors, then turn it 6 clicks up. Replace the rubber plug.
7. With that all done, you want to lubricate the slider pins on the caliper bracket. Hold the rubber boot at the bottom and pull the pin up. Give it a little bit of grease. Push it back down so the boot full seats. Bolt up the caliper bracket to 41 ft-lbs.
8. On the caliper bracket there should be a metal clip on the top and bottom that the pads sit on. Lube those with the little packet of grease that comes with the pads, use sparingly. Remove the shims from the back of the pads and spread the grease over the back of the pad. Replace shim, grease back of shim. Slide the pads into the caliper bracket.
9. Prepare the caliper, clean around the seal with a toothbrush to remove all the crud. The grease the part of the piston that is exposed with the same grease as you used on the pins. Use a piston compressor tool to reset the piston in its bore. Slide the caliper over the pads and install the 2 12mm bolts with anti seize and torque to 17ft-lbs.
You can repeat these for all 4 if you have an AT for those of us with Brembos Read on.
1. Remove those danged screws with the impact driver again.
2. Turn the wheel towards you for better access, drive out the pins with a 3.5mm punch.
3. Pull pads out with vice grips. Clean caliper interior with tooth brush. Using a differnt piston compressor reset all 4 pistons in their bore.
4.Remove the brake line bracket on the spindle, 2 10mm bolts. Remove the caliper bolts on the back 2 20mm bolts. Hang the caliper on a coat hanger from the upper control arm.
5. Use the 2 8x1.25 bolts again to pull the rotor from the hub. Replace the rotor, put the 2 screws back in with anti-seize.
6. Re attach the caliper, anti-seize the bolts and torque to 125 ft-lbs. I forgot to take pic.
7. Grease the pads,, shims. Make sure you line up all the arrows with the direction of wheel motion.
8. Slide the pads back into the caliper. Slide the first pin through and punch back into place. Slip the spring under the one you just installed and hold the bottom part down while you slide the second pin through the bottom, and punch into place. It should look like this.
9. GO HAVE A BEER you just did you BRAKES. P.S. Torgue all your lugs to 81ft-lbs.
My dilema happened on the drivers side from caliper. The lower caliper bolt was cross thread from the factory or dealer. I'm still not sure how this is going to get fixed but i'm not happy. here's some pics.
The following 5 users liked this post by The Dougler:
*.jpg (09-28-2016),
Cativo (02-04-2014),
screaminz28 (03-16-2014),
Undying Dreams (06-28-2012),
Vincent Rossi (10-20-2012)
08-18-2007 | 09:56 PM
#2
Burning Brakes
Joined: Dec 2006
Posts: 871
Likes: 11
From: Hollywood
That is really good info......
I am very glad that i did not replace my Brembo pads with OEM...
Ceramic pads are about 1000X cleaner no brake dust at all...
You have problems with that on yours?
Thanks for the walkthrough very nice
I am very glad that i did not replace my Brembo pads with OEM...
Ceramic pads are about 1000X cleaner no brake dust at all...
You have problems with that on yours?
Thanks for the walkthrough very nice
08-18-2007 | 10:01 PM
#3
Ya I get the dusting, but I get OEM parts at cost so the price comparison is a tough point for me. Also I plan to sell the car as soon as the 09 comes out so longevity and such was less of a concern.
08-19-2007 | 08:40 PM
#7
05 TL
Joined: Sep 2005
Posts: 562
Likes: 0
From: San Antonio
Nice. I changed the front brakes in my AT. I had to drill out the retaining screws... I am wondering if I need to buy the brake shims for the rears, or if I can just reuse the old ones. They cost 80% of the rear set that contains pads and shims... About 20 bux too much if you ask me.
Good Job Dougler.
Good Job Dougler.
Trending Topics
08-19-2007 | 11:10 PM
#9
Former Sponsor
iTrader: (1)
Joined: Mar 2004
Posts: 9,877
Likes: 624
From: www.ExceleratePerformance.com
Wow.... unless you re-thread that caliper don't drive. You are missing a good 4 to 5 threads which is basically what the end of the bolt holds on to. More than likely the threads in the caliper are fine and the bolt is just messed up b/c the caliper metal is stronger than the bolt. If the threads are good just replace the bolt and torque it down to spec. Don't drive the car like you have it.
08-19-2007 | 11:57 PM
#10
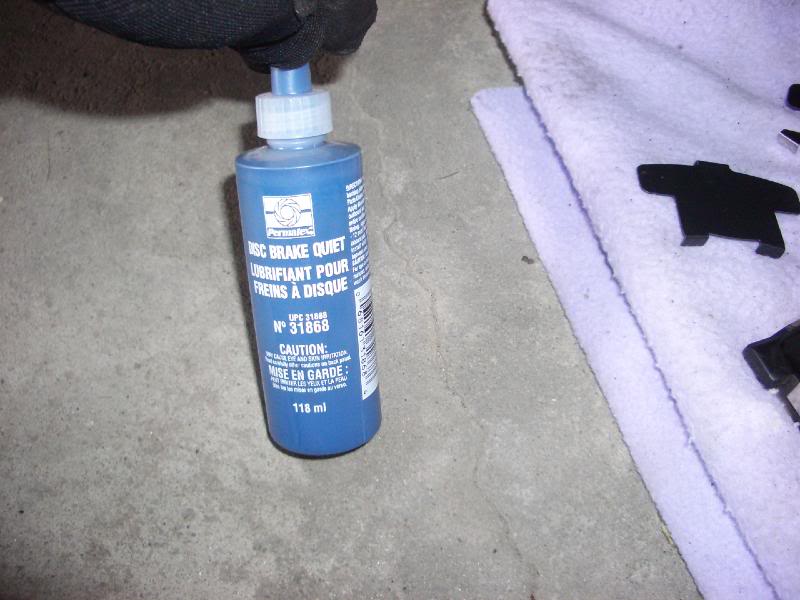
Some comments from 01tl4tl Regarding my work. I think he makes pretty good points about the use of brake grease on the caliper piston. In the future I would advise following his instructions regarding that.
Originally Posted by 01tl4tl
HI
When I read all the fine print about caliper grease, it was pretty specific to NOT get any on the rubber seal of the piston- and to apply grease to the pad back and not the piston edge -just to avoid that possible contamination
Grease is a dust magnet and if you looked under the rubber seal- it goes in just a little and fits into a very thin o-ring groove on the piston
Clean everything- yes!!
use only as much backing plate adheshive and caliper grease as needed - cleaning off excess so its not attracting more brake dust and road dirt
I would not trust those rear calipers based on how much corrosion is there
Also- if you put the old pad against the piston and then use the tool- its less cranking on the knob required and insures a flat stable push and less work
I find it wise to flush the brake fluid first to remove crud- again looking at the outside of your brakes....
Another trick- against corrosion- besides the screws, the center lip where the rotor slides onto the axle hub- guess what gets stuck all the time- usually have to hammer the rear rotors loose when it happens
And same for the contact points of wheel rim to rotor/axle- where dissimilar metals meet- corrosion thrives and rust is a fact of life- anti sieze or caliper grease in small amounts there
Good write up- just thought you may want to add some of these tips to your post
01tl4tl Tom
08-20-2007 | 12:06 AM
#11
Originally Posted by Excelerate
Wow.... unless you re-thread that caliper don't drive. You are missing a good 4 to 5 threads which is basically what the end of the bolt holds on to. More than likely the threads in the caliper are fine and the bolt is just messed up b/c the caliper metal is stronger than the bolt. If the threads are good just replace the bolt and torque it down to spec. Don't drive the car like you have it.
I was able to pick the aluminum from the bolt threads with a small file, I cleaned it up with a wire brush on a dremel tool, the bolt is about as good as new.
The threads in the caliper were in bad shape, Also due to the weird thread pitch buying an off the shelf tap & dye was not possible. The bolt is an M14 X 150mm for those counting, not standard fare at local automotive shops and dealers are closed sunday. Lucky for me my best friend is a CNC/ Tool and dye maker, who has a key to his shop. Even luckier for me, we were able to turn up the correct tap from their rather large selection, I had him tap the caliper for me as he uses that shit all the time and I didn't want to risk finishing it off myself. The tap re threaded it like butter, bolt went in like new and is torqued to factor specifications at 125ft-lbs for those counting. I just drove 200km and everything feels great.
After doing the bed in procedure the brakes stop pretty decent but will get better with some more miles on them.
08-20-2007 | 01:01 AM
#13
I live in canada, we use tons of salt/sand on the roads in the winter, Especially where I go to school because the temperature is always hovering around 2c and -10c there is alot of melting and flash freezing over night so they lay out the salt pretty hardcore in that area. It is known as I'm told by locals as the black ice capital of canada.
08-20-2007 | 08:25 PM
#14
06 TL 6spd. Navi/A-spec
Joined: Oct 2006
Posts: 903
Likes: 1
From: Naples, FL.
Originally Posted by The Dougler
I live in canada, we use tons of salt/sand on the roads in the winter, Especially where I go to school because the temperature is always hovering around 2c and -10c there is alot of melting and flash freezing over night so they lay out the salt pretty hardcore in that area. It is known as I'm told by locals as the black ice capital of canada.
08-21-2007 | 01:44 AM
#15
www.princessauto.com
It was 20 bucks, they're a quickly growing chain here in Canada, they have everything and most of their stuff has lifetime garuntee without receipt! Sadly their website blows! you'll have to look for the online catalogue (pdf) and page through it to find what your looking for. I'm pretty sure they do mail order. Acura sells it as well but they wanted like 154 bucks and that's @ cost.
It was 20 bucks, they're a quickly growing chain here in Canada, they have everything and most of their stuff has lifetime garuntee without receipt! Sadly their website blows! you'll have to look for the online catalogue (pdf) and page through it to find what your looking for. I'm pretty sure they do mail order. Acura sells it as well but they wanted like 154 bucks and that's @ cost.
 07-03-2009 | 09:37 PM
#17

10th Gear
Joined: Nov 2008
Posts: 12
Likes: 0
Thanks for this. Just did the rear pads and rotors. Had to drill out the rotor screws which was kind of a pain....then one drum brake pins broke when I was pulling off the rotor...quick trip to the dealer to get the pin and all was good. Put it all together and all was good. The pictures helped a lot. Thanks
07-06-2009 | 09:49 AM
#20
#1 Super Guy!
Joined: May 2007
Posts: 2,337
Likes: 511
It would have also been a good idea to service the rear caliper slide pins. These are the typical failure place on a single or dual piston floating caliper. Simply pull the pin out (do them one at a time), clean it and the pin-bore, relube both, and reinstall.
When a caliper pin siezes up, the outer brake pad ceases to function on that wheel. You are left with all the work being done by the inner brake pad, which wears at an accelerated rate. This also puts excessive stress on that wheel bearing cause it's the only thing left resisting the caliper pistons force.
Great writeup nonetheless...
 07-13-2009 | 10:12 PM
#23
It would have also been a good idea to service the rear caliper slide pins. These are the typical failure place on a single or dual piston floating caliper. Simply pull the pin out (do them one at a time), clean it and the pin-bore, relube both, and reinstall.
When a caliper pin siezes up, the outer brake pad ceases to function on that wheel. You are left with all the work being done by the inner brake pad, which wears at an accelerated rate. This also puts excessive stress on that wheel bearing cause it's the only thing left resisting the caliper pistons force.
Great writeup nonetheless...
When a caliper pin siezes up, the outer brake pad ceases to function on that wheel. You are left with all the work being done by the inner brake pad, which wears at an accelerated rate. This also puts excessive stress on that wheel bearing cause it's the only thing left resisting the caliper pistons force.
Great writeup nonetheless...
edit:
7. With that all done, you want to lubricate the slider pins on the caliper bracket.
Last edited by The Dougler; 07-13-2009 at 10:14 PM.

 09-05-2009 | 07:10 PM
#27
///////////
Joined: Mar 2004
Posts: 667
Likes: 0
From: NY
Is it OK if the Parking brake is engaged when changing the rear rotors? Ive already removed the rear rotors (with the parking brake engaged), and now im having a hard time putting the new rotors on. It seems like it would make sense that the new rotors wouldnt want to go on when the ebrake is engaged or at least it would be impossible to get the parking brake to the same level of force it was at simply by rotating the spike wheel
Last edited by alpswd; 09-05-2009 at 07:12 PM.
09-05-2009 | 07:22 PM
#28
///////////
Joined: Mar 2004
Posts: 667
Likes: 0
From: NY
Also, I stripped one of the two rotor screws and ended up drilling it out. The only problem is that when I was driliing I ruined the threads on the piece the screw goes into. Is this a problem or should I be fine with just one screw?
09-15-2009 | 03:28 AM
#29
6speed Anthracite
Joined: Sep 2007
Posts: 308
Likes: 38
From: Richmond Hill, Ontario
Exact same thing just happened to me, except ..... I wasn't so lucky to be able to re-cut the threads. There was nothing to be re-cut. I had a few ideas to fix it, like: cut a bigger thread and use a helicoil or just use a bigger screw and drill out the matching hole to except the bigger screw. Any other way to fix it? What do you guys think would be the best thing to do?


 09-15-2009 | 08:06 AM
#30
Senior Moderator
Joined: Mar 2005
Posts: 11,995
Likes: 361
From: St. Cloud, FL
You don't need the retaining screws for the rotors. They are there as part of the process when building your car to hold the rotor in place before the caliper is installed. They are not needed now to hold the rotor.
09-15-2009 | 12:30 PM
#32

Team Owner
Joined: Sep 2006
Posts: 33,535
Likes: 1,137
In answer to rear brakes and park brake ON,
the park brakes are a mini set of drum brakes that live inside the rear rotor- see that wide center hub?- thats the drum for the brake shoes to press against.
It should have been difficult to remove the rotor with them on, or the park brakes are very worn from driving off with them On, of they are horribly out of adjustment
MUST release the park brakes to install the new rotors- then check and adjust them to fit the new rotor per the book for your type -pull handle or foot pedal
May need to adjust them again after everything gets used to each other
New pads and rotors may take up to 500 miles of regular driving to get all the micro sized hills and valleys to wear into each other and get 100% contact while in use
NOTE: It has been found that several pad makers are/were using the wrong backing plate for the rear pads. It has 3 raised tabs on the back of the inner pad
Should only be 2, one on each end (one secures the squeeler tab the other is not used)
If there is a 3rd tab in the top center of the pad- it will contact the caliper piston and cause the pad to go in crooked against the rotor when brakes applied!!!
Applies to gen2 and 3
Easy check is look under the car at rear rotors- if half the width is rusty and other half shiny- guess what!
Can be fixed by grinding off the offending center tab- flush
Check all new pads for this problem before install (if not OE pads), and check the rotors on any rear brake job done in the past for that rust/shine situation
Real Techs: please check this when you see a TL or CL...a peek at the inner side of rear rotor takes seconds and can save lives
hawk rb and several others all used the same backing plate part number- companies I found were notified and some have made the change/correction
That pad back is actually for an RL which has a different park brake system and needs the 3rd tab to operate it---
Im guessing that somewhere along the line some years ago at a brake company:
an assistant looked up a part number for acura pad plates- put it in the computer system and the next place looked up info from them,,,it went on and on with incorrect info
GIGO!! garbage in garbage out- computer only as good as its programmer
Last edited by 01tl4tl; 09-15-2009 at 12:32 PM.
11-12-2009 | 12:48 PM
#34

Intermediate
Joined: May 2005
Posts: 48
Likes: 0
From: MD&DC
Do new front rotors need to be lathed before install? Just talked to a coworker about my weekend project of new pads and rotors upfront and new pads in back and he mentioned this. And, now I am paranoid. This is for a 05 MT.
Thanks.
Thanks.
Last edited by KOIBOY; 11-12-2009 at 12:50 PM.
02-14-2010 | 11:50 AM
#37

8th Gear
Joined: Jan 2006
Posts: 8
Likes: 0
From: Mission Viejo, CA
09-11-2010 | 03:01 PM
#38
Instructor
Joined: Jun 2010
Posts: 218
Likes: 1
From: Indy
I hate to bring up an old thread, one which is very useful btw, but the caliper bolts on the Brembo fronts are not 20mm, they are 19mm. Just an fyi as I had to make a trip to the store for a new socket haha.
Great write-up though, it really gave me the confidence to do my own brakes.
Thanks.
Great write-up though, it really gave me the confidence to do my own brakes.
Thanks.
Last edited by Bucks13; 09-11-2010 at 03:14 PM.
 10-02-2010 | 09:11 PM
#40

Racer
Joined: Dec 2009
Posts: 453
Likes: 49
From: Huntsville, AL
Maybe mine was made on opposite day, but I had to rotate mine all the way down in order for the rotors to go on.