
Roof Rails Self Install with pictures 2007 & newer
 05-30-2009 | 08:07 AM
#1
Thread Starter
Intermediate
Joined: Jul 2006
Posts: 42
Likes: 8
From: Lafayette, LA
Roof Rails Self Install with pictures 2007 & newer
Roof Rails Self Install
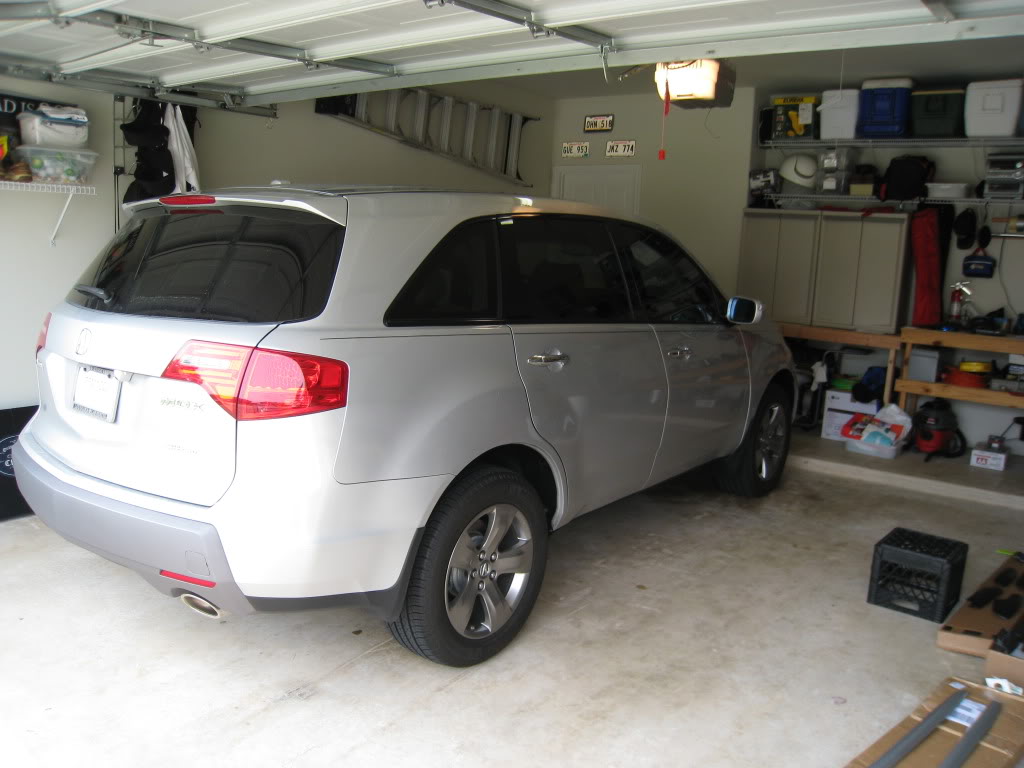
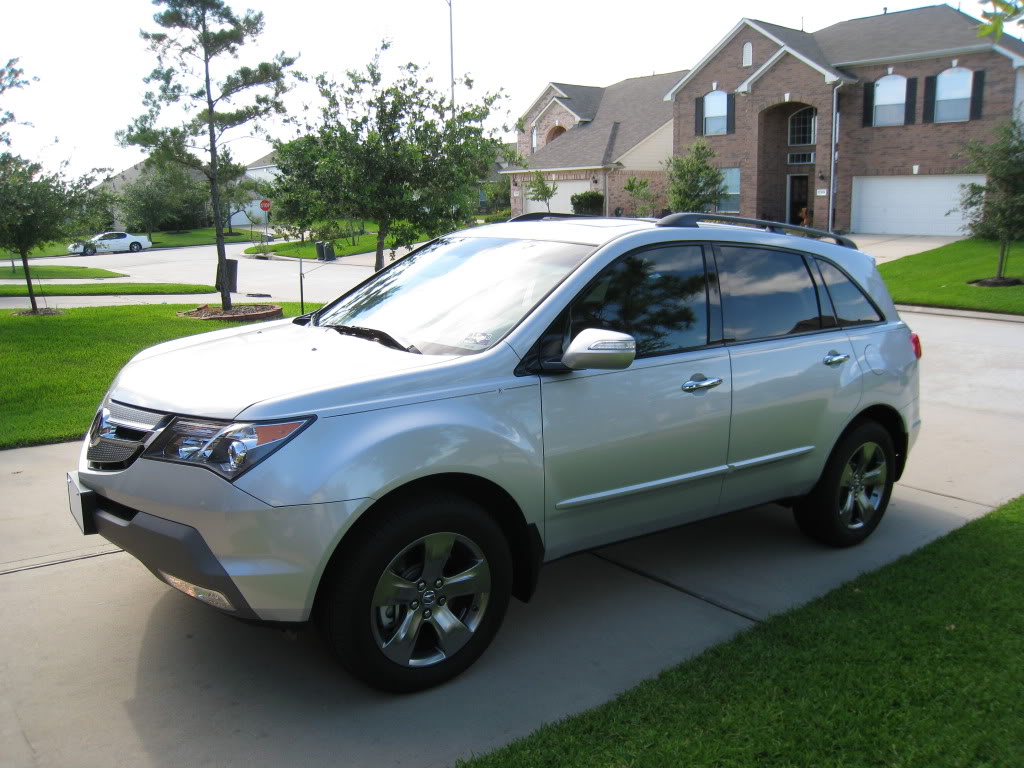
BEFORE:
Overall, the install wasn’t too bad! Took just over 2 hours for the install. I am a bit OCD so I measured, remeasured, measured again then remeasured before making any cuts to the black plastic trim piece
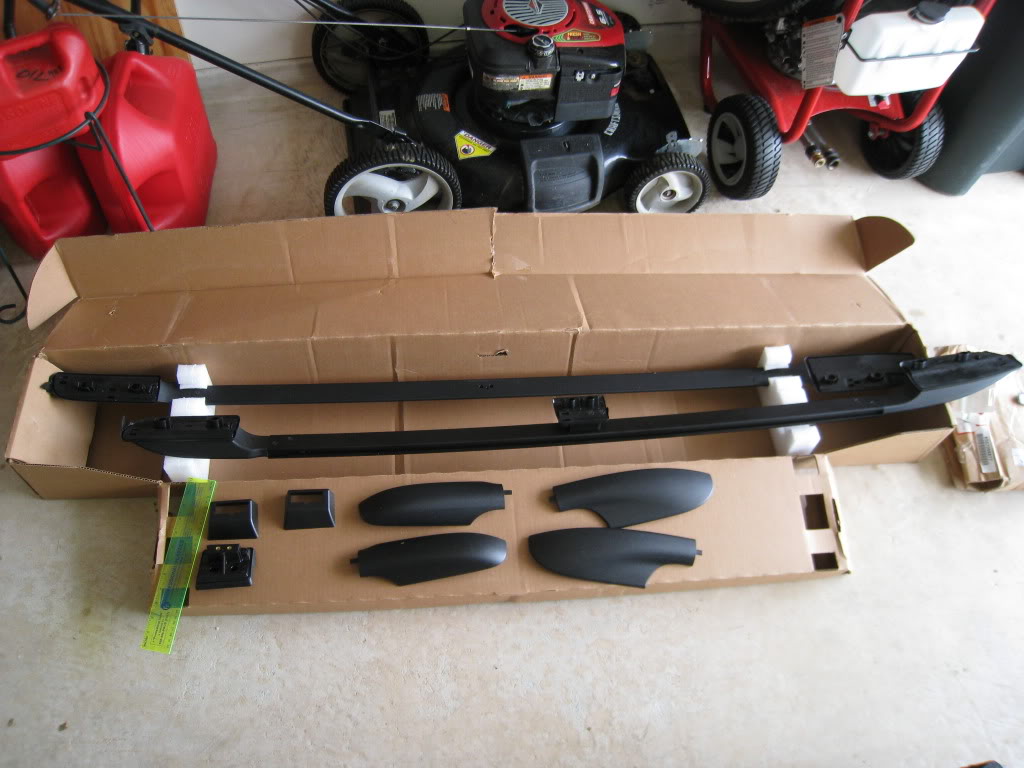
Here are all the part that came in the box.
Prior to doing anything, I did a fit test and marked on the black trim where I thought the cuts would need to be made. I had to install the center pillar piece for the fit test (It will need to be remove to actually install)

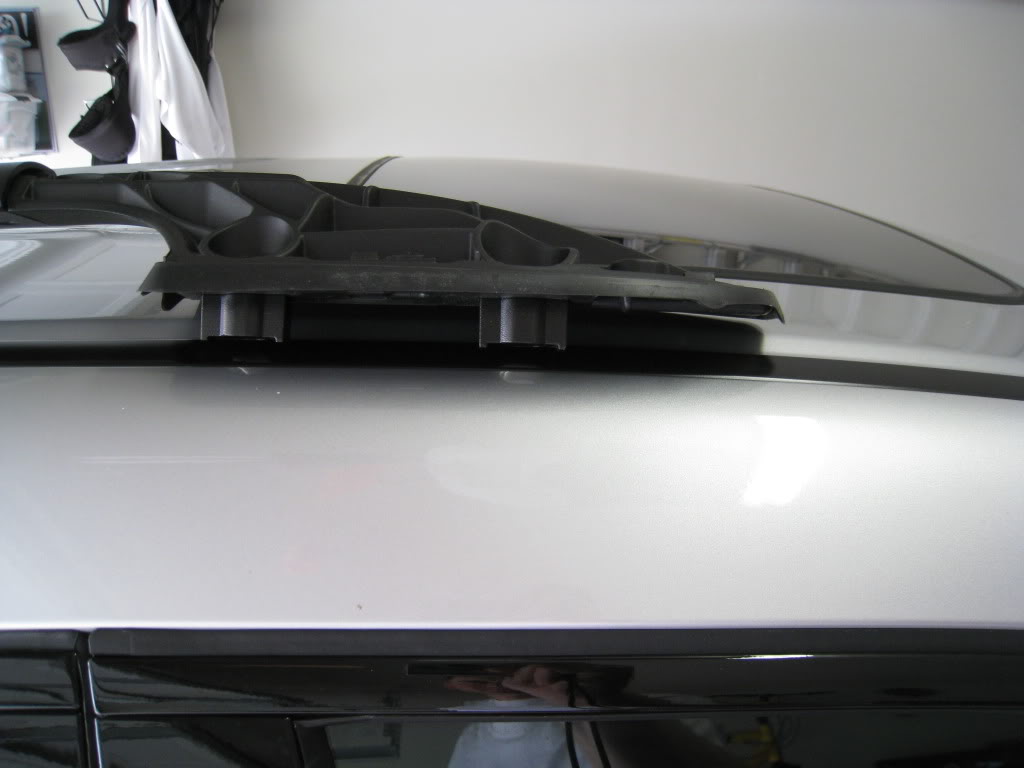
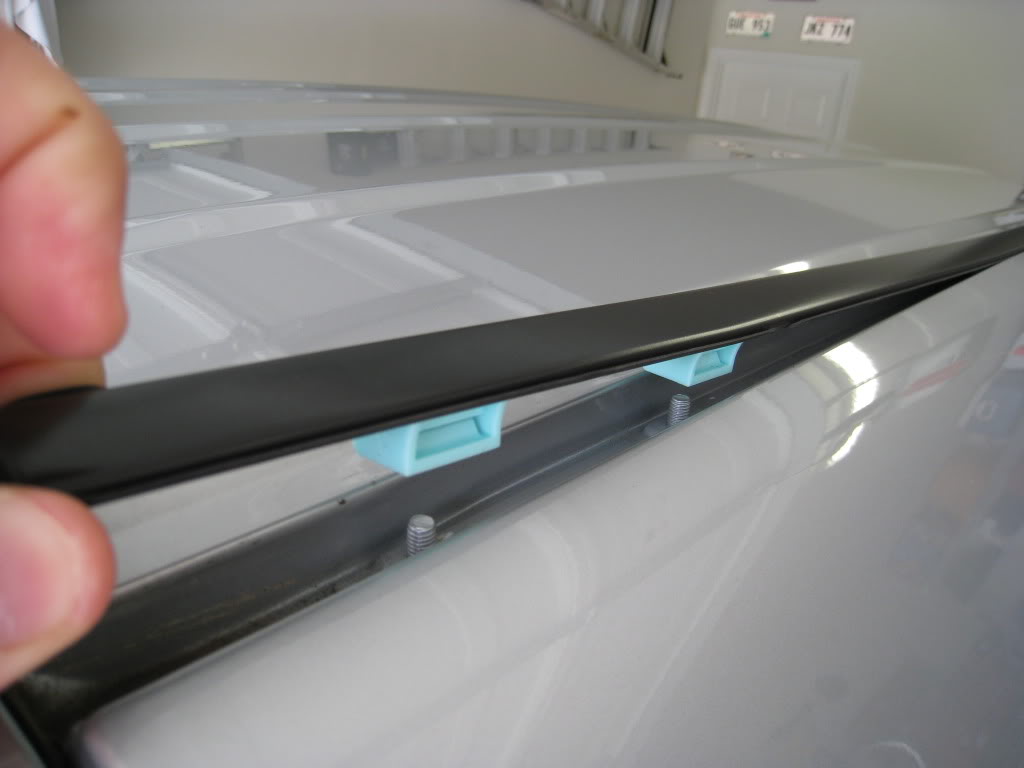
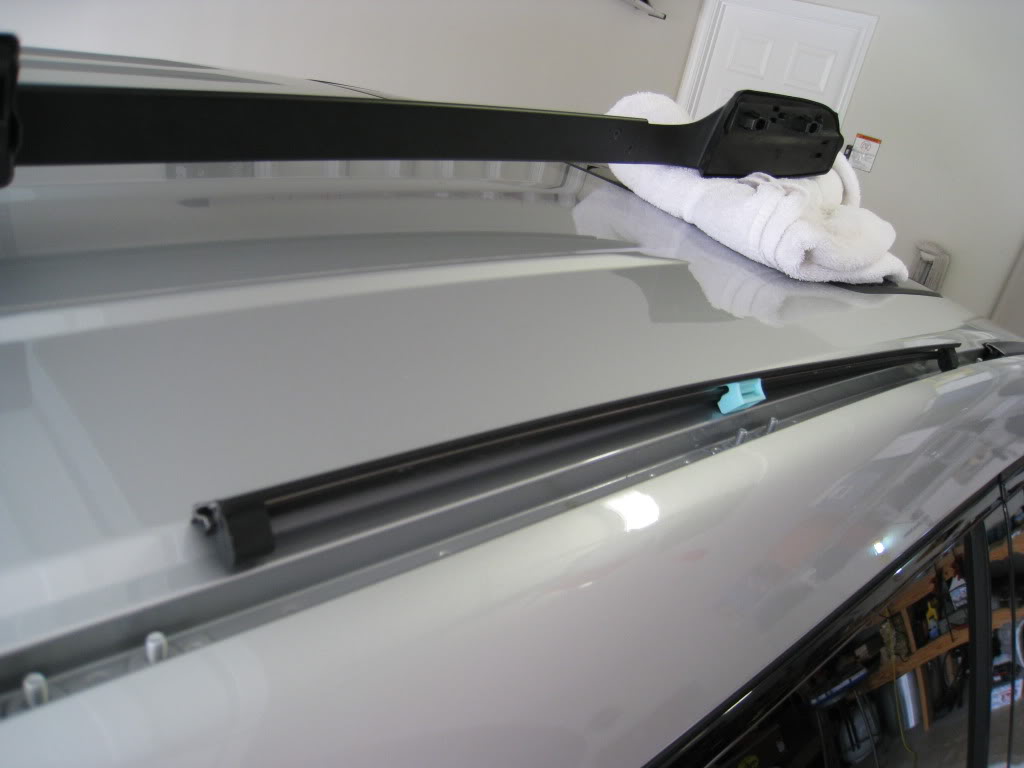
First you have to remove the black plastic trim piece. Instructions said to remove all the way to the windshield the remove from vehicle. I stopped the removal at the sun roof (more on that later). There are clips under the trim that attach it to the studs on the roof. Don’t worry so much about breaking these clips, concentrate more on NOT over bending the trim and damaging it for good. You will need to reuse 2 of the clips per side later for the actual install.
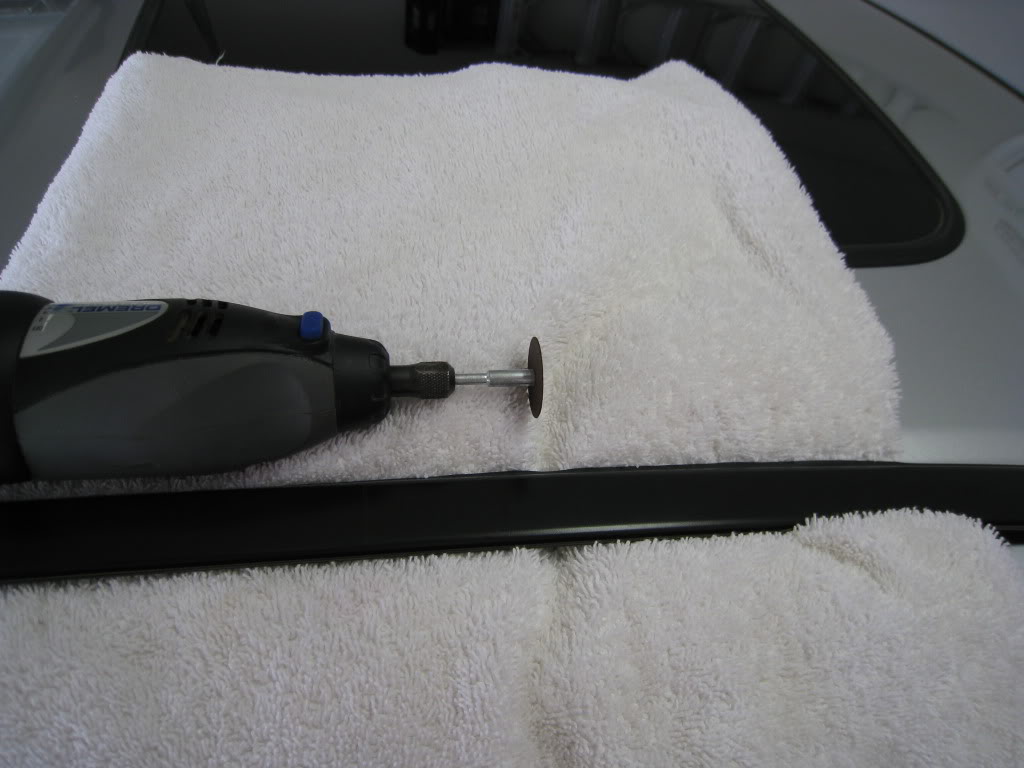
On the trim removal, I cheated and made my first/longest measurement(circled in red) while it was still on the MDX(the measurement is in millimeters, so you will need a metric tape measure.). Just be sure to protect the roof from damage, especially towards the back since the trim tends to flap around while trying to cut it. I used a Dermel to make the cut.

BEFORE:
Overall, the install wasn’t too bad! Took just over 2 hours for the install. I am a bit OCD so I measured, remeasured, measured again then remeasured before making any cuts to the black plastic trim piece
Here are all the part that came in the box.
Prior to doing anything, I did a fit test and marked on the black trim where I thought the cuts would need to be made. I had to install the center pillar piece for the fit test (It will need to be remove to actually install)
First you have to remove the black plastic trim piece. Instructions said to remove all the way to the windshield the remove from vehicle. I stopped the removal at the sun roof (more on that later). There are clips under the trim that attach it to the studs on the roof. Don’t worry so much about breaking these clips, concentrate more on NOT over bending the trim and damaging it for good. You will need to reuse 2 of the clips per side later for the actual install.
On the trim removal, I cheated and made my first/longest measurement(circled in red) while it was still on the MDX(the measurement is in millimeters, so you will need a metric tape measure.). Just be sure to protect the roof from damage, especially towards the back since the trim tends to flap around while trying to cut it. I used a Dermel to make the cut.
The following users liked this post:
SmilingBob (02-05-2016)
05-30-2009 | 08:18 AM
#2
Thread Starter
Intermediate
Joined: Jul 2006
Posts: 42
Likes: 8
From: Lafayette, LA
PT2: Roof Rails Self Install with pictures 2007 & newer
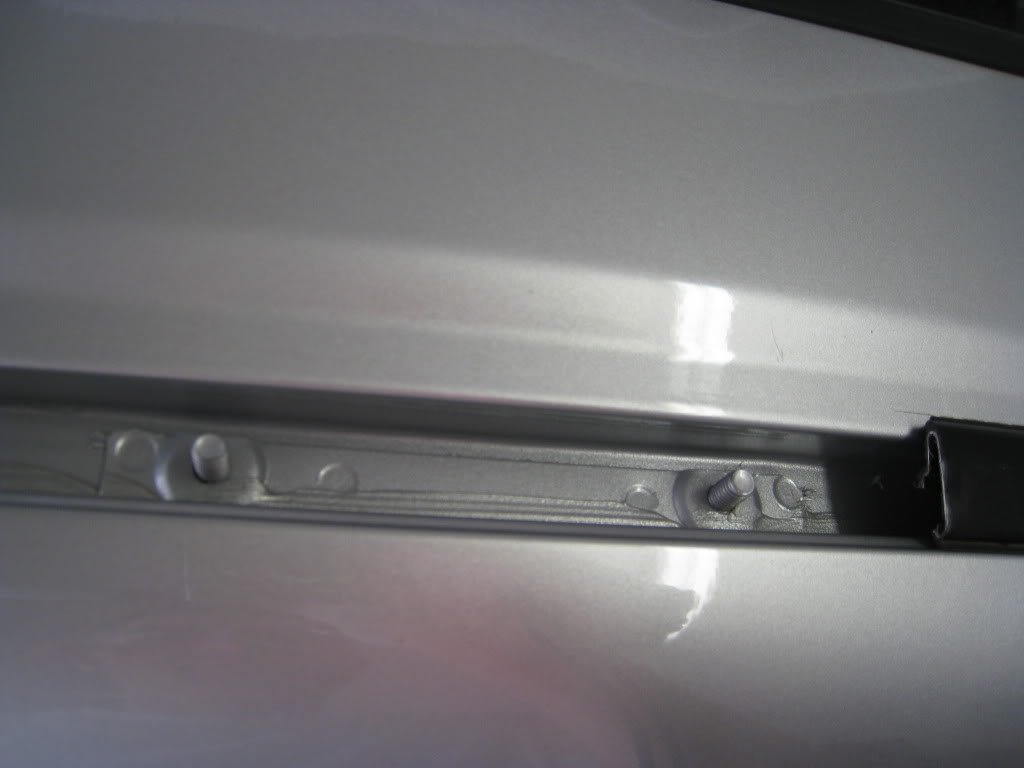
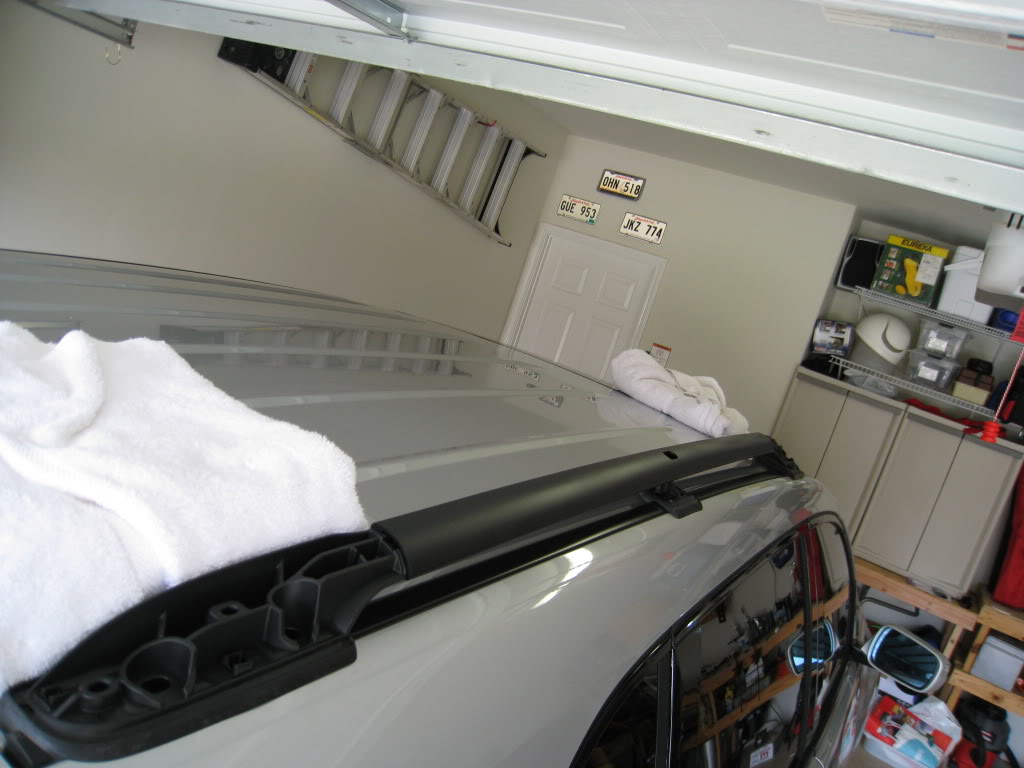
From here on out the rest is a breeze! I had to remove the caulk that is in the channel at the stud locations. Be sure to remove the extra caulk at least 2 inches in both directions from the studs.
The directions show cutting out sections of the black trim, but I simply cut the length I needed off of the end. It saved me about 4 cuts with a hacksaw. (Once the trim was off it was a lot easier using the hacksaw instead of the Dremel).
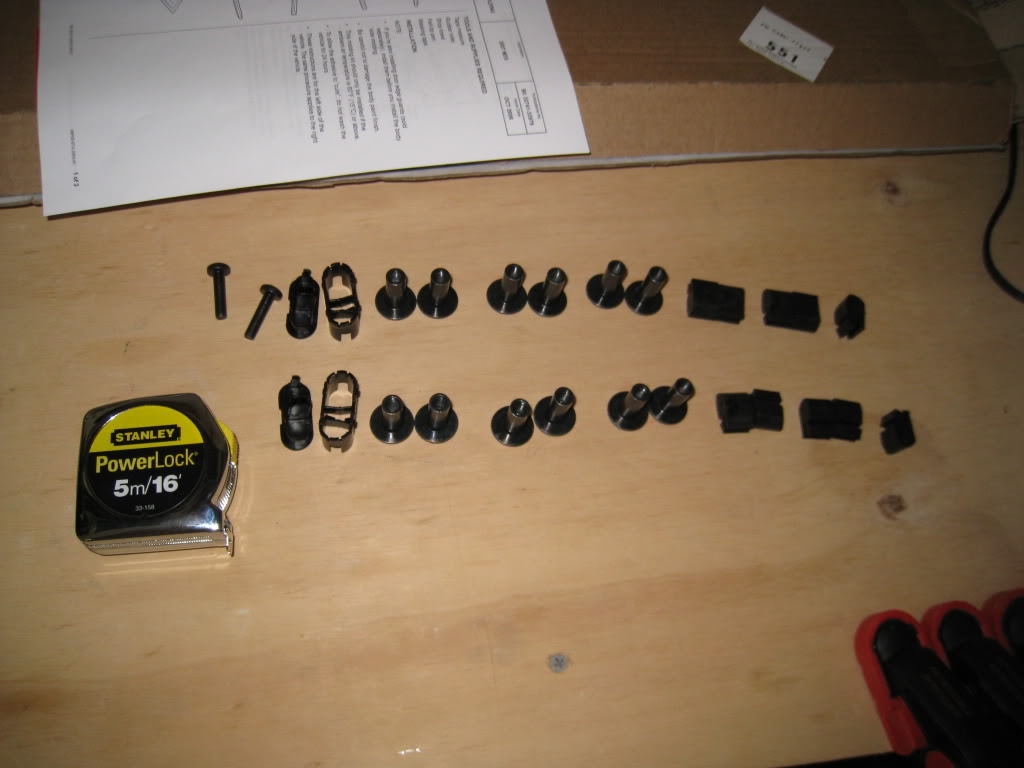
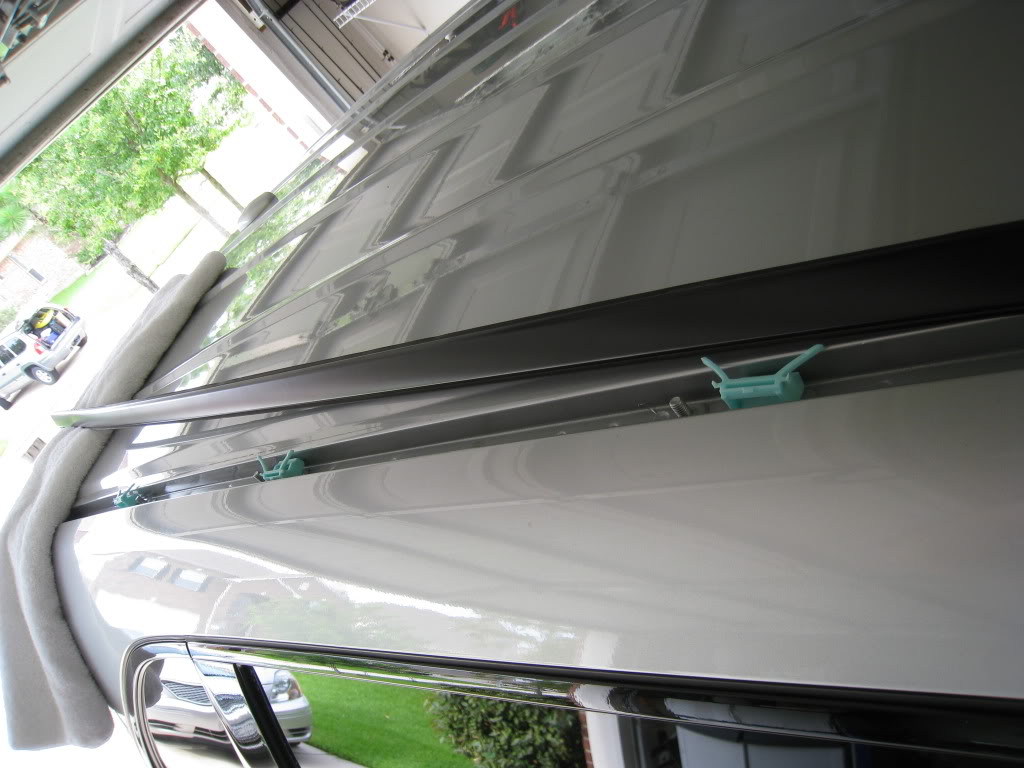
Once I finished my cuts, I did another fit test of the rail. I actually was measuring everything long (purposely) and had to trim a little off one of the trim pieces. You will need to install the rubber end caps and clips on the cut trim piece.
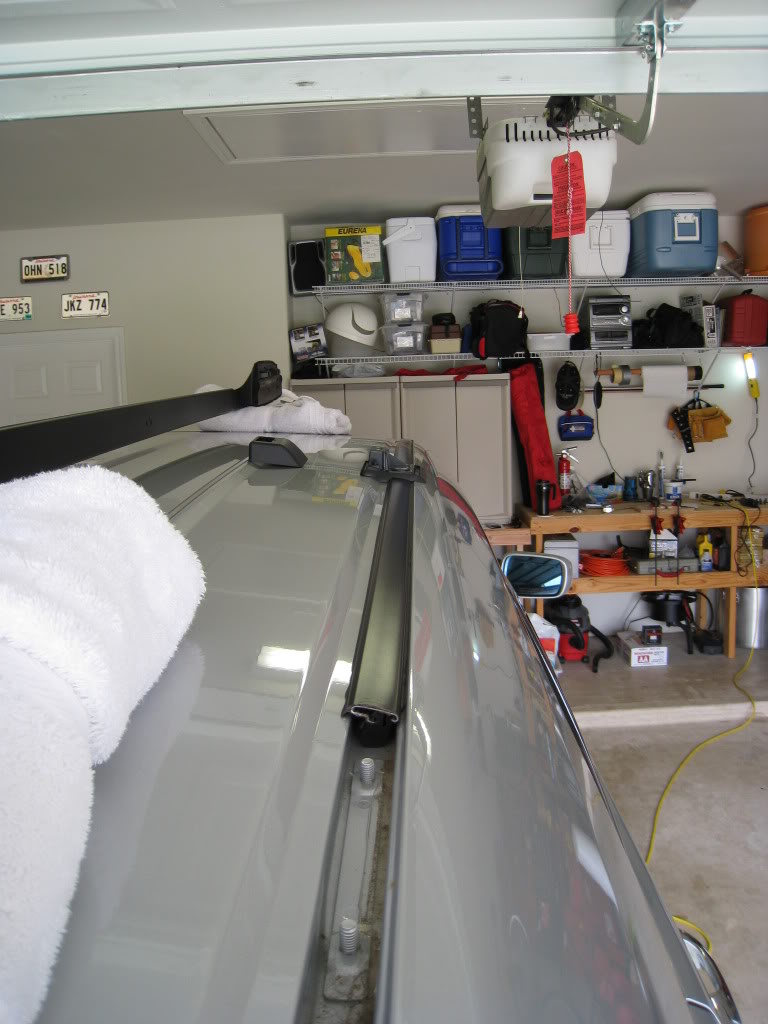
Don’t forget to remove the center pillar before the final install (only if you installed it for the fit test). Bolt everything down (You will need a T-30 Torx screwdriver, I used a flathead). Install center pillar, then install rail and bolts front and back.
Finally, install the covers on both ends(they snap into place).
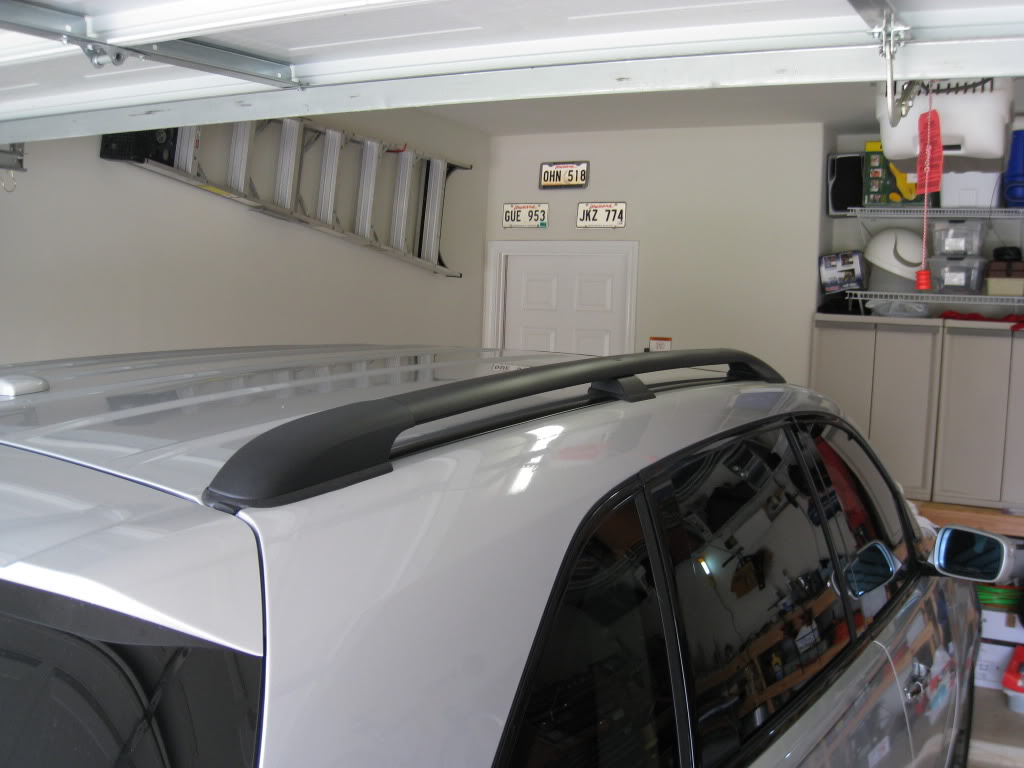
Now you are HALF done. Do the same thing on the other side.
AFTER:
In the end, the install wasn’t bad at all, well worth the money I saved!!
Sorry the write up is so short; I wanted to keep it simple. I hope this is at least helpful to at least some of you.
I plan to do another write up on the side molding install later.
Feel free to contact me if you have any questions or need more detail.
05-30-2009 | 08:22 AM
#3
Thread Starter
Intermediate
Joined: Jul 2006
Posts: 42
Likes: 8
From: Lafayette, LA
For those interested, here is a link to the actual instructions I used!
https://hondacuraworld.hostasaurus.c...dxroofrack.pdf
https://hondacuraworld.hostasaurus.c...dxroofrack.pdf


Trending Topics
06-15-2009 | 12:59 AM
#9

7th Gear
Joined: Apr 2009
Posts: 7
Likes: 1
From: Arizona
 Nice job!
I could have used the info a six weeks ago when I did mine. I would recommend making the cuts as described in the directions - the slight curve of the molding (plastic coated metal -very easy to bend too much but hard to cut) seemed to make a difference, albeit slight. I did one side the way you described, just cutting the pieces needed off the end and the molding didn't seem to fit the curve of the roof perfect. Did the other side like the directions and no problems - just took longer with more cuts. Somehow lost one of the rubber bumpers when I pried a piece off to check the fit.
 Spent two hours looking for it! The end cap from the first cut off piece rigged it well enough though.
 I used a hacksaw to make the cuts- the Dremel is a much better and cleaner option! Measurements don't need to be exact. 5mm either way and it would be close enough.
Did you put the cross rails on too?
02-09-2011 | 08:28 PM
#11

1st Gear
Joined: Feb 2011
Posts: 1
Likes: 0
Firstly, thanks to BTRAND for the directions above. I installed my roof rail using most of his advices. In lieu of a Dremel though, I used a hack saw and this Clamping Mitre Box I got from HomeDepot. The plastic box added protection while cutting the trim.


02-10-2011 | 08:47 AM
#12

Three Wheelin'
Joined: Mar 2005
Posts: 1,966
Likes: 180
I have had black rails before but not on an MDX and the paint goes dull and eventually peels. Does anyone have experience or comments regarding the black MDX rails and their durability. The chrome ones are so much more expensive.
07-16-2011 | 06:05 PM
#13

Advanced
Joined: Oct 2000
Posts: 54
Likes: 1
Thank you for this great thread. Was searching online for pics of the install and found this thread. Decided to do it myself vs pay the dealer. As I started pulling up the weather strip I started chickening out and though I might still have them do it. Pushed myself, and 3 hours later (2+ hours for the first side, 45 minutes for the second as I knew what I was doing) and I have them on. Started with the dremel but changed to the hack saw once I saw all of the sparks during the cutting. Measured, measured, and measured again, but realized that you can definitely be off a bit without a problem. Love the looks of the silver rail on the Bali Blue.
07-19-2011 | 02:15 PM
#14
Racer
Joined: Jun 2005
Posts: 252
Likes: 5
Thanks for taking the time to put this up. I've been looking at the 2nd gen MDX's, and trying to find ones that already have them. I wasn't sure how hard it would be to do. I always thought drilling was required. I use the one on my currenty MDX all the time to carry stuff.

 12-04-2011 | 01:12 AM
#17

2nd Gear
Joined: Dec 2011
Posts: 2
Likes: 0
any leaks?
It looks great. My racks were also installed and I noticed there is a little gap between original rail and the cap of new racks. Is there any problem with leaks? I presume water may get in there but not into the car ceiling, but still some water in the gutter under the rail is never dried out and may cause noise or impact on screw to rust...
Any advice?
Any advice?
12-04-2011 | 02:11 PM
#18
Stay Out Of the Left Lane
Joined: Oct 2003
Posts: 9,014
Likes: 1,246
From: SE Mass --- > Central VA --- > SE Mass
https://acurazine.com/forums/sponsored-sales-group-buys-10/found-lower-price-acura-parts-838183/
Tim Poliniak
Internet Parts Sales - Acura of Peoria
www.oemacuraparts.com
1-866-347-8355
01-31-2012 | 05:49 PM
#19
So I'm gonna pull my black roof rack and have it painted silver... There's just no reason the OEM silver one costs 4X as much.
Anyone have any idea how to pull those trim covers off? I've pried and pulled, afraid I'm gonna break something.
Anyone have any idea how to pull those trim covers off? I've pried and pulled, afraid I'm gonna break something.
06-05-2012 | 10:38 AM
#20

1st Gear
Joined: Jun 2012
Posts: 1
Likes: 0
That was pretty smooth!
Quick question - is there any need to apply some form of silicone caulking etc. to where the edges of the rails and moulding meet, especially after the moulding is no longer one piece. In other words, is there a chance of having water seep into the gutter where the nuts/bolts reside and cause any corrosion.
The installation instructions do not mention anything about this. Did you consider doing this while installing or is there even a need to do so??
Thanks again for the picture installation guide.
04-21-2013 | 03:48 PM
#23

2nd Gear
Joined: Oct 2012
Posts: 2
Likes: 0
Success!
I'm not particularly car savvy but all you need is a little attention to detail to do this yourself. I bought the black rails from Acura of Peoria and used btrand's walkthrough as a guide. Used a Dremel to make the cuts. Couldn't figure out at first how the spacers went in but btrand's pictures showed it well. Overall no problems, under 2 hours including set up and clean up. Saved about $300 off the dealer's quoted price, after the discount on the parts and by doing it myself. Didn't buy the Acura cross bars; plan to use a Yakima cross bar that I can put on and take off as needed. Pretty much anyone could do this easily. Thanks to this forum I was confident enough that I didn't succumb to just paying the dealer for it!
03-17-2014 | 05:22 PM
#24

Intermediate
Joined: Mar 2014
Posts: 32
Likes: 2
You sir have huge cojones in DIY Roof Rails, much respect. I was also debating if I should install the Roof Rails just for looks (not for use); but I kind of like it with out them. I guess once I commence my mods; I will decide then.
 11-06-2014 | 11:46 AM
#26

5th Gear
Joined: Nov 2014
Posts: 5
Likes: 0
Have you experienced any water leakages?
First off, thanks for the write-ups! You gave me the courage to do this on my own, but recently I noticed that water starts leaking into the inside of the vehicle from the rain storms. It was dripping from the the two front side pillars next to the airbags. There was water accumulated inside the tray under the moon roof as well...I'm wondering if the weather strip on moon roof goes bad or it was a bad installation on the railing and somehow damaged the trims/molding. If I lift the trims and look inside the channels, I don't see any opening that would allows water to seep inside the vehicle. Am I wrong on this? I had the railing done months ago and been through many storms and no leaks... It just started to happen from the last few storms. The dealers want a lot of money to diagnose this, but I'm thinking if I should just put the bet on the trims, and get myself a new set. What do you guys thinks?
11-06-2014 | 11:55 AM
#27
Stay Out Of the Left Lane
Joined: Oct 2003
Posts: 9,014
Likes: 1,246
From: SE Mass --- > Central VA --- > SE Mass
First off, thanks for the write-ups! You gave me the courage to do this on my own, but recently I noticed that water starts leaking into the inside of the vehicle from the rain storms. It was dripping from the the two front side pillars next to the airbags. There was water accumulated inside the tray under the moon roof as well...I'm wondering if the weather strip on moon roof goes bad or it was a bad installation on the railing and somehow damaged the trims/molding. If I lift the trims and look inside the channels, I don't see any opening that would allows water to seep inside the vehicle. Am I wrong on this? I had the railing done months ago and been through many storms and no leaks... It just started to happen from the last few storms. The dealers want a lot of money to diagnose this, but I'm thinking if I should just put the bet on the trims, and get myself a new set. What do you guys thinks?
 11-06-2014 | 12:32 PM
#29
Stay Out Of the Left Lane
Joined: Oct 2003
Posts: 9,014
Likes: 1,246
From: SE Mass --- > Central VA --- > SE Mass
We had the exact same issue in the exact same spot and it turned out the drainage tubes from the sunroof (which run down the A pillar) were clogged and backed up. It was under warranty at the time and the dealer apparently blew out the tubes with compressed air. I was suspect of their diagnosis and solution, but we never had an issue again after their fix.
I would start looking there especially seeing you said you had water on the moonroof cover. I'm willing to bet your DIY on the roof rails is fine and you have blocked/clogged drainage tubes.
I would start looking there especially seeing you said you had water on the moonroof cover. I'm willing to bet your DIY on the roof rails is fine and you have blocked/clogged drainage tubes.
The following users liked this post:
microli (11-06-2014)
 11-10-2014 | 10:01 AM
#32
5th Gear
Joined: Nov 2014
Posts: 5
Likes: 0
I had a chance to check on the drainage system this weekend and the front two holes were completely clogged. I was able to unclogged the driver side with a weed wire and compressed air, but having a hard time unclogging the passenger side. I've tried varies solutions like vinegar, citric acid, and soapy water. None of them seems to work and I couldn't fish the wire down the tube. But anyway...I am convinced that this was the culprit of the water leak. As long as I have one side working, water will not overflow from the tray. Too bad there is not a drop of rain showing in the near forecast. Again, thank you for the quick response NBP04TL4ME! You saved me a lot of headaches, time, and money
11-10-2014 | 10:27 AM
#33
Stay Out Of the Left Lane
Joined: Oct 2003
Posts: 9,014
Likes: 1,246
From: SE Mass --- > Central VA --- > SE Mass
microli - you are very welcome and glad you were able to sort half of it out. By weed wire to you mean the orange or green wire/cord used by the weed whackers? Depending on where the clog is, you might want to try pipecleaner or possibly even a coat hanger.
In any event, I'm glad it wasn't your install of you roof rails, but felt pretty confident it wasn't based on your pictures.
In any event, I'm glad it wasn't your install of you roof rails, but felt pretty confident it wasn't based on your pictures.
 02-05-2016 | 04:56 PM
#39

3rd Gear
Joined: Feb 2016
Posts: 3
Likes: 0
Signed up specifically to thank the OP for a great tutorial. We purchased the rack and cross bars (oem) off Amazon and the install went pretty easily on our 2012 MDX. Cutting the trim was the hard part which was much easier with my dremel than a hacksaw IMO. Thanks for the helpful guide.