***Acura MDX DIY/FAQ***
 10-23-2008, 01:05 PM
#1
Moderator Alumnus
Thread Starter
***Acura MDX DIY/FAQ***
How To:
Engine/Drivetrain
Change VTM-4 Rear Diff Fluid
Change Engine Oil and Filter (01-06)
'03-'06 MDX - 3rd & 4th Gear Transmission Switches / Sensors DIY
Exterior
Install Body Side Moldings (01-06)
Install Body Side Moldings (07-up)
Install Running Boards (01-06)
Install Running Boards (07-up)
Install Moon Roof Visor (01-06)
Install 2002-up Roof Rack (02-06)
Install Tailgate Spoiler (01-06)
Aftermarket wheel "Need 2 knows" (01-06)
Install Acura MDX Hitch (04)
Install Roof Rails (07-up)
Install Body Side Moldings (07-up)
Interior
Import PhoneBook into Navi System (07-up)
Fix Steering Wheel Audio Controls (01-06)
Glove Box Light Stays On (01-04)
Fix Subwoofer Rattle (01-06)
TSBs
Technical Service Bulletins
*Please feel free to add, I will update thread accordingly
Last edited by FiftyFive; 10-20-2009 at 07:40 AM.

The following 2 users liked this post by FiftyFive:
Micro-Shock (08-28-2011),
Steve G PW (07-13-2014)
10-25-2008, 11:20 AM
#2
Three Wheelin'
Aftermarket wheel "Need 2 Knows" for the 2001 - 2006 MDX
I wish I had some of this information available to me prior to buying aftermarket wheels for my 2006 MDX. Hopefully my lessons learned will help others out...
1) The stock MDX wheel is 17" x 6.5" with a 235/65/17 tire and a 45mm offset. The overall diameter of wheel+tire is 29.028 inches. Here is a great Tire Calculator that provides overall wheel diameter calculations.
2) The 2007+ MDX wheels will not fit the 2001 - 2006 MDX. The 2007+ MDX has a 5 x 120mm bolt pattern where the 2001-2006 MDX is 5 x 114.3mm. AVOID adapters - the 5 x 120mm to 5 x 114.3mm adapters will force the wheels out about 2 inches from the fender.
3) You will need hub-rings unless the aftermarket wheel you're purchasing has a 64.15mm hub (the factory hub of the 01-06 MDX). Honda and Acura wheels are balanced on the hub, so it's imperative that you have a 64.15mm hub. You'll experience vibration if your wheels are not properly mounted with rings. Hub-rings are inexpensive and are sometimes offered for free with your purchase of aftermarket wheels. Hard nylon rings don't last as long as metal, but are preferable because they will not rust your hub or wheel. Just tell the shop you need hub-rings for the 64.15mm hub on your MDX. If they say you don't need rings, insist that you do. My rings are 66.5mm (the hub of my aftermarket wheel) to 64.15mm. They simply slide on the hub, then you mount the wheel, tighten, and you're ready to go.
4) I feel the ideal width of the aftermarket wheel for the 2001-2006 MDX is 8.5 inches, of which you'll need at least a 40+mm offset (I have a 35mm offset). Remember that the lower the offset is, the further the outer wheel rim sticks out from the hub, so saying "at least" means 40mm or lower. Below are my recommendations for wheel/tire sizes:
Nylon hub ring

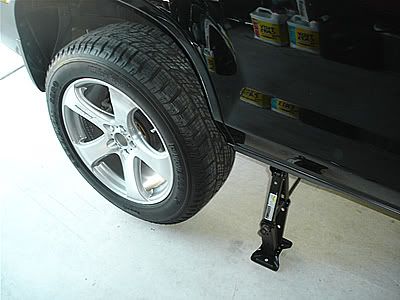
With your new wheels, your floor/hydraulic jack may not be tall enough, use the tire jack in the rear hatch if necessary
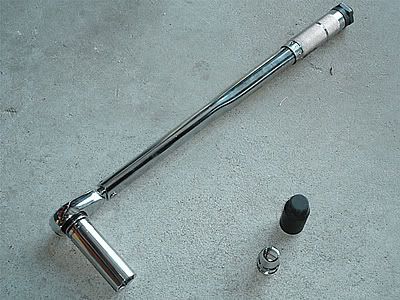
You may need to buy a torque wrench with a long socket for your new wheels and I highly suggest buying a quality set of wheel locks
1) The stock MDX wheel is 17" x 6.5" with a 235/65/17 tire and a 45mm offset. The overall diameter of wheel+tire is 29.028 inches. Here is a great Tire Calculator that provides overall wheel diameter calculations.
2) The 2007+ MDX wheels will not fit the 2001 - 2006 MDX. The 2007+ MDX has a 5 x 120mm bolt pattern where the 2001-2006 MDX is 5 x 114.3mm. AVOID adapters - the 5 x 120mm to 5 x 114.3mm adapters will force the wheels out about 2 inches from the fender.
3) You will need hub-rings unless the aftermarket wheel you're purchasing has a 64.15mm hub (the factory hub of the 01-06 MDX). Honda and Acura wheels are balanced on the hub, so it's imperative that you have a 64.15mm hub. You'll experience vibration if your wheels are not properly mounted with rings. Hub-rings are inexpensive and are sometimes offered for free with your purchase of aftermarket wheels. Hard nylon rings don't last as long as metal, but are preferable because they will not rust your hub or wheel. Just tell the shop you need hub-rings for the 64.15mm hub on your MDX. If they say you don't need rings, insist that you do. My rings are 66.5mm (the hub of my aftermarket wheel) to 64.15mm. They simply slide on the hub, then you mount the wheel, tighten, and you're ready to go.
4) I feel the ideal width of the aftermarket wheel for the 2001-2006 MDX is 8.5 inches, of which you'll need at least a 40+mm offset (I have a 35mm offset). Remember that the lower the offset is, the further the outer wheel rim sticks out from the hub, so saying "at least" means 40mm or lower. Below are my recommendations for wheel/tire sizes:
- 17 x 7" wheel, 235/65/17 tire
- 18 x 8" wheel, 255/55/18 tire
- 19 x 8.5" wheel, 245/55/19 tire
- 20 X 8.5" wheel, 265/45/20 tire
- 22 x 9" wheel, 265/35/22 tire
Nylon hub ring
With your new wheels, your floor/hydraulic jack may not be tall enough, use the tire jack in the rear hatch if necessary
You may need to buy a torque wrench with a long socket for your new wheels and I highly suggest buying a quality set of wheel locks
 09-05-2009, 09:50 PM
#5
Moderator Alumnus
Thread Starter
 12-30-2009, 05:54 PM
#7
1st Gear

Join Date: Dec 2009
Age: 43
Posts: 1
Likes: 0
Received 0 Likes
on
0 Posts
tranny question
does anyone know what manuel trannys will bolt up to a mdx motor if any? or if there is anything about an adaptor plate?
Trending Topics

 04-05-2010, 11:32 PM
#11
Failing navigation?
anything on 03-04 navigation systems failing? Mine only loads to the "enter code" prompt and then only allows 1 of the 4 numbers to be typed.
Any info on a fix would be appreciated. I am thinking of picking up a used one but am not apposed to a full upgrade if anyone knows of an aftermarket deck that accommodates the climate control. I refuse to pay thousands to have the crapy stock deck but I will pay a few hundred if no other options are available.
Thanks.
05-05-2010, 09:32 AM
#12
anything on 03-04 navigation systems failing? Mine only loads to the "enter code" prompt and then only allows 1 of the 4 numbers to be typed.
Any info on a fix would be appreciated. I am thinking of picking up a used one but am not apposed to a full upgrade if anyone knows of an aftermarket deck that accommodates the climate control. I refuse to pay thousands to have the crapy stock deck but I will pay a few hundred if no other options are available.
Thanks.
Any info on a fix would be appreciated. I am thinking of picking up a used one but am not apposed to a full upgrade if anyone knows of an aftermarket deck that accommodates the climate control. I refuse to pay thousands to have the crapy stock deck but I will pay a few hundred if no other options are available.
Thanks.
For those who need repair of the Honda Navigation Unit found in the trunck of the car. Navigation Technical Support (888) 628-4357.
Ship to:
Alpine Electronics of America, Inc.
2012 Abalony Avenue - Unit D
Torrance, CA 90501
Include:
Description of Problem
Return Address
Phone Contact
Pay by Credit Card, Check or Money Order $150.

 08-07-2010, 11:42 AM
#16
I havent messed with the cabin filter on an MDX but Ive swapped them out of every other car I've owned. Its really not difficult once you locate the filter. I guess I'm making assumptions and not really giving any real advice...so I'll just say look to the manual for the filter's location and go from there. Its been my experience that they are always behind the glove box. Do an Azine search for removing your glove box...good luck.
08-28-2010, 09:49 AM
#17
I am hoping someone has the install scans for replacing the passenger side exterior mirror for an 07 MDX???
My wife backed the SUVie out a few weeks ago and hit the side mirror on the garage causing the casing to crack. I have already ordered and received the replacement housing pieces just want to make sure I uninstall correctly to avoid breaking any needed components.
Many Thanks!
My wife backed the SUVie out a few weeks ago and hit the side mirror on the garage causing the casing to crack. I have already ordered and received the replacement housing pieces just want to make sure I uninstall correctly to avoid breaking any needed components.
Many Thanks!
08-28-2011, 12:04 PM
#18

How To:
Engine/Drivetrain
Change VTM-4 Rear Diff Fluid
Change Engine Oil and Filter (01-06)
'03-'06 MDX - 3rd & 4th Gear Transmission Switches / Sensors DIY
Exterior
Install Body Side Moldings (01-06)
Install Body Side Moldings (07-up)
Install Running Boards (01-06)
Install Running Boards (07-up)
Install Moon Roof Visor (01-06)
Install 2002-up Roof Rack (02-06)
Install Tailgate Spoiler (01-06)
Aftermarket wheel "Need 2 knows" (01-06)
Install Acura MDX Hitch (04)
Install Roof Rails (07-up)
Install Body Side Moldings (07-up)
Interior
Import PhoneBook into Navi System (07-up)
Fix Steering Wheel Audio Controls (01-06)
Glove Box Light Stays On (01-04)
Fix Subwoofer Rattle (01-06)
TSBs
Technical Service Bulletins
*Please feel free to add, I will update thread accordingly
Engine/Drivetrain
Change VTM-4 Rear Diff Fluid
Change Engine Oil and Filter (01-06)
'03-'06 MDX - 3rd & 4th Gear Transmission Switches / Sensors DIY
Exterior
Install Body Side Moldings (01-06)
Install Body Side Moldings (07-up)
Install Running Boards (01-06)
Install Running Boards (07-up)
Install Moon Roof Visor (01-06)
Install 2002-up Roof Rack (02-06)
Install Tailgate Spoiler (01-06)
Aftermarket wheel "Need 2 knows" (01-06)
Install Acura MDX Hitch (04)
Install Roof Rails (07-up)
Install Body Side Moldings (07-up)
Interior
Import PhoneBook into Navi System (07-up)
Fix Steering Wheel Audio Controls (01-06)
Glove Box Light Stays On (01-04)
Fix Subwoofer Rattle (01-06)
TSBs
Technical Service Bulletins
*Please feel free to add, I will update thread accordingly
Import PhoneBook into Navi System (07-up)
http://ttr.blog-city.com/tutorial_ho...your_acura.htm

 09-18-2014, 06:16 PM
#23
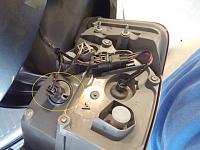
DIY: LED Rear signal light install 07-09
Tools:
-Ratchet or Philips head screw driver
-Flat head screw driver
-Lift rear gate
-Pry off rear light assembly screw covers with flat head screw driver
-Unscrew both bolts with phillips screw driver or ratchet
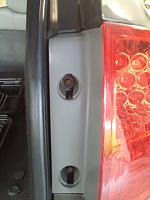
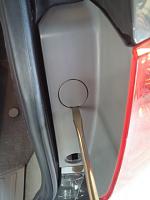
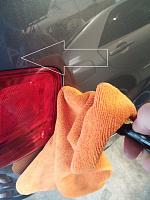
-Once both screws are out wiggle the entire lens towards the back of the truck to give yourself enough of a gap to squeeze a flat head screw driver in between the body and the rear lens. Use a towel over the screw driver so you dont scratch the paint. Once you have at least 1/4 to 1/2 of the screw driver tip in the crack then you're going to want to twist the screw driver to help pry the lens out.
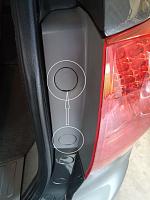
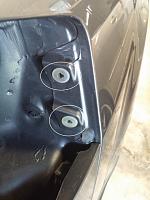
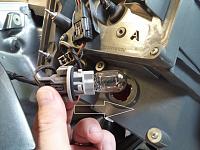
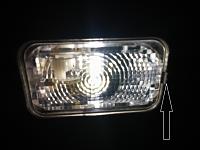
This is whats holding the lens to the body:
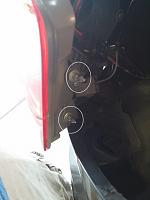
-When you get the lens out turn it on the side and look for this ballast. Turn the ballast counter clockwise to release the prongs and pull the bulb out.
-Pull the old bulb out and replace with the LED. *Most LED's only work when plugged in one way, they are polarized... so test the bulb BEFORE you button everything back up* If it doesnt lite then remove the bulb, rotate, then plug it back in.
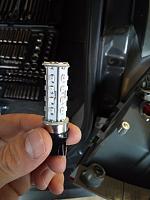
-Install the LED bulb into the ballast rotate the ballast clockwise to lock it back in place and then line the two prongs on the back of the lens with the two holes in the body and push towards the front of the car until you feel it snap in place... replace the 2 screws (do not over tighten) and screw covers.
DONE
-Ratchet or Philips head screw driver
-Flat head screw driver
-Lift rear gate
-Pry off rear light assembly screw covers with flat head screw driver


-Unscrew both bolts with phillips screw driver or ratchet

-Once both screws are out wiggle the entire lens towards the back of the truck to give yourself enough of a gap to squeeze a flat head screw driver in between the body and the rear lens. Use a towel over the screw driver so you dont scratch the paint. Once you have at least 1/4 to 1/2 of the screw driver tip in the crack then you're going to want to twist the screw driver to help pry the lens out.

This is whats holding the lens to the body:


-When you get the lens out turn it on the side and look for this ballast. Turn the ballast counter clockwise to release the prongs and pull the bulb out.


-Pull the old bulb out and replace with the LED. *Most LED's only work when plugged in one way, they are polarized... so test the bulb BEFORE you button everything back up* If it doesnt lite then remove the bulb, rotate, then plug it back in.

-Install the LED bulb into the ballast rotate the ballast clockwise to lock it back in place and then line the two prongs on the back of the lens with the two holes in the body and push towards the front of the car until you feel it snap in place... replace the 2 screws (do not over tighten) and screw covers.
DONE
Last edited by FactoryMDX; 09-18-2014 at 06:20 PM.
09-18-2014, 06:39 PM
#24
DIY: Interior LED install
Tools:
-Sunglass Repair Screw driver (flathead)
-Needle nose pliers
-Paper towel
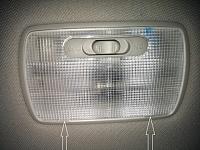
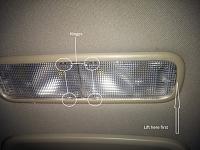
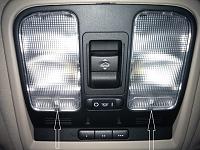
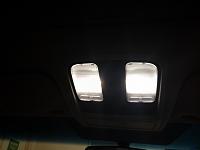
Very simple, I've marked all the pry areas on the lens'.. Put the Small flat head all the way into the pry area, then pry. The lens will pop off. The 2nd row lights have a hinge on one side, so open using the marked pry area first then pull straight down off the hinges.
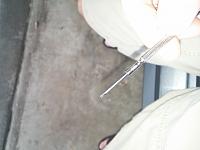
The bulbs are tight to remove so I folded paper towel and lined the inside of the needle nose pliers so it wouldnt break the glass and pulled the bulbs straight out.
-Rear gate door bulbs (194)
-Rear cargo area bulb (DE3175)
-2nd Row dome light (194)
-Front map lights (194)
-Front courtesy lights (DE3175)

-Sunglass Repair Screw driver (flathead)
-Needle nose pliers
-Paper towel
Very simple, I've marked all the pry areas on the lens'.. Put the Small flat head all the way into the pry area, then pry. The lens will pop off. The 2nd row lights have a hinge on one side, so open using the marked pry area first then pull straight down off the hinges.
The bulbs are tight to remove so I folded paper towel and lined the inside of the needle nose pliers so it wouldnt break the glass and pulled the bulbs straight out.
-Rear gate door bulbs (194)
-Rear cargo area bulb (DE3175)
-2nd Row dome light (194)
-Front map lights (194)
-Front courtesy lights (DE3175)


 09-20-2014, 03:49 PM
#25
DIY: Oil Change 07-09
Tools:
-Ratchet
-Funnel for new oil
-oil catch can for old oil
-new oil
-new filter
-new drain bolt crush washer
-Open Hood
-I removed the plastic trim on top for more room to pour new oil in, but if you have a long funnel you might not have to.
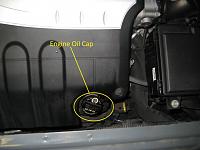
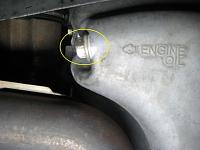
-Remove oil Cap
-Locate and Loosen the oil drain bolt until you can spin it with your fingers slowly but do not remove yet
-Place oil catch can under drain bolt and now you can fully remove the drain bolt and drain engine oil. Let drain until there is a drip, then replace oil pan drain bolt with a new crush washer.
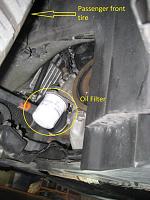
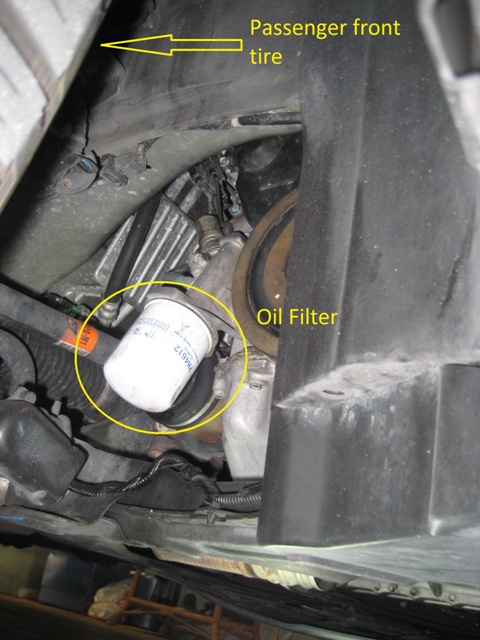
-Locate oil filter & Place catch can underneath, unscrew filter counter clockwise. Once removed, let oil drain for a second then replace with new filter and tighten HAND TIGHT. *make sure old oil filter rubber seal is not stuck on the mounting surface | Also rub a small amount of engine oil on the new filters rubber seal*
-Find the oil fill cap in engine bay, remove cap counter clockwise, place funnel into fill hole and fill engine with 4.5 quarts of oil. *I use Valvoline super syn 5w-20 and I buy the 5 quart jug from walmart*
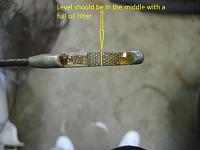
-Make sure all tools are cleared out of the engine bay, start engine and let idle for 15 seconds so the oil can fill the new oil filter. Turn engine off and check oil dip stick level.
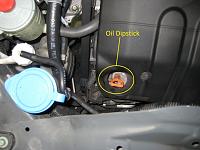
-The oil level should be in the middle of the cris crossed area of the dip stick. Check oil level after 4 quarts as it is easier to add than take away.
-After all is OK start the engine again and look under truck to make sure the oil filter and drain bolt is not leaking.
-Reset the oil minder by navigating to where it tells you the oil life percentage, hold the reset button on the steering wheel until you get the confirmation question to reset, choose reset. You're done
-Ratchet
-Funnel for new oil
-oil catch can for old oil
-new oil
-new filter
-new drain bolt crush washer
-Open Hood
-I removed the plastic trim on top for more room to pour new oil in, but if you have a long funnel you might not have to.
-Remove oil Cap

-Locate and Loosen the oil drain bolt until you can spin it with your fingers slowly but do not remove yet

-Place oil catch can under drain bolt and now you can fully remove the drain bolt and drain engine oil. Let drain until there is a drip, then replace oil pan drain bolt with a new crush washer.
-Locate oil filter & Place catch can underneath, unscrew filter counter clockwise. Once removed, let oil drain for a second then replace with new filter and tighten HAND TIGHT. *make sure old oil filter rubber seal is not stuck on the mounting surface | Also rub a small amount of engine oil on the new filters rubber seal*
-Find the oil fill cap in engine bay, remove cap counter clockwise, place funnel into fill hole and fill engine with 4.5 quarts of oil. *I use Valvoline super syn 5w-20 and I buy the 5 quart jug from walmart*
-Make sure all tools are cleared out of the engine bay, start engine and let idle for 15 seconds so the oil can fill the new oil filter. Turn engine off and check oil dip stick level.

-The oil level should be in the middle of the cris crossed area of the dip stick. Check oil level after 4 quarts as it is easier to add than take away.

-After all is OK start the engine again and look under truck to make sure the oil filter and drain bolt is not leaking.
-Reset the oil minder by navigating to where it tells you the oil life percentage, hold the reset button on the steering wheel until you get the confirmation question to reset, choose reset. You're done
09-20-2014, 04:08 PM
#26
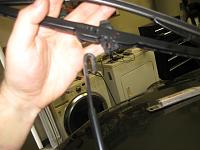
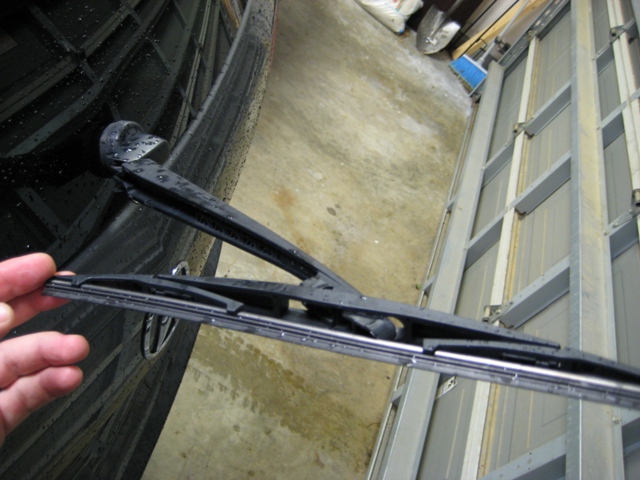
DIY: Front Windshield wiper replacement 07-09
Tools:
Two Hands
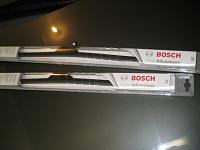
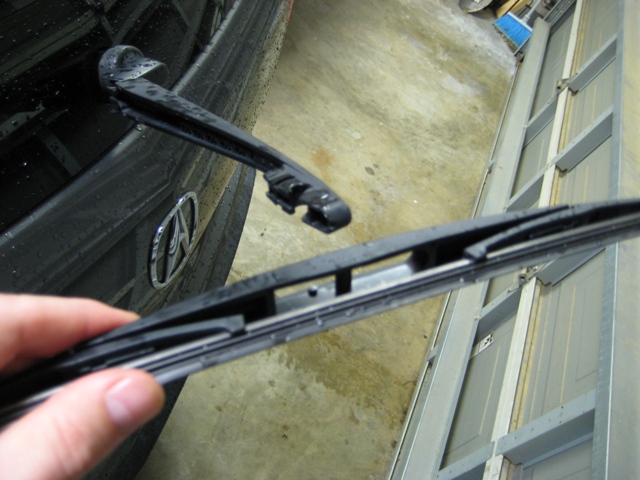
-Lift driver side wiper arm as shown. I use the frame-less wiper blades b/c they are just better and look nicer than the old framed ones.
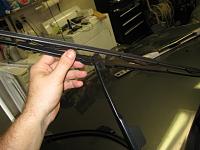
-Swivel the wiper blade as shown and follow the pictures.
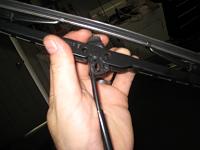
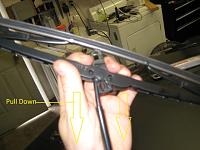
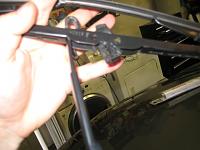
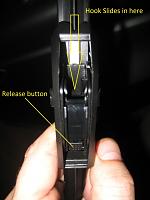
-Once the old blade is removed line up the new blade in the correct position, slide the hook end on the wiper arm into the accepting slot on the new wiper blade
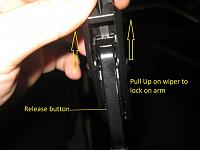
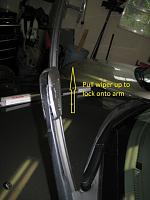
-Once inside the slot, pull the new blade upwards to lock it onto the wiper arm. Do the same on the passenger side. You're Done
Two Hands
-Lift driver side wiper arm as shown. I use the frame-less wiper blades b/c they are just better and look nicer than the old framed ones.


-Swivel the wiper blade as shown and follow the pictures.


-Once the old blade is removed line up the new blade in the correct position, slide the hook end on the wiper arm into the accepting slot on the new wiper blade

-Once inside the slot, pull the new blade upwards to lock it onto the wiper arm. Do the same on the passenger side. You're Done


Last edited by FactoryMDX; 09-20-2014 at 04:10 PM.


 09-20-2014, 04:40 PM
#28
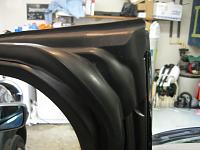
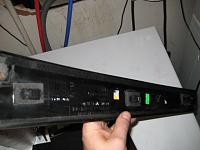
DIY: Front Door Sash Trim Repair TSB 12-006: (2007-2012 MDX)
Tools:
-Phillips head screw driver
-Felt with adhesive on back
-Scissors
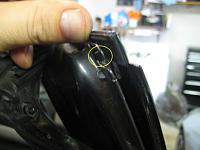
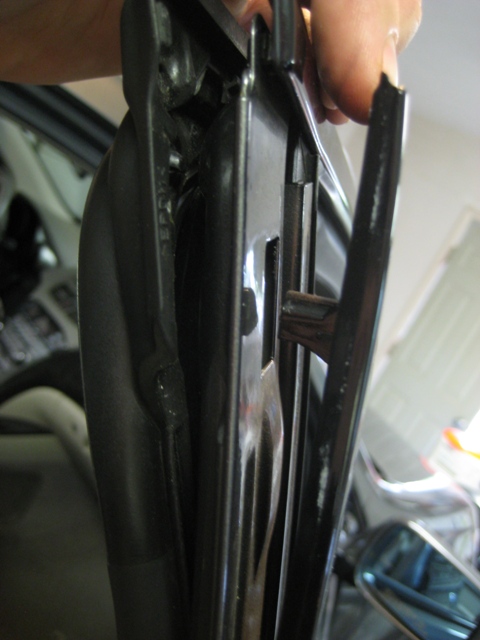
-Open driver door and look at top outside corner of door.
-Peel the weatherstripping off the corner. It is held on by a plastic clip, just pull outward and clip will release. Remove screw under the weatherstripping that holds the outside sash on.
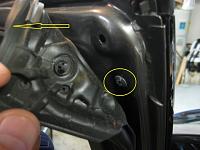
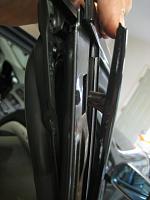
-Release this clip that holds the top trim on. Do not pull hard on this piece as you only need to flex this a little to untuck the outter sash for removal.
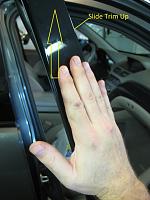
-Untuck the upper piece of the outter sash and then slide the sash upwards to unhook.

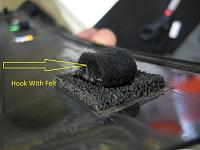
-Cut and attach the felt to the inner rail as shown. I also covered the plastic hooks in felt for good measure.
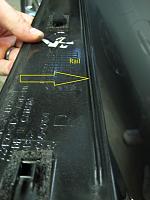
-Re-install the reverse way. You're done
-Phillips head screw driver
-Felt with adhesive on back
-Scissors
-Open driver door and look at top outside corner of door.
-Peel the weatherstripping off the corner. It is held on by a plastic clip, just pull outward and clip will release. Remove screw under the weatherstripping that holds the outside sash on.


-Release this clip that holds the top trim on. Do not pull hard on this piece as you only need to flex this a little to untuck the outter sash for removal.

-Untuck the upper piece of the outter sash and then slide the sash upwards to unhook.


-Cut and attach the felt to the inner rail as shown. I also covered the plastic hooks in felt for good measure.


-Re-install the reverse way. You're done

Thread
Thread Starter
Forum
Replies
Last Post
IIDXholic
3G RLX (2013+)
23
10-19-2015 09:40 PM