FamilyGuy's 6MT Type S
 12-06-2014, 09:02 PM
#41
Three Wheelin'
Thread Starter
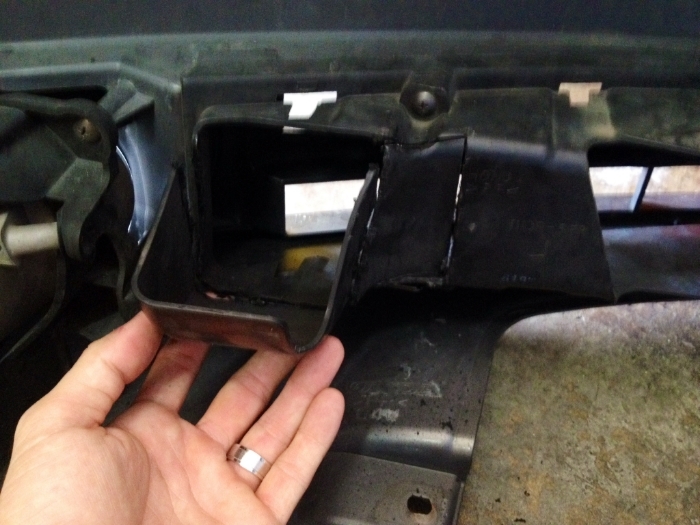
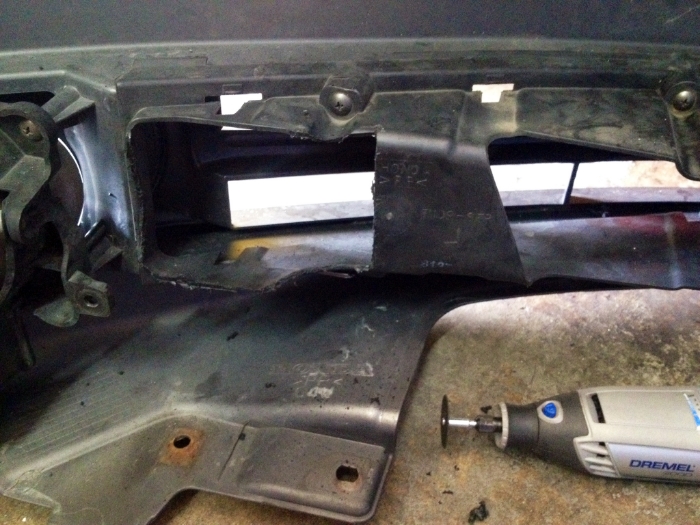
Small DYI mod last week, the stock air intake has a funnel on the bumper directing the air upwards, towards the stock air intake piping. This took air away from the AEM, so I fixed it:
Few more random shots
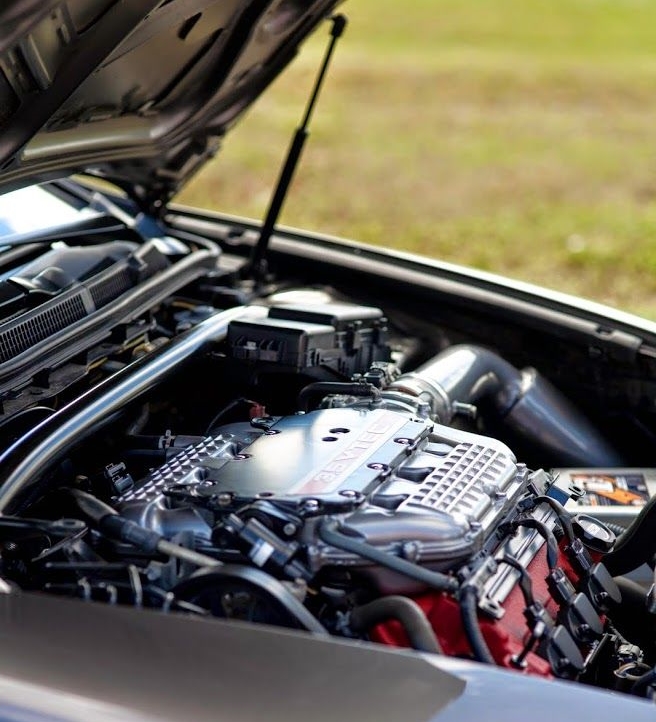
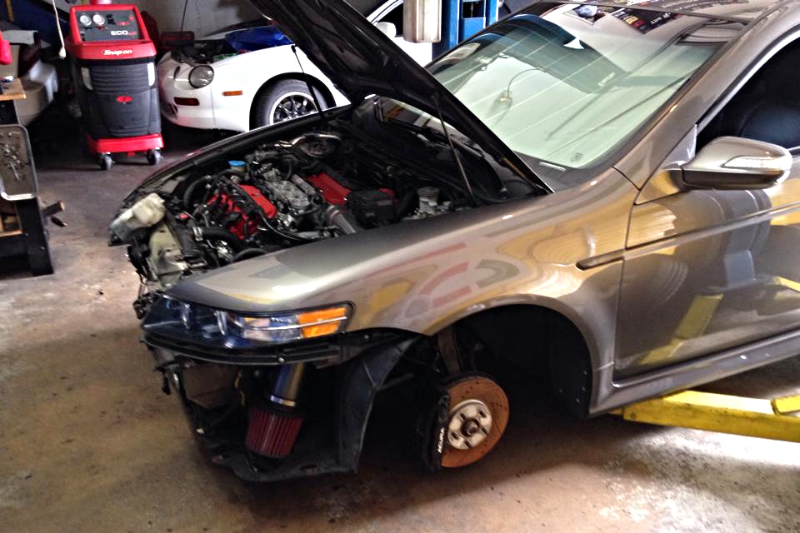

Few more random shots

The following users liked this post:
EL BAN (12-07-2014)
12-07-2014, 07:54 AM
#42
Road Racer / Solo Addict
Looking good, looking real good..
Was great meeting you last month!
Cheers!
Was great meeting you last month!
Cheers!
The following users liked this post:
FamilyGuy (12-07-2014)
12-07-2014, 02:27 PM
#43
Team Owner
iTrader: (2)
Join Date: Jan 2008
Location: Kansas City, MO (Overland Park, KS)
Posts: 36,545
Received 6,470 Likes
on
5,162 Posts

The following users liked this post:
FamilyGuy (12-07-2014)
 lol. i want mine to look like that so bad hahaha
The following users liked this post:
FamilyGuy (12-12-2014)
12-13-2014, 10:51 AM
#45
Your Friendly Canadian
Join Date: Dec 2007
Location: Toronto, Ontario
Age: 31
Posts: 17,428
Received 1,484 Likes
on
1,048 Posts
Wow, that engine bay looks gorgeous - nice work!
The following users liked this post:
FamilyGuy (12-13-2014)
The following users liked this post:
FamilyGuy (12-14-2014)
12-14-2014, 04:23 PM
#47
Three Wheelin'
Thread Starter
Thx guys it's been a fun project and great learning experience so far
Saving up for the next phase in the project
Saving up for the next phase in the project
12-14-2014, 08:11 PM
#48
Team Owner
iTrader: (2)
Join Date: Jan 2008
Location: Kansas City, MO (Overland Park, KS)
Posts: 36,545
Received 6,470 Likes
on
5,162 Posts
^^^ .....which is?????
12-14-2014, 08:47 PM
#49
Three Wheelin'
Thread Starter
Suspension / handling 
The original one is getting tired, and the compliance bushings are starting to rip.
Still need to finish performance with hondata tune. Will be tricky cuz we're saving up for a house now, so the car budget will slow down, but I was able to do a lot this year, I'm happy with the progress so far. The car is a pleasure to drive on the freeway. Next is to extend that to the twisties.
12-15-2014, 12:52 PM
#51
Three Wheelin'
Thread Starter
Luv it. Puts more power to the ground esp in the first 3 gears. I did have issues with Spec at first but it worked out in the end. I recommend either their stage 2 setup or Clutchmasters FX250 with the AASCO flywheel. Replace your rear main seal while in there. I took mine to a local shop, this is a big job.
Def do a lightweight flywheel (single mass) along with a clutch. The flywheel is what frees up power to the wheels. Compliment that with a lightweight pulley to further reduce drivetrain load
Def do a lightweight flywheel (single mass) along with a clutch. The flywheel is what frees up power to the wheels. Compliment that with a lightweight pulley to further reduce drivetrain load
Last edited by FamilyGuy; 12-15-2014 at 12:55 PM.
The following users liked this post:
FamilyGuy (12-15-2014)
12-15-2014, 03:04 PM
#53
Luv it. Puts more power to the ground esp in the first 3 gears. I did have issues with Spec at first but it worked out in the end. I recommend either their stage 2 setup or Clutchmasters FX250 with the AASCO flywheel. Replace your rear main seal while in there. I took mine to a local shop, this is a big job.
Def do a lightweight flywheel (single mass) along with a clutch. The flywheel is what frees up power to the wheels. Compliment that with a lightweight pulley to further reduce drivetrain load
Def do a lightweight flywheel (single mass) along with a clutch. The flywheel is what frees up power to the wheels. Compliment that with a lightweight pulley to further reduce drivetrain load
12-15-2014, 03:21 PM
#54
Three Wheelin'
Thread Starter
Here's the thread on the clutch and FW that I used when I did mine, good read:
https://acurazine.com/forums/perform...ch-kit-904261/
https://acurazine.com/forums/perform...ch-kit-904261/
12-15-2014, 09:57 PM
#56
Three Wheelin'
Thread Starter
I'm sure you'll like the end result regardless how you get there
The following users liked this post:
FamilyGuy (12-16-2014)
12-16-2014, 10:08 AM
#59
Three Wheelin'
Thread Starter
I know the feeling. Mine was slipping too when I bought the car.
I should try and do a new video. The car is pushing really hard now that the temps are in the 60s here in FL. I suck at doing videos though, it's hard to hold the phone steady and on target while shifting and steering, and I don't want to become a road hazard. Safety first.
Last edited by Steven Bell; 12-16-2014 at 09:16 PM. Reason: Merged Posts
12-16-2014, 04:46 PM
#60
Suzuka Master
^^^^I demand a video NOW.
The following users liked this post:
FamilyGuy (12-16-2014)
12-16-2014, 09:16 PM
#61
Team Owner
iTrader: (2)
Join Date: Jan 2008
Location: Kansas City, MO (Overland Park, KS)
Posts: 36,545
Received 6,470 Likes
on
5,162 Posts
^^^ LOL....wow.

The following users liked this post:
FamilyGuy (12-22-2014)
01-19-2015, 10:37 PM
#63
Three Wheelin'
Thread Starter
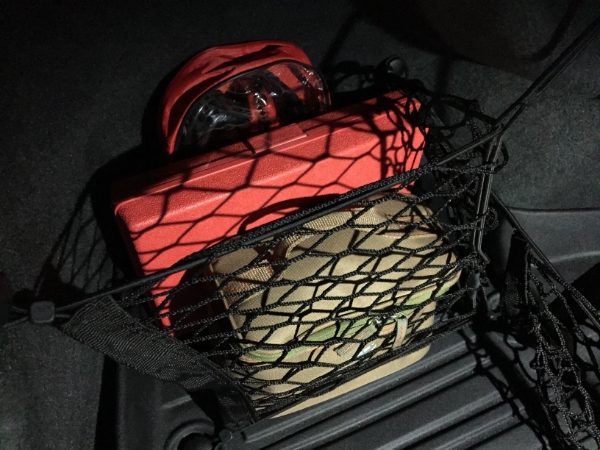
Finally had time to cut out the holes for the cargo nets today and sort out the trunk space

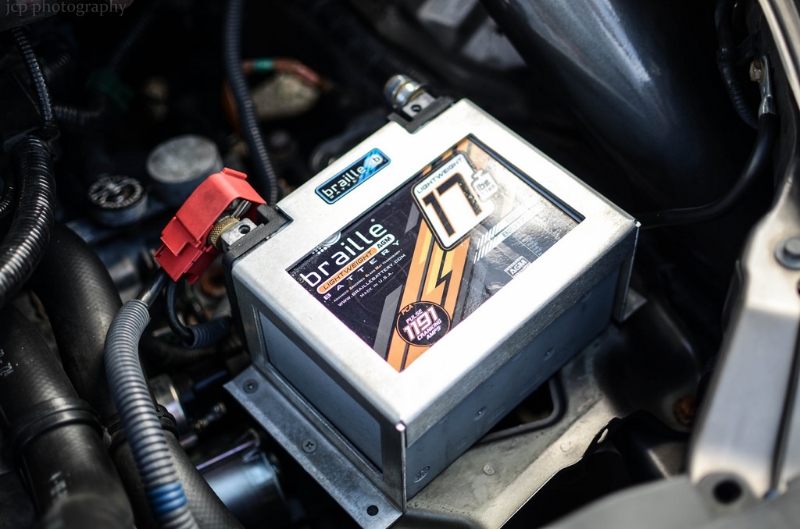
Since I removed the spare tire, I put together a flat tire emergency kit: air pump + tire plug kit + pliers, as well as jumper cables in case anything happens with the 17lb battery. Doesn't take up a lot of space and all together only weighs ~6lbs, so I still saved ~30lbs on the spare tire removal.
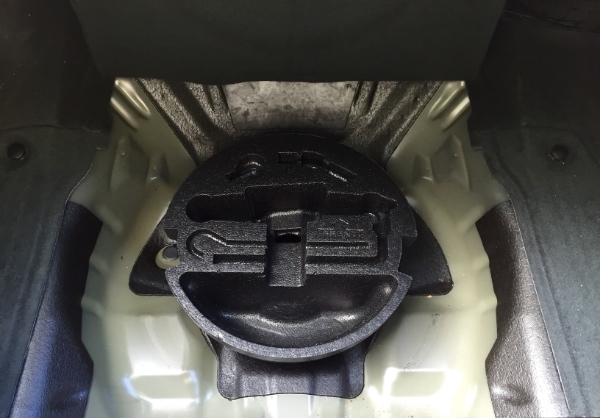
The trunk floor board bends a lot under heavy luggage, now that it doesn't have any support underneath anymore, so I put the tool foam piece back under it, secured with double sided tape. It doesn't weight anything, and although it doesn't reach the bottom of the board, it almost does, so any weight will only slightly bend it. Best I could think of for now.
Since I removed the spare tire, I put together a flat tire emergency kit: air pump + tire plug kit + pliers, as well as jumper cables in case anything happens with the 17lb battery. Doesn't take up a lot of space and all together only weighs ~6lbs, so I still saved ~30lbs on the spare tire removal.
The trunk floor board bends a lot under heavy luggage, now that it doesn't have any support underneath anymore, so I put the tool foam piece back under it, secured with double sided tape. It doesn't weight anything, and although it doesn't reach the bottom of the board, it almost does, so any weight will only slightly bend it. Best I could think of for now.
01-20-2015, 08:42 AM
#64
Suzuka Master
all the pics but no video? Nice progress tho.
The following users liked this post:
FamilyGuy (01-20-2015)
The following users liked this post:
FamilyGuy (01-20-2015)
01-20-2015, 09:29 AM
#67
Three Wheelin'
Thread Starter
I didn't measure it, but it pretty mutch matched the OEM gaskets.
There's a photo on page 1 that shows Garzand measuring 44.8mm on one of them with plastic calipers. I think it's closer to 45mm.
There's a photo on page 1 that shows Garzand measuring 44.8mm on one of them with plastic calipers. I think it's closer to 45mm.
Last edited by FamilyGuy; 01-20-2015 at 09:31 AM.
01-20-2015, 11:34 AM
#68
Safety Car
iTrader: (7)
Join Date: Dec 2008
Location: San Jose, CA/ Charleston, WV
Posts: 4,045
Received 619 Likes
on
459 Posts
just wanted to know how much material can be taken off since I have runners that a little over 45mm wide that I would like to have the intake manifold match up. The magnesium manifold has that weird lip where the 2 pieces are glued together.
01-20-2015, 12:17 PM
#69
Three Wheelin'
Thread Starter
I think you should be ok at that diameter. I measured a few IM / runner ports and IIRC they were all around ~45mm.
What lip you talking about? The one on the exterior of the IM where the two halves meet? Or inside the IM?
What lip you talking about? The one on the exterior of the IM where the two halves meet? Or inside the IM?
01-20-2015, 12:44 PM
#70

 01-20-2015, 12:56 PM
#71
Three Wheelin'
Thread Starter
The lip from the ports to the outside edge wall? Not sure what the wall thickness is, but from the outside it looks thick enough.
If you mean inside the ports, that "lip" joint (looks like a thick black line in the photo), don't know if the ports are two halves joined together as well, or its wall thickness, but that joint is a depression, not a lip (sticking out), so again, I think you'll be ok at 45.xx mm. If you were trying to hit ~48mm or more then you might run into trouble.
You can always open up the two halves of the IM. Just remove the bolts and separate - don't know how hard it would be or if it damages the IM, but the sealant is Hondabond (gray). Then you could PnP inside the IM and see what the wall thicknesses are.
I didn't separate mine, Garzand just PnP'd as far as his drill would reach, along with same thing on the TB port.
Last edited by FamilyGuy; 01-20-2015 at 01:00 PM.
The following users liked this post:
thisaznboi88 (01-20-2015)

 01-20-2015, 01:15 PM
#73
Three Wheelin'
Thread Starter
My head gaskets matched up perfectly to the runners, no matching needed there for me.
I think you'll be ok, a half of a millimeter is not a lot of length at all. It's around 0.020".
I think you'll be ok, a half of a millimeter is not a lot of length at all. It's around 0.020".
01-20-2015, 07:09 PM
#74
Team Owner
iTrader: (2)
Join Date: Jan 2008
Location: Kansas City, MO (Overland Park, KS)
Posts: 36,545
Received 6,470 Likes
on
5,162 Posts
Looks good.
The following users liked this post:
FamilyGuy (01-20-2015)
01-22-2015, 08:37 PM
#75
Three Wheelin'
Thread Starter


 now go get it put on!!!!
01-23-2015, 07:49 AM
now go get it put on!!!!
01-23-2015, 07:49 AM
#78
Three Wheelin'
Thread Starter
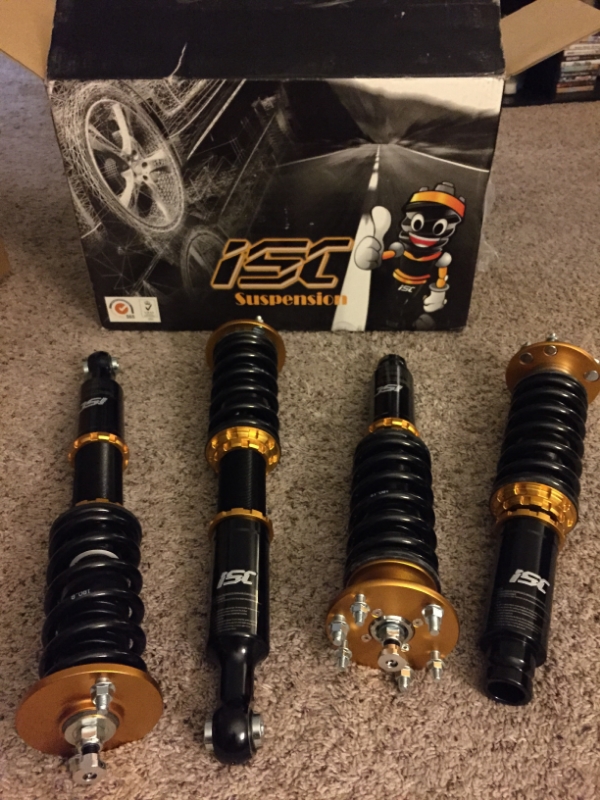
Somehow I have to ignore this box staring at me for a few more weeks, until I find time to finish researching and reading, reading and more reading About what else I need to do it right. My girl's getting me the progress RSB for my bday next week, and so far I plan to get skunk2 front camber kit, and leaning towards the spc rear camber kit, read too many issues with the ingals one, after that I don't know. I'm leaning towards new OEM FSB bushings and end links, OEM rear links, the rest of them, and Heeltoe compliance bushings. I'm a little scared about the rear toe, not sure what other options we have there yet besides ingals.
I had to jump on XLR8's sale on the N1's though, great deal
I had to jump on XLR8's sale on the N1's though, great deal
Last edited by FamilyGuy; 01-23-2015 at 07:51 AM.
01-23-2015, 08:01 AM
#79
-------Tim-------
^from what I've read regarding rear toe adjustment with the SPC upper camber arm, is that you can get toe within spec. I'm sure Rockstar can answer this for sure.
Congrats on the coils, and the soon to be had Progress RSB!
Congrats on the coils, and the soon to be had Progress RSB!
The following users liked this post:
FamilyGuy (01-23-2015)
01-23-2015, 08:31 AM
#80
Three Wheelin'
Thread Starter