FamilyGuy's 6MT Type S
 looks so much cleaner, crazy how the littlest things can make big differences.

The following users liked this post:
FamilyGuy (03-16-2015)
 03-15-2015, 10:37 PM
#202
Team Owner
iTrader: (2)
Join Date: Jan 2008
Location: Kansas City, MO (Overland Park, KS)
Posts: 36,545
Received 6,470 Likes
on
5,162 Posts
Busy man-looks good!
The following users liked this post:
FamilyGuy (03-16-2015)
03-16-2015, 08:31 AM
#203
Three Wheelin'
Thread Starter
03-16-2015, 09:31 AM
#204


 03-16-2015, 10:12 AM
#205
Three Wheelin'
Thread Starter
Yes original was OEM and don't have it anymore, they removed it to instal the new one.
03-16-2015, 11:37 AM
#207
Ah ok.... I need a new armrest in mine... just inquiring....
03-16-2015, 12:28 PM
#208
Three Wheelin'
Thread Starter
I have an extra one that I'm bringing to our meet next week. Jeremy's got dibs on it first though. It's the same as the new one I just put on.
03-16-2015, 04:07 PM
#209
Jeff
iTrader: (3)
Join Date: Jul 2014
Location: Port City, New Brunswick Canada
Posts: 5,728
Received 815 Likes
on
726 Posts
dude! everything under the hood looks freakin awesome!!! its inspiring me to get a powder coat job of my own come summer. thnx for posting the detailed pics of the RSB dilemma, just ordered mine there today hopefully everything goes smooth lol
The following users liked this post:
FamilyGuy (03-16-2015)
03-16-2015, 04:57 PM
#210
Three Wheelin'
Thread Starter
No prob bud. You think you could snap a couple pics of your end links, like the pics I posted? I'd like to see how they are stock. Do it with the car on the ground, flat surface, gotta crawl under it a bit...thx!
03-16-2015, 05:31 PM
#211
Jeff
iTrader: (3)
Join Date: Jul 2014
Location: Port City, New Brunswick Canada
Posts: 5,728
Received 815 Likes
on
726 Posts
car is put away for the winter, up here in eastern canada winters are just too harsh for the TL, when i get it out and everything installed I will most certainly do up some pics!!
The following users liked this post:
FamilyGuy (03-16-2015)
03-16-2015, 06:59 PM
#212
Safety Car
iTrader: (5)
I'll get pics when I can but might be a while. My car is lowered and its not the easiest to get under, plus I have to be in a mood to get dirty Cuz my apartment parking spot is outside and asphalt haha
The following users liked this post:
FamilyGuy (03-16-2015)
03-17-2015, 04:29 PM
#213
I have an extra one that I'm bringing to our meet next week. Jeremy's got dibs on it first though. It's the same as the new one I just put on.[/QUOTE]
With red stitch or without?
With red stitch or without?
03-17-2015, 04:34 PM
#214
Three Wheelin'
Thread Starter
With
03-17-2015, 10:19 PM
#215
Team Owner
iTrader: (2)
Join Date: Jan 2008
Location: Kansas City, MO (Overland Park, KS)
Posts: 36,545
Received 6,470 Likes
on
5,162 Posts
You need to carry that red stitching throughout the interior, now.
03-18-2015, 08:26 AM
#217
Three Wheelin'
Thread Starter
I think I've got the coils dialed in now, ended up with 20 in the front and 17 in the rear, with the progress rsb on street. She feels good, not bouncy, doesn't crash over bumps and handles better than stock. No dive on braking or acceleration, and should hold more speed on cornering on the street setting of the rsb vs track, where it would corner flatter but give out sooner and fish tail. I just hope the bar holds.
Yea seats would be nice but so expensive
I'd love to give the carbon fiber door panels a red tint treatment but no idea how. That would look killer imo.
Yea seats would be nice but so expensive
I'd love to give the carbon fiber door panels a red tint treatment but no idea how. That would look killer imo.
03-18-2015, 07:13 PM
#219
Senior Moderator
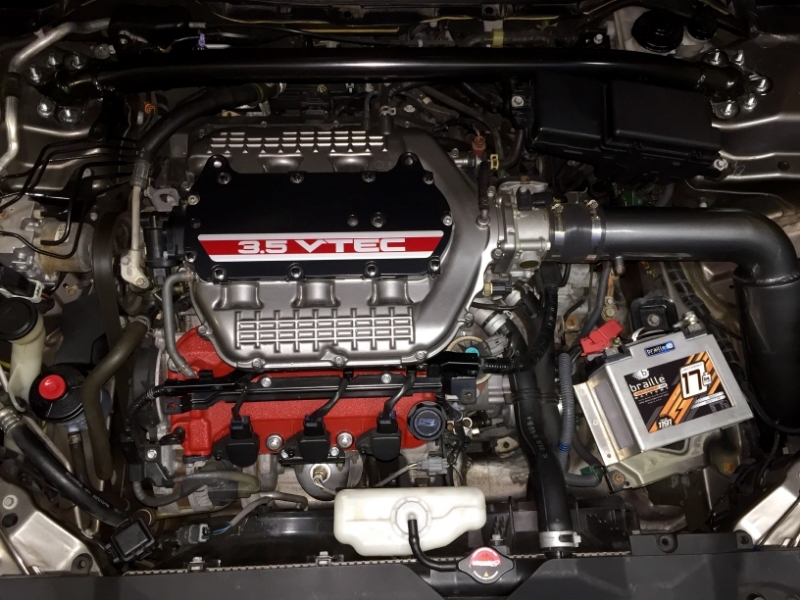
Wow... I'd never think to paint the brake/clutch/windshield/powersteering caps... They look VERY clean! Good call on that! 
Also chiming in with the Progress RSB. I had it on my old Accord and then moved it to my 08 TL-S and never had any issues. Accord was lowered about 2 inches, TL is stock.
Hope you figured it all out!
Also chiming in with the Progress RSB. I had it on my old Accord and then moved it to my 08 TL-S and never had any issues. Accord was lowered about 2 inches, TL is stock.
Hope you figured it all out!
03-18-2015, 09:35 PM
#220
Team Owner
iTrader: (2)
Join Date: Jan 2008
Location: Kansas City, MO (Overland Park, KS)
Posts: 36,545
Received 6,470 Likes
on
5,162 Posts
03-18-2015, 11:21 PM
#221
Three Wheelin'
Thread Starter
From what I've read here, with the bar on street you get max corner speed and a little body roll / under steer - very minor, I would still consider it "flat" cornering compared to the OEM body roll, and on track you get an even flatter cornering but lose some max speed to over steer (it can fish tail on you).
Try both, see which you like best. I still need to try the track setting myself, but luv the way it behaves right now. A little bit of give lets the suspension do its thing to keep the car on the road. Too stiff feels like all the lateral forces are on the tires, nothing is absorbed by the suspension, and once the tires lose grip off you go. The upside there is the chassis reacts very fast to input from the steering wheel. Anyway, don't quote me on any of this, this is just how I *think* it works, I don't know how it really works...and you can always play with the dampening and even diff spring rates, bushings, etc. lots of diff setups you can try, you can go pretty wild on suspension setups. I'm aiming at a street setup, comfortable enough over bumps and sporty enough to handle spirited driving without the stock diving, squatting and body roll
I wish I had a good test road around here to see how this set up behaves on under vs over steer. I haven't found the limit yet, and it still feels like a slight under steer, but def an improvement over the stock under steer. It's almost neutral, my corner speed limits have increased, I've taken this one 90 degree corner at around ~30mph and she holds, neither front or rear gives out.
Wow... I'd never think to paint the brake/clutch/windshield/powersteering caps... They look VERY clean! Good call on that!
Also chiming in with the Progress RSB. I had it on my old Accord and then moved it to my 08 TL-S and never had any issues. Accord was lowered about 2 inches, TL is stock.
Hope you figured it all out!
Also chiming in with the Progress RSB. I had it on my old Accord and then moved it to my 08 TL-S and never had any issues. Accord was lowered about 2 inches, TL is stock.
Hope you figured it all out!

Last edited by FamilyGuy; 03-18-2015 at 11:29 PM.
03-19-2015, 10:20 AM
#223
Three Wheelin'
Thread Starter
Correction, that corner I mention above, I've taken it at 20mph, not 30 
03-19-2015, 06:05 PM
#224
Team Owner
iTrader: (2)
Join Date: Jan 2008
Location: Kansas City, MO (Overland Park, KS)
Posts: 36,545
Received 6,470 Likes
on
5,162 Posts
It does take a lot of time, but the results turn out great.
03-21-2015, 06:38 PM
#225
Three Wheelin'
Thread Starter
Tried the progress rsb on the track setting and wow it's amazing how much diff a half inch can make. Everything's much tighter and the chassis reacts much faster to the steering. But it also felt like I up'd the dampers a few clicks and a near solid rear axle. Would def luv it on a track, but I went back to the street setting better for me as a dd  I have the exact balance I wanted right now and I'm enjoying it
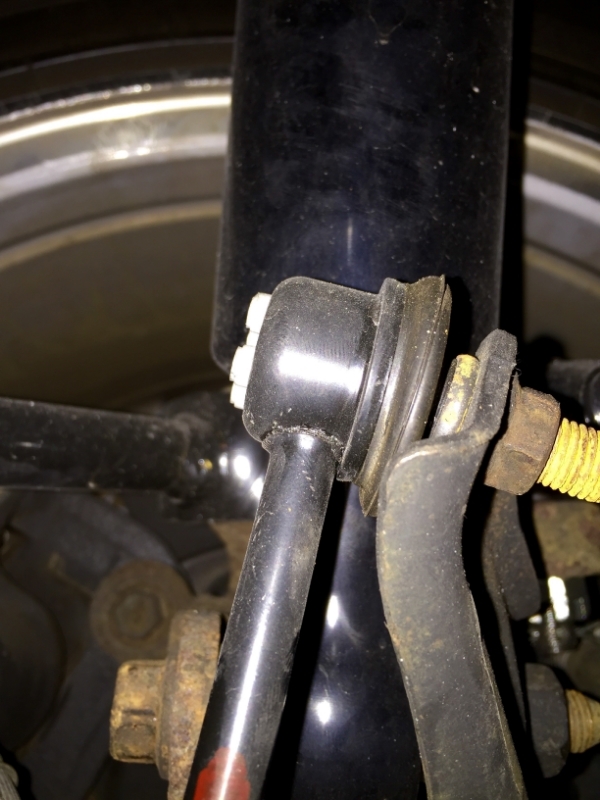
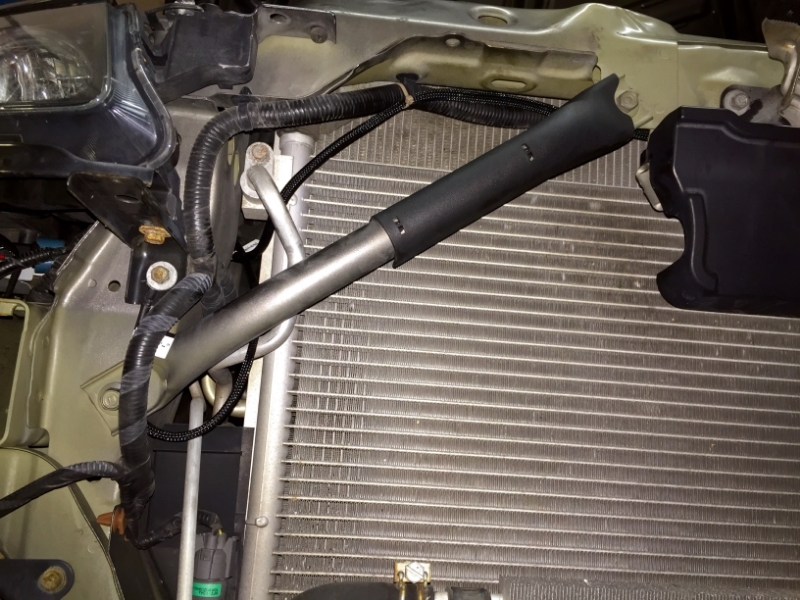
The end link is at the limit on the street setting in my car, so maybe this is what busted the bushing. I didn't have the bar all teh way back on the adj brackets. I do now, so hope it holds.
Here's a shot of the end link on the track setting, you can see it looks better, i.e. not at the limit:
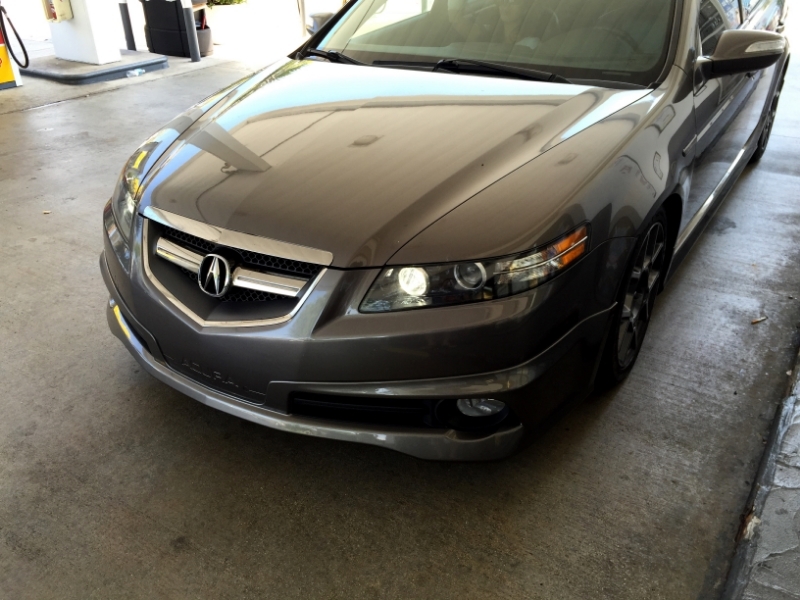
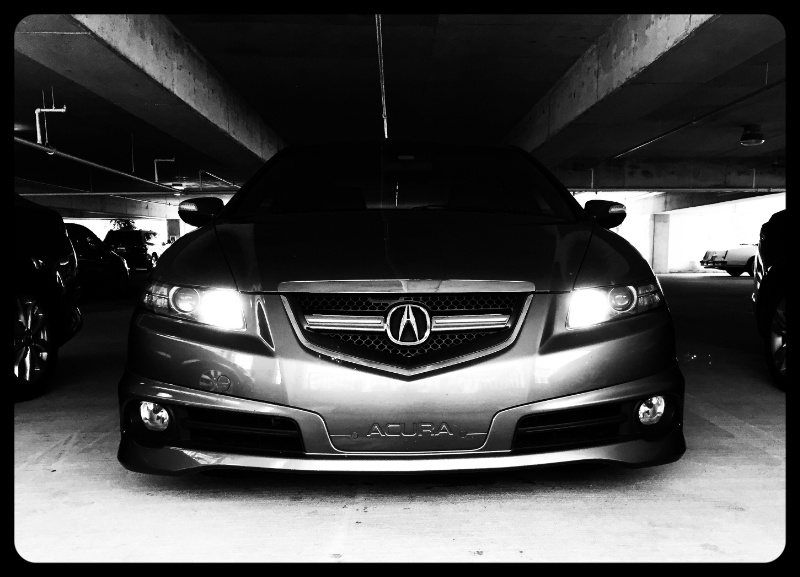
Also installed vleds DRLs 5k
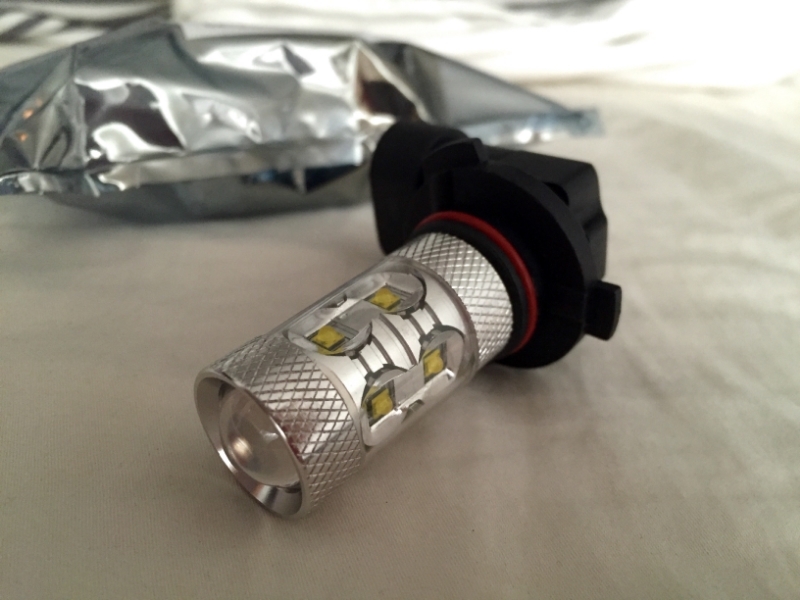
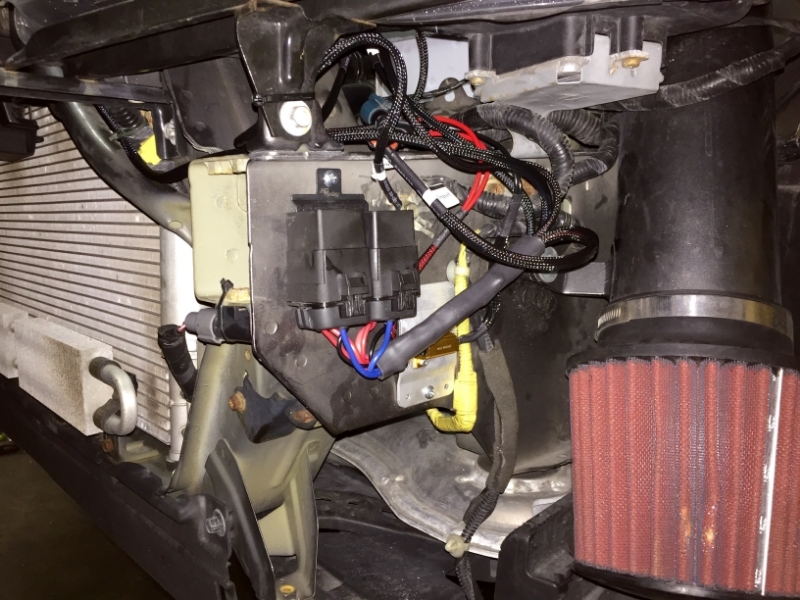
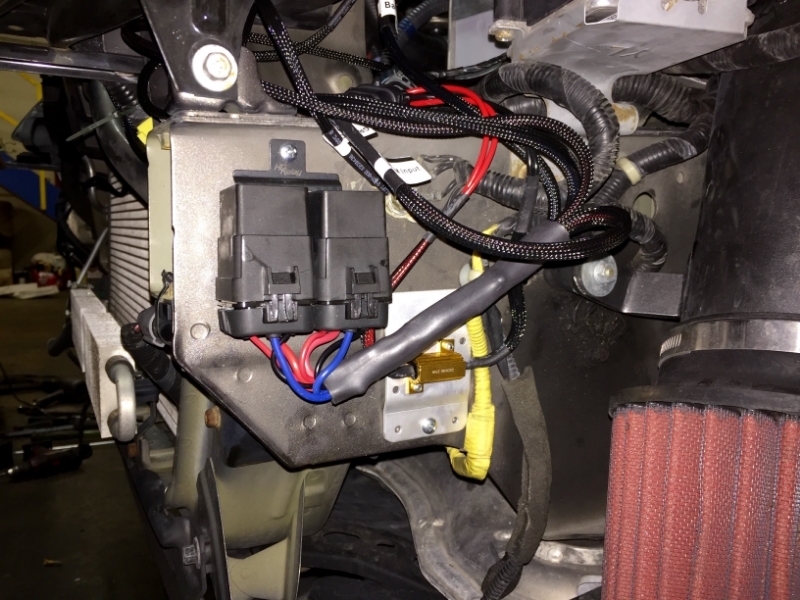
Here's the installation, we hid the wires as best we could, you can't see anything other than the battery wire under the hood

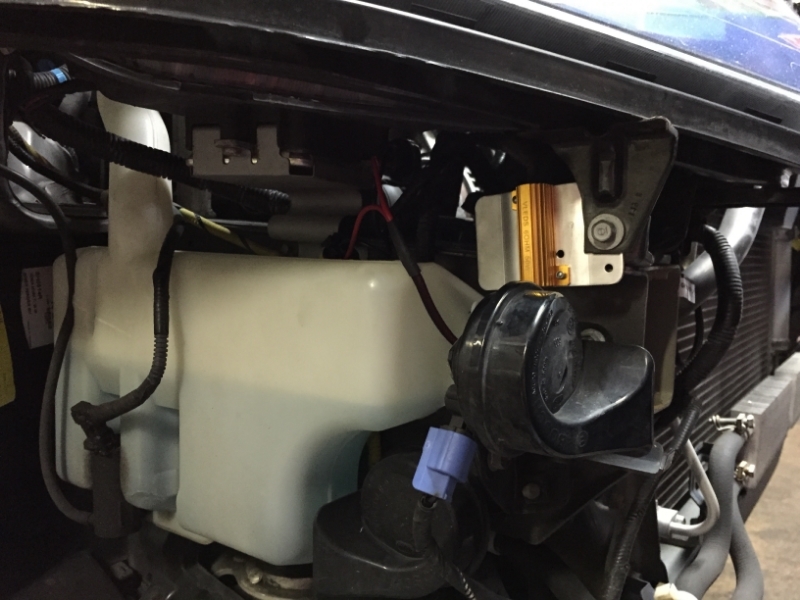
Hard to capture the 5 k light on my cell phone camera, but best i could do for now:
Old
New
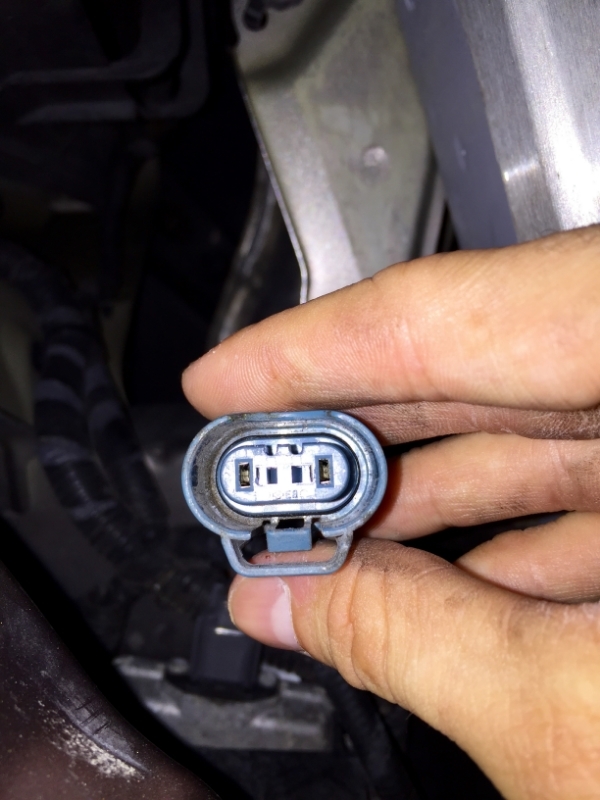
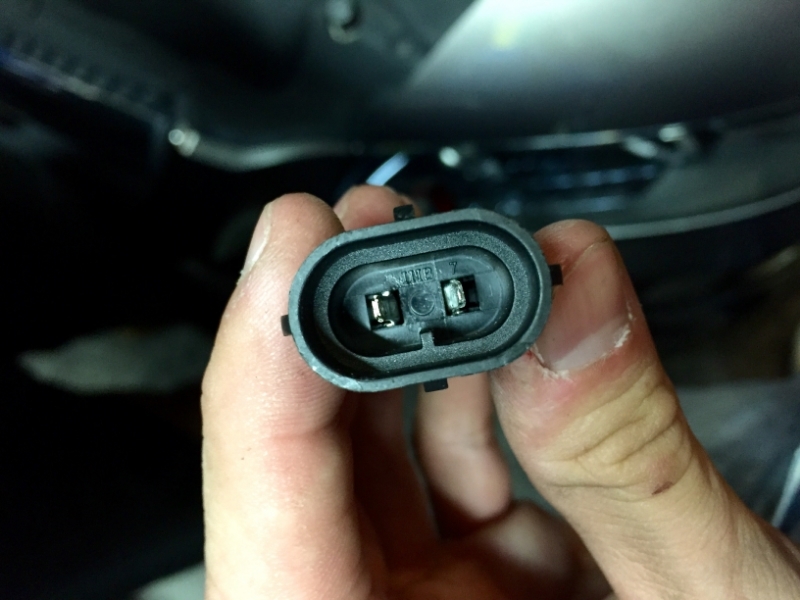
We did have one issue with the vleds kit, the driver's side resistor's connector was the wrong one.
Car's connector:
vled's connector:
We managed to make the connection, everything works.
A BIG thx to Acutech Automotive for their genius
I have the exact balance I wanted right now and I'm enjoying itThe end link is at the limit on the street setting in my car, so maybe this is what busted the bushing. I didn't have the bar all teh way back on the adj brackets. I do now, so hope it holds.
Here's a shot of the end link on the track setting, you can see it looks better, i.e. not at the limit:
Also installed vleds DRLs 5k
Here's the installation, we hid the wires as best we could, you can't see anything other than the battery wire under the hood
Hard to capture the 5 k light on my cell phone camera, but best i could do for now:
Old
New
We did have one issue with the vleds kit, the driver's side resistor's connector was the wrong one.
Car's connector:
vled's connector:
We managed to make the connection, everything works.
A BIG thx to Acutech Automotive for their genius
Last edited by FamilyGuy; 03-21-2015 at 06:43 PM.
 03-21-2015, 10:50 PM
#227
Three Wheelin'
Thread Starter
Thx! I used these: ACURA HONDA LED DRL HARNESS
03-21-2015, 11:01 PM
#228
Jeff
iTrader: (3)
Join Date: Jul 2014
Location: Port City, New Brunswick Canada
Posts: 5,728
Received 815 Likes
on
726 Posts
interesting diagnosis on the RSB...lots of tweaking going on here lol... question for ya.... what did you use to fill the holes on your front bumper from the plate frame?? I have the same holes on mine it pisses me off... getting the front end respryaed and was going to get that taken care of also but just curious
03-21-2015, 11:14 PM
#229
Three Wheelin'
Thread Starter
The covers for the two cut outs are from Acura, you can buy them if they're missing in your car, and the third hole that the holder leaves, the guy that painted my bumper did a plastic weld job to plug it, came out perfect.
Why Acura only did two cut outs for a holder that drills 3 holes is a funny mystery. The 3rd hole is the problem.
Why Acura only did two cut outs for a holder that drills 3 holes is a funny mystery. The 3rd hole is the problem.
The following users liked this post:
Oh Sickest TL (03-21-2015)
03-21-2015, 11:36 PM
#230
Jeff
iTrader: (3)
Join Date: Jul 2014
Location: Port City, New Brunswick Canada
Posts: 5,728
Received 815 Likes
on
726 Posts
do you have a pic of the 3rd hole or can you at point out where it was?? My car is stored but it has the front plate frame still attached to it, but once I take it out come spring Ill be taking that frame off (I'm registering it as a seasonal vehicle, where I'm from a front plate is required unless the car is a seasonal registration from April-Nov)
Acura Parts @ AcuraOEMparts.com - Genuine Acura OEM Parts from Delray Acura
so part #11 for the 2 holes but not sure where the 3rd hole is located??
thanks in advance
Acura Parts @ AcuraOEMparts.com - Genuine Acura OEM Parts from Delray Acura
so part #11 for the 2 holes but not sure where the 3rd hole is located??
thanks in advance
03-21-2015, 11:43 PM
#231
Three Wheelin'
Thread Starter
Yup #11
I don't have a pic, but the 3rd hole is dead smack in the middle of the bumper, behind the top of the plate holder. Just a drilled hole through the bumper basically. A decent shop should be able to plug it for you. Do that before painting
I don't have a pic, but the 3rd hole is dead smack in the middle of the bumper, behind the top of the plate holder. Just a drilled hole through the bumper basically. A decent shop should be able to plug it for you. Do that before painting
03-21-2015, 11:49 PM
#232
Jeff
iTrader: (3)
Join Date: Jul 2014
Location: Port City, New Brunswick Canada
Posts: 5,728
Received 815 Likes
on
726 Posts
right on mang
and yes a very reputable shop will be painting my car , I wouldn't have it any other way
so it looks like its pretty much just above the "U" in ACURA eh?
why they would do that is just "horse pucky" LOL
and yes a very reputable shop will be painting my car , I wouldn't have it any other way
so it looks like its pretty much just above the "U" in ACURA eh?
why they would do that is just "horse pucky" LOL
Last edited by Oh Sickest TL; 03-21-2015 at 11:52 PM.
03-22-2015, 12:02 AM
#233
Three Wheelin'
Thread Starter
Lol right
Yup that's where it is
Yup that's where it is
03-22-2015, 04:46 PM
#234
Team Owner
iTrader: (2)
Join Date: Jan 2008
Location: Kansas City, MO (Overland Park, KS)
Posts: 36,545
Received 6,470 Likes
on
5,162 Posts
Wow, very nice work!
03-22-2015, 05:19 PM
#235
Three Wheelin'
Thread Starter
Thx Steven!
03-23-2015, 11:34 AM
#236
Jeff
iTrader: (3)
Join Date: Jul 2014
Location: Port City, New Brunswick Canada
Posts: 5,728
Received 815 Likes
on
726 Posts
hey man , if I can draw your attn to that bumper link again .... for your weight reduction you removed the absorbers? correct? part#12 and #21, #24 in the diagram .. if those are indeed the items removed how much did those weigh
Last edited by Oh Sickest TL; 03-23-2015 at 11:36 AM.
03-23-2015, 12:33 PM
#237
Three Wheelin'
Thread Starter
You remove #8 and #21. The plastic absorbers #12 and #24 come out too.
Each weighs ~16-17lbs, or around ~32-34lbs total. Since the weight is at the extreme ends of the car, you can feel it on turn in.
You will need to relocate the ambient air temp sensor, which is tied to the front bumper, but that's easy. I forget where we put mine, my friend did it.
Each weighs ~16-17lbs, or around ~32-34lbs total. Since the weight is at the extreme ends of the car, you can feel it on turn in.
You will need to relocate the ambient air temp sensor, which is tied to the front bumper, but that's easy. I forget where we put mine, my friend did it.
The following users liked this post:
Oh Sickest TL (03-23-2015)
03-23-2015, 12:36 PM
#239
Three Wheelin'
Thread Starter
Anytime
03-23-2015, 03:00 PM
#240
Senior Moderator

