
Detailed: The place to park my shiny TL-S!
 02-06-2009, 01:41 PM
#1
2012 SH-AWD / Advanced
Thread Starter
Detailed: The place to park my shiny TL-S!
You guys have seen many of my writeups on detailing cars, so you probably know what you're in for on this one as well. Now that the temperatures are in the single digits outside, and the TL-S is getting very dirty, I thought I'd take the time to satisfy my OCD needs and work on the garage!
Extreme Garage Makeover!
My house was built 9 years ago, and unfortunately the garage has been a neglected area as it is in many homes. I finally decided that it was time to do something about it, and I started on the project late in December. It was originally supposed to be a �2 week� project, but that quickly turned into 6. I decided that if I'm going to do it, it's going to be done correctly, and done just once.
This year I am taking my detailing to a whole new level (website in the works as well), and I knew that I needed a much more professional look for when my customers bring their prized possessions to me. A clean and well organized work space is equally as important.
After much thought, I came up with the following list of needs:
Insulated wall and garage door
Finished wall
Garage heater
More electrical outlets
Storage space
Organization
Better lighting
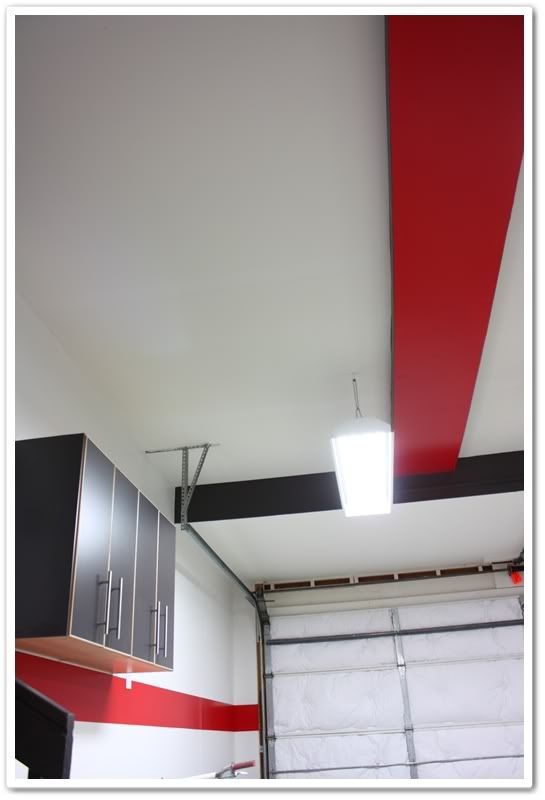
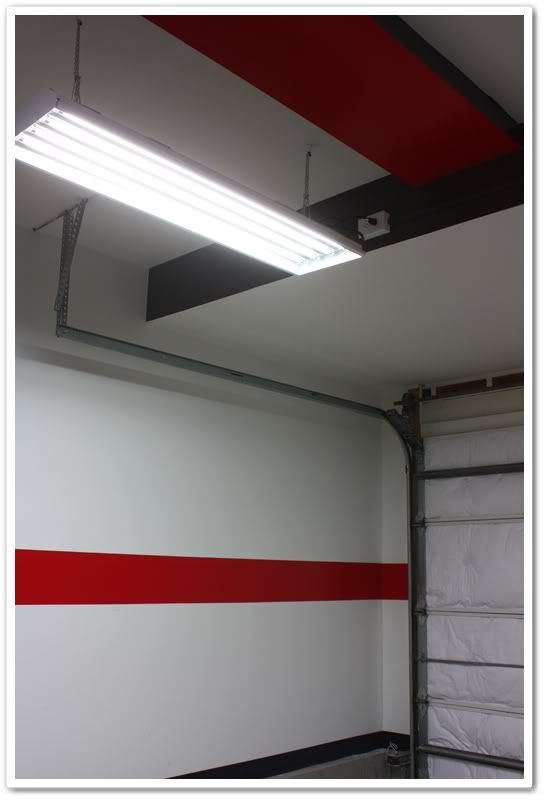
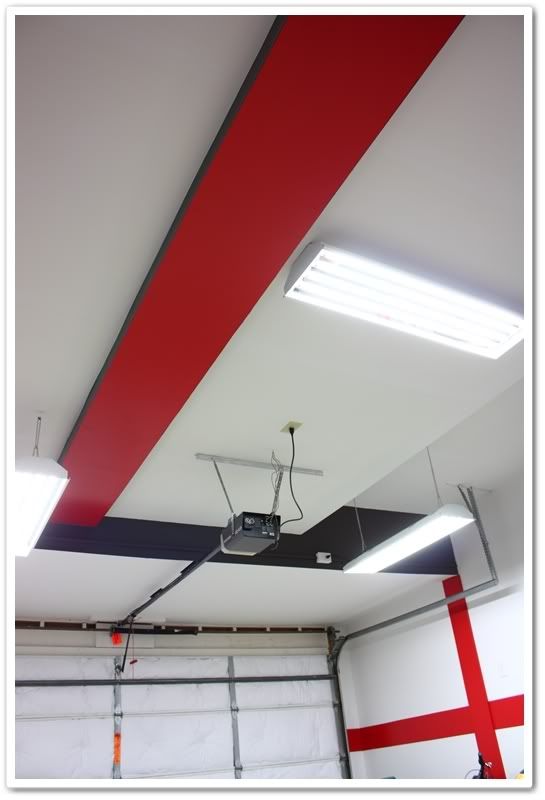
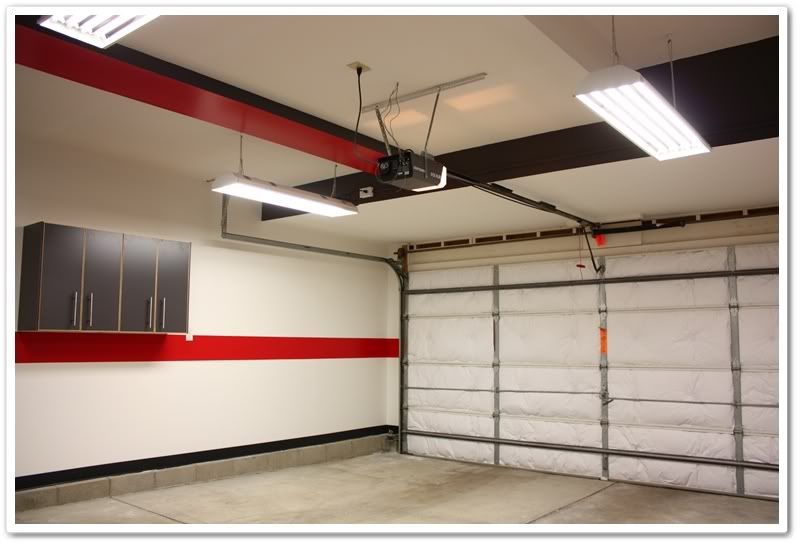
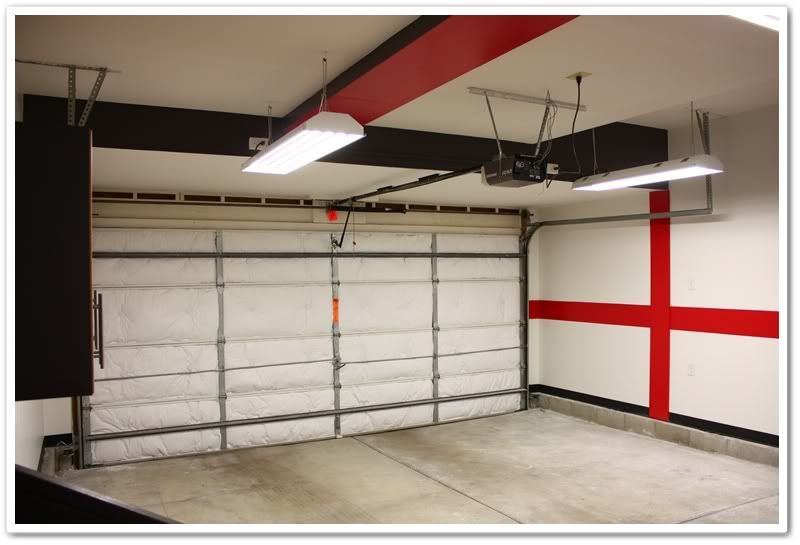
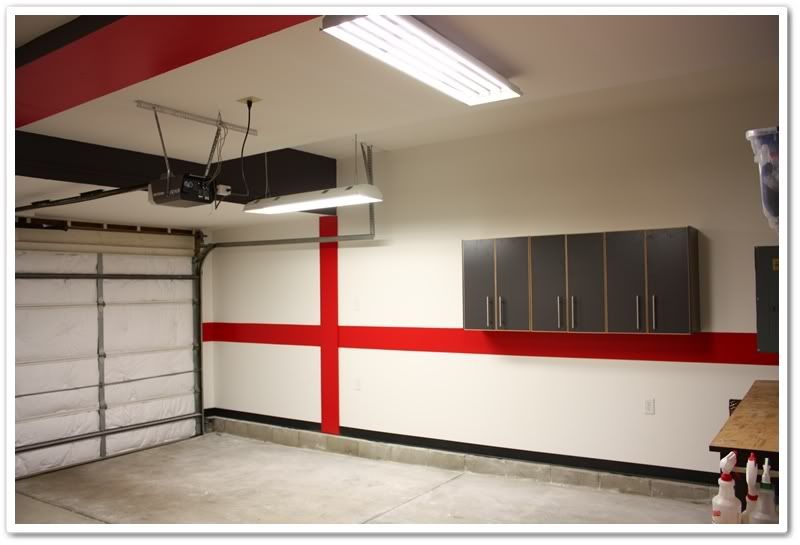
First up was to address electrical needs. I installed 7 new outlets on 2 new circuits...one of them being a 240v outlet for a new garage heater. Several of the outlets needed to be on the ceiling so that I could hang a few more fluorescent fixtures. For the lighting, I went with 3, 48�, 4-bulb T-5 high output light fixtures with 5000K bulbs. These are very bright, and produce a color very similar to sunlight. 57,000 lumens in a 400sq/ft garage...! Wear your sunglasses kids.
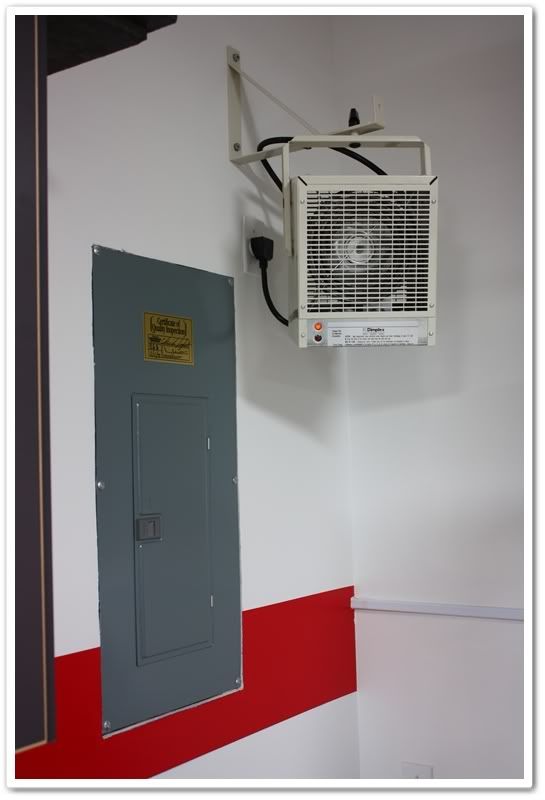
Now that the electrical was done, I was able to install my new Dimplex DGWH4031 garage heater. It's a 240v, 13,000 BTU unit that's perfect for heating a 400sq/ft garage. Even when it's single digits outside, I can easily heat up my garage to 65 or 70 degrees! And now that it's all insulated, it's not difficult to maintain a comfortable temperature while I'm working out there.
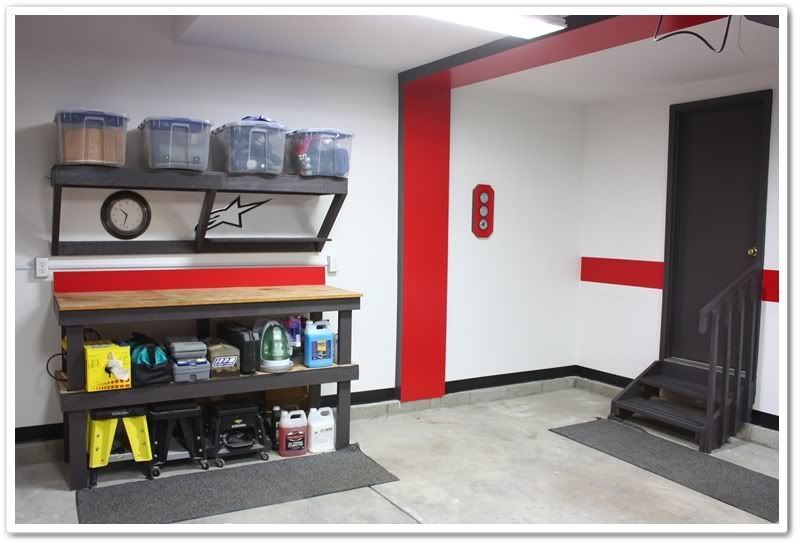
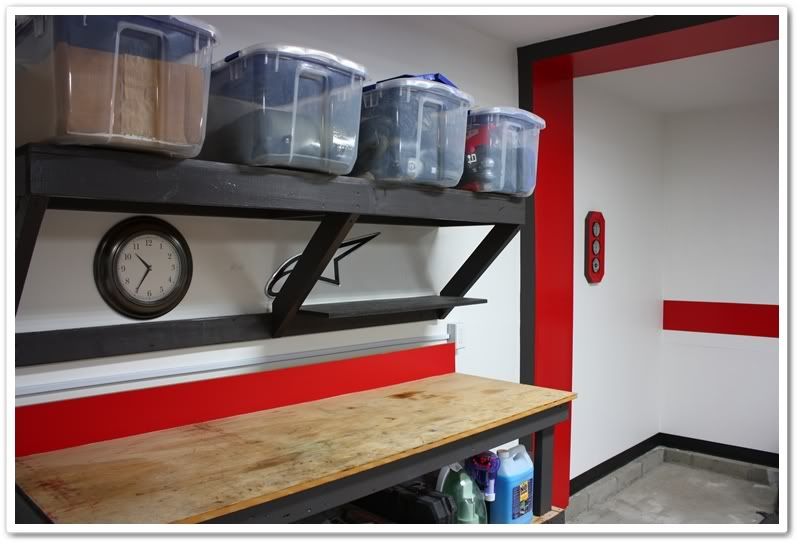
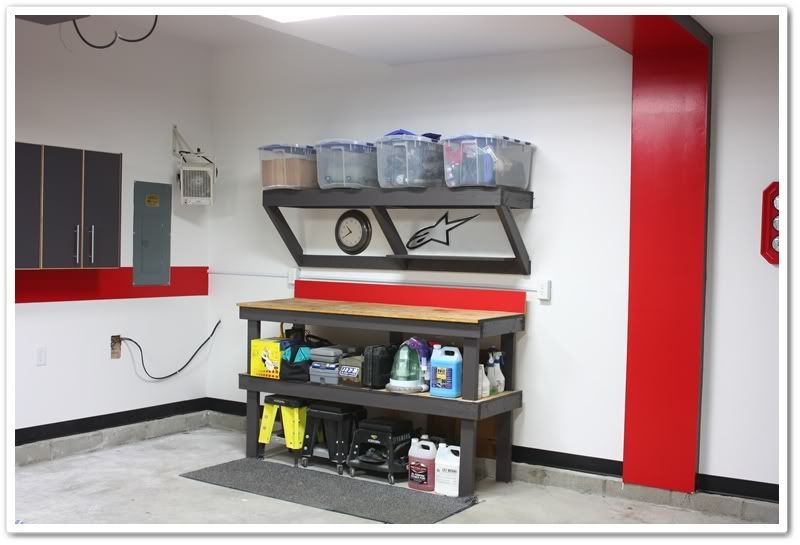
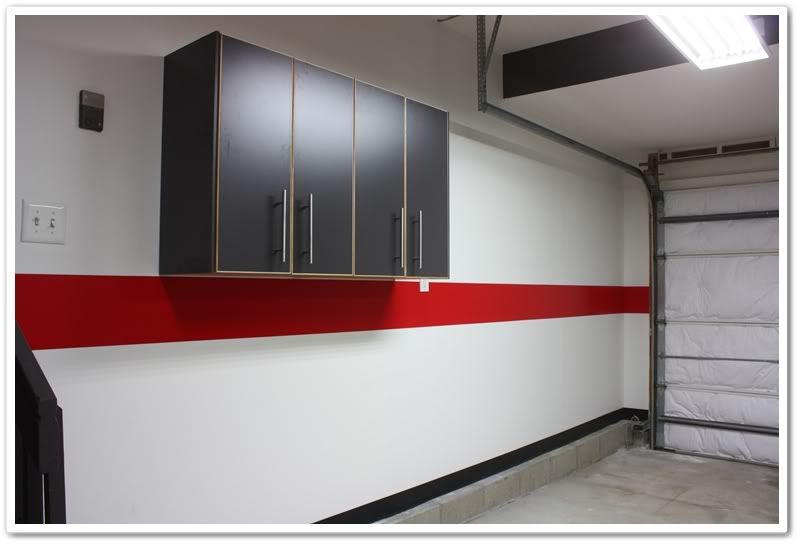
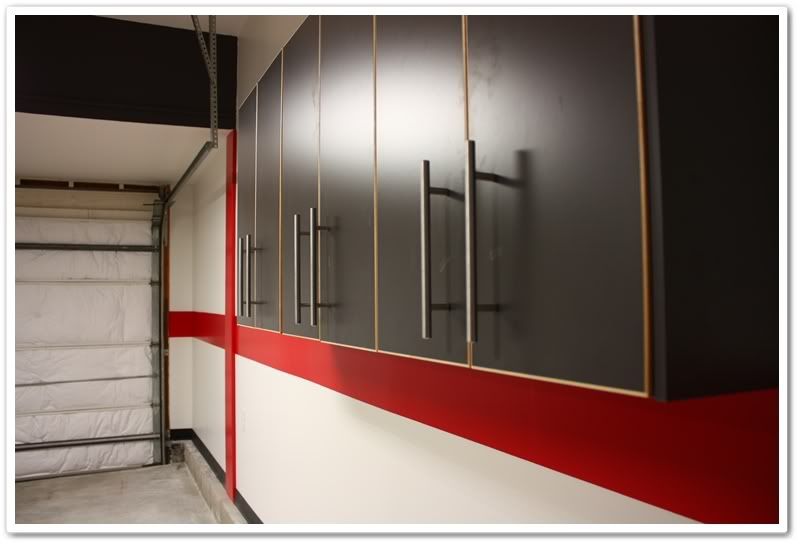
I knew I needed some nice cabinets, but some of the garage-specific models were just too much. I found some really nice ones at IKEA, and they only cost me $70/each. I placed 3 of them on the far wall for my detailing supplies, and put 2 of them near the entrance of the house for food and kitchen overstock (this helped with the wife-acceptance factor).
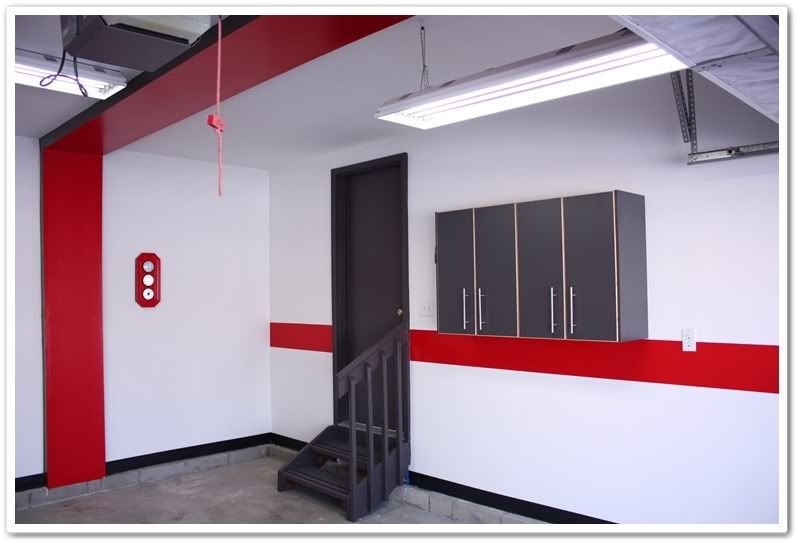
For the trim paint (part of ceiling, workbench, steps, door), I took one of the cabinet doors to Lowe's and had them color match the dark grey. Now everything is properly color-matched throughout the garage!
I still have to work on the floor, but it's simply too cold right now for any kind of finishing. That will be a good project for late spring.
I got a bit camera happy, so don't mind all of the photos. Enjoy!
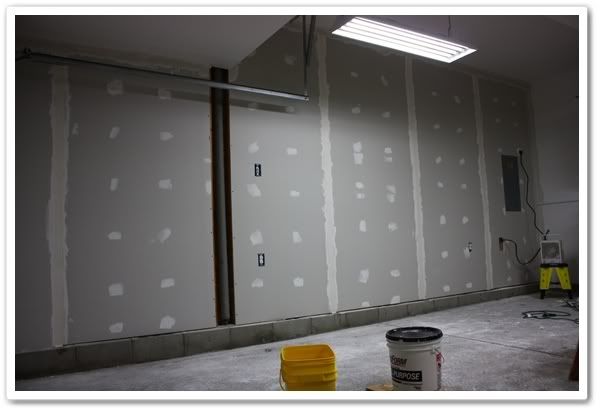
It was exceptionally messy here because I had extra clutter from Christmas decorations. As you can see though, the wall was less than impressive:
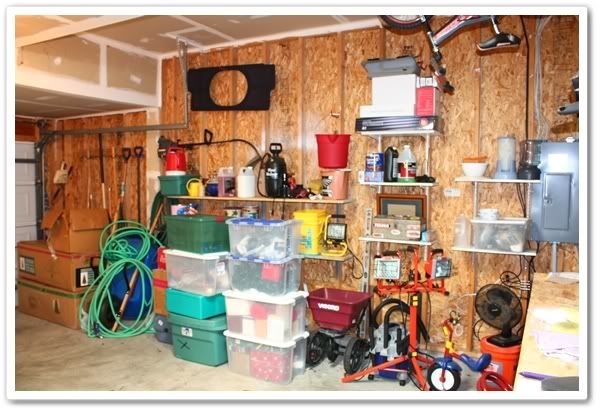
Unfinished ceiling as well:
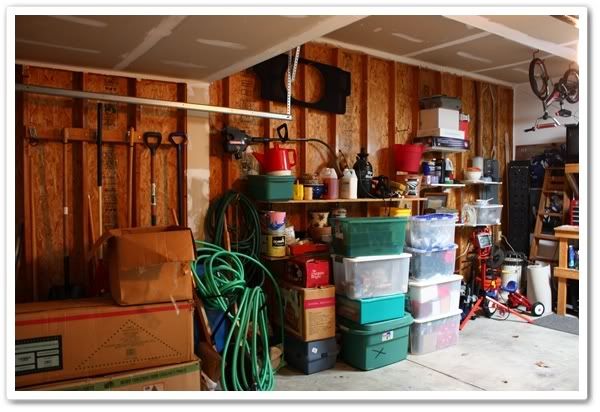
Workbench is a bit cluttered:
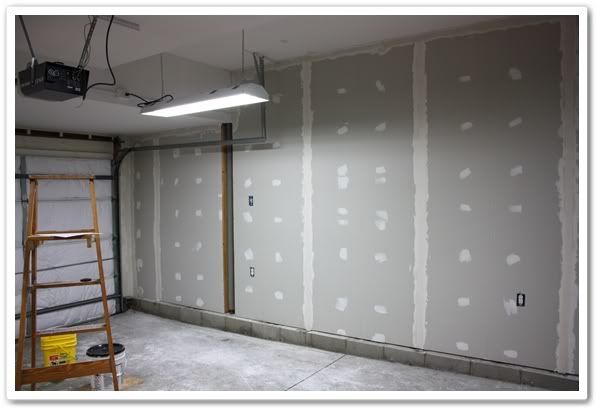
In process. As you can see, I have a support pole on the wall that barely stuck out further than the studs, so I couldn't just cover it with drywall. Later in the photos I'll show you how I addressed this.
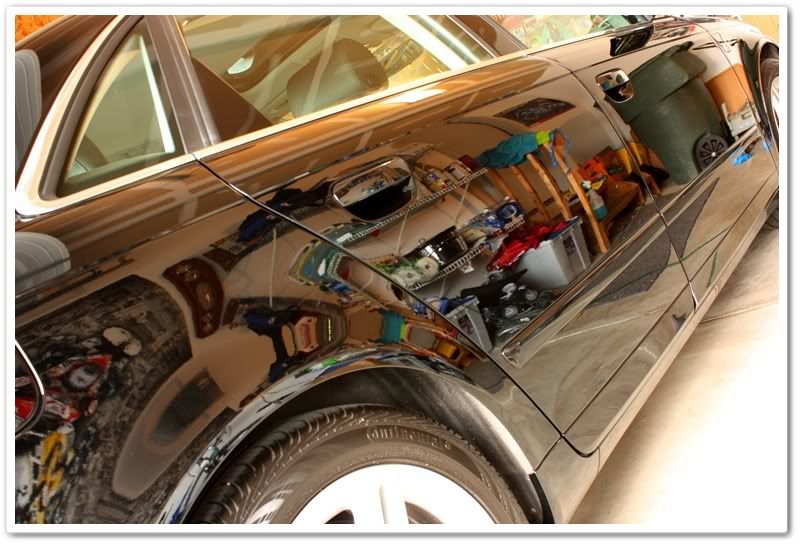
As you can see from this photo that I took last year while working on this Audi, the side wall added some great reflections of clutter! Cool photo, but not very professional by any means.
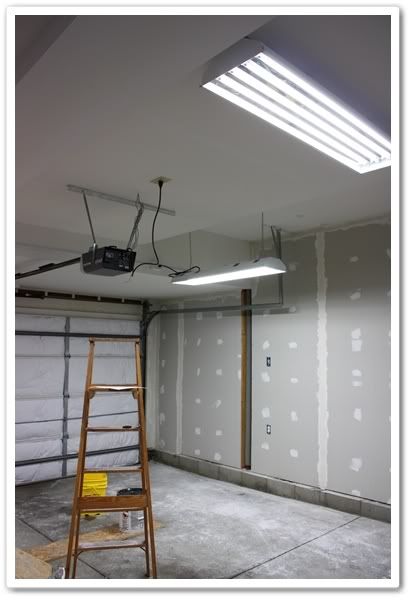
The ceiling is already painted, and new T-5 lights installed:
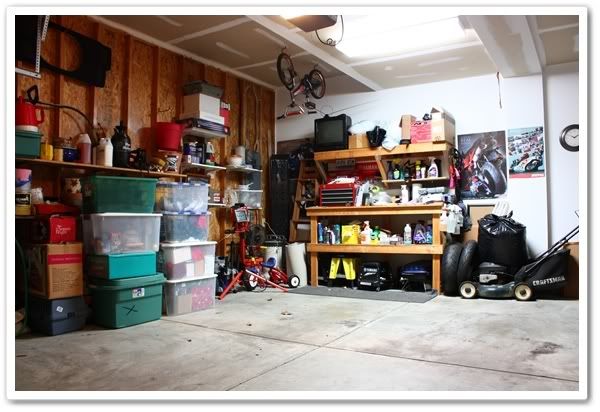
Here is it mostly finished. I still have some decorating to do, and a few more bins of �stuff� to put on shelves, but it's pretty much ready.

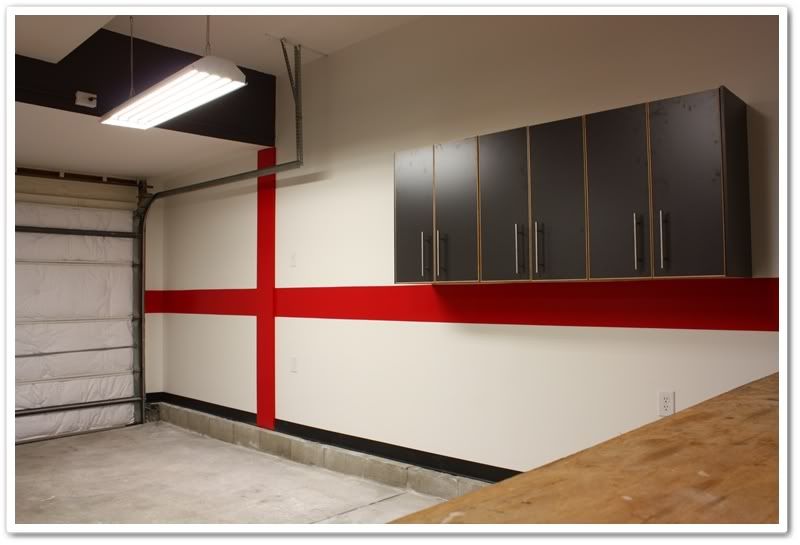
Notice the vertical red stripe on the left. I bought an 8� board, sanded and painted it, and used it to cover up the support pole shown earlier. It was a great solution, and added a nice design element as well.
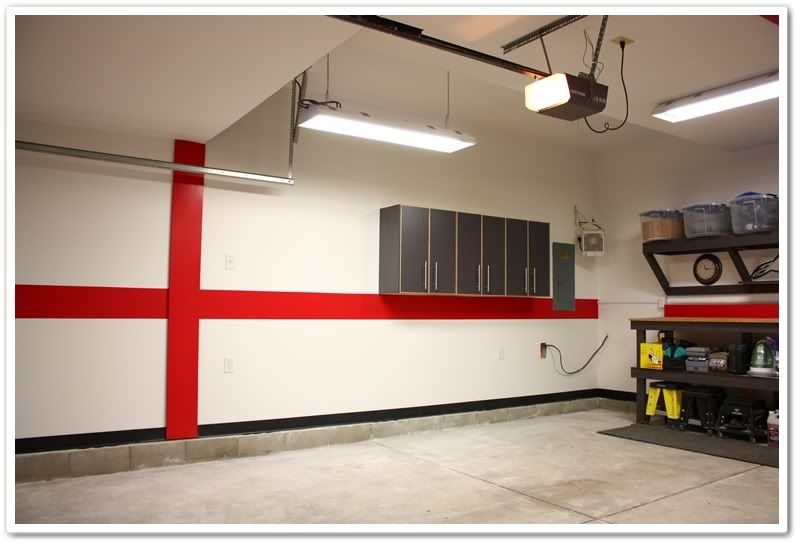
The red area with dark grey trim that goes up from the floor, and across the ceiling was a boxed-in section that was raised about 3� from the surface. It was a great canvas for me to work with and add some color and dimension.
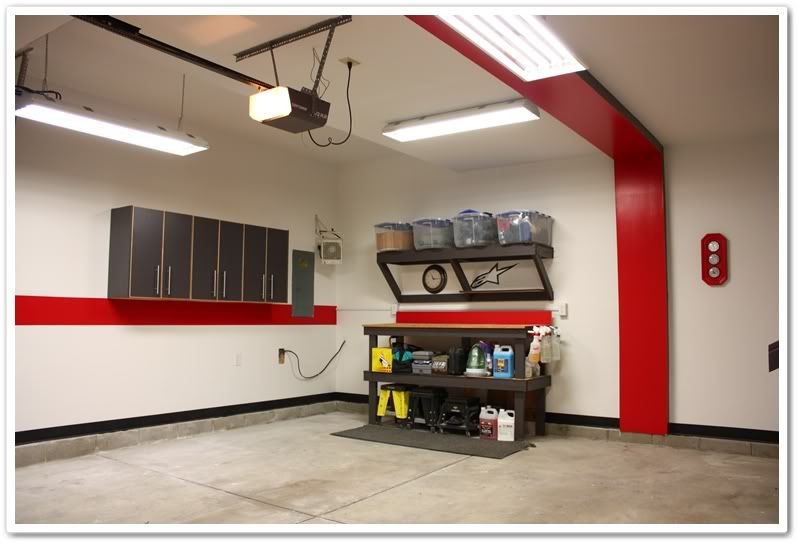
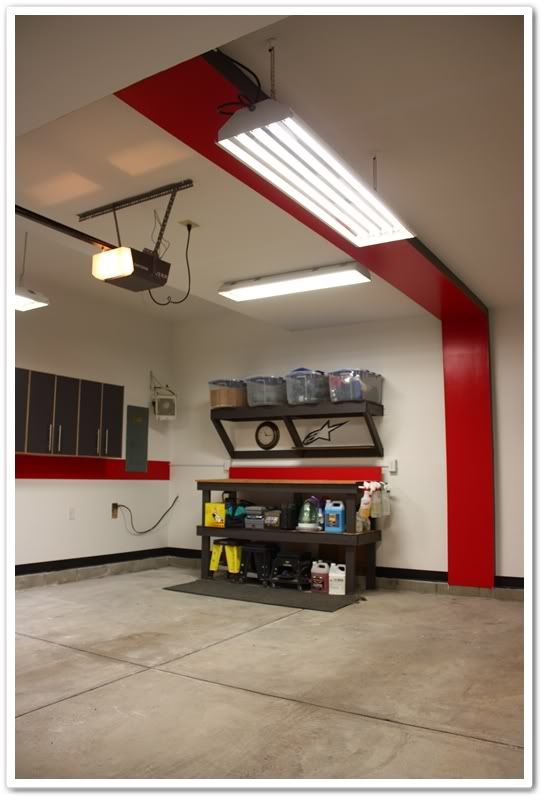
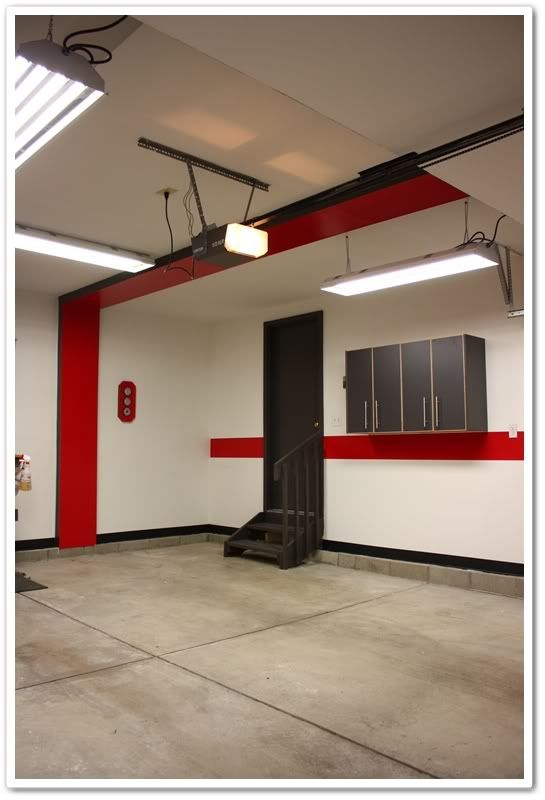
You can see here where that raised area meets up with a lowered face to the ceiling. Once again...another opportunity to mix up some colors on different surfaces.
I've yet to finish the top of the workbench:
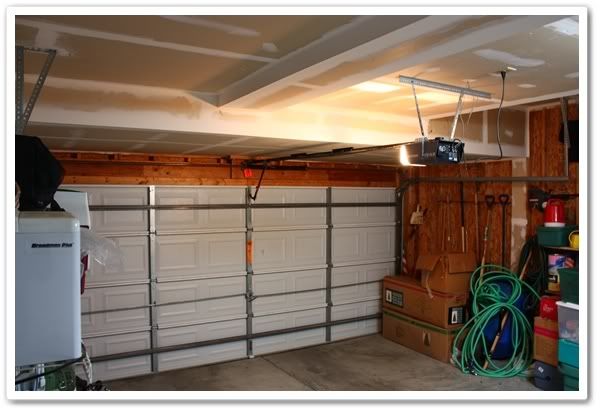
To the bottom left you can see a hole in the wall with cable coming out of it. I'm going to get an access box like you find on the outside of the house and finish this off. I just haven't gotten that far yet.
IKEA 24x30 cabinets.
Here you can see where/how I ran the outlets for two of the light fixtures:
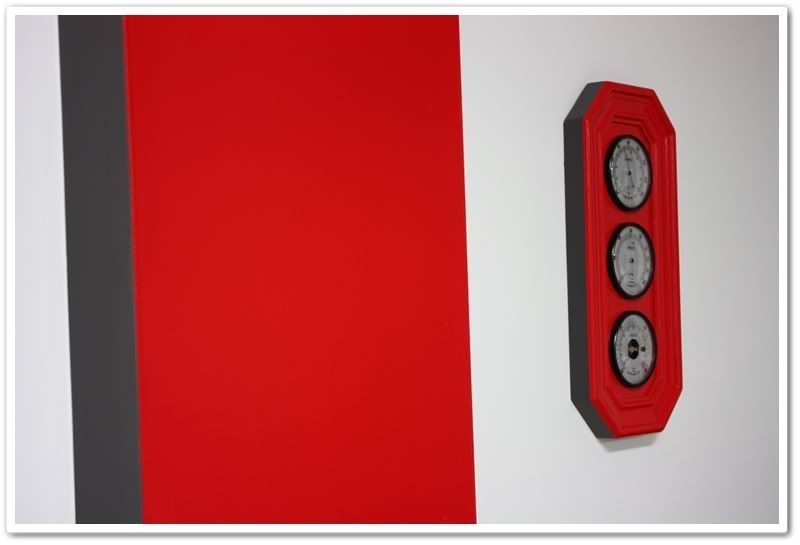
Here's an example of my OCD, err I mean my attention to detail. I took apart my weather gauges and painted the assembly to match the rest of the garage.
The Dimplex heater is awesome! Small, compact, and puts out a lot of heat!
I tried to get the colors to flow from one side of the garage...from the floor, across one way in red, to another direction in grey, and then back down to the floor on the other side of the garage in red.
Thanks for checking it out!
Extreme Garage Makeover!
My house was built 9 years ago, and unfortunately the garage has been a neglected area as it is in many homes. I finally decided that it was time to do something about it, and I started on the project late in December. It was originally supposed to be a �2 week� project, but that quickly turned into 6. I decided that if I'm going to do it, it's going to be done correctly, and done just once.
This year I am taking my detailing to a whole new level (website in the works as well), and I knew that I needed a much more professional look for when my customers bring their prized possessions to me. A clean and well organized work space is equally as important.
After much thought, I came up with the following list of needs:
Insulated wall and garage door
Finished wall
Garage heater
More electrical outlets
Storage space
Organization
Better lighting
First up was to address electrical needs. I installed 7 new outlets on 2 new circuits...one of them being a 240v outlet for a new garage heater. Several of the outlets needed to be on the ceiling so that I could hang a few more fluorescent fixtures. For the lighting, I went with 3, 48�, 4-bulb T-5 high output light fixtures with 5000K bulbs. These are very bright, and produce a color very similar to sunlight. 57,000 lumens in a 400sq/ft garage...! Wear your sunglasses kids.
Now that the electrical was done, I was able to install my new Dimplex DGWH4031 garage heater. It's a 240v, 13,000 BTU unit that's perfect for heating a 400sq/ft garage. Even when it's single digits outside, I can easily heat up my garage to 65 or 70 degrees! And now that it's all insulated, it's not difficult to maintain a comfortable temperature while I'm working out there.
I knew I needed some nice cabinets, but some of the garage-specific models were just too much. I found some really nice ones at IKEA, and they only cost me $70/each. I placed 3 of them on the far wall for my detailing supplies, and put 2 of them near the entrance of the house for food and kitchen overstock (this helped with the wife-acceptance factor).
For the trim paint (part of ceiling, workbench, steps, door), I took one of the cabinet doors to Lowe's and had them color match the dark grey. Now everything is properly color-matched throughout the garage!
I still have to work on the floor, but it's simply too cold right now for any kind of finishing. That will be a good project for late spring.
I got a bit camera happy, so don't mind all of the photos. Enjoy!
It was exceptionally messy here because I had extra clutter from Christmas decorations. As you can see though, the wall was less than impressive:
Unfinished ceiling as well:
Workbench is a bit cluttered:
In process. As you can see, I have a support pole on the wall that barely stuck out further than the studs, so I couldn't just cover it with drywall. Later in the photos I'll show you how I addressed this.
As you can see from this photo that I took last year while working on this Audi, the side wall added some great reflections of clutter! Cool photo, but not very professional by any means.
The ceiling is already painted, and new T-5 lights installed:
Here is it mostly finished. I still have some decorating to do, and a few more bins of �stuff� to put on shelves, but it's pretty much ready.
Notice the vertical red stripe on the left. I bought an 8� board, sanded and painted it, and used it to cover up the support pole shown earlier. It was a great solution, and added a nice design element as well.
The red area with dark grey trim that goes up from the floor, and across the ceiling was a boxed-in section that was raised about 3� from the surface. It was a great canvas for me to work with and add some color and dimension.
You can see here where that raised area meets up with a lowered face to the ceiling. Once again...another opportunity to mix up some colors on different surfaces.
I've yet to finish the top of the workbench:
To the bottom left you can see a hole in the wall with cable coming out of it. I'm going to get an access box like you find on the outside of the house and finish this off. I just haven't gotten that far yet.
IKEA 24x30 cabinets.
Here you can see where/how I ran the outlets for two of the light fixtures:
Here's an example of my OCD, err I mean my attention to detail. I took apart my weather gauges and painted the assembly to match the rest of the garage.
The Dimplex heater is awesome! Small, compact, and puts out a lot of heat!
I tried to get the colors to flow from one side of the garage...from the floor, across one way in red, to another direction in grey, and then back down to the floor on the other side of the garage in red.
Thanks for checking it out!
 02-06-2009, 03:01 PM
#2
Senior Moderator
how did you insulate the garage door? Product? I might take some of your ideas and update my garage since the walls were already finished by the builder, but its a simple garage door and 1 color paint...
02-06-2009, 03:08 PM
#3
2012 SH-AWD / Advanced
Thread Starter
Owens Corning garage door kits. It took two of them for a two car garage. They sell for about $69/kit. http://www.lowes.com/lowes/lkn?actio...99870-278-GD01
02-06-2009, 03:47 PM
#4
Senior Moderator
Owens Corning garage door kits. It took two of them for a two car garage. They sell for about $69/kit. http://www.lowes.com/lowes/lkn?actio...99870-278-GD01
02-06-2009, 04:14 PM
#6
2012 SH-AWD / Advanced
Thread Starter
Thanks Patrick. The floors will be done. I have to wait for the surface temp to be above 50 degrees for at least 48 hours...so given the brutally cold winter we've been having, it probably won't be for a few months before I can do it.
02-06-2009, 04:21 PM
#7
Senior Moderator
quick question, what did you do with the brooms and shovel?
Trending Topics
02-06-2009, 04:26 PM
#8
2012 SH-AWD / Advanced
Thread Starter
I created a storage space in my utility closet in the house. There are still a few things I need to find places for, but for now I simply don't want to hang anything on my new walls! 
 02-06-2009, 04:58 PM
#10
'05 TSX 6MT

Join Date: Mar 2006
Posts: 623
Likes: 0
Received 0 Likes
on
0 Posts
I love the heat!
Far as I know there is no answer for the floor. Your raw concrete lets the water drain. Maybe you can do epoxy if you install floor drains? Hot tires in the summer are murder on finished floors.
If there is a floor answer for your climate, will be found in corporate aircraft hangers
Far as I know there is no answer for the floor. Your raw concrete lets the water drain. Maybe you can do epoxy if you install floor drains? Hot tires in the summer are murder on finished floors.
If there is a floor answer for your climate, will be found in corporate aircraft hangers
02-06-2009, 06:38 PM
#13
Former Sponsor

 02-06-2009, 09:10 PM
#15
Evil Mazda Driver
Hey Todd,
Looking awesome there. I can't wait to get a place of my own; a 2-car garage is an absolute must for me but this is roughly what I want to achieve.
Looking awesome there. I can't wait to get a place of my own; a 2-car garage is an absolute must for me but this is roughly what I want to achieve.
 02-06-2009, 10:39 PM
#18
Team Owner
iTrader: (2)
Join Date: Jan 2008
Location: Kansas City, MO (Overland Park, KS)
Posts: 36,545
Received 6,470 Likes
on
5,162 Posts
Todd,
Wow...what a transformation! We know where you'll be spending most of your time now-great job.
Wow...what a transformation! We know where you'll be spending most of your time now-great job.
02-07-2009, 01:11 AM
#19
Racer
Join Date: Oct 2007
Posts: 449
Likes: 0
Received 0 Likes
on
0 Posts
im slowly throwing away/donating unneeded junk, then hopefully be able to get down to a manageable amount so i can do something like this. looks really professional, after seeing this i would have no worries about leaving a car with you. i like the modern look also.
lets see a new garage reflection pic off your car
how bad could warm tires be to epoxy floors?
lets see a new garage reflection pic off your car
how bad could warm tires be to epoxy floors?
Last edited by bo0sty; 02-07-2009 at 01:14 AM.
02-07-2009, 05:03 AM
#22
2012 SH-AWD / Advanced
Thread Starter
im slowly throwing away/donating unneeded junk, then hopefully be able to get down to a manageable amount so i can do something like this. looks really professional, after seeing this i would have no worries about leaving a car with you. i like the modern look also.
lets see a new garage reflection pic off your car
how bad could warm tires be to epoxy floors?
lets see a new garage reflection pic off your car
how bad could warm tires be to epoxy floors?
I'm hoping other people feel the same way about leaving their cars with me. I think a bright red F-car would look fabulous in there!
It will be a while before I can polish my car out again, but I look forward to seeing those reflection shots with this new paint scheme.
02-07-2009, 05:14 PM
#23
AZ Community Team

Join Date: May 2007
Location: N35�03'16.75", W 080�51'0.9"
Posts: 32,488
Received 7,771 Likes
on
4,342 Posts
NICE!!
I think I've gotta do that - finish the walls and paint the ceiling. Yours looks really nice.
Last spring I did the clean and organize bit. Floor painted with epoxy paint and acrylic clear. You should consider that. There are a couple of pics in the '07 Album in the "My Garage" link. Doing lighting this soon.
Here's one: https://acurazine.com/forums/album.p...pictureid=7373
Last edited by Bearcat94; 02-07-2009 at 05:17 PM.
 02-08-2009, 06:54 PM
#28
Racer
Join Date: Jan 2007
Location: Northern Virginia
Age: 51
Posts: 439
Likes: 0
Received 1 Like
on
1 Post
I Love the Garage Makeover! Looks amazing! How did you like sanding all the mud from the drywall work! Especially the ceiling! ha..ha..! I did mine over the summer and boy did it suck! Anyway Looks great! I can't wait to see some reflection shots
02-08-2009, 08:34 PM
#29
2012 SH-AWD / Advanced
Thread Starter
I think I STILL have dust everywhere from it!
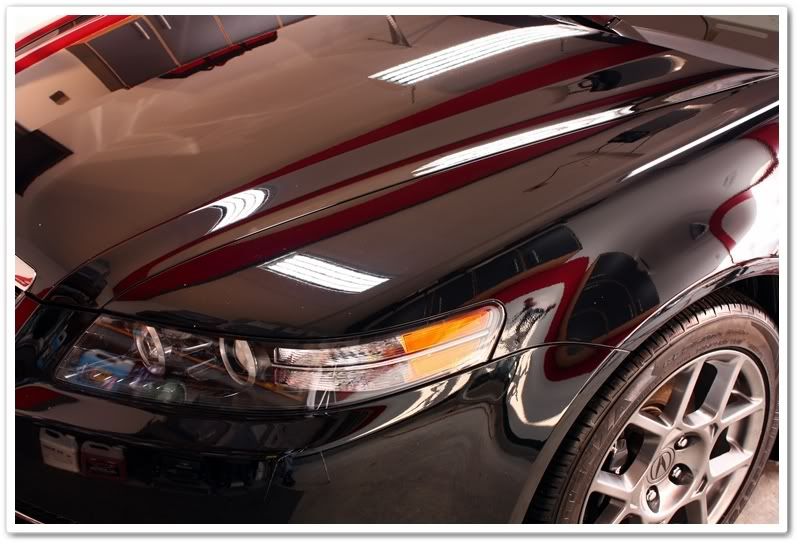
You want reflection shots...you got 'em. It was almost 50 out today, so I washed the car and snapped a few photos:
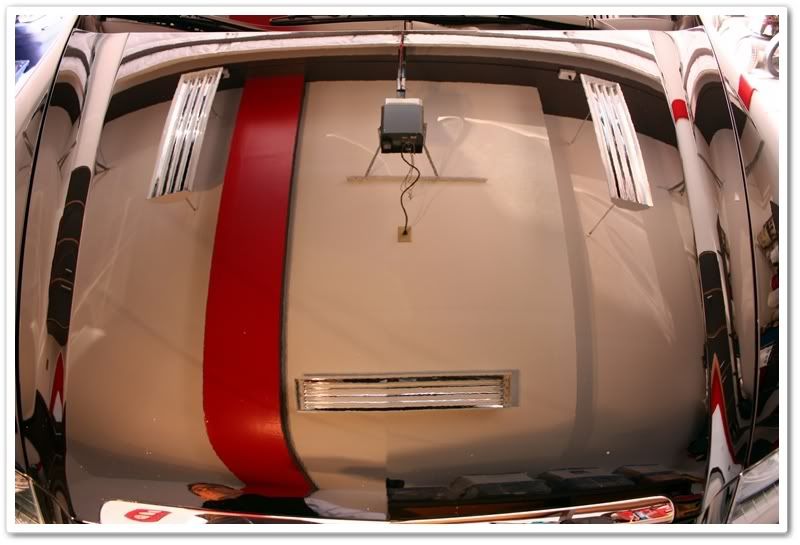
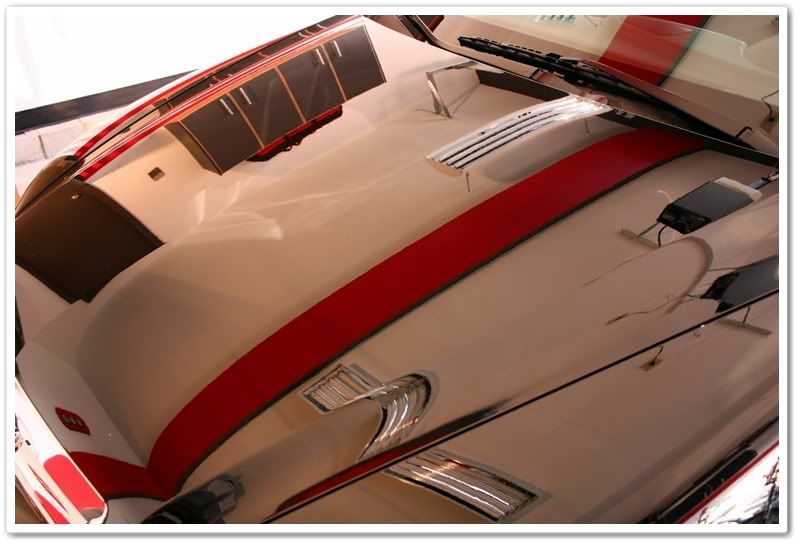
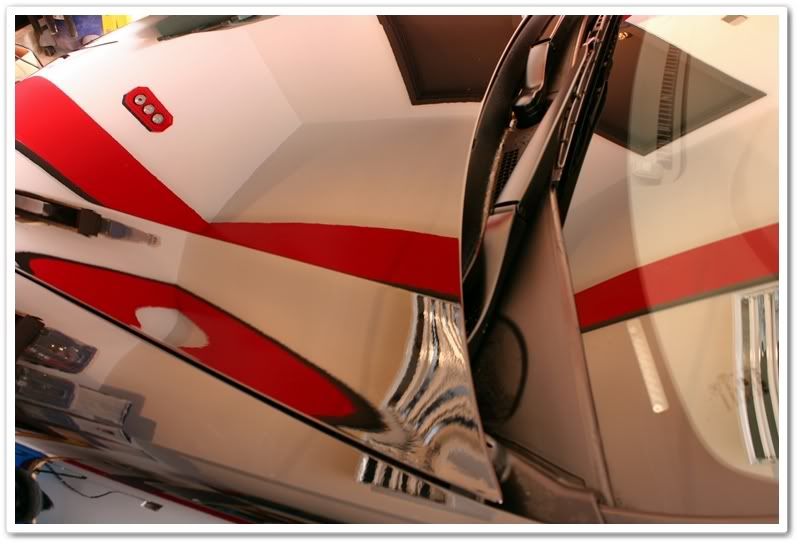

Same shot, but with the lights on, and a different exposure:
You want reflection shots...you got 'em. It was almost 50 out today, so I washed the car and snapped a few photos:
Same shot, but with the lights on, and a different exposure:
 02-10-2009, 03:53 PM
#37
Senior Moderator
Regional Coordinator
(Mid-Atlantic)
Regional Coordinator
(Mid-Atlantic)
iTrader: (6)
Beautiful, very nice job. I have a similar plan set for my garage this spring. Planning to paint my brick walls with some form of water seal paint, epoxy the floors, and more circuits and wiring as well. How much did the lights run you? Very inspiring, congrats on all your hard work
 02-10-2009, 06:00 PM
#38
2012 SH-AWD / Advanced
Thread Starter
Beautiful, very nice job. I have a similar plan set for my garage this spring. Planning to paint my brick walls with some form of water seal paint, epoxy the floors, and more circuits and wiring as well. How much did the lights run you? Very inspiring, congrats on all your hard work
The lights were $130 a piece.
