
White Cold Cathode License Plate How-To!!!! 3G Garage #G-070
 01-28-2008, 05:26 PM
#201

Long term LED update. I have a post somewhere in this thread with some 5 basic white LEDs..
welp they dun burned up... so i replaced um with some potted LED's... lets see how long they last this time


welp they dun burned up... so i replaced um with some potted LED's... lets see how long they last this time
 03-18-2008, 10:54 PM
#202
05 TL
Join Date: Sep 2005
Location: San Antonio
Age: 44
Posts: 562
Likes: 0
Received 0 Likes
on
0 Posts
So my trunk light inverter died a few days ago... I think the problem was it was mounted upside down so it couldn't vent.
Since I was in my trunk I saw, heard and smelled it burn out. Nothing freaks me out more then seeing smoke and smelling stuff burn coming out of somewhere I cant get to super fast.
Replaced it with a new inverter, all is good. Tubes last forever... Inverts burn out, but LEDs suck alot more.
Since I was in my trunk I saw, heard and smelled it burn out. Nothing freaks me out more then seeing smoke and smelling stuff burn coming out of somewhere I cant get to super fast.
Replaced it with a new inverter, all is good. Tubes last forever... Inverts burn out, but LEDs suck alot more.
03-26-2008, 04:05 AM
#203
steeez
Join Date: Mar 2006
Location: san jose cali
Age: 34
Posts: 1,708
Likes: 0
Received 2 Likes
on
2 Posts
Originally Posted by Kracker
So my trunk light inverter died a few days ago... I think the problem was it was mounted upside down so it couldn't vent.
Since I was in my trunk I saw, heard and smelled it burn out. Nothing freaks me out more then seeing smoke and smelling stuff burn coming out of somewhere I cant get to super fast.
Replaced it with a new inverter, all is good. Tubes last forever... Inverts burn out, but LEDs suck alot more.
Since I was in my trunk I saw, heard and smelled it burn out. Nothing freaks me out more then seeing smoke and smelling stuff burn coming out of somewhere I cant get to super fast.
Replaced it with a new inverter, all is good. Tubes last forever... Inverts burn out, but LEDs suck alot more.
03-26-2008, 06:04 PM
#204
One point of note when building the reflector to put over the cathodes. Make sure you allow ventilation. I have had 3 configurations, one of which didn't work well.
1 cathode setup - Had a reflector setup as a v over the top of it. The v portion above the cold cathode allowed for air flow. I had no problems with this.
2 cathode setup - Made the reflector form exactly around the edges of the two cathodes side by side (like this |__| except that is upside down) This did not allow ventillation. Moving to KC didn't help with the heat either. The heat caused the cathodes to become very dim and it actually melted the plastic casing!
3 cathode setup - I attached the cathodes in a pyramid fashion. The reflection cover looks like a house with a flat roof and sides angling down to the walls. This has openings on each side of the top cathode for ventilation. So far no problems.
If you have wendy's camera installed make sure you route the cathode wires away from the camera cable otherwise you'll get interference.
If you want pics to see what I'm talking about just let me know.
-----------------------
Check out the Meets section for the KC meet on May 4th!
03-27-2008, 06:45 PM
#205
05 TL
Join Date: Sep 2005
Location: San Antonio
Age: 44
Posts: 562
Likes: 0
Received 0 Likes
on
0 Posts
Ecliptics: I ordered extra lights, I cant get the inverters by themselves from directron anymore. I managed to order the lights somewhere else; so I didnt have to pay for tax and they were a few bux cheaper.
Buda: Why is ventilation so important for the lights? The inverters, yes. Tubes... I don't know about that.
Buda: Why is ventilation so important for the lights? The inverters, yes. Tubes... I don't know about that.
03-27-2008, 08:49 PM
#207
I have this mod, looks great..sometimes i worry about the inverter going out and I wont know til i get pull over at night. I am going to switch to Leds ( Modified ones) after these goes out.
03-27-2008, 10:03 PM
#209
05 TL
Join Date: Sep 2005
Location: San Antonio
Age: 44
Posts: 562
Likes: 0
Received 0 Likes
on
0 Posts
Cops dont pull people with burn out LEDs. My Leds were overpriced, burnt out way to quick, and were ugly.
If I was going to replace my CC tubes, I would go back real bulbs.... I dont hear alot of people complaining about their original bulbs.
I can get 2 sets of (4 bulbs, 2 inverters) that will last around 4 years for about 15 bux. Get that out of any LEDs that are on every minute your headlights are on.
03-28-2008, 11:20 AM
#210
Originally Posted by Kracker
Buda: Why is ventilation so important for the lights? The inverters, yes. Tubes... I don't know about that.
If I have the failed set still I'll see about posting today or this weekend.
05-10-2008, 10:47 PM
#213
05 TL
Join Date: Sep 2005
Location: San Antonio
Age: 44
Posts: 562
Likes: 0
Received 0 Likes
on
0 Posts
Buy extras. It will overheat given enough time. The correct answer is, "make sure it vents up, or at least sideways".
In mine the holes face down. Heat rises, holes should point up. I live in South Texas, so it is HOT here. But my car lives in the shade or inside 95% of the time. I think thats why mine lasted about 2 years.
I am one of the first to do this and I live in a hot climate... Almost every time something went wrong it was because I did it.
08-12-2008, 01:25 PM
#215
Instructor
I'd really like to get my hands on the pics from the original DIY in this thread. I'd like to look at them before I dissasemble my MDX  I could probably host them somewhere too...
boxstock
I could probably host them somewhere too...boxstock
 08-13-2008, 09:10 AM
#218
Instructor
On my MDX I have a wiring harness for each license plate light (2).
I'm planning to power 1 inverter off just one harness and then power two bulbs off that inverter. I guess I'll just tape the other harness and leave it inside the tailgate.
Sound ok?
boxstock
I'm planning to power 1 inverter off just one harness and then power two bulbs off that inverter. I guess I'll just tape the other harness and leave it inside the tailgate.
Sound ok?
boxstock
08-13-2008, 09:29 AM
#219
^-- Actually I'd recommend running and inverter to each side. The reason is that in case 1 fails you still have the other going until you notice it. I've had one inverter failure so far and got lucky to notice it as I was showing it off to someone and it didn't work. My setup now makes it hard for complete failure.
I'm running 3 4" bulbs on each side and 3 invertors powering everything. It's going to take a lot for full failure.
I'm running 3 4" bulbs on each side and 3 invertors powering everything. It's going to take a lot for full failure.
 09-02-2008, 10:17 PM
#223
i.e.:
1. two 12 inch bulbs
2. two 4 inch bulbs (one on each side)
3. four 4 inch bulbs (two on each side)
4. six 4 inch bulbs (three on each side)
I've done options 2,3, and 4. I'm currently running 4.
Basically if you use two 12 (or 4) inch bulbs, then use 2 inverters and attach 1 CCFL to each inverter. If you use more then two bulbs in total, then divide the total bulbs by 2 (assuming even number of bulbs) and you use that many inverters. When attaching the CCFL tubes to the inverters, attach 1 CCFL from each side to an inverter.
This way
Inverter
/........\
bulb.....bulb
instead of this way
Inverter
........\\
.........bulb.bulb
This way if an inverter goes out it evenly reduced the light on each side and the remaining inverter(s) will still be powering the remaining bulbs (if more than 2 bulbs are used).
09-05-2008, 04:11 PM
#225
Instructor

Join Date: Apr 2008
Age: 41
Posts: 172
Likes: 0
Received 0 Likes
on
0 Posts
Could you specify the bulb setup you are wanting?
i.e.:
1. two 12 inch bulbs
2. two 4 inch bulbs (one on each side)
3. four 4 inch bulbs (two on each side)
4. six 4 inch bulbs (three on each side)
I've done options 2,3, and 4. I'm currently running 4.
Basically if you use two 12 (or 4) inch bulbs, then use 2 inverters and attach 1 CCFL to each inverter. If you use more then two bulbs in total, then divide the total bulbs by 2 (assuming even number of bulbs) and you use that many inverters. When attaching the CCFL tubes to the inverters, attach 1 CCFL from each side to an inverter.
This way
Inverter
/........\
bulb.....bulb
instead of this way
Inverter
........\\
.........bulb.bulb
This way if an inverter goes out it evenly reduced the light on each side and the remaining inverter(s) will still be powering the remaining bulbs (if more than 2 bulbs are used).
09-06-2008, 01:10 AM
#226
The CCFLs can also go out over time. What I recommend is making a second set at the same time that way when it does happen you can just do a quick swap.
09-10-2008, 07:21 PM
#227
Instructor
Join Date: Apr 2008
Age: 41
Posts: 172
Likes: 0
Received 0 Likes
on
0 Posts
I finally completed this mod! It wasn't too bad to do either. The worst part for me was using the dremel because I never used one before, but after some trial and error I got the connectors to fit nicely. I would like to thank Kracker for sending me the DIY files and Buda for the suggestions on how to complete it. I will try and post some pics tomorrow or the day after.
09-29-2008, 01:42 PM
#228
once you go black....
iTrader: (1)
Join Date: Jul 2008
Location: Houston, TX
Age: 38
Posts: 250
Likes: 0
Received 0 Likes
on
0 Posts
Can someone please tell me what cold cathodes to buy for the rear license plate lights? Im not sure where to get them and a previous link to them is dead. Thanks
09-29-2008, 05:08 PM
#229
Instructor
Join Date: Apr 2008
Age: 41
Posts: 172
Likes: 0
Received 0 Likes
on
0 Posts
click here.
I bought two of the 4 inch white kits. No real problems yet, but it has only been approx two weeks since I installed them. My inverters did separate themselves from the 3M tape today, though, but I just quickly undid the trunk liner and stuck them back on.

 10-23-2008, 11:31 AM
#232
Safety Car
Thread Starter
Here is the updated link to the DIY. I have sent a message to the mods to ask them to fix the link.
http://www.zsport.org/russ/cathodeTLhowto.htm
http://www.zsport.org/russ/cathodeTLhowto.htm
10-23-2008, 11:42 AM
#233
Here is the updated link to the DIY. I have sent a message to the mods to ask them to fix the link.
http://www.zsport.org/russ/cathodeTLhowto.htm
http://www.zsport.org/russ/cathodeTLhowto.htm
I updated the link in the first post. Thanks for posting it and keeping the thread current.
If there is anything else that needs changing, send me a PM.
 11-08-2008, 06:47 PM
#235
this mod is awesome. props to whoever made the tutorial.. easy to follow. only thing is I didnt use 3m wire taps or male connectors. Instead, I used t-taps from autozone and just did black to black, red to red. at times the lights would flicker but just have to crimp the taps extremely hard, and so far no flicker. no pics at the moment, but ill take some later on.
11-08-2008, 09:21 PM
#236
ok I think something went wrong... after applying some hot glue from a glue gun to the plastic pieces, I noticed the glue turned purple. anyone know how I can remove the glue and plastic pieces without any damage so I can put on some plexiglass with some sealant
11-08-2008, 09:55 PM
#237
05 TL
Join Date: Sep 2005
Location: San Antonio
Age: 44
Posts: 562
Likes: 0
Received 0 Likes
on
0 Posts
Cool and peel.... Will it be noticeable? Do you really have to fix it?
11-08-2008, 10:22 PM
#238
its pretty noticeable when the trunk is lifted. I have ocd when it comes to those kinds of things  I'll try the cool and peel method with a blow dryer and that cooling feature it has. You think goo gone is safe on the paint? or any other adhesive removers out there.
I'll try the cool and peel method with a blow dryer and that cooling feature it has. You think goo gone is safe on the paint? or any other adhesive removers out there.
11-12-2008, 08:24 PM
#239
05 TL
Join Date: Sep 2005
Location: San Antonio
Age: 44
Posts: 562
Likes: 0
Received 0 Likes
on
0 Posts
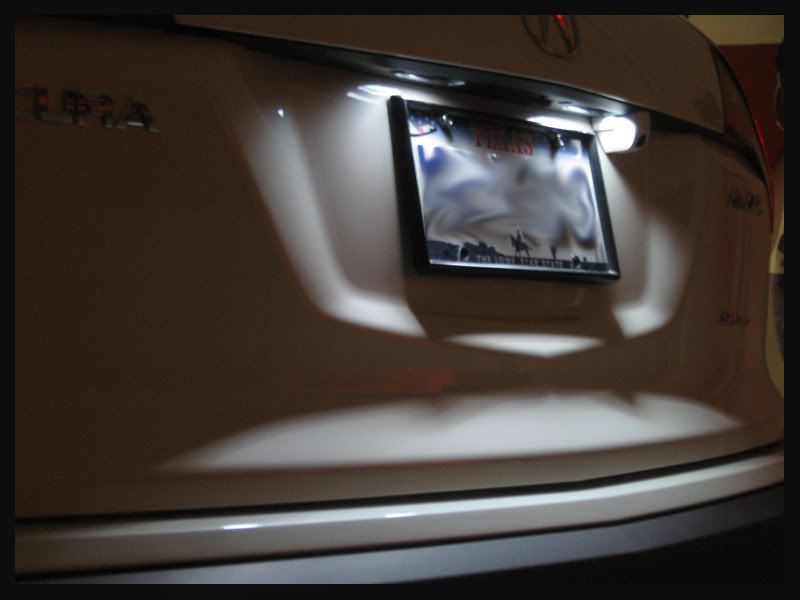
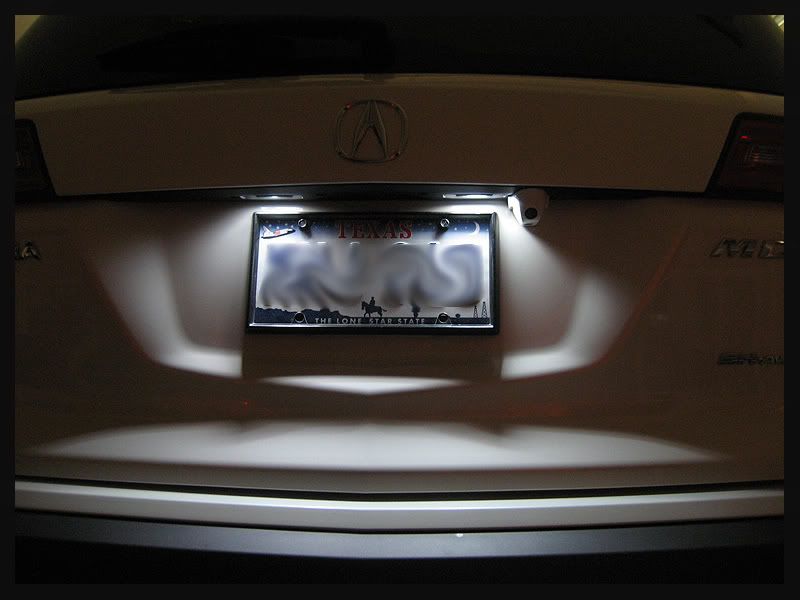
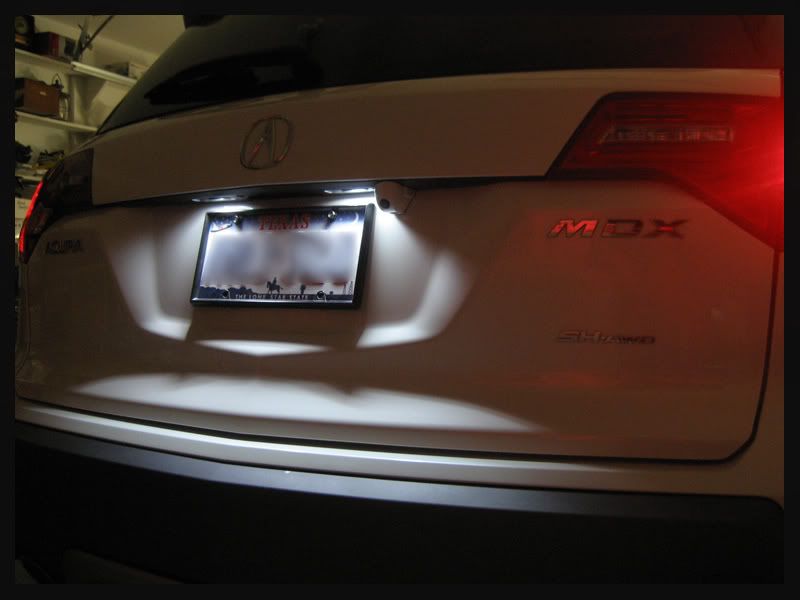
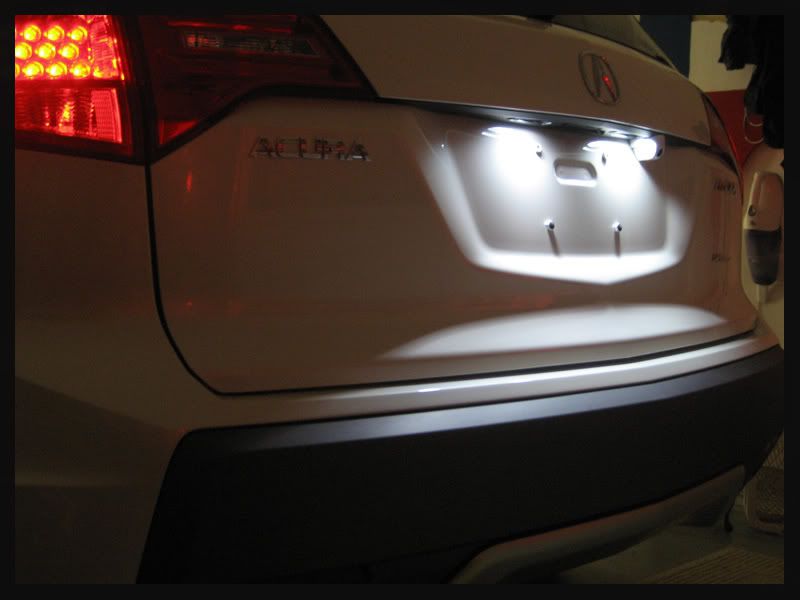
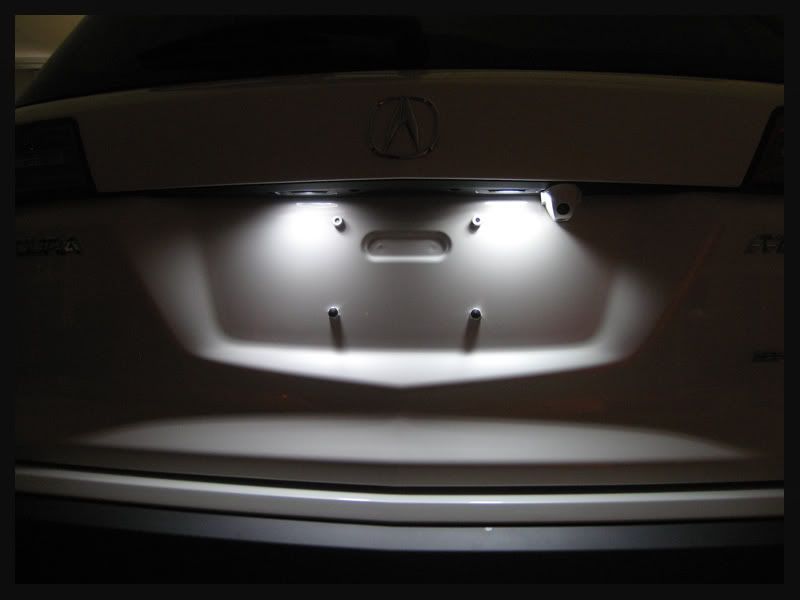
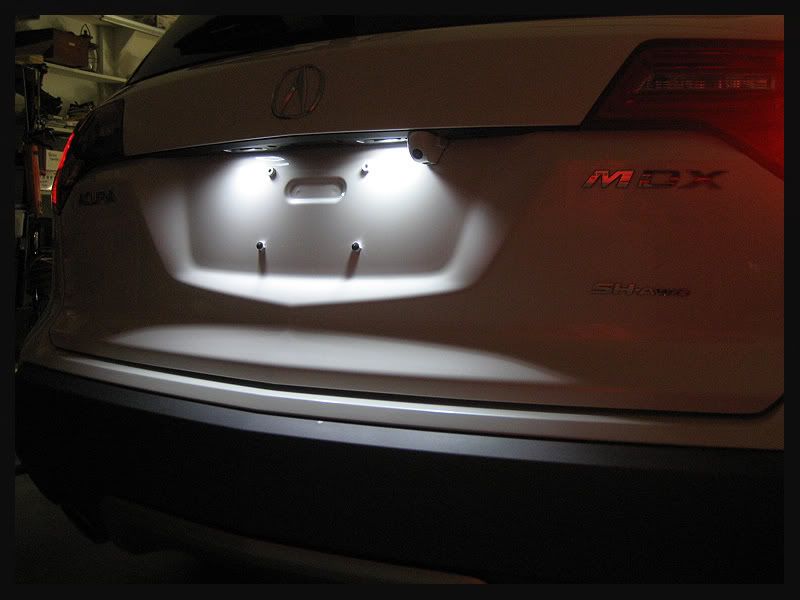
Here are my trunk lights... I like these the best:

This is with the factory light looks like:

This is what the CCFL light looks like:

License plate lights... (taking pictures at night.. pfft)

Other lights

More lights


This is with the factory light looks like:

This is what the CCFL light looks like:

License plate lights... (taking pictures at night.. pfft)

Other lights

More lights
