When you click on links to various merchants on this site and make a purchase, this can result in this site earning a commission. Affiliate programs and affiliations include, but are not limited to, the eBay Partner Network.
My driver side seat heating stopped working - seat cushion still heats up a little bit, but no back. I check it and it gets power, just draws very little current. Guess that one of filaments or however it's made, is broken. I will replace it, but because it requires to take off leather, I figured out that maybe it's time for upgrade.
For now I don't know what I'm doing. I did some research and there are couple kits available. They start anywhere from $120 and go as far as $350 for one seat, where $350 uses thermoelectric coolers to have actually cooled seat, not just vented.
I'm pretty sure that I can do it cheaper and possibly better than $120 china kits. For now parts list:
1. Heating elements - must have holes/mesh for air to pass through, OEM are crazy expensive for a simple wire. There are many kits:
4. Mesh / breathable foam that can pass air. It will go under leather, under heater elements. I can cut out some factory sponge to fit this material, and then route one of the pipes from the bottom. Kinda like
5. Some kind of controller. I will probably make one from Arduino and I will control mosfet to have couple fan speeds. Then just hide button somewhere, like front or side of the seat. Keep stock switch for heating.
Or go a little bit different way and:
6. Buy one of those heated/vented seat covers and rip guts out, and then put them under the leather. It takes care of controller, motor, and material/sponge. Like this one:
7. Now for taking leather off - what exactly is included? I replaced bottom cushion on passenger seat and that was no problem, but how leather is attached to the sponge? Hog rings? What do I need to take them off without ripping leather apart?
Just keep in mind that I'm brainstorming for now, looking for advise and ideas. Maybe I will never take the seat out of the car, maybe I will do it next week.
I found the video below when researching possible seat skin replacement on my CLS6. It has a lot of good info if you are interested.
Hope it helps your projects potential success on #7 above.
Good Luck!
The only cooling seat ever worth goes on a car is one that actual has a duct that get air from A/C vent (like the one found on GM vehicle), all other way is nothing but a glorifying fan. Trust me I used to had a LS460 with ventilated seats and it doesn't worth .02 cent.
I remember getting into some Acura or Lexus cars last summer and some of them had ventilated seats. I could barely feel it by hand, yet it had a nice effect.
It's kind of like sitting next to a fan - airflow is enough to make our body's 'system' work much better, as it speeds up evaporation.
I remember leaning against steering wheel to get my back 'unstuck' from the seat, as no airflow, sweat, and contact makes me uncomfortable. Especially on the black car, with black interior, in 90F summer.
I guess it wouldn't be that hard to 'borrow' some air from the rear passenger vent, and then just feed it into seat's fan to increase the pressure. But I will skip this idea for now - too much cutting.
My main worry is best material that goes under the leather, that will distribute the air more or less equally.
Originally Posted by zeta
I found the video below when researching possible seat skin replacement on my CLS6. It has a lot of good info if you are interested.
Hope it helps your projects potential success on #7 above.
Good Luck!
Thanks! That's perfect as it exactly show how they taken it apart.
the foam will compress over time after years of usage and somewhat restrict the flow of air (either ventilated or cooling seat), if you will be doing the conversion make sure you restore/replace with a new foam.
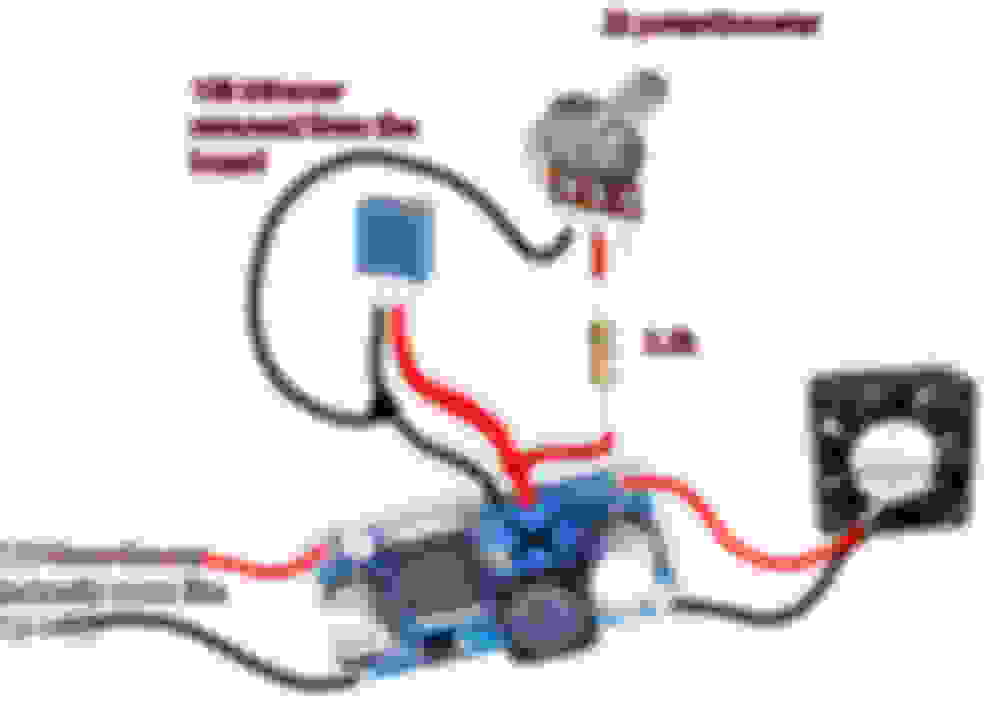
5. Fan that I ordered works on 12V. It doesn't start spinning by itself when below 6V. Works fine at around 7-7.5V. So I need a way to adjust voltage between 12 and 7V to regulate speed (and air flow).
Voltage from the car will vary, but I'm assuming it will be always above 13V - when engine is off it doesn't matter.
For the controller I decided to go simple and dig out some DC voltage converter.
For my converter to output ~12V the blue trimmer needs to have around ~2.7k resistance, and for 7V around 1.6k. Add another potentiometer, in line fuse, and a switch, and that sums up to something like:
Start with all potentiometers all the way down. Under load, I turned big potentiometer all the way up, and turned small blue trimmer up until voltage reached 12V. When big potentiometer is turned all the way down voltage goes down to 7.7V. Close enough taking into consideration that I eyeballed it.
Now just put switch before the DC converter and electrical for this project is done. Everything will be hidden somewhere as I don't think I will need to adjust speed that often.
For now it looks like that:
I might add second fan or use one that came with the seat cover if there is not enough air flow.
6. And speaking about seat cover. Whole thing started when I ordered
couple days ago. It works fine, but I hate the looks of seat cover, and it's kinda thick so I'm too close to the roof of the car and slide too much when taking corners (as those sides on the seat are almost flat with the cover).
Controller is garbage, as it doesn't remember last position, and every time I start the car I need to press power button, and then the heat/vent button.
But it heats up fast, and distributes air pretty good, It's made of some fabric and firm plastic mesh that doesn't collapse under the weight.
I paid around $55 for it, which is about how much heater kits are online.
So for now, the plan is to cut this cover and use this material for distributing air and use the wire from the cover for heating - I can't find sponge or other material that would work good.
I will order some plastic tubing, hog ring pliers, spray adhesive, and rethink the whole idea before getting into the seat cover.
look in the service manual for the 4G TL and look how they did it, pretty simple and effective design. Also rather than the seats pushing air they pull in air into the seat to cool it better than forcing warm air or "cool" air through the cushion.
I decided to pull the trigger. Mostly because I was missing heated seats.
Taking the seat apart was pretty straight forward. Pulling leather off and cutting off old hog rings easy. Not much time and seat was apart, leather separated from the foam. I found out that one of the wires on the bottom heater broke off, which is quite surprising as those wires are quite beefy, but I soldered it back and OEM heaters work again. I decided to not use heaters I pulled from the seat cover (as they are smaller than OEM, and wouldn't cover whole seat) which means I kinda wasted it. Oh well. I disconnected the battery before unplugging the seat (and the airbag). Had no problems afterwards.
Anyways, I decided to go ahead and 'add' ventilated seats function. OEM leather has some foam sewn behind the leather. It's not connected to the leather itself, so it's more for additional cushion than to make leather stronger.
The only problem is that this sponge/foam cushion doesn't allow much air to pass. I decided to remove this foam, instead of cutting seat's cushion foam like in the video from first post.
Ended up with something like that. Doesn't need to be 100% straight as I won't be able to see it anyways, and this black material is only for air to pass and hopefully redistribute it. I used some black string to attach the black material to whatever was left from yellowish foam. Only to keep it in place.
Now to bring air to the cushion, I decided to use some plastic tubing. The bigger the better the airflow, but I didn't want to lose seat support, or to be able to feel that seat was modified. I went with two 10mm ID tubes for each section. Made holes in the foam with screwdriver, drill, and knife.
There's the link to the tubing:
It's easy to find, just make sure it's 'non-split'.
Another problem: front section is covered from underneath with seat's frame. I cut out small section to pass the tubing:
Here's reinstalled bottom cushion to the seat's frame. Of course I made sure that tubing won't interfere with the springs before making the holes.
I used some spray adhesive to attach heaters back to the foam, and a knife to cut out small sections for the tubing.
Now it was time to put leather back on the cushion. It looks kinda bad, but it wasn't perfect before, and it stretched a bit when put back on the frame. Overall I would say that leather looks the same as it did before the modification.
The point is that it was my first time taking leather off, and first time using hog rings pliers, and it turned out to not be difficult.
With back part of the seats come more problems. There is not enough space between the foam and back cover to put in the fan and this fan to have enough space and air around it. Here's photo of the frame with back cover, but without the foam.
And lumbar support makes it hard to pass the tubing, because it can move quite enough to hit it. I took out small part of the support.
Now it's pretty much the same story as with the bottom part. Make holes, pass tubing, 'adjust' the heater, and cut out foam from the leather and sew back material from the seat cover.
To connect all the small tubing together I used 23mm ID plastic tubing, used one from here:
Here's the final version of the back seat. Tubing is connected with epoxy and ducktape to prevent any leaks. Bigger tube is routed through the same path that wires use on the opposite side.
It can be seen from the rear passenger, but it's kinda hard as it's black tube on black seat, and only in the lower part. If I feel like it I can cover it with some black fabric.
With the tubing came some unusual problem - air passing through it makes whistling sound. It took couple tries to reorient it so it won't whistle no matter the fan setting. Squeezing it with zipties every so often help break the pattern as well.
Hope air temperature doesn't affect this whistling. If you manage to find flexible tubing that is smooth on the inside use that. (or use some kind of rubber hose)
I put potentiometer under the seat adjustment buttons. With black knob on it it's hard to notice and doesn't stand in a way of anything, no matter the seat position.
The switch is in front of the seat. It's flat with the plastic so there's no way of toggling it by mistake.
I decided to wire it so it lights up all the time there's power to the seat, so it lights up the foot-well pretty nice (another reason for putting it in front). Here's the link to the switch:
It's wired so it comes on with key in the first/second position like all other accessories.
That's the completed bottom part of the seat.
I put bigger fan for the back as air needs to travel more distance. I also went with bigger DC converter, as fans are peaking at 2A of current, which made previous converter quite warm. This one is 'rated' for 10A, and with 30 min trial with fans on max it got barely warm. It needed another setup of potentiometer and resistors. Used 10k potentiometer and couple resistors to stay within the range. There might be some way to calculate it, but I went ahead and played a bit with https://www.falstad.com/circuit/ and build this:
To test the values (to make sure that total resistance stays within the range corresponding to 12V-7V on the module's output).
Again used duck tape, zip ties, and epoxy to attach tubing.
Then XT60 connector for power, and power taken from the cigarette lighter in the middle console.
Overall... I have my heat working again so it was worth it. Seems that without foam, and with this new material, seat it getting too warm if left on high. Guess that's the improvement. Some people upgrade engines to make more power, I upgrade seat heaters to stay warm in the winter hah.
I can feel the air flow, but I will wait for the summer with final verdict. If nobody is sitting air comes out pretty much in one spot, but as soon as I sit down it spreads pretty much to the edge of the perforated leather part.
For now I connected fans so they blow air through the cover instead of pulling it as some people advised. I found out the Tesla forum where people were complaining about 'useless' air pulling seats and for the fan design used here, it would be harder to connect fans so they pull air.
Hit me with any questions if you like, preferably about the topic.
Hit me with any questions if you like, preferably about the topic.
Nice job!
It will be interesting to see, during (prolonged) heavy use if there will be any significant condensation formation, along the path of the tubes, that will emerge from the ends??
It will be interesting to see, during (prolonged) heavy use if there will be any significant condensation formation, along the path of the tubes, that will emerge from the ends??
I don't think so, as they are vented, not cooled. Water would have no reason to condensate inside the tubes as there won't be temperature difference.
Originally Posted by gatrhumpy
That airflow through the tubes could be a problem with dust and debris getting in there.
Dust might be a problem. I thought about adding some filter material in front of the fans, but couldn't find something that wouldn't restrict air flow too much. And I don't think fans are powerful enough to suck in some debris.
It doesn't need to be exact, key words are 12V and 1.8A (it replaced 12V and 0.9A fan). I never run it at 12V as it's also a bit noisy at this power, but from my tests more powerful fan on low power blows harder and quieter than lower powered one on higher rpm. Of course that was done by feel and db app on the phone, so don't trust that claim too much.
I also used that higher diameter tube instead of couple smaller diameter ones for final delivery. It doesn't make whistling noise and provides less restrictions = more airflow on lower fan speed. I'm using two "zones" for bottom part and two zones for back part, instead of 3 each like before.
I also printed some simple (crappy) splitters for the tubes instead of using duct tape everywhere.
I'm comparing that to 2013 Lexus ES 350 with vented seats that I'm familiar with, and this system, while more noisy, works much better. Lexus for some reason sucks air from the seat instead of blowing, and has only two zones. When sitting I can't really feel Lexus seats and need to lean forward a bit to cool back, and seat in TL actually feels cooler.

 02-23-2019, 02:57 PM


 This is awesome! I always thought about the idea and wanting to do this on my TL-S.