

 Jul 13, 2016, 03:30 PM
Last edit by: IB Advertising
See related guides and technical advice from our community experts:
- Acura How to Clean Foggy Headlights
Step by step instructions for do-it-yourself repairs.

G-085: DIY: Restoring Hazed/Cloudy Headlights
Thread Starter
Chapter Leader (San Antonio)
iTrader: (3)
Joined: Oct 2008
Posts: 6,022
Likes: 437
From: Houston, Texas
G-085: DIY: Restoring Hazed/Cloudy Headlights
Well, I was searching through forums and couldn't find a good write-up for this so I made my own. Hopefully this will help someone out as it did me.
Materials:
- bowl of water
- soft (cotton) towl
- assorted sandpaper (320,400,600,800, 1500)
- PlastX (can find at any AutoZone, AdvanceAutoParts, etc)
- headlight(s) that needs clearing (only tested on plastic)
- towl to work on if not outside (didn't want to mess up my carpet)

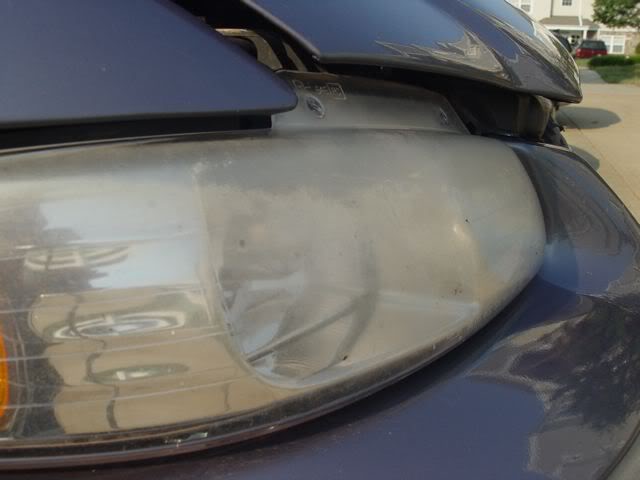
Below is what my headlight looked like upclose. Very foggy, yellow, and just plain gross. Didn't disperse light like it should and could hardly see at night.


Procedures:
- Start with 320 grit sandpaper, dip it in your bowl of water, and rub horizontally across the headlight. Apply even pressure from all fingers, or use the palm of your hand. Make sure to get all over and evenly. Try not to make circles or vertical strokes. Repeat until the headlight is evenly foggy. Wipe the water and debris from the headlight with a towel to clean it up. It should look something like this.

- Repeat previous step using higher grit sandpaper each time. Here are the progression pictures ...


- When you have finished with the 1500 grit sandpaper grab your clean, preferably 100% cotton, towel and PlastX. Squeez a dime-size on the towel and start at one end of the headlight and work your way all over. Take your time on this part and make sure rub a lot and evenly all over. You can put another coat on if you wish. I did. This is what I got.

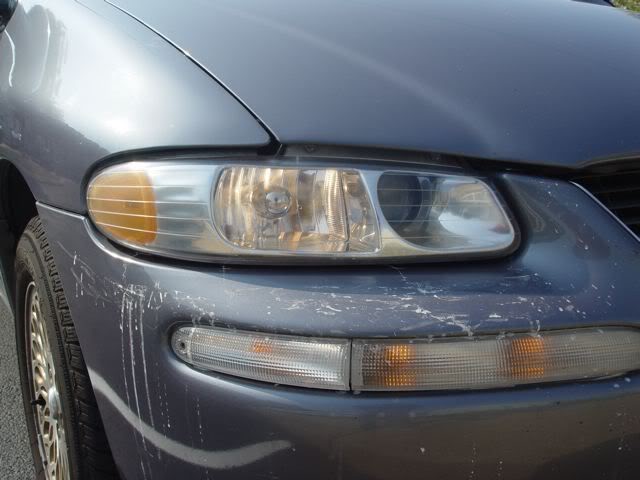
- Let the headlight sit for about a minute. The excess PlastX will dry and you will need to use a clean part of your towel to wipe off. Once you do this ... you're done. This is my final result.

This is a tutorial that my friend made awhile back! Hope this helps -xcel
Materials:
- bowl of water
- soft (cotton) towl
- assorted sandpaper (320,400,600,800, 1500)
- PlastX (can find at any AutoZone, AdvanceAutoParts, etc)
- headlight(s) that needs clearing (only tested on plastic)
- towl to work on if not outside (didn't want to mess up my carpet)
Below is what my headlight looked like upclose. Very foggy, yellow, and just plain gross. Didn't disperse light like it should and could hardly see at night.
Procedures:
- Start with 320 grit sandpaper, dip it in your bowl of water, and rub horizontally across the headlight. Apply even pressure from all fingers, or use the palm of your hand. Make sure to get all over and evenly. Try not to make circles or vertical strokes. Repeat until the headlight is evenly foggy. Wipe the water and debris from the headlight with a towel to clean it up. It should look something like this.
- Repeat previous step using higher grit sandpaper each time. Here are the progression pictures ...
- When you have finished with the 1500 grit sandpaper grab your clean, preferably 100% cotton, towel and PlastX. Squeez a dime-size on the towel and start at one end of the headlight and work your way all over. Take your time on this part and make sure rub a lot and evenly all over. You can put another coat on if you wish. I did. This is what I got.
- Let the headlight sit for about a minute. The excess PlastX will dry and you will need to use a clean part of your towel to wipe off. Once you do this ... you're done. This is my final result.
This is a tutorial that my friend made awhile back! Hope this helps -xcel

AZ Community Team
Joined: May 2007
Posts: 32,488
Likes: 7,771
From: N35�03'16.75", W 080�51'0.9"
Very nice. 
Should be "Restoring Headlight" or some thing like that so it does not get confused with Clearing/Blacking out a headlight. csmeance can change the title if you ask.
Should be "Restoring Headlight" or some thing like that so it does not get confused with Clearing/Blacking out a headlight. csmeance can change the title if you ask.

Good info. I may do this on a friend's car. She got in a minor accident awhile ago and had to have one headlight replaced so that one is new while the other is in bad shape. Actually worse than the one you had.

Trending Topics
Thread Starter
Chapter Leader (San Antonio)
iTrader: (3)
Joined: Oct 2008
Posts: 6,022
Likes: 437
From: Houston, Texas
Is this Meguires Plastx like a clearcoat? I hope so because without clearing them they will only fade again very quickley. I have an actual plastic light repair kit as I used to detail and can speak from experience about this not working without some sort of clear...
Senior Moderator


Joined: Feb 2006
Posts: 21,407
Likes: 2,185
From: Space Coast, FL
No idea on the clear coat, but what a friend recommended was to put some clearbra after sanding and polishing to protect the finish.
Racer
Joined: Mar 2007
Posts: 404
Likes: 3
From: Baltimore, MD
I do the exact same thing when I unhaze headlights. The only difference is I go to 2000 grit and then use a 3m rubbing compound to completely take out any scratch marks before I use the plastix stuff. Trust me this works. Just take your time.

Intermediate
Joined: Apr 2007
Posts: 28
Likes: 0
Does anyone know if this is the best method to remove minor chipping and knicks from road debris? I'm not too sure how much surface this is removing, and whether this would get all chips out. I don't have any yellowing on my TL's headlights, just a few minor rock marks.. Thanks!!
Senior Moderator
Joined: Feb 2006
Posts: 21,407
Likes: 2,185
From: Space Coast, FL
Does anyone know if this is the best method to remove minor chipping and knicks from road debris? I'm not too sure how much surface this is removing, and whether this would get all chips out. I don't have any yellowing on my TL's headlights, just a few minor rock marks.. Thanks!!
^^But if they look like they need to be restored then the factory UV coating has started to fail and needs to be stripped off anyways.
I used Mother's Carnuba Paste Wax to seal my headlights when I did them. Let's see how long it lasts.
I used Mother's Carnuba Paste Wax to seal my headlights when I did them. Let's see how long it lasts.
HI GUYS
I do this often at my shop, the way you described to do it is good but only temp. as you sand the headlight you are removing the protective clear coat, so in another 3 months your headlights will haze again, the proper way of doing this is by sanding the headlight and then applying clear coat on it, i use automotive clear same as on body panels. it has lasted on my silverado for 4 years now, my headlights still look new. *mod edit*
I do this often at my shop, the way you described to do it is good but only temp. as you sand the headlight you are removing the protective clear coat, so in another 3 months your headlights will haze again, the proper way of doing this is by sanding the headlight and then applying clear coat on it, i use automotive clear same as on body panels. it has lasted on my silverado for 4 years now, my headlights still look new. *mod edit*
Last edited by ggesq; May 23, 2010 at 10:49 AM. Reason: cucu posted a plug for his business.


Racer
Joined: Mar 2007
Posts: 404
Likes: 3
From: Baltimore, MD
My brother has that van now. I will take pics of the headlights but I am pretty sure they are still clear. On the cars I did it took two or three years to start to yellow again. I am not saying you are wrong, just giving my experience. Hoever I think I will try clearing the next ones I do. If you don't spread the clear coat evenly wouldn't it mess up your beam pattern?
HI GUYS
I do this often at my shop, the way you described to do it is good but only temp. as you sand the headlight you are removing the protective clear coat, so in another 3 months your headlights will haze again, the proper way of doing this is by sanding the headlight and then applying clear coat on it, i use automotive clear same as on body panels. it has lasted on my silverado for 4 years now, my headlights still look new. *mod edit*
I do this often at my shop, the way you described to do it is good but only temp. as you sand the headlight you are removing the protective clear coat, so in another 3 months your headlights will haze again, the proper way of doing this is by sanding the headlight and then applying clear coat on it, i use automotive clear same as on body panels. it has lasted on my silverado for 4 years now, my headlights still look new. *mod edit*
Wiggy Wiggy Wiggy
Joined: Jan 2008
Posts: 1,363
Likes: 45
But this stuff is expensive, and you need proper guns, proper air system, ect. Something like this I would want to be sure the finish is flawless, so a paint booth is ideal. You need the clear base, and hardener, and maybe reducer depending on brand. You can find some pro clears in quarts, but still is expensive. The clear I use is BASF DC5100, LINK.
Best bet is to take your headlights into a shop. They should clear something like this for cheap. They typically throw away what they would need for just 2 lights on a daily basis.
Prepping for this is tricky too. I would recommend to have someone prep the light for paint, that's done this before.
Quoted from the RL section
I only use 3000 as anything coarser than than will leave marks when the lights are lit, 3000 just takes a whole lot more time as I need to take down a few mil off of the lens before I polish them to OEM luster. The UV protection either comes from 3M Ventureshield or high gloss clear.
Here is another example, I did this set of Jeep headlights for a local customer.
BEFORE


AFTER


Here is another example, I did this set of Jeep headlights for a local customer.
BEFORE
AFTER
What I've always done.
1. Wash thoroughly with something that can remove wax.
2. Clay both lights.
3. Wet sand 1500, 2000, 3000 as evenly as possible. Rinsing as often as possible. Wash quickly after last. Dry.
4. Use a rubbing compound or PlastX and rub out all of the haze. Wash again and dry completely.
5. Apply automotive clearcoat as recommended.
Tips:
a) Don't be afraid to go overboard with any of the sanding or polishing.
b) Your starting point on the sandpaper grit is dictated by how bad your lights are. None of our TLs should be that bad. So there is nothing wrong with doing 2000 and up or 3000 only.
c) If on your car, tape up all edges and be liberal about it. You don't need to sand your paint. Especially because we are working with edges and corners, triple tape it!
d) You can use a sanding block to help with evenness when sanding.
e) You can use a da or buffer for the polishing step.

Cruisin'
Joined: Apr 2010
Posts: 23
Likes: 0
From: St. Louis MO
Do these haze naturally or is this a result of running the car thru the rag type car washes? My reason for asking is that my '07 TL hasn't shown signs of this yet but I've never taken it to a car wash that had the brushes/rags.
^There is a very thin layer of uv protective clearcoat on the headlights. Sun, heat, age will eventually wear it down and turn it hazy/yellow. When you sand basically you are sanding that layer completely off, exposing just the plastic. That is why putting another layer of clear back on is important. If not the plastic will get hazy very fast.
If you park your car outside this will happen a lot faster, obviously.
If you park your car outside this will happen a lot faster, obviously.
Instructor
Joined: Feb 2009
Posts: 151
Likes: 3
Thanks for the info!! I followed this procedure for my Jeep headlights. You could hardly see the headlights at night. Now they are clear and the lights shine bright.
Any idea how long this will last given I park the car outside?
Any idea how long this will last given I park the car outside?
Thread Starter
Chapter Leader (San Antonio)
iTrader: (3)
Joined: Oct 2008
Posts: 6,022
Likes: 437
From: Houston, Texas
Any time of sealant will work. I now use Blackfire Wet Diamond Sealant for headlights. (Best sealant/wax/UV coating for the quality/price out there)
I've used the PlastX on my integra and it worked out great. I tried it again using a newer pad and buffing out the headlights on my TL and didn't get as good of results. Ill probably try a different product along with the sandpaper method.
Very informative!
Very informative!
Does anybody know if applying headlight film after restoring prevent future hazing?
Film such as this
http://www.lamin-x.com/Acura-TL-07-0...rs-p/ac506.htm
Film such as this
http://www.lamin-x.com/Acura-TL-07-0...rs-p/ac506.htm
Safety Car
Joined: Jan 2006
Posts: 3,827
Likes: 340
From: Sacramento area
Yes, it should. Just make sure you're happy with the way the headlights look , because once you put that on it, that's what they will look like until you take it off. In other words, get all the imperfections/haze out , then apply the film.

7th Gear
Joined: Jun 2013
Posts: 7
Likes: 1
I did my 06 TL with Meguiar-'-ScratchX. No sandpaper. It took about an hour to do both front lens covers. Then I used some Meguiar carnauba wax on them. I do this now about once every six months and it only takes about 30 minutes for the whole job. They are clear. No yellow and no haze. I tried a commercial product on my 06 silverado and the meguiars does a better job a lot cheaper. And no sanding.
^The problem is hazing isn't the only issue. You can get pits and scratches, etc. Sanding can, for the most part, remove all blemishes.
The reason they haze, and the likely reason you have to do your process every 6 months, is because the lights come with a UV rated clear coat from the factory that deteriorates. This *should* be replaced by something. Carnuba isn't the answer. Carnuba lasts what, 2 weeks max or getting wet once?
Try a mix of half mineral spirits and half ultra clear spar urethane. You'll get years not months between cycles.