

G-043: Blinking sidemarker DIY guide! Suitable for 3G garage?
 01-04-2009, 04:59 PM
#1
Three Wheelin'
Thread Starter
iTrader: (3)
G-043: Blinking sidemarker DIY guide! Suitable for 3G garage?
Fellow 3G TL owners:
This past week I tackled a mod that I had been wanting to do for a while now: Blinking front Sidemarkers.
While there are some threads in the 3G garage that cover this topic, they are a bit old and dont elaborate on much of the wiring sprefic to any ONE brand of relay. So i decided to to this on a radioshack relay that "Kennedy" showed some basic pictures of in one of those threads. I do appreciate all the into provided in those threads. They have definitely helped me to do this to my own car and create this DIY guide.
This mod requires the following tools:
-medium flat head screwdriver
- medium Philips head screwdriver
-Soldering Iron
-Solder
-Wire snip/wire stripper
-flux
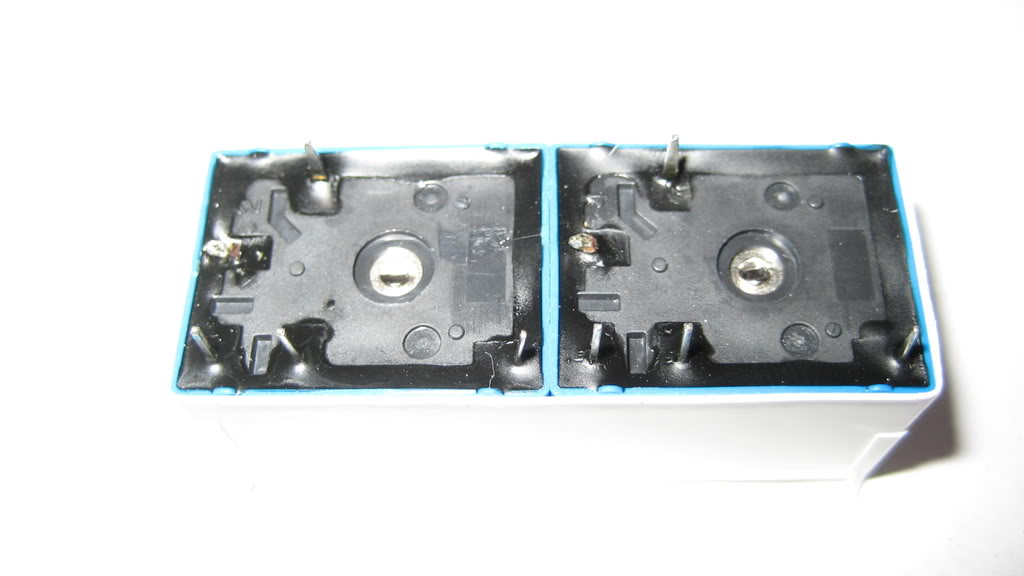
-(4) relays from radioshack (as shown below)
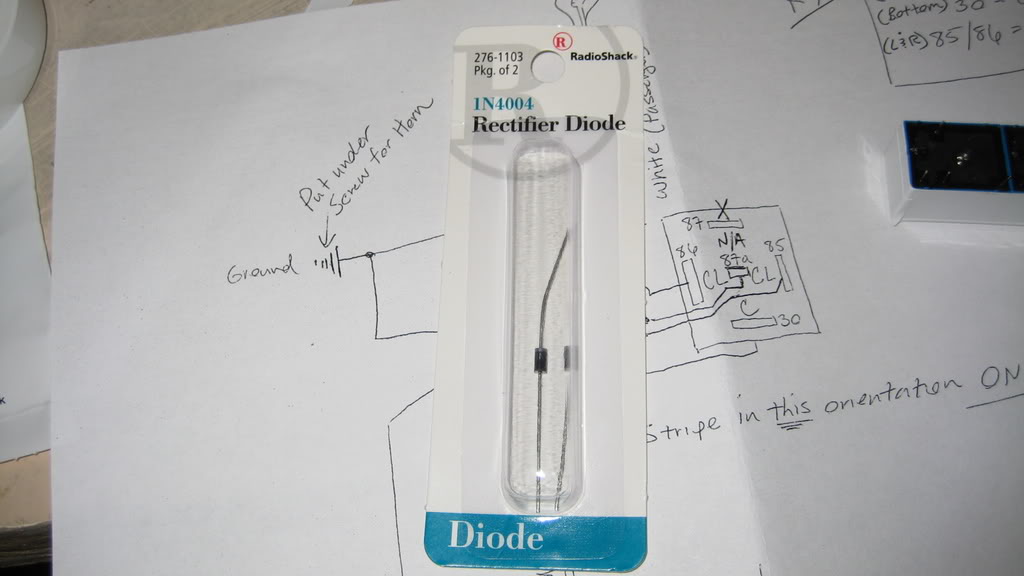
-(4) diodes from radioshack (as shown below)
-About 4 hours of labor
The diodes:
The relays:

Starting off:
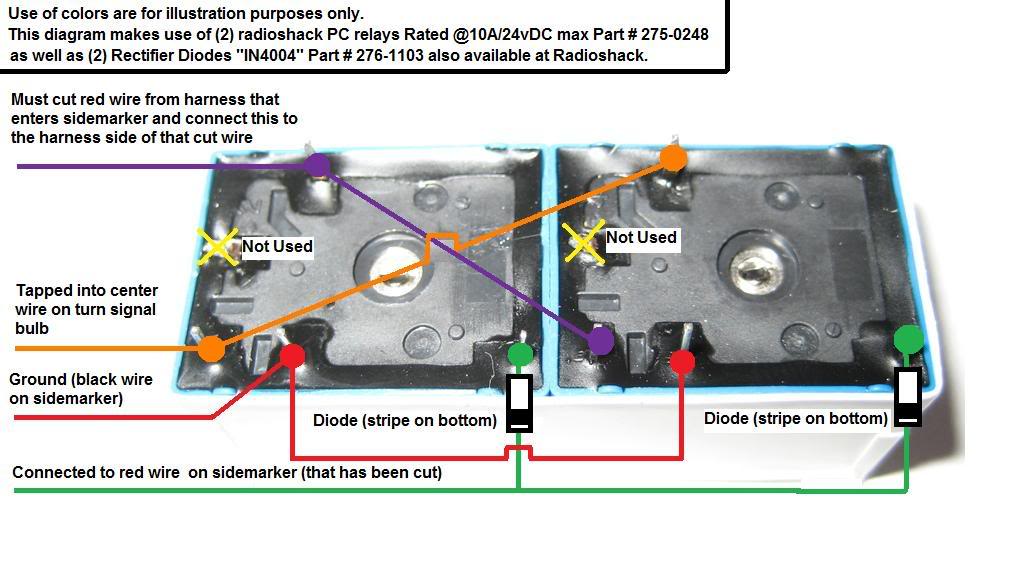
Use the diagram/pictures below to purchase what you need from Radioshack and wire up 2 identical pairs of relays. Tape the relays together using eectrical tape than then wrap them in electrical tape after you are done wiring them to make them relatively water proof. I also used some "liquid" electrical tape.
One pair of relays will be used for the drivers side sidemarker and the other for the passengers side sidemarker. Make sure to give ample length to the wire which runs to the turn signal bulb harness (about 4 feet is a safe bet). The other 3 remaining wires coming from your relays can be left at about 12-14 inches long.
Diagram:
After wiring:
Waterproofed:
The installation:
We will start by removing the drivers side sidemarker. To do this, turn the steering wheel all the way to the left so that you have room to get behind the wheel.
Once you are at this point, remove the (4) philips at the bottom of the wheel well as well as a clip just above those so that the wheel lining can be pulled back. Pulling back the wheel lining can be tricky. But just be rough, you wont hurt anything. It's made of a very tough plastic.
Once the wheel lining is pulled back, put your hand up to where the sidemarker is and depress the clips on either side that have been designed to hold the sidemarker in place. The sidemarker should now fall out and have its harness attached. The diagram below explains which wires from the relays need to be wired to this.
Now, turn the wheel all the way to the right so you can access the rear portion of the headlight (and most importantly the turn signal bulb/harness). Remove the necessary screws/clips as we did for the rear of the wheel well. Once exposed, you should see the turn signal bulb housing, turn the bulb until you can remove it and use the extra slack length in the harness to tap into the bulb's center wire as described above in the diagram.
From this point onward, things should be pretty self-explanatory. Button everything up the way you found it and the sidemarkers will snap back into place.
I'll be posting a video soon as well.
Thanks!
This past week I tackled a mod that I had been wanting to do for a while now: Blinking front Sidemarkers.
While there are some threads in the 3G garage that cover this topic, they are a bit old and dont elaborate on much of the wiring sprefic to any ONE brand of relay. So i decided to to this on a radioshack relay that "Kennedy" showed some basic pictures of in one of those threads. I do appreciate all the into provided in those threads. They have definitely helped me to do this to my own car and create this DIY guide.
This mod requires the following tools:
-medium flat head screwdriver
- medium Philips head screwdriver
-Soldering Iron
-Solder
-Wire snip/wire stripper
-flux
-(4) relays from radioshack (as shown below)
-(4) diodes from radioshack (as shown below)
-About 4 hours of labor
The diodes:
The relays:
Starting off:
Use the diagram/pictures below to purchase what you need from Radioshack and wire up 2 identical pairs of relays. Tape the relays together using eectrical tape than then wrap them in electrical tape after you are done wiring them to make them relatively water proof. I also used some "liquid" electrical tape.
One pair of relays will be used for the drivers side sidemarker and the other for the passengers side sidemarker. Make sure to give ample length to the wire which runs to the turn signal bulb harness (about 4 feet is a safe bet). The other 3 remaining wires coming from your relays can be left at about 12-14 inches long.
Diagram:
After wiring:
Waterproofed:
The installation:
We will start by removing the drivers side sidemarker. To do this, turn the steering wheel all the way to the left so that you have room to get behind the wheel.
Once you are at this point, remove the (4) philips at the bottom of the wheel well as well as a clip just above those so that the wheel lining can be pulled back. Pulling back the wheel lining can be tricky. But just be rough, you wont hurt anything. It's made of a very tough plastic.
Once the wheel lining is pulled back, put your hand up to where the sidemarker is and depress the clips on either side that have been designed to hold the sidemarker in place. The sidemarker should now fall out and have its harness attached. The diagram below explains which wires from the relays need to be wired to this.
Now, turn the wheel all the way to the right so you can access the rear portion of the headlight (and most importantly the turn signal bulb/harness). Remove the necessary screws/clips as we did for the rear of the wheel well. Once exposed, you should see the turn signal bulb housing, turn the bulb until you can remove it and use the extra slack length in the harness to tap into the bulb's center wire as described above in the diagram.
From this point onward, things should be pretty self-explanatory. Button everything up the way you found it and the sidemarkers will snap back into place.
I'll be posting a video soon as well.
Thanks!
Last edited by gerzand; 01-04-2009 at 05:02 PM.

The following 5 users liked this post by gerzand:
Brandon21 (07-07-2011),
I are LEGEND (01-13-2012),
mcmguti (02-11-2012),
robocam (05-05-2014),
Turbocoop (07-22-2013)
01-04-2009, 07:23 PM
#3
Three Wheelin'
Thread Starter
iTrader: (3)
Thanks mmade22. :-)
Heres the video on youtube:
http://www.youtube.com/watch?v=QpNifFEXqUI
(it just has to be processed by their servers. should be available within a few minutes)

Heres the video on youtube:
http://www.youtube.com/watch?v=QpNifFEXqUI
(it just has to be processed by their servers. should be available within a few minutes)
The following users liked this post:
robocam (05-05-2014)


Trending Topics
01-04-2009, 10:28 PM
#10
Three Wheelin'
Thread Starter
iTrader: (3)
u can do it
01-04-2009, 10:42 PM
#11
Instructor
Join Date: Sep 2008
Location: Albany, OR
Age: 42
Posts: 207
Likes: 0
Received 0 Likes
on
0 Posts
Man I might just give it a try. I am just scared of making any major mistakes on anything with my TL. Did you have instructions on this or did you just kinda figure it out by yourself?
01-04-2009, 10:51 PM
#12
Three Wheelin'
Thread Starter
iTrader: (3)
My write-up might not be totally comprehensive with pictures of every detail of the installation, but what isnt mentioned should be pretty inherently obvious. Still though, if you have any questions please ask.
01-05-2009, 02:32 AM
#13
2011 BMW 335i
iTrader: (2)
Join Date: Jan 2008
Location: Southern California
Age: 38
Posts: 1,256
Likes: 0
Received 1 Like
on
1 Post
thanks gerzand, I've beening wanting to do this for a long time (I like that bimmer look)....it does sound a bit complicated tho. saw your vid and it looks great, the only think I think I would like better would be if the side blinkers blinked at the same time as the front blinkers....check this out
http://i528.photobucket.com/albums/d...idesignals.flv
http://i528.photobucket.com/albums/d...idesignals.flv
 01-05-2009, 06:42 AM
#16
Racer
Ok, so here is my challenge to you. Since you have done the sidemarker mod and made it blink, is there any way you can figure out to take apart a switchback and put it in the sidemarkers so they run white and blink amber?
01-05-2009, 07:48 AM
#18
Three Wheelin'
Thread Starter
iTrader: (3)
thanks gerzand, I've beening wanting to do this for a long time (I like that bimmer look)....it does sound a bit complicated tho. saw your vid and it looks great, the only think I think I would like better would be if the side blinkers blinked at the same time as the front blinkers....check this out
http://i528.photobucket.com/albums/d...idesignals.flv
http://i528.photobucket.com/albums/d...idesignals.flv
In order to have the parking lamps turned on and get the sidemarkers to blink at the same time as the headlights and taillights, you would need a logic chip to control this because you want to keep the running light functionality (especially in night driving). The video you gave the link for is actually just that guy's sidemarkers wired up DIRECTLY to the turn signals. Therefore, his sidemarkers dont also work as running lights. They only flash. That might be an easier alternative, but you do lose some functionality from the stock setup. It's just a tradeoff in that case.
01-05-2009, 07:51 AM
#19
Three Wheelin'
Thread Starter
iTrader: (3)
 . It would make the mod totally complete IMO. definately do-able, however it might be a while until i get another set of switchbacks and sidemarkers to "carve up" since I've already spent way too much this month on the car.
Last edited by gerzand; 01-05-2009 at 07:53 AM.
01-05-2009, 06:01 PM
#21
Three Wheelin'
Thread Starter
iTrader: (3)
Dun Dun Dun..............
New project:
Anyone interested in a set of Switchback sidemarkers?
They will blink amber and be white running lights to match as set of headlights that also have switchbacks installed and will blink in sync with the headlights/taillights
You supply the parts and I'll supply the time/labor.
Any takers? PM me and we might be able to work something out.
01-05-2009, 08:12 PM
#22
Instructor
Join Date: Sep 2008
Location: Albany, OR
Age: 42
Posts: 207
Likes: 0
Received 0 Likes
on
0 Posts
New project:
Anyone interested in a set of Switchback sidemarkers?
They will blink amber and be white running lights to match as set of headlights that also have switchbacks installed and will blink in sync with the headlights/taillights
You supply the parts and I'll supply the time/labor.
Any takers? PM me and we might be able to work something out.
Anyone interested in a set of Switchback sidemarkers?
They will blink amber and be white running lights to match as set of headlights that also have switchbacks installed and will blink in sync with the headlights/taillights
You supply the parts and I'll supply the time/labor.
Any takers? PM me and we might be able to work something out.
I ask cause of right now I have stock lights, but I am trying to get on JnC's list to get some blacked out lights with switchbacks but I don't think he has any Type S lights right now.
01-05-2009, 08:37 PM
#23
Three Wheelin'
Thread Starter
iTrader: (3)
So these wouldnt match up with the stock lights? You need to have switchbacks for them to match up?
I ask cause of right now I have stock lights, but I am trying to get on JnC's list to get some blacked out lights with switchbacks but I don't think he has any Type S lights right now.
I ask cause of right now I have stock lights, but I am trying to get on JnC's list to get some blacked out lights with switchbacks but I don't think he has any Type S lights right now.
I think it would only be practical for someone who has switchbacks, IMO.

 01-07-2009, 10:54 AM
#30
Safety Car
Thanks, I have one bad relay ( I believe ) in my set up,and have been wanting to replace it. I had no idea what the part # was though. I'll look this # up online and see if I can order another.
01-12-2009, 07:19 AM
#31
Instructor
iTrader: (2)
Join Date: May 2008
Location: Bham Al
Age: 46
Posts: 121
Likes: 0
Received 0 Likes
on
0 Posts
In post 13 it shows a mod where the markers flash with the blinkers. I understand how to make this happen but if I do this does that mean I lose the running light effect. Can I have it both ways?
01-12-2009, 08:11 AM
#32
Three Wheelin'
Thread Starter
iTrader: (3)
The short of it is that you cant have it both ways when using a single color sidemarker setup. You either bypass running lights completely and lost that functionality, but have the sidemarkers in sync when the corner lights are on or do it the way I did.
Although, you could (with alot of work) fabricate up a set of switchback sidemarkers with both amber and white led's that would be in total sync. I'm in the process of making a few sets for some forum members and another azine member just posted a video of his approach to making them as well.
Last edited by gerzand; 01-12-2009 at 08:13 AM.
 01-15-2009, 01:05 AM
#36
Stickr Mstr
iTrader: (3)
Join Date: Aug 2005
Location: 310 cali
Posts: 76
Likes: 0
Received 0 Likes
on
0 Posts

This mod isn't hard because I've had previous experience hooking up relays and soldering/crimping, tapping wires.
I didn't remove the tire to access under the fenders, so it was a bit tight with my hands trying to reach for the front corner signal light wire. The sun had already set and I had to go find a flashlight to finish up. I used two 30 watt relays, as seen in the picture below. The black taped up part are the two diodes.
I didn't have any problems. I just soldered up the wires and tested it. It worked with no issues.
Sidenote: I own a 04 Base and my sis picked up a 08 Base. One thing I notice while inside the 08 model, the blinkers are a lot louder than 04 models. I was changing lanes and my buddy was like "You didn't use your signals?" I said.."Yes I did, you just couldn't hear it!"...
I was thinking of making a kit to aid people who don't want to deal w/ cutting and soldering.
Overall inexpensive and safety mod =D
01-22-2009, 01:34 AM
#39
HOME SWEET HOME....
Join Date: Jun 2007
Location: BK, ENY best place 2 b
Age: 45
Posts: 638
Likes: 0
Received 0 Likes
on
0 Posts
gerz how much was all the "parts" from radio shack, i might try this mod when i get back to ny if i have the time, but if i dont how much would you charge to do the setup?
01-22-2009, 07:11 AM
#40