
DIY for painting brake calipers
 07-11-2012, 04:43 PM
#1
DIY for painting brake calipers
I have spent the past 30 minutes searching for a good DIY on the proper way of painting the calipers for longevity and getting the brembo stickers to stay on. I intend on painting the inside portion of the hub and the caliper and then placing RDX brake covers on the rear brakes and painting them as well. I know that a lot of variables come into play if you want longevity out of a paint job but hardly know anything about painting at all. My plan was to wipe it down with mineral spirits, tape everything off that even has a microscopic chance of getting over spray on it, sand it down (what grit sand paper should I use?) hit it 1 coat of primer, 3 coats of base, and 2-3 coats of clear coat. Am I missing anything?
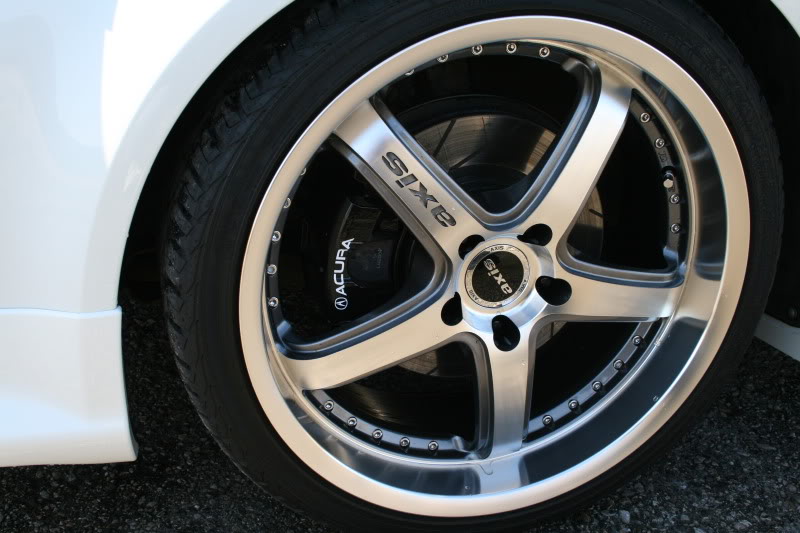
Here are the portions that I want to paint below, excluding the outside of the rotor.

Also, what vendor are you guys purchasing your brembo decals from? There are a ton of different colors and sizes here but I don't want to just guess.
http://www.ebay.com/sch/i.html?_trks...ecals&_sacat=0
Lastly, what vendor are you guys picking up your RDX brake covers from?
Thanks for everyone's help! I WILL be doing a thorough DIY for future members when I do all of this. At the same time, I'll be plasti dipping my front grill and painting the inside of my quad exhaust since some of the existing black is starting to chip away. If I can find a good product in time, I'm also going to re-black my wheel wells since they are getting a little dull.
Here are the portions that I want to paint below, excluding the outside of the rotor.
Also, what vendor are you guys purchasing your brembo decals from? There are a ton of different colors and sizes here but I don't want to just guess.
http://www.ebay.com/sch/i.html?_trks...ecals&_sacat=0
Lastly, what vendor are you guys picking up your RDX brake covers from?
Thanks for everyone's help! I WILL be doing a thorough DIY for future members when I do all of this. At the same time, I'll be plasti dipping my front grill and painting the inside of my quad exhaust since some of the existing black is starting to chip away. If I can find a good product in time, I'm also going to re-black my wheel wells since they are getting a little dull.
 07-12-2012, 12:48 AM
#3
Safety Car
iTrader: (5)
i just painted my calipers white with the G2 paint kit. came out really well, i sanded first with 600 grit, then did 2 coats, the first being light and the second fairly heavy. here is the link for the brembo stickers i got, very good quality so far (been on for only 2 weeks though). i asked for custom 4" length decals since i read some threads and they said that seemed the right size for our calipers (original are 3.5" i think)
http://www.ebay.com/itm/Evo-Brembo-B...item43af0273bd
i can try posting some pics later this week...not perfect but a nice touch in my opinion
http://www.ebay.com/itm/Evo-Brembo-B...item43af0273bd
i can try posting some pics later this week...not perfect but a nice touch in my opinion
07-12-2012, 01:06 AM
#4
i just painted my calipers white with the G2 paint kit. came out really well, i sanded first with 600 grit, then did 2 coats, the first being light and the second fairly heavy. here is the link for the brembo stickers i got, very good quality so far (been on for only 2 weeks though). i asked for custom 4" length decals since i read some threads and they said that seemed the right size for our calipers (original are 3.5" i think)
http://www.ebay.com/itm/Evo-Brembo-B...item43af0273bd
i can try posting some pics later this week...not perfect but a nice touch in my opinion
http://www.ebay.com/itm/Evo-Brembo-B...item43af0273bd
i can try posting some pics later this week...not perfect but a nice touch in my opinion
07-12-2012, 01:44 AM
#5
10th Gear
Lucky for you guys I was searching this up just yesterday. Here are the two helpful DIY's I found.
One from mmade22: https://acurazine.com/forums/3g-tl-2004-2008-93/d-097-diy-painting-factory-brembos-red-white-acura-logo-640092/#1
And one from rockstar143: https://acurazine.com/forums/3g-tl-problems-fixes-114/tl-type-s-brembo-paint-plastic-peeling-833964/
One from mmade22: https://acurazine.com/forums/3g-tl-2004-2008-93/d-097-diy-painting-factory-brembos-red-white-acura-logo-640092/#1
And one from rockstar143: https://acurazine.com/forums/3g-tl-problems-fixes-114/tl-type-s-brembo-paint-plastic-peeling-833964/
Trending Topics
07-12-2012, 08:25 AM
#8
Safety Car
iTrader: (5)
no clear coat or primer...just clean, sand, clean, paint, that's what's nice about the G2 paint kit. and you don't have to take apart your brakes (even though it would prob turn out nicer but i didn't want to hassle with anything)
 07-12-2012, 08:36 AM
#10
Suzuka Master
Here is mine done with High Temp Caliper paint. This has been on 3 years.
Only drawback to G2 is once mixed it has to be used in a short period of time.
OP don't clean with mineral spirits you will have fish eye issues .Use Brakleen.
I used a wire wheel on my dremel to clean up the rust then masked everything off and sprayed a light coat and used a hair dryer / heat gun to help dry .. then 2 more heavier coats using the heat gun etc. Painting step took 20 min. per wheel. Install wheel and ready to drive right away.
07-12-2012, 09:15 AM
#11
Here is mine done with High Temp Caliper paint. This has been on 3 years.
Only drawback to G2 is once mixed it has to be used in a short period of time.
OP don't clean with mineral spirits you will have fish eye issues .Use Brakleen.
I used a wire wheel on my dremel to clean up the rust then masked everything off and sprayed a light coat and used a hair dryer / heat gun to help dry .. then 2 more heavier coats using the heat gun etc. Painting step took 20 min. per wheel. Install wheel and ready to drive right away.
Would acetone be better to clean them with rather than mineral spirits?
07-12-2012, 09:29 AM
#14
Senior Moderator
Are you spraying or using a brush? If a brush, you can be really careful and paint it. You may want to tape off certain areas and also your rotor. If spraying, I'd remove the caliper so you don't spray everything else. I sprayed mine and left the calipers on, but did get some over spray on rotors and such. Could have been done better if I removed them. Also, you want to put on at least 3 coats. The paint drys pretty fast, in which case I did one caliper, then the next and by the time I got back to the first one it was ready for the next coat. Hope this helps.
07-12-2012, 09:39 AM
#15
Are you spraying or using a brush? If a brush, you can be really careful and paint it. You may want to tape off certain areas and also your rotor. If spraying, I'd remove the caliper so you don't spray everything else. I sprayed mine and left the calipers on, but did get some over spray on rotors and such. Could have been done better if I removed them. Also, you want to put on at least 3 coats. The paint drys pretty fast, in which case I did one caliper, then the next and by the time I got back to the first one it was ready for the next coat. Hope this helps.
07-12-2012, 10:22 AM
#17
Safety Car
iTrader: (5)
then i waited about 12 hours before driving. i put the stickers on a day later to make sure there were no issues. i taped up the best i could and still got some on parts i shouldn't have. so what i did was spray brake cleaner on a q-tip and it gives you more control on taking off the still-wet paint where you don't want it. next up i need to paint my hubs black (cheaper duplicolor paint i have) so they don't show rust
i bought my G2 kit from searching online and found whoever had the best deal (black and red are typically sold locally but other colors are not)
07-12-2012, 10:44 AM
#18
Chapter Leader (Midwest Region)
+1 on G2 kit. But if you have Brembos make sure you scuff them up and clean them before you paint. I did not sand mine so it doesn't look perfect when you get close to them. I am going to redo mine soon, as I cant stand them not being perfect.
07-12-2012, 11:50 AM
#19
Senior Moderator
https://acurazine.com/forums/3g-tl-2004-2008-93/d-106-painting-rotor-hub-diy-726854/
The following users liked this post:
sockr1 (07-12-2012)
07-12-2012, 12:00 PM
#21
07-12-2012, 12:05 PM
#22
according to their website:
DIRECTIONS:
Preparation -
Remove all four wheels from the vehicle. This product was developed for easy DIY application so removal of calipers and/or drums will not be necessary; however, if you intend to paint inside the calipers, the brake pads may have to be removed before continuing.
Clean surfaces to be painted of grease, dirt, oil and any fluids with the enclosed G2 Brake Cleaner Spray. Use no degreasers! Spray should be applied liberally and allowed to air dry. Please read and follow specific instructions and cautions on can. Use a steel brush to loosen any rust and wipe away with a clean, lint free cloth.
Masking of the area to be painted is recommended. Cover all rubber parts and the brake bleeder screw.
Application -
Mix the entire jar of PaintSystem Reactor into the can of Brake Caliper Paint and mix it thoroughly with the enclosed stir stick. Leave the mixture to react for about 5 minutes and mix once more before applying.
Apply the reacted paint to the caliper or drum with the enclosed brush in a thin, even coat. A few bubbles will naturally appear in the first coat as a side effect of the reaction process.
Wait 15 minutes before applying a second coat to cover any bubbles and even out the gloss finish of each caliper.
Curing -
The paint requires 2 hours' curing time before reinstalling the wheels. Do not use vehicle for 24 hours in order to allow the paint to reach its full grade of hardening.
07-12-2012, 01:37 PM
#23
Suzuka Master
I masked everything off .... no overspray...
Use Brakleen ... stay away from mineral spirits.
Last edited by Steven Bell; 07-14-2012 at 11:56 PM. Reason: Merged posts

 07-14-2012, 04:49 PM
#27
Safety Car
iTrader: (5)
http://www.ebay.com/itm/Acura-Brake-...item43af02733e
make sure you tell them you want flat, horizontal decals...i forgot to and they sent me the curved ones (4"). didn't matter because i went with the brembo logo anyways
make sure you tell them you want flat, horizontal decals...i forgot to and they sent me the curved ones (4"). didn't matter because i went with the brembo logo anyways
04-09-2013, 12:48 PM
#28
Great post gents. Question for those who use the G2 kit, how well did the decals stay on the caliper? Because there's no clear coat applied at the end, it appears to me that the decals would be "exposed" with nothing to cover it (like clear coat) from the elements. Is this a concern or issue you encountered? Any updates on performance and how well G2 lasted now that it's 2013?
04-09-2013, 01:08 PM
#29
Wire wheel is the best way to do it; but on a power drill.
That's how I've always done it; on both brembos and 5at brakes.
And I use the duplicolor paint brush "kit." Makes the work easier cause with a spray can you have to tape a lot more; also the duplicolor ceramic kit is like 12$ on eBay shipped these days. Best bang for your buck.
After painting I suggest putting the decal on the same way as all other decals. Then spray with high temp clear if you wish. I never did. (sold separately)
It's really not hard at all
04-09-2013, 01:54 PM
#30
Safety Car
iTrader: (5)
my G2 paint is holding up very good still, many months later. i didn't use clear coat and the decals are holding up fine. i recommend the G2 (brush on) over the duplicolor (brush on). i've used both and G2 is a much better paint in terms of quality, application, and just overall look.
The following users liked this post:
Nick216 (05-06-2013)
04-09-2013, 06:04 PM
#34
The g2 kit is probably really nice and I've heard nothing but good things. From what I saw it was about 40$ so I went with the duplicolor since I had good experiences with it and it was 1/3 the cost.
You get what you pay for though, I'm sure the g2 kit is superior. Duplicolor was good enough for me though.
You get what you pay for though, I'm sure the g2 kit is superior. Duplicolor was good enough for me though.


Thread
Thread Starter
Forum
Replies
Last Post
SidhuSaaB
3G TL Problems & Fixes
18
05-30-2020 12:40 AM
detailersdomain
Wash & Wax
3
10-09-2015 10:13 PM