C-036: DIY Transmission Filter Replacement With Pics
 08-09-2010, 01:12 PM
#1
Dogmatic Dinosaur
Thread Starter

C-036: DIY Transmission Filter Replacement With Pics
My apologies if this was done before - I searched before I started and did not find it. This is probably too detailed for most, but wanted to make sure that everybody could do it if they wanted.
Tools required:
10MM 1/4" or 3/8" Socket
8MM 1/4" or 3/8" Socket
6" socket extention
Pliers
6"+ Phillips Screwdriver
10MM boxed end wrench
19MM boxed end wrench
Parts/Brake Cleaner
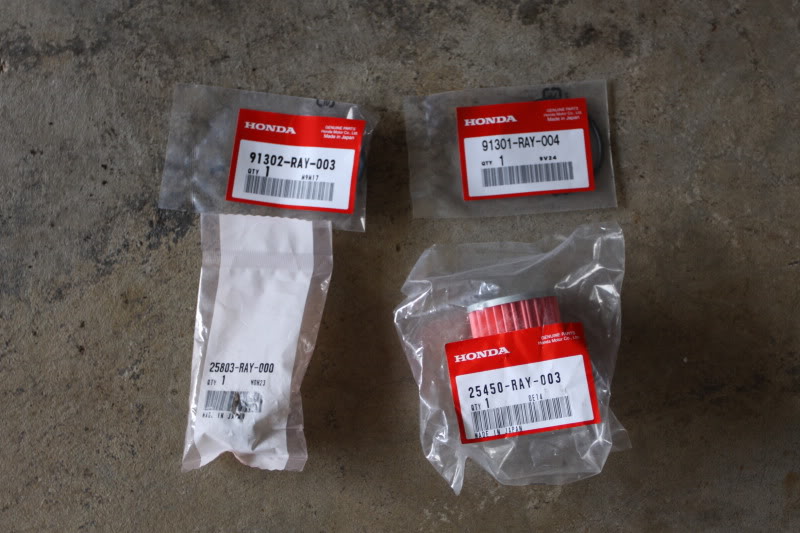
Parts required:
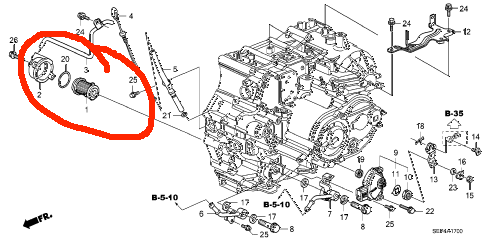
01302-RAY-003 : Bushing
91301-RAY-004 : O-Ring
25803-RAY-000 : Spring
25450-RAY-003 : Filter
?????-???-??? : x2 Crush Washers which I did not buy, but would next time.
Cost:
Less than $20
Level of difficulty & time required:
Medium-Hard - slightly harder than changing oil.
Took 25 minutes with taking pictures and making sure that my hands were clean so that I didn't get oil on my Canon 5D.
Prereqs:
Cool car (I did it hot, but cool is better)
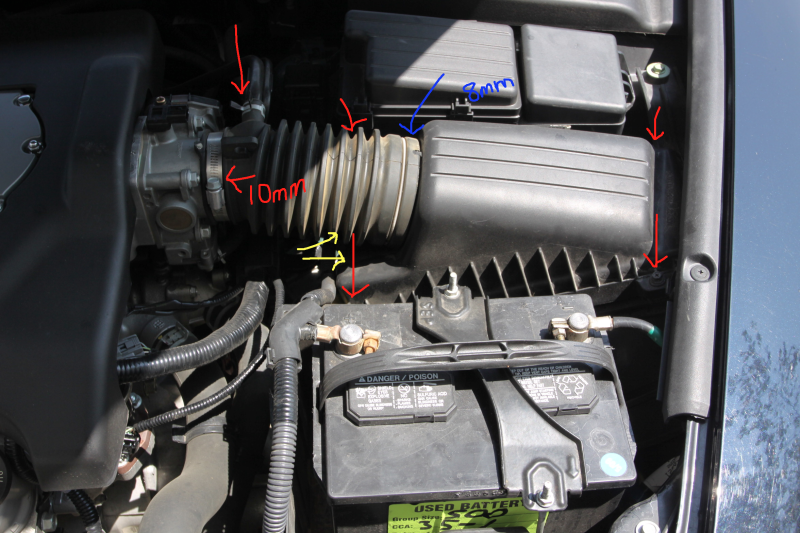
Step 1 - Remove Air Box Cover and Hose.
There are 4 phillips screws on the left pointed at with red arrows. You must disengage the clamp (top left red arrow) and remove the metal hose. There is a 10MM clamp holding the hose onto the intake. To fully remove this unit, there are 2 plastic clips (yellow) that hold a power wire to the left side of bottom of the top cover. Ignore the blue 8MM mark - it is premature.
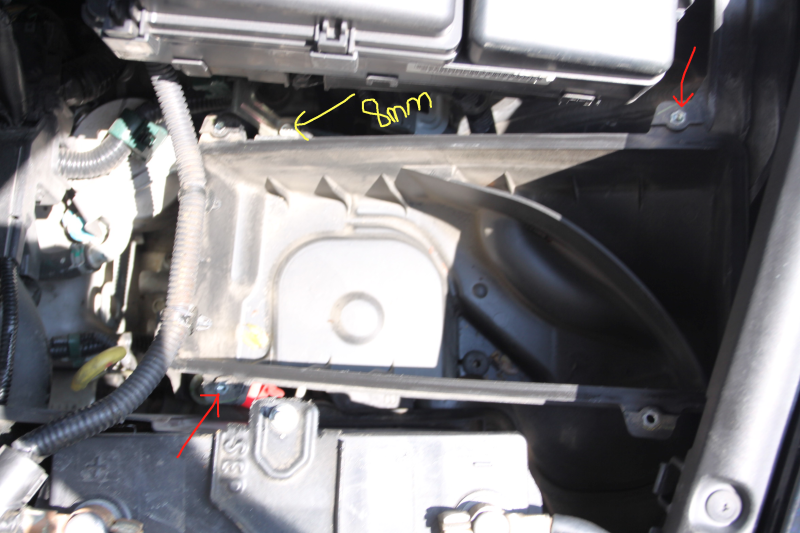
Step 2 - Remove the air box:
Remove the 2 10MM bolts in red. Remove the 8MM clip bolt in yellow. You might have to move the box to the side, but it should come out easily. Take the time to get the dusty moths, butterflies and other garbage out of the bottom of the box.
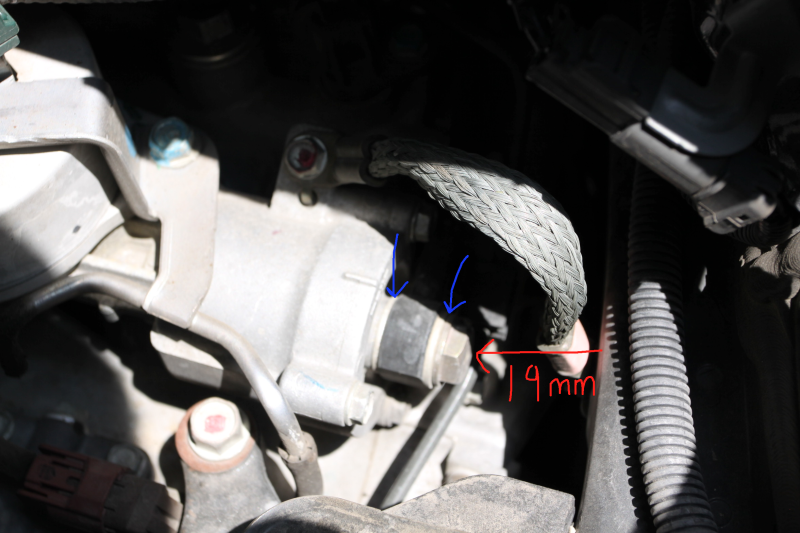
Step 3 - Remove the inlet line:
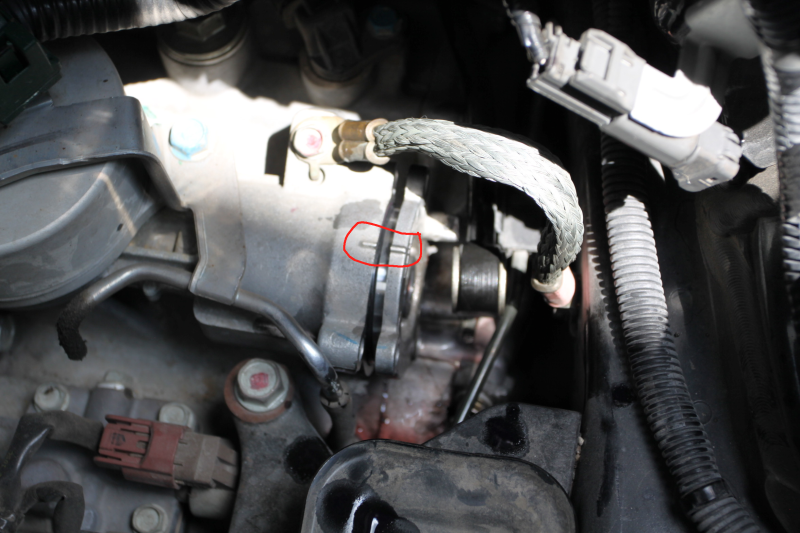
Remove the line bolt with a 19MM boxed end wrench. It should unscrew with your fingers once you break it loose. There are crush washers on both sides the line fitting (in blue) - don't lose these if you plan to reuse them... and don't forget to remove them if you plan to install new ones. The crush washers stuck to my fitting, so pay attention. NOTE: if it would be easier for you, you can remove that grounding strap, but it does not really get in the way too much.
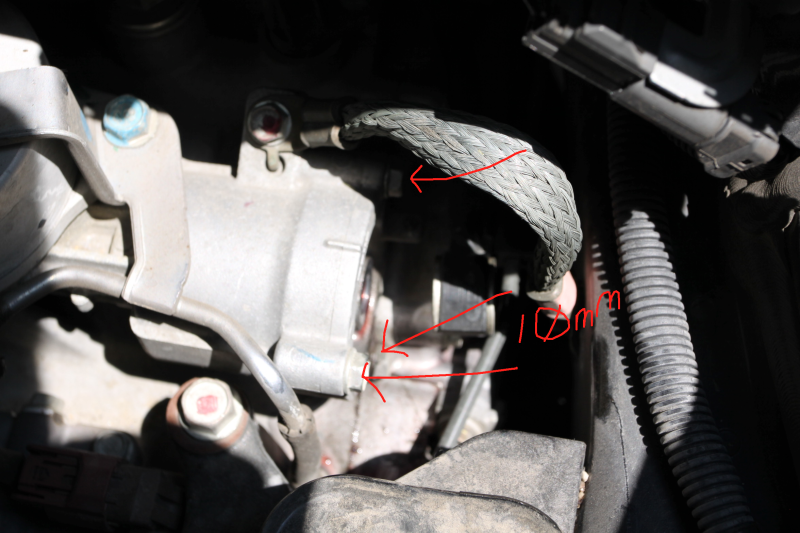
Step 4 - Remove the filter cover:
There are three 10MM bolts that hold the cover on. Use a 10MM boxed end wrench to get these off. They should also unscrew with your fingers once you break them free.
Step 5 - Remove the cover:
The cover should start to come off on it's own with the spring pressure. Be sure and observe the line-up marks on the cover and housing.
Step 6 - Take out the stuff (industry term):
No picture here since I needed both hand, but take the cover off, then the filter and spring. You might have to reach in to get the spring. The grommeted side of the filter goes towards the housing and the solid end goes with the spring.
Step 7 - Clean cover and install new o-ring:
Remove the old o-ring and clean the housing with your choice of cleaner - I use brake/parts cleaner. Install the new o-ring without any lubrication oil - I did not see any extra lube when I took it off, so I put no new lube on when I assembled.
Step 8:
Put it all back together. Again, pay attention to the crush washers on the line fitting.
Findings:
The old filter was full of the same junk that is on the plug. It came off easily and was plentiful. The car drives no differently, which I expected, but I am glad to have gotten a new filter in there.
Parts:
Filters compared:
Guess which one is new?
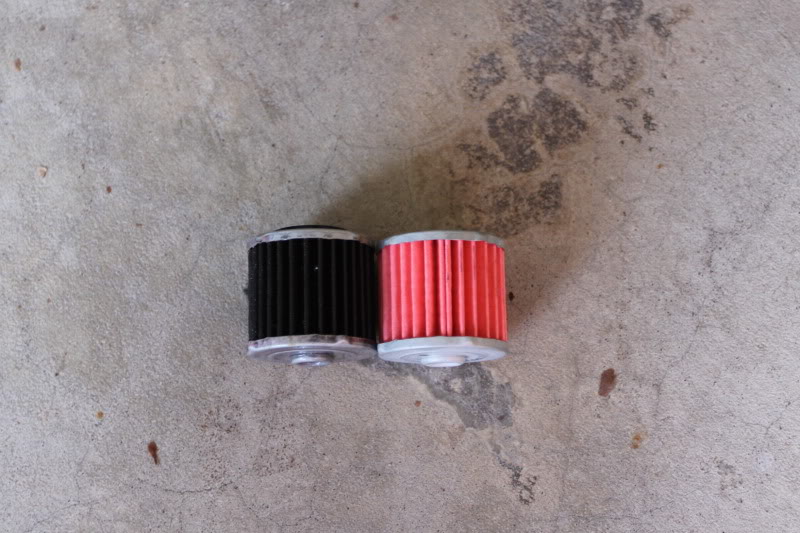
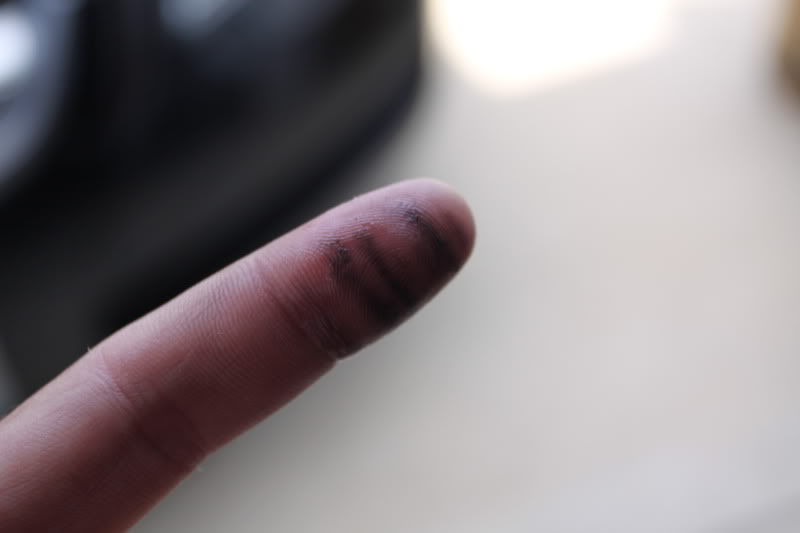
This is from a light rub of my finger on the filter.
I would do this again in 20K miles, or so. It is cheap and easy enough to be cheap insurance. I suppose that Honda put these on here for a reason, even if they don't have them in their scheduled maintenance guide.
I hope that this helps somebody out. Sorry again, if this was posted before.
Tools required:
10MM 1/4" or 3/8" Socket
8MM 1/4" or 3/8" Socket
6" socket extention
Pliers
6"+ Phillips Screwdriver
10MM boxed end wrench
19MM boxed end wrench
Parts/Brake Cleaner
Parts required:
01302-RAY-003 : Bushing
91301-RAY-004 : O-Ring
25803-RAY-000 : Spring
25450-RAY-003 : Filter
?????-???-??? : x2 Crush Washers which I did not buy, but would next time.
Cost:
Less than $20
Level of difficulty & time required:
Medium-Hard - slightly harder than changing oil.
Took 25 minutes with taking pictures and making sure that my hands were clean so that I didn't get oil on my Canon 5D.
Prereqs:
Cool car (I did it hot, but cool is better)
Step 1 - Remove Air Box Cover and Hose.
There are 4 phillips screws on the left pointed at with red arrows. You must disengage the clamp (top left red arrow) and remove the metal hose. There is a 10MM clamp holding the hose onto the intake. To fully remove this unit, there are 2 plastic clips (yellow) that hold a power wire to the left side of bottom of the top cover. Ignore the blue 8MM mark - it is premature.
Step 2 - Remove the air box:
Remove the 2 10MM bolts in red. Remove the 8MM clip bolt in yellow. You might have to move the box to the side, but it should come out easily. Take the time to get the dusty moths, butterflies and other garbage out of the bottom of the box.
Step 3 - Remove the inlet line:
Remove the line bolt with a 19MM boxed end wrench. It should unscrew with your fingers once you break it loose. There are crush washers on both sides the line fitting (in blue) - don't lose these if you plan to reuse them... and don't forget to remove them if you plan to install new ones. The crush washers stuck to my fitting, so pay attention. NOTE: if it would be easier for you, you can remove that grounding strap, but it does not really get in the way too much.
Step 4 - Remove the filter cover:
There are three 10MM bolts that hold the cover on. Use a 10MM boxed end wrench to get these off. They should also unscrew with your fingers once you break them free.
Step 5 - Remove the cover:
The cover should start to come off on it's own with the spring pressure. Be sure and observe the line-up marks on the cover and housing.
Step 6 - Take out the stuff (industry term):
No picture here since I needed both hand, but take the cover off, then the filter and spring. You might have to reach in to get the spring. The grommeted side of the filter goes towards the housing and the solid end goes with the spring.
Step 7 - Clean cover and install new o-ring:
Remove the old o-ring and clean the housing with your choice of cleaner - I use brake/parts cleaner. Install the new o-ring without any lubrication oil - I did not see any extra lube when I took it off, so I put no new lube on when I assembled.
Step 8:
Put it all back together. Again, pay attention to the crush washers on the line fitting.
Findings:
The old filter was full of the same junk that is on the plug. It came off easily and was plentiful. The car drives no differently, which I expected, but I am glad to have gotten a new filter in there.
Parts:
Filters compared:
Guess which one is new?
This is from a light rub of my finger on the filter.
I would do this again in 20K miles, or so. It is cheap and easy enough to be cheap insurance. I suppose that Honda put these on here for a reason, even if they don't have them in their scheduled maintenance guide.
I hope that this helps somebody out. Sorry again, if this was posted before.

The following 17 users liked this post by jda123:
austinjh (12-23-2011),
B Sc (12-16-2021),
blk 3g type s (01-26-2015),
cjlaubach (02-02-2013),
djkurious (08-03-2012),
and 12 others liked this post.
08-09-2010, 01:48 PM
#2
Race Director
iTrader: (8)
Cool DIY, I'll put it in use sometime =)
08-09-2010, 05:02 PM
#6
Dogmatic Dinosaur
Thread Starter
No idea about the filter. I bought the car used.
I did lose several tablespoons to a third of a cup of fluid. ...not enough to tell on the dipstick, but enough to make a little bit of a mess on the floor.
I forgot to mention that I used some brake/parts cleaner and some hot water on the area after I got done. I want it CLEAN to check for leaks.
I did lose several tablespoons to a third of a cup of fluid. ...not enough to tell on the dipstick, but enough to make a little bit of a mess on the floor.
I forgot to mention that I used some brake/parts cleaner and some hot water on the area after I got done. I want it CLEAN to check for leaks.
Trending Topics
 08-09-2010, 05:54 PM
#9
Thanks for the post I was going to ask this as well since I just purchased an 06 TL Certified with 61620 miles. My fluid is more like a reddish brown and right now even though the fluid has been replaced twice with 1 drain/fill one at around 30k and one just recently at 61620 before sale. I am going to get 3 drain and fill done until my next service I will get the filter replaced then
08-09-2010, 06:14 PM
#10
Senior Moderator
added to the 3G garage! Awesome writeup!
The following users liked this post:
papivic27 (11-23-2021)
08-10-2010, 07:49 AM
#15
BANNED
iTrader: (33)
 08-10-2010, 09:22 AM
#16
Dogmatic Dinosaur
Thread Starter
Bring your 2007 to KC and I will do it. 
I am starting to think that this should be a necessary maintenance item once you start to see debris on the magnetic plug. We all know that metal shavings are riding around in our transmissions once this starts to happen, so why leave the filter unchanged? Would any of us do this with our engines? I am going to do this every 15K, or so, when I change the fluid.
Does anybody know what you are starving of fluid if/when this filter starts to get clogged?
08-10-2010, 09:36 AM
#17
BANNED
iTrader: (33)
08-10-2010, 12:20 PM
#19
08 MDX, 04 TL (sold)
iTrader: (1)
Apparently the trans fluid also has a path that bypasses the filter such that you can never starve anything. Dealers claim that the filter does not need to be replaced and that it is designed to not need replacing. You can just let it keep collecting debris and no harm is done.  I asked the dealer to replace the filter for me and they said they never replace it as preventative maintenance and somehow convinced me out of it.
  Something tells I should give this a try as my first DIY cause I don't see why not replace it.
I asked the dealer to replace the filter for me and they said they never replace it as preventative maintenance and somehow convinced me out of it. Something tells I should give this a try as my first DIY cause I don't see why not replace it.
08-10-2010, 02:00 PM
#21
Dogmatic Dinosaur
Thread Starter
Acura.com in the store. This is on the ATF PIPE page for a 2007, is this internal? I cannot tell from the picture.

Last edited by jda123; 08-10-2010 at 02:01 PM. Reason: typo
08-10-2010, 02:09 PM
#22
BANNED
iTrader: (33)
anyone else that may know, feel free to chime in!

The following users liked this post:
stevieray (09-16-2023)
08-10-2010, 02:56 PM
#24
BANNED
iTrader: (33)
^thanks for clearing that up Dan.
so what do we do? just deal with a filthy filter like the one pictured above? seems like a shitty deal.
so what do we do? just deal with a filthy filter like the one pictured above? seems like a shitty deal.
08-10-2010, 03:15 PM
#25
Safety Car
Mine is a 2006.
One of the few times that it is actually better to have an older model.

In the illustration above - The washers for the Banjo fitting was changed midway thru the 2006 production run. I ordered two of each version and will "cherry pick" which version is best.
In the quote above - Correction on the typo on the PN #91302. Red text in above quote is the corrected info

Order placed. I used Acura Carland (click here).
One of the few times that it is actually better to have an older model.
In the illustration above - The washers for the Banjo fitting was changed midway thru the 2006 production run. I ordered two of each version and will "cherry pick" which version is best.
In the quote above - Correction on the typo on the PN #91302. Red text in above quote is the corrected info
Order placed. I used Acura Carland (click here).
Last edited by Inaccurate; 08-10-2010 at 03:18 PM.
The following 3 users liked this post by Inaccurate:
08-10-2010, 03:34 PM
#26
Dogmatic Dinosaur
Thread Starter
Apparently the trans fluid also has a path that bypasses the filter such that you can never starve anything. Dealers claim that the filter does not need to be replaced and that it is designed to not need replacing. You can just let it keep collecting debris and no harm is done.
Last edited by jda123; 08-10-2010 at 03:35 PM. Reason: typo
08-10-2010, 07:20 PM
#27
Registered Member
Join Date: Jun 2009
Location: Long Island N.Y.
Age: 58
Posts: 376
Likes: 0
Received 2 Likes
on
2 Posts
I change my trans every 1500 miles with my oil (mobil 1 ) Fluids are cheap compared to having my car torn apart. I am thinking about putting my own trans filter online by my trans cooler.
08-10-2010, 10:48 PM
#28
08 MDX, 04 TL (sold)
iTrader: (1)
I just might try and tackle this one.
09-10-2010, 07:35 PM
#30
HE>i
iTrader: (1)
Can anyone confirm on my 99 TL that pic# 14 is the sensor switch that i need to replace (2 required). I read somewhere that it was two different part #'s (28600-P7Z-003 and 28600-P7W-003).
Also part #(25450-P7W-003) only shows for 00-03TL. I plan on replacing atf filter element also.
I looked in 2nd gen section but i have found more related info here. I will complete this on my 99 TL, then my 05 TL later on

Thanks in advance
Also part #(25450-P7W-003) only shows for 00-03TL. I plan on replacing atf filter element also.
I looked in 2nd gen section but i have found more related info here. I will complete this on my 99 TL, then my 05 TL later on
Thanks in advance
Last edited by 05_NBP_TL; 09-10-2010 at 07:37 PM.
09-11-2010, 02:56 PM
#31
More Than Meets The Eye
Join Date: May 2007
Location: Orange County
Age: 42
Posts: 273
Likes: 0
Received 0 Likes
on
0 Posts
I guess if you are an 07 Type-S owner like myself just make sure you change your fluids more frequently. If you are going to go under your car and replace the oil, might as well replace the tranny oil as well. I usually replace the tranny oil every other oil change. Sure it's probably not necessary but it doesn't hurt to have clean fluids.
 11-04-2010, 09:22 AM
#34
Dogmatic Dinosaur
Thread Starter
FYI - I did my last 1x4 with synthetic fluid this last weekend (4 total) and the magnetic plug was completely clean of debris - when I wiped it off, all that I got off of it was red fluid with not even a hit of greyish black. It had been about 5K since I had the plug out.
Not sure if the filter is helping trap the metal shavings, but I am going to start changing this filter every 20K or so.
Not sure if the filter is helping trap the metal shavings, but I am going to start changing this filter every 20K or so.
04-19-2011, 12:34 PM
#35
Why is ATF filter replacement not part of any service interval? Not even the big 100K service?
Is it assumed that the filter will perform sufficiently for the life of the transmission?
Is it assumed that the filter will perform sufficiently for the life of the transmission?

The following users liked this post:
dajonx (06-22-2011)
06-22-2011, 02:35 PM
#40