When you click on links to various merchants on this site and make a purchase, this can result in this site earning a commission. Affiliate programs and affiliations include, but are not limited to, the eBay Partner Network.
ok so if you want to add the magnafine filter and remove the stock one can you just replace the stock one with the magnafine filter on? in the same exact spot?
ok so if you want to add the magnafine filter and remove the stock filter can you just replace the stock filter with the magnafine filter and put it in the same exact spot? ****
ok that does make sense, but then if the regular filter is removed what is put there to replace it? because from the diagram it looks like it would be a big open in the tranny if its not there lol therefore no presure
My question is do you pretty much put a 5 foot hose on each of the banjo's and route them to each end of the cooler, a little unclear of the pics and the plumbing.
ok that does make sense, but then if the regular filter is removed what is put there to replace it? because from the diagram it looks like it would be a big open in the tranny if its not there lol therefore no presure
Not sure about this, as I left my stock filter installed. I would think there would be no pressure drop once the space is filled with fluid.
Originally Posted by usmarinedelta
My question is do you pretty much put a 5 foot hose on each of the banjo's and route them to each end of the cooler, a little unclear of the pics and the plumbing.
Yes. Each connector on the cooler runs to one or the other banjo fittings. Does it matter which is which? Not so sure as far as the cooler goes, but you want the Magnefine on the hose feeding the cooler, situated properly with the flow.
It's right in front of the radiator at the bottom. You can't miss it as it looks like a mini radiator.
I thought the type-s already had a filter inside the tranny.
~~~~~~~~~~~***********~~~~~~~~~~
I used a JC Whitney plate-fin hi-eff trans cooler on my F355 kit car build 8 years ago [w/3800 V6 Grand Prix engine/trans] & have over 7000 miles on the install; same as the B&M unit noted in this install but lower cost at $46 currently.
Question>>>
anyone know if I can connect this cooler/filter to the POWER STEERING in/out conns at the back of the trans??? I have a J32 w/auto installed in the BACK of my K-1 Attack kit car that was just completed in June, and knowing the issues my 2003 TL's trans possibly could have []..... since my car does not use these [I have them closed-looped currently], are there any issues in not using this for the cooler? high pressure or anything? I have plenty of physical location/mounting options for the cooler, since the car has 2 large side air inlets! And possibly thinking of doing a turbo install too that might add more heat to the drive train .... more the reason for the cooler!
Awesome write up! I really appreciate every detail you posted. I finished this install last week and your write up helped me tremendously.
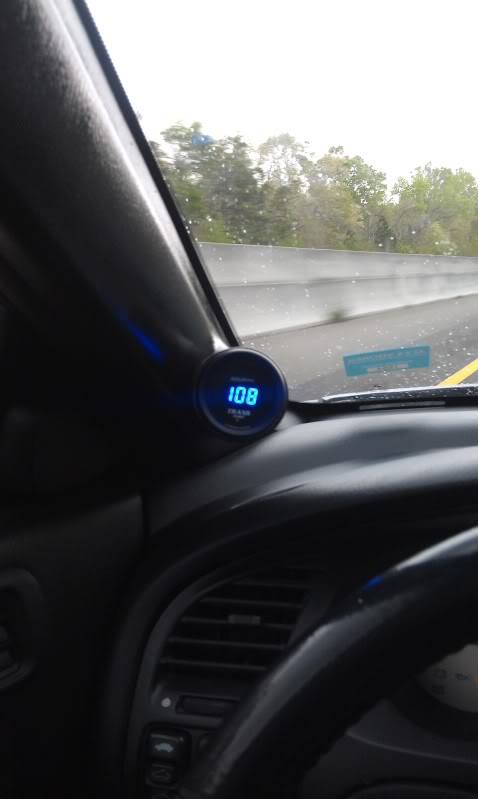
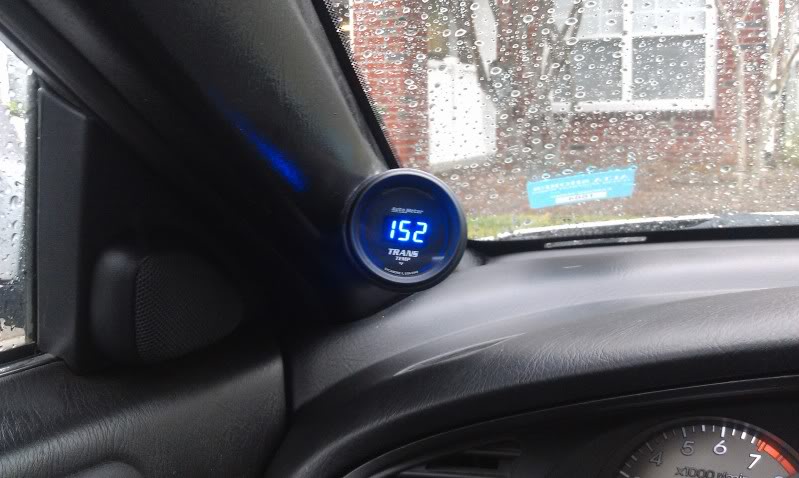
I own a 01 CL-S and used the same Cooler and inline magnetic filter. I also added a AutoMeter Trans Temp gauge to verify temps. Today on the highway I was at 108 degrees steady, at idle Im experiencing 152 and Stop and go Highway is about 198 when it was 85 degrees outside. Here are a couple pics to show.
my ? is how much of an improvement is this over a tl type S oil cooler, as this is what i have and im debating on getting another oil cooler but dont know how well the oil cooler works on the type S as is???
and does any one know how many rows is the stock type S oil cooler
This is not for Type-S or TL's that already have a cooler. This DIY is for the majority of TL owners that don't have a ATF cooler. In fact, it's probably not a good idea to run a large or pair of coolers.
I agree, the Type S should be fine as is. Unless you're towing and towing hard it should be fine. Just keep in mind the most heat is created when there's a large difference in input and output speeds of the torque converter to input shaft speeds. For example climbing a steep hill in 5th gear. Just creeping at low speeds in a high gear will create excessive heat. Driving down the freeway steady state with the converter locked up creates practically zero heat. Your factory heat exchanger will be fighting with your aftermarket cooler to heat the transmission up. Or said another way, heavy throttle, low rpm/road speed.
If you have a Type S and want to do an upgrade, it might be useful to install a gauge first and see how hot it gets first.
Has anyone considered a kit that uses a standard oil filter? Seems like it would be super simple to change and you can a large filter and probably add a quart or more extra fluid. Extra fluid alone will aid in cooling.
I've used those filters before in a desperate attempt to keep second gear from going out in the 200-4R which was dumb of me. I like the kits, they make changing the filter very easy obviously and you can sometimes get away with one of the ultra fine filters used in bypass filtration as long as you use an oversized filter.
The reason I went with Magnefine over this style is only because the transmission sheds mostly metal debris that a magnet can remove and the (sometimes) non metallic clutch material and aluminum and brass is usually pretty large that any average filter will stop like the magnefine.
In the ones I've torn apart with stuck valves or other symptoms of debris have almost always been caused by varnish in the valvebody from the fluid itself and not by dirt. To clarify, I have seen dirt get into a valve body and stick a valve but it's pretty rare.
Still though, it's not much more trouble if any to do the spin on filter and sometimes I wish I had done one. I would go with an ultra high quality filter, all silicone/metal/synthetic media construction because you should be able to go over 100,000 miles between filter changes and it would be nice for the filter to hold up. Royal Purple makes a great one for this, at least for a "normal" engine oil filter. There are finer spin ons available for hydraulic systems that look the same on the outside but would be too restrictive for engine oil and the amount of combustion byproduct it would acquire.
After seeing what I've seen I decided to add the cooler, filter, and a good synthetic back when the car was still young but if I could only do one it would be a good synthetic changed at reasonable intervals.
Last edited by I hate cars; 05-22-2013 at 05:42 PM.
Just did a 2x3 today and im getting ready to install the cooler tommorrow. The only question I have is which line is feeds into the transmission. I know its supposed to be the bottom one on the cooler, but which banjo fitting is it. There are 2 banjo's. One sort of on the centerline of the car, and one slightly offset, further to the drivers side.
I wish I could help but I think it was 2007 when I installed mine and I have a hard time remembering what I did 10 minutes ago. At the time I don't think anyone else had installed a cooler so I ran both lines a little long and stuck them in a bucket and cranked the engine to see which was which. It's not real important if you're only doing the cooler but if you throw a filter in the mix it is important. Me personally, I would verify for myself even if you identify the correct banjo after you run the lines since it can really screw things up with a filter.
I wish I could help but I think it was 2007 when I installed mine and I have a hard time remembering what I did 10 minutes ago. At the time I don't think anyone else had installed a cooler so I ran both lines a little long and stuck them in a bucket and cranked the engine to see which was which. It's not real important if you're only doing the cooler but if you throw a filter in the mix it is important. Me personally, I would verify for myself even if you identify the correct banjo after you run the lines since it can really screw things up with a filter.
Thanks IHC. That was exactly my plan if no one replied with a solid answer. I gotta go buy a little extra ATF since when I drained it each time yesterday about 3 3/4 quarts came out each time when I drained. But ill hopefully update once im done.
Holy cow did I have a tough time. The drain and fills were were absolute cake. easily one the easiest job ive done on the car. Now the transmission cooler is a whole other task.
My first task was to fit the cooler. I saw people mentioned they could put on the cooler without removing the bumper, so I figured id try. there is a ton of wiggle room and its easy to fit. Then I put in the push through zip ties to hold the cooler on. attaching the back end of the zip tie thing was a little tough. I actually had to move the fan. Its really simple. Its 4 bolts (2 on top and 2 on the bottom). I also had to move the coolant overflow tank, which is simply one bolt which holds the bracket. I didn't take the fan completely off, but it gave me enough room to easily go underneath the car to snip the lower ties, and enough room to fit my hand with wire cutters through the top. I tried without removing the fan but there was just no space to get any tools to cut the ties.
The next part is where I spent the majority of the time. Removing the hole from the rear banjo fitting. at first, I just moved the fuse box. torwards the end. I has just about everything out (Battery, intake, fuse, undid connectors, wire holders). I had a friend helping and we actually ended up getting it from the bottom with guidance from a person watching above. One clip came off fairly easy. took maybe 20min. We used a set of needle nose pliers. The hose is really snug onto the banjo fitting, so it took us a while to wiggle it off. We actually to a razor and made a small slit to split the hose along the length, which made it come off much much easier. This was the spring clip further to the drivers side.
the other clip, more towards the centerline of the car, and further behind the engine probably had an evil spell cast on it. We probably spent 2 hours using all sorts of pliers, super long needle nose pliers (16", and 11", with various angles on the tips). I remembered reading someone saying the dremel'ed off the clip, so we figured we'd give that a shot. What ended up happening is we only ended up cutting about 2/5 of the clip off. the remaining 3/5 of the clamp was enough to still put pressure on those hose. it would not budge. we attempted to use a razor to cut the hose the same way we did the first one, but the clip was simply to tight still. all sorts of worst case solutions were running through my mind. I ended up taking a screw driver and prying the clip off from underneath the car (you have absolutely 0 visibility of the actually clip/banjo fitting. its all done by feel). I had contemplated actually removing the banjo fitting bolt and just taking the hose off once the whole fitting was off the car. Im so glad it didnt come to that.
After that, I ran the hoses. they pretty much run between the radiator and the headlight, underneath the battery tray, under the air filter box, and then to the respective banjos. the clips went on very easy. all seemed well. did my last 1x3. and fired her up. and thats when I saw transmission fluid start leaking pretty bad. it was at the way front, so I knew it was from the cooler. the lower hose I installed was no where near tight enough (I was afraid of overtightening.. I re-tightened the clamps and it seemed fine and dry. however, it seemed like fresh fluid continued to appear. I would driver around the neighborhood, and check. first 3 times resulted in fluid underneath the car, but the hose which was leaking was bone dry. After my third drive. I figured out that some fluid had pooled underneath the radiator, and was just sort of washing out when I was driving around (roads were very wet, and its been raining for days). I took a water hose with a jet head, and blasted that suspecting area for quite some time. Went for my last drive, and there was no more fluid leaking!
I didnt figure out which hose pumps atf in or our. I was so aggravated at the time trying to get those clips out, and it was getting way too late, that I just put them one. I figured its a 50/50, with a benefit of a cooler either way. The transmission felt great after the 2x3. I didnt notice much of a difference after the final 1x3 and the cooler. but the shifts are definitely much better, and the 3rd gear shudder is gone. Im hoping my install stands the test of time, and hopefully it helps extend the life of the fluid a bit. I used Acura/Honda DW-1. I read all the threads on different ATFs, but I figured id keep it stock.
Does anyone know where the lines would go and where the filter goes on a 03 TL type S(oil jet kit installed) i cant figure out where to put the lines from the cooler
I'm considering a cooler for my new-to-me 06 w/ 106k miles but any thoughts on whether it would be worth while or not? I'm in the process of doing the 3/4 pressure sensor swap and fluid flushes because I started noticing the "shudder" the day after I bought it :why me: Is this more pertinent for warmer climates and people who push their cars hard or might it help me stave off a trany rebuild? I don't tend to drive hard (with a few exceptions) and live in Ohio. I think I will at least do the in-line filter at some point.
thanks for the DIY, finally had time to get the BSM Transmission Cooler and Magnefine filter installed on my 2004 TL.
Install wasn't too bad, the stock hose come out easy. I also removed the stock filter, it was pretty dirty. 1qt of ATF was needed when everything was put back together, I used Redline D6. A couple months ago I did a 1x3 with Redline Racing, Redine Lightweight Racing, and Redline D6.
Thanks for the DIY! I am planning to install a cooler in my 04 tl. However, would it be possible for someone to re-upload the images? They seem to have been deleted from the hosting site.
For those that installed a cooler for their AT. I attempted this today but could not get the hose clamps off the small section of hose in the rear of the transmission. It's a bitch to get those off and they aren't budging. It doesn't help that there is so little room back there. Please advise. thanks.
ya pics would be great.. I cant even tell where everyone connected the lines.. I was looking at the Type-S lines but my 2005 does not look like that...
I've run an external B&M cooler for over 100k miles now on my 07 Accord V6 since the above post 3 years ago.
The trans fluid outlet is the pipe that's connected to the filter housing. The trans fluid inlet is the pipe leading back into the trans in the back of the trans. You'll need a set of remote hose clamp pliers to clamp down that rear spring clamp while you move it off the hose.
You want to connect a hose to pipe #12 leading to the inlet of the cooler, and another hose to pipe#13 to the outlet of the cooler. This ensures cooler fluid going back into the trans via pipe #13. If you have the TSB done with that newer cooler pipe then #33 pipe is the fluid outlet. But that defeats the purpose of using an external cooler with that pipe since you can't route it back to an external cooler. So you really need pipe #12.
Disconnect and toss hose #6. Keep it if you are going to sell the car in the future and you think it's important to put that hose back. It's a short 6" hose. Get a 10' section of trans fluid cooler hose from Advanced Auto and size it accordingly. I kept slack on the 2 new longer hoses to accommodate for engine movement.
ok thanks for the direct answer.
1. I guess we do not need to drain any fluid to do the install.. except maybe add more fluid to fill the cooler/radiator--
2. And based on the picture, I guess #14 does not show where it is bolted down, because the hole is on the back and out of the view of the diagram.. correct?
3. by the way, I am guessing that red dashed line drew there was part of a recall for this... I checked the recall page, and nothing came up for my car.
If you didn't do that recall then don't worry about pipe #33, it does not exist on your car.
You aren't going to touch #14, which extends into the innerts of the trans. You are going to disconnect and remove hose #6 and lose maybe a couple ounces of fluid then connect 2 new hoses to pipes #12 and 13 that lead to the external trans cooler. Have at least 1 qt. of fluid ready because you need to accommodate for the internal volume of the trans cooler.
gotcha. I was just trying to follow those lines on that dragram.. Some of those lines intersect and turn and I couldnt tell what goes where. They need to spread that diagram apart from that recall section. haha

 10-07-2011, 02:16 PM

 ]..... since my car does not use these [I have them closed-looped currently], are there any issues in not using this for the cooler? high pressure or anything? I have plenty of physical location/mounting options for the cooler, since the car has 2 large side air inlets! And possibly thinking of doing a turbo install too that might add more heat to the drive train .... more the reason for the cooler!