
The RETURN of the MAVEN SHIFT KNOB
 10-08-2009, 10:15 PM
#81
I just got the ano knobs today. Taking pics tomorrow. AFTER the preorders ship. Then I have to answer all the messages on the 2G ATLP thread because some people keep asking and asking about tracking over there (elbow hehe, jfwy). Then I have to work on the pic processing distribution.
 I'm a pre-order!
 10-11-2009, 08:59 AM
#82
Someone stole "My Garage"
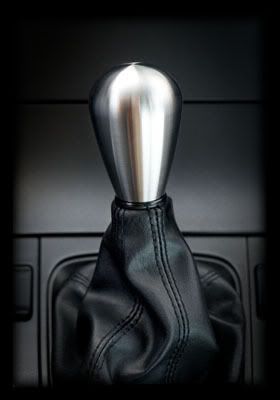
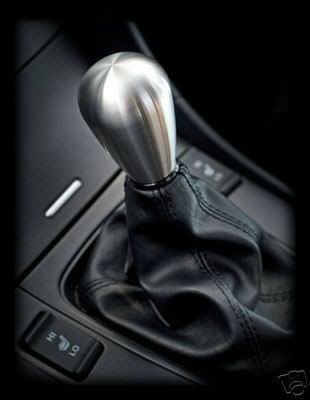
To anyone (with a TSX at least, maybe others) looking to have their shift boot sit immediately below the knob, like in these pictures, I installed my shift knob yesterday and had no problems rigging something up to accomplish this.
1. Remove old knob (14mm wrench for the locknut).
2. Remove the centre console (2 clips at front, 2-3 on each side, and 2 at the back). BE CAREFUL not to pull up where the ring is around the shift boot or you'll pop that portion off and require super glue to fix it from coming loose (
 )
)3. Tilt the centre console forward, no need to disconnect the seat heater switches at all.
4. Get a zip-tie / ty-rap, a thicker one if possible. I used one that was about 1/4" wide. Put it on immediately above the little protrusions on the shifter stick.
5. Get some black electrical tape. Wrap this around the zip-tie about 4-5 times, then work upwards about 3/4" above the zip-tie to kind of make a cone shape. It'll be used to press-fit the collar of the shift boot between it and the knob, holding it secure. You probably want about 5-7 wraps at this spot so that there's no chance of it moving or getting loose over time.
6. Reinstall the centre console without attaching the clips.
7. Test-fit the Maven knob. The last few turns should have lots of resistance as this is the knob pushing the collar onto the taped area. Finally it'll come to a dead stop -- this is the end of the threads and is where the knob is meant to sit.
8. If you're happy with the results (and if it was done according to my instructions, you should be!), then go and pop the centre console back in place with its clips and grab a beer - job well done!

 11-20-2009, 05:23 PM
#89
Instructor
Join Date: Jul 2008
Location: NY
Posts: 163
Likes: 0
Received 0 Likes
on
0 Posts
So i just got my Maven Mark one shift knob and WOW! this thing is heavy lol. Finish looks awesome. Driving takes some getting used to but i can say that for some reason shifting is alot more smoother. Great product, definitely worth the 60 bucks. i dont know what to do with my OEM shift knob now lol
Thx Marcus.
Thx Marcus.
11-23-2009, 12:34 PM
#90
Thanks for the feedback!
"For some reason it a lot smoother"
The reason is because you have added mass to the lever system and that gives more momentum through the throw. The shifter actually shifts itself a bit with a heavy knob on it making the system feel smoother and easier for you!
"For some reason it a lot smoother"
The reason is because you have added mass to the lever system and that gives more momentum through the throw. The shifter actually shifts itself a bit with a heavy knob on it making the system feel smoother and easier for you!
12-30-2009, 03:49 PM
#91
Cruisin'

Join Date: Dec 2009
Location: Tampa, FL
Age: 41
Posts: 19
Likes: 0
Received 0 Likes
on
0 Posts
Maven Shift Knob
To anyone (with a TSX at least, maybe others) looking to have their shift boot sit immediately below the knob, like in these pictures, I installed my shift knob yesterday and had no problems rigging something up to accomplish this.
1. Remove old knob (14mm wrench for the locknut).
2. Remove the centre console (2 clips at front, 2-3 on each side, and 2 at the back). BE CAREFUL not to pull up where the ring is around the shift boot or you'll pop that portion off and require super glue to fix it from coming loose ()
3. Tilt the centre console forward, no need to disconnect the seat heater switches at all.
4. Get a zip-tie / ty-rap, a thicker one if possible. I used one that was about 1/4" wide. Put it on immediately above the little protrusions on the shifter stick.
5. Get some black electrical tape. Wrap this around the zip-tie about 4-5 times, then work upwards about 3/4" above the zip-tie to kind of make a cone shape. It'll be used to press-fit the collar of the shift boot between it and the knob, holding it secure. You probably want about 5-7 wraps at this spot so that there's no chance of it moving or getting loose over time.
6. Reinstall the centre console without attaching the clips.
7. Test-fit the Maven knob. The last few turns should have lots of resistance as this is the knob pushing the collar onto the taped area. Finally it'll come to a dead stop -- this is the end of the threads and is where the knob is meant to sit.
8. If you're happy with the results (and if it was done according to my instructions, you should be!), then go and pop the centre console back in place with its clips and grab a beer - job well done!
1. Remove old knob (14mm wrench for the locknut).
2. Remove the centre console (2 clips at front, 2-3 on each side, and 2 at the back). BE CAREFUL not to pull up where the ring is around the shift boot or you'll pop that portion off and require super glue to fix it from coming loose (
)3. Tilt the centre console forward, no need to disconnect the seat heater switches at all.
4. Get a zip-tie / ty-rap, a thicker one if possible. I used one that was about 1/4" wide. Put it on immediately above the little protrusions on the shifter stick.
5. Get some black electrical tape. Wrap this around the zip-tie about 4-5 times, then work upwards about 3/4" above the zip-tie to kind of make a cone shape. It'll be used to press-fit the collar of the shift boot between it and the knob, holding it secure. You probably want about 5-7 wraps at this spot so that there's no chance of it moving or getting loose over time.
6. Reinstall the centre console without attaching the clips.
7. Test-fit the Maven knob. The last few turns should have lots of resistance as this is the knob pushing the collar onto the taped area. Finally it'll come to a dead stop -- this is the end of the threads and is where the knob is meant to sit.
8. If you're happy with the results (and if it was done according to my instructions, you should be!), then go and pop the centre console back in place with its clips and grab a beer - job well done!
Anyone else have pictures?
 01-18-2010, 06:40 PM
#94
I did put a black one in my TSX earlier in the weekend. It was looking pretty good, I think I am going to rock that one, fits better with the tan interior than the stainless does. Pics coming soon, There are some floating around though.
02-26-2010, 04:53 AM
#95
New Member

Join Date: Feb 2010
Age: 36
Posts: 0
Likes: 0
Received 0 Likes
on
0 Posts
was just wondering how heavy the ano aluminum one was? thanks lmk
03-09-2010, 11:57 AM
#100
Yea FINALLY GOT THEM BACK. just yesterday as a matter of fact. Here is a pic of one installed on my TSX 6MT:

It looks great in my tan interior! Better than the silver or black IMO. If you have parchment or taupe interior this is a great option.
Marcus
It looks great in my tan interior! Better than the silver or black IMO. If you have parchment or taupe interior this is a great option.
Marcus


Thread
Thread Starter
Forum
Replies
Last Post
SidhuSaaB
3G TL Problems & Fixes
18
05-30-2020 12:40 AM
Hines57
Car Parts for Sale
0
09-24-2015 01:58 PM