
2004-05 Acura Tl Illuminated Door Sills Group Buy

Weapon X
Joined: Oct 2004
Posts: 182
Likes: 0
From: San Diego, CA
Originally Posted by Supercomputers
Grich4U
Sent your pic to my Tech, We did the directions based on the 04, Was told me there was no difference in set up between 04 and 05+ I will make sure wires did not change color and will try and get back to you as soon as I can. Also there are a few tech savy members here on the board maybe on of them have an answer Will try and get you a response asap.
Sent your pic to my Tech, We did the directions based on the 04, Was told me there was no difference in set up between 04 and 05+ I will make sure wires did not change color and will try and get back to you as soon as I can. Also there are a few tech savy members here on the board maybe on of them have an answer Will try and get you a response asap.


Tightl
Al 2nd generation sill went out a few days after the 2004+ so you should be getting them soon, There has been over 50+ customers on the 2004+ on the 99-03 we only have around 12 to this point.
Thanks
Dave
Al 2nd generation sill went out a few days after the 2004+ so you should be getting them soon, There has been over 50+ customers on the 2004+ on the 99-03 we only have around 12 to this point.
Thanks
Dave
Just wanted to confirm my order placed about two weeks ago, paypal address was shoesdirect00@aol.com
Make MyTL Great Again
Joined: Nov 2004
Posts: 1,686
Likes: 5
From: Dunellen, NJ
Originally Posted by GRich4u
Well it took more than 10 minutes. What I have noticed is there is 2 white connecters on the '05 and not 1. Sorry if the pics arent clear. They were taken with my Sony Ericsson 710A phone and everytime I use a flash its to bright.
Previous Owner
Joined: May 2004
Posts: 848
Likes: 9
From: San Diego, CA
Originally Posted by Supercomputers
Chusteveb,
I dont have any wires showing what so ever they are all tucked away and you see nothing but the sill, Let me see if I can get you some more info. Should be a clean install with nothing showing what so ever.
I dont have any wires showing what so ever they are all tucked away and you see nothing but the sill, Let me see if I can get you some more info. Should be a clean install with nothing showing what so ever.
Super,
can you post some of your pics, closeups would be great. Did you install it yourself? or had someone install it for you? if so, where and how much. Thanks.
Make MyTL Great Again
Joined: Nov 2004
Posts: 1,686
Likes: 5
From: Dunellen, NJ
Originally Posted by Thorin78
Super,
can you post some of your pics, closeups would be great. Did you install it yourself? or had someone install it for you? if so, where and how much. Thanks.
can you post some of your pics, closeups would be great. Did you install it yourself? or had someone install it for you? if so, where and how much. Thanks.
Guys I will try and get you some pics up. I am waiting to hear from my tech on when he can do a question an answer session on here. My Sills were installed by the Acura Tech who created the instructions.
Cuban Mix you are confirmed and they are on there way,
Dave
Cuban Mix you are confirmed and they are on there way,
Dave
Weapon X
Joined: Oct 2004
Posts: 182
Likes: 0
From: San Diego, CA
Originally Posted by AdamNJ
You are looking at the correct location right? I'm asking only because I'm trying to match up your picture with the one in the PDF, and I don't see the vertical row of terminated wires in the PDF, and I also don't see the one large black wire from the gray connector in the PDF in your pic. As you said, your picture isn't too good, so that might be why I think there are differences.
So has any one with an '05, that is installing it themselves know where Im coming from??

Racer
Joined: Aug 2004
Posts: 359
Likes: 2
From: OKC
So this was a bit more of a job than I thought. Of course I'm a bit more picky than the average so when I install things, I install it as if it was designed to have it from the factory. I had my sills waiting for me at my front door when I got home from work last night. I unpackaged them and took off the drivers side front and rear factory door sills after dinner. That was basiclly it for last night because I had to sleep on how I was going to perform a clean install. So tonight I got started on it right after I got home from work and have been working on it for a few hours. The install for me involved using a dremel and a drille which I'm sure most or you guys won't feel necessary to use. At this point I'm satisfied with how they are installed into the car.
As to the quality of the material, these sills are excellent; it's the aplication to our car that I had to work a bit harder on to get it to my liking. I'll be more than happy to answer any questions that may arise for those who will try to install themselves. Overall, I'm glad I got these sills. Thanks Supercomputers for this product. If you are interested I can give you more input as to my opinion on this product that you may want to consider for future referance.
As to the quality of the material, these sills are excellent; it's the aplication to our car that I had to work a bit harder on to get it to my liking. I'll be more than happy to answer any questions that may arise for those who will try to install themselves. Overall, I'm glad I got these sills. Thanks Supercomputers for this product. If you are interested I can give you more input as to my opinion on this product that you may want to consider for future referance.
Make MyTL Great Again
Joined: Nov 2004
Posts: 1,686
Likes: 5
From: Dunellen, NJ
Originally Posted by chusteveb
The install for me involved using a dremel and a drille which I'm sure most or you guys won't feel necessary to use.
Do you have an 05, if so can you comment on the wiring issue the GRich4u brought up?
Make MyTL Great Again
Joined: Nov 2004
Posts: 1,686
Likes: 5
From: Dunellen, NJ
Originally Posted by GRich4u
here is another picture from further back. On the left side is the other terminal connector.
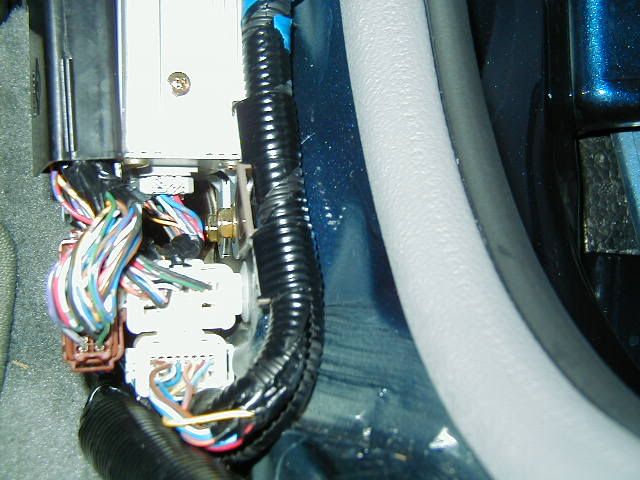
The wires that come out of the black channel on the left get split up into two groups/connectors. One of those plugs directly into the amp. I think there is a yellow wire w/ green stripes in that connector...but it doesn't look like it would be the same one, since in the picture with the instructions that wire doesn't look like it is plugged into the amp.
Besides getting an 'official' answer from the Acura Tech, can someone with an 04 (even if they haven't installed them yet) take more pictures of this area? I'd like to compare differences between the 04/05.
Its times like these when I think I should just buy the service and electrical manual.
Make MyTL Great Again
Joined: Nov 2004
Posts: 1,686
Likes: 5
From: Dunellen, NJ
Originally Posted by J RIDE 81
I can't believe no one has succesfully installed these yet. I keep bugging for a write up!
With the instructions provided already you should be able to figure out the wiring on the driver side (you can even use add-a-circuit for constant power if you want).
Racer
Joined: Aug 2004
Posts: 359
Likes: 2
From: OKC
Ok really when it comes down to it, the wiring on these sills are not the hardest part of the install. But I guess this depends on who you talk to. I've already received mine and they are in the car installed and fully functional as we speak. Each sill has only 2 wires that need to be hooked up: One is the black wire from the sill that will be attached (I used a 'T-Tap') to the exisitng wire in the car associated with the proper door switch. This wire will show a ground when the door is open. The second and last wire is the red from the sill and will need to be attached to a constant B+ in the car. I did not attach my sills to what the instructiobns said simply because I have existing B+ wires running to the trunk which I added these sills to. I guess I can do a write up on my install but it won't be typical install. I guess additional pics never hurt.

Team Nighthawk Director
Joined: May 2004
Posts: 1,594
Likes: 0
From: Buffalo Grove, ILL
Originally Posted by AdamNJ
Everyone knows that you and others want a write up, you don't have to keep asking for one. I haven't received my door sills yet, and I doubt everyone else has either. Somehow mine were lost for a few days, and UPS just scanned them in Illinois...quite a bit of distance from NJ (destination) and NY (source), but I should have them tomorrow. I would also guess that some of the others who have received them and not installed them are probably waiting for the weekend because they work during the day.
With the instructions provided already you should be able to figure out the wiring on the driver side (you can even use add-a-circuit for constant power if you want).
With the instructions provided already you should be able to figure out the wiring on the driver side (you can even use add-a-circuit for constant power if you want).

Racer
Joined: Jan 2004
Posts: 485
Likes: 0
From: Calabasas, California
After my AP's I will put a super detailed write up on how i did it, even if it has already been done...
Im looking forward to this since it will be my reward for going through the hell of AP's
My shipment was "lost" also and popped up in illinois but its still going in the right direction
Im looking forward to this since it will be my reward for going through the hell of AP's
My shipment was "lost" also and popped up in illinois but its still going in the right direction
Racer
Joined: Aug 2004
Posts: 359
Likes: 2
From: OKC
Some pics for you guys. Feel free to ask questions on the pics if you don't understand.
1. Pics of the factory sills removed from the factory black plastic housing by bending the tabs straight on the back side to allow for removal.

2&3. I drilled a hole on the back side of the factory black housing on the sills to allow for the wire from the ill sills to come through. Replacing the factory sills will cover this hole.


4&5. Fed the ill sills wire through the drilled hole and through into the car as shown then taped up the exposed with electrical tape. This allows for the wire to not be pinched in the door jam.


6. A pic showing where the wire comes through into the car. I had to take a dremel and make this existing hole a bit larder to accommodate for the end plug to fit through and for the wire to sit without being pinched after the interior trim piece is reinstalled.

7. No wires pinched or showing

8&9. pic of 'B' pillar and where you can find the factory wire for the front door switch. Reach into the 'B' pillar and pull on the wire a bit to allow for easier access.


10. pic of where I hid the voltage regulators for both the front and rear. I just stuck both onto the car pne right on top of the other.

11&12. I also grabbed the wire for the rear door right there where the main warness crosses right infront of the 'B' pillar rather than running a wire all the way to the door switch in the back. Be sure to check your instructions for the right wire to grab.


13&14. Same goes for the rear sill. Removed foctory sill from black plastic housing, drilled a hole to allow for the wire to pass through into the car. Fed the wire and taped exposed wire to keep it from moving around.


Pics of it fully installed and functional:


So the only other thing that I didn't tell about was where I got my B+ (constant 12v power). I got mine from existing wires I ran to the trunk so someone else is going to have to talk about that.
1. Pics of the factory sills removed from the factory black plastic housing by bending the tabs straight on the back side to allow for removal.
2&3. I drilled a hole on the back side of the factory black housing on the sills to allow for the wire from the ill sills to come through. Replacing the factory sills will cover this hole.
4&5. Fed the ill sills wire through the drilled hole and through into the car as shown then taped up the exposed with electrical tape. This allows for the wire to not be pinched in the door jam.
6. A pic showing where the wire comes through into the car. I had to take a dremel and make this existing hole a bit larder to accommodate for the end plug to fit through and for the wire to sit without being pinched after the interior trim piece is reinstalled.
7. No wires pinched or showing
8&9. pic of 'B' pillar and where you can find the factory wire for the front door switch. Reach into the 'B' pillar and pull on the wire a bit to allow for easier access.
10. pic of where I hid the voltage regulators for both the front and rear. I just stuck both onto the car pne right on top of the other.
11&12. I also grabbed the wire for the rear door right there where the main warness crosses right infront of the 'B' pillar rather than running a wire all the way to the door switch in the back. Be sure to check your instructions for the right wire to grab.
13&14. Same goes for the rear sill. Removed foctory sill from black plastic housing, drilled a hole to allow for the wire to pass through into the car. Fed the wire and taped exposed wire to keep it from moving around.
Pics of it fully installed and functional:
So the only other thing that I didn't tell about was where I got my B+ (constant 12v power). I got mine from existing wires I ran to the trunk so someone else is going to have to talk about that.
Last edited by chusteveb; Apr 28, 2005 at 12:32 AM.
Racer
Joined: Aug 2004
Posts: 359
Likes: 2
From: OKC
You don't have to drille holes in your factory black plastic sill housings nor do you have to remove the foctory sills. I personally just thought it would be a better install to have the wires routed rather then tucked in crevises in order to be out of sight. Howver either way will work just fine.

Weapon X
Joined: Oct 2004
Posts: 182
Likes: 0
From: San Diego, CA
I think the last couple of response have been where to connect the (constant 12v power) or which wire to use.
Chusteveb your instructions and pictures are good. Still doesnt solve the issue of which wire to use.
Today during lunch Im going to get a voltmeter and test the wires myself. My car has been torn apart for the last 3 days and Im getting a little frustrated seeing it like that.
I know Im not the only one with an '05 and has sills. I might be the first one to get them and try putting them on to discover this.
Once I find the wire that is used for the door light Im going with that one. And I will post my results.
Instructor
Joined: Feb 2004
Posts: 127
Likes: 0
From: Niceville FL
Power for Sills
I recieved my sills last Monday and I've been waiting till this weekend to install them. Until then I've been monitoring the forum just to see if there was a better way to hook up the wires. So here's my question. In my fuse box I remember when I was hooking up my Navi/DVD conversion kit there was a open fuse slot that was constant 12 volts...it's on the bottom row, can't remember the number of the slot right now. I was wondering if I could hook all four of the door sill lights to that one slot. Not sure what size fuse to install on the "Add-a-Circuit" (maybe 7.5 or 10 amp fuse) because I have no idea how many amps each light draws. Any suggestions? Has anyone hooked the power lead to the wires stated in the directions? Also, is it really necessary to remove the sills and use close pins to get a secure fit?
Last edited by SparkAF; Apr 28, 2005 at 10:54 AM.
Make MyTL Great Again
Joined: Nov 2004
Posts: 1,686
Likes: 5
From: Dunellen, NJ
Originally Posted by SparkAF
In my fuse box I remember when I was hooking up my Navi/DVD conversion kit there was a open fuse slot that was constant 12 volts...it's on the bottom row, can't remember the number of the slot right now. I was wondering if I could hook all four of the door sill lights to that one slot.
Originally Posted by SparkAF
Not sure what size fuse to install on the "Add-a-Circuit" (maybe 7.5 or 10 amp fuse) because I have no idea how many amps each light draws. Any suggestions? Has anyone hooked the power lead to the wires stated in the directions? Also, is it really necessary to remove the sills and use close pins to get a secure fit?

So far the only report of using the power wires in the directions is Dave (since the guy who wrote the instructions did it).
The clothes pins idea is really just to ensure you get a tight fit/the 3m strips adhere very good. I could be wrong, but I don't think chusteveb even adhered them to his original sills since he removed them and drilled holes in the plastic (If the original metal sills were there, he wouldn't be able to get the wire through w/o drilling a hole in them too).
Last edited by AdamNJ; Apr 28, 2005 at 11:26 AM.
Instructor
Joined: Feb 2004
Posts: 127
Likes: 0
From: Niceville FL
Yea, I know to use the wires coming off the switch for the ground. Thanks AdamNJ. I was looking at Chusteveb pictures and if he's worried about the wires getting pinched by the door trim I wonder if he thought about cutting a small slit in the metal where the door trim is installed instead of drilling through the plastic holder.
Racer
Joined: Aug 2004
Posts: 359
Likes: 2
From: OKC
If I didn't have an existing B+ wire that ran to the trunk on the passenger side of the car, I would run a wire from the passenger side of the car to the drivers side kick panel and meet up with the wire that is uesd to run down the drivers side and hook it all into one place. If you find a blank spot on the fuse panel then fine. I personally didn't find the wire that was in the instructions but again I didn't look too hard for it since I wasn't going to use it anyways. My best advise is to use the power (which is high current) from the ignition. You can grab this right at the fuse panel so no worries there. Simply use a "T-tap" and grab the wire that always shows B+

If some of you have already found the wire that has a B+ on the drivers side (the one talked about in the instructions) use that for both sides.
If some of you have already found the wire that has a B+ on the drivers side (the one talked about in the instructions) use that for both sides.
Racer
Joined: Aug 2004
Posts: 359
Likes: 2
From: OKC
Originally Posted by SparkAF
Yea, I know to use the wires coming off the switch for the ground. Thanks AdamNJ. I was looking at Chusteveb pictures and if he's worried about the wires getting pinched by the door trim I wonder if he thought about cutting a small slit in the metal where the door trim is installed instead of drilling through the plastic holder.
I wasn't really worried about the wires getting pinched by the door trim itself although that is also a factor now that I think about it. And yes cutting a small slit for the wire to come out of the trim would remedy that problem however now that you mention it, this is exactly what I was having issues with. If you do that, then now you've got a wire that is expose when you open the door.
The only way around that is to have the wire go up underneath the weather stripping and I didn't like how that was. The weather stripping grabs onto a fairly sharp edge and is even used to help hold the interior trim and sills together to the car, but more so it grabs it pretty tight and isn't meant for wires to fit underneath it. there simply isn't space alloted for such a thing which is why I decided to route my wire through the plactic door trim housing and up into the car (basiclly bypass having wires pinched in the weather stripping. I'm sure that it would work for a while if you decided not to go my route in fact it may last forever (I wouldn't bet on it). However I'll guarantee that my route will be less chances of failure especially if you are like me and anticipate taking the weather stripping off more than once in order to get the interior trim peices off to run additional wires to the trunk. Taking off the weather stripping more than once will really up your chances on shorting out your sills and I know that I've got mine comming off again in a few weeks for headrest monitors and other things in the future.
I'm also willing to bet that simply opening and closing the door will help to shorten the life of a wire that is routed under or tucked behind the weather strip.
Make MyTL Great Again
Joined: Nov 2004
Posts: 1,686
Likes: 5
From: Dunellen, NJ
Originally Posted by chusteveb
The weather stripping grabs onto a fairly sharp edge and is even used to help hold the interior trim and sills together to the car, but more so it grabs it pretty tight and isn't meant for wires to fit underneath it.
it was kinda like this:

Racer
Joined: Aug 2004
Posts: 359
Likes: 2
From: OKC
Originally Posted by AdamNJ
We will see what happens when I go to do my install; however, yesterday during lunch when I checked out my passenger kick panel, I had the weather stripping pulled up and I saw (and felt) at least one spot that didn't feel sharp, and it also dipped down, and I thought what a great place for the wires to cross over it.
it was kinda like this:
it was kinda like this:
Like I said, I'm sure you can get it to work. It just wasn't my preferance.
BTW, even if you find spot where it isn't sharp and lets say it gives you ample room to cross over, the weather stripping still grabs onto the side of this real tight in fact this is how the weather stripping stays on (or else the weather stripping at the top of the door frame would fall down) and that is what I don't like. Trying to force a wire up and down even a low spot was something I didn't want to do.
Good idea though, but you still have something with force pushing a wire up against metal; and that to me is too close to a situation that may end in a short.
Last edited by chusteveb; Apr 28, 2005 at 01:57 PM.
Make MyTL Great Again
Joined: Nov 2004
Posts: 1,686
Likes: 5
From: Dunellen, NJ
Originally Posted by chusteveb
the weather stripping still grabs onto the side of this real tight in fact this is how the weather stripping stays on
As for what you did...when you drop the wire through the 'clip hole', how do you get the wire back out on the other side (inside the car interior)? Is that an open area which connects to the inside of the car? Is it protected from the road (is is a closed compartment)? Also instead of drilling the hole in the plastic, you might be able to simply slip the wire back underneath the plastic (to route it though the clip hole) when you snap them back into place?
Racer
Joined: Aug 2004
Posts: 359
Likes: 2
From: OKC
Yeah I see what you ae saying. I guess you could try to losen up the weather stripping right where you want it to cross over but I'm hesitant to say that would work. It would sure help to not rub the wires on metal with so much force. Maybe you could cut a slit in the weather stripping on both sides but only on the wall (sides) part of it. That combined with a low spot on that edge could be an ok solution... maybe. Not sure if that would completely hide the wire though.
As for what I did, it is an open cavity under that but is not directly exposed to the underside of the car, you still have the bottom layer of metel under the car and the plastic side moldings that wrap under the car (some even with the a-spec body kit on top of that). I simply used feeder wire and taped the end of the wires from the sills to it and pulled it through.
Also slipping the wire back underneath the plastic to route to the clip hole is ok but again, now you've got the pressure of the sills when properly clipped down into place putting pressure on your sill wires onto metal.
Simply put, the factory sills were very easy to remove from the plastic housing, now I've got them stored in the box that my aftermarket sills came in and can reinstall them at any time without worrying about how they are doing under my aftermarket sills. Also even with a hole drilled in the plastic housing, the reinstallation of the oem sills will completely cover this hole. One would have to completely remove the sills from the vehicle and look at the underside of them to even see my hole I made, and even then, it doens't compromise how the sills are held to the plasic housing (factory or aftermarket) nor how the plastic housing is held to the car.
Make MyTL Great Again
Joined: Nov 2004
Posts: 1,686
Likes: 5
From: Dunellen, NJ
Originally Posted by chusteveb
Simply put, the factory sills were very easy to remove from the plastic housing, now I've got them stored in the box that my aftermarket sills came in and can reinstall them at any time without worrying about how they are doing under my aftermarket sills.
Racer
Joined: Aug 2004
Posts: 359
Likes: 2
From: OKC
Originally Posted by AdamNJ
So did you use the 3m tape? How are Supercomputers' sills attached to the plastic?
However this brings up one other issue that I had or still have with the new sills. The front sills fit fine and stick ok with the existing 3M tape that comes on the new sills when shipped. It is the rear sills that I'm not too fond of the fittment. the angle of the curve doesn't exactly match that of our cars or oem sills for that matter. Although it is very close so additional 3M tape should do the trick to hold it down. This is probably why SUPERCOMPUTERS mentioned to use clips overnight to make sure they stay. I used some pretty heavy duty clips for over a few hours (not overnight ) and needless to say I'll still be having to get more/ different adhesive for the rears only; but it's on for now until I get a chance to get to the store.
I'd like to find out from you guys who got sills if you too are having problems with fitment issues on the rear sills only. Like I said it is minor fittment issues, but just enough to where I'll need addition adhesive.
Guys just so you know my sills were installed by the tech based on his directions. I did not pull out my old sills just placed the new ones on top of them, We ran the wires threw the weather stripping channel and it work nice for a clean install. The tech did not seem to see a problem with doing it that way. The 3m is tricky and needs the correct tepature to get a perfect fit. We cleaned the old sills very good and then Did use a hair dryer to get the correct tempature. I installed mine in Feb if you remember here in NY. The back sills are where you will find it a bit harder, The bend in our sills is very tough to duplicate, Thats why I suggest having the sills sit over night with clothes pins. It worked well for us and it gives the 3m a chance to set up. and if you want an even tighter fit use a Rubber type of epoxy and it will grab perfect and not ruin anything or just more 3m tape. Guys keep in mind we did our best to design a top quality product at an affordable price. You may need a slight modification to make an adjustment to fit your needs or personal prefrence.
As for directions seems to be a slight difference between 2004-2005, I am working on trying to get a set of 2005 directions created. If anybody on here beats me to the punch I can offer them a nice discount if they decide to order my pedals.
And for a final thought on our future projects we will be using Fedex ground as we find them much more reliable, Ups lost and misrouted over 15 of your packages, In some cases tracking numbers were not even sent, But we are real close to everybody being delivered. If you still have not received them please PM or e-mail me. If you guys have any questions please ask and I hope you enjoy the product we worked real hard on it.
Thanks
Dave