When you click on links to various merchants on this site and make a purchase, this can result in this site earning a commission. Affiliate programs and affiliations include, but are not limited to, the eBay Partner Network.
2003 TL-P here. currently @129K, bought at 105K. Unsure of previous history, but figure it's time to do a 3x3.
I looked through many DIYs. Lacking a heavy jack or other way to put the vehicle up as well as other tools, I figured I'd ask the local mechanic shop to drain the transmission for me (the 3 quarts through the drain) and fill up the fluid I take in hoping it would be a simple thing during an oil change (and repeat for 2 weeks after that first drain).
However, the mechanic gave me a long story about a half hour's worth of labor to remove the sensor and plug and whatnot in order to refill the fluid. He wants to charge me $75 for the job (each time). From what I've read/seen, there's supposedly a single bolt that can be removed to refill Transmission fluid... or did I get that totally wrong?
Now Qs:
1. Is this right? Will it really be $75 (excluding fluid which I'm taking in) for just draining and filling? Or is this a ripoff?
2. Can I still go DIY without a jack - other than a standard one the vehicle came with- (I can buy ratchets as necessary)?
3. When I knelt down to find the drain plug as well popped the hood for the fill bolt, I could find neither Any guide to how to get to the necessary locations if going DIY?
4. Is it worth trying to fill in fluid through the dip-stick hole as an alternative, or is that too painful?
He�s totally trying to screw you over...
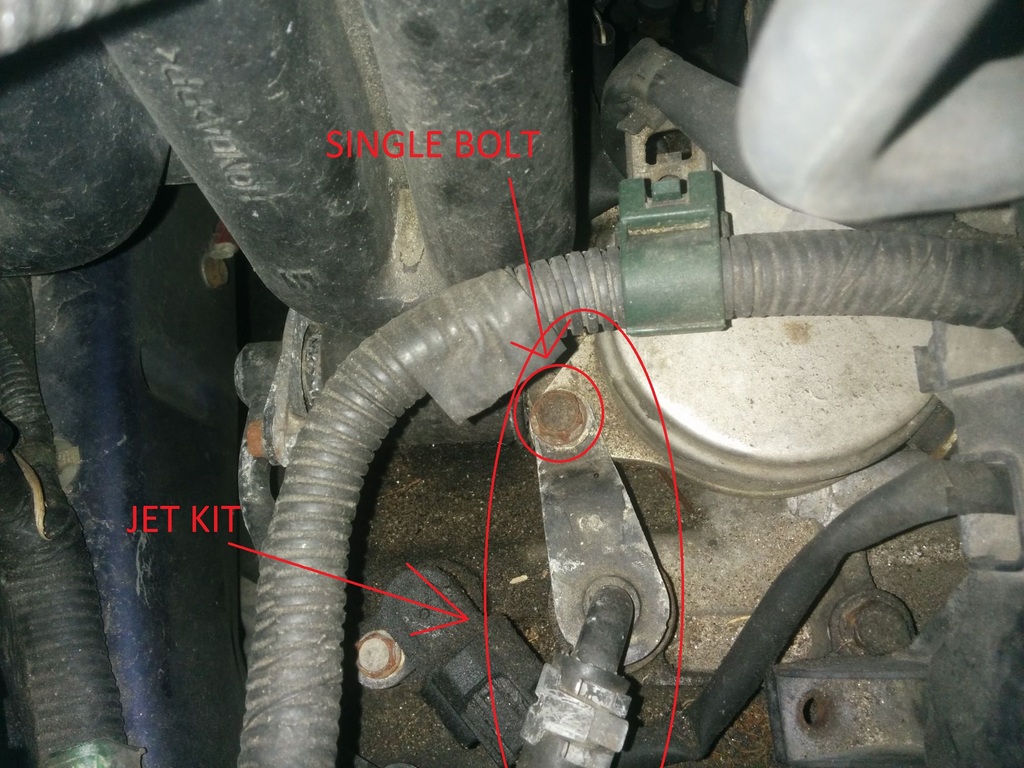
There is no sensor on top of the fill hole, The stock fill hole is plugged by a big ol 17mm or something bolt. Once you remove that big ass bolt you insert the funnel and fill. If in any case you have the Jet Kit you remove an even smaller bolt of 10/12mm and just set the jet apart and insert the funnel.
The fill bolt has a huge ATF stamp on it. You can see it in this pic (Its the golden bolt on the top from the camera flash):
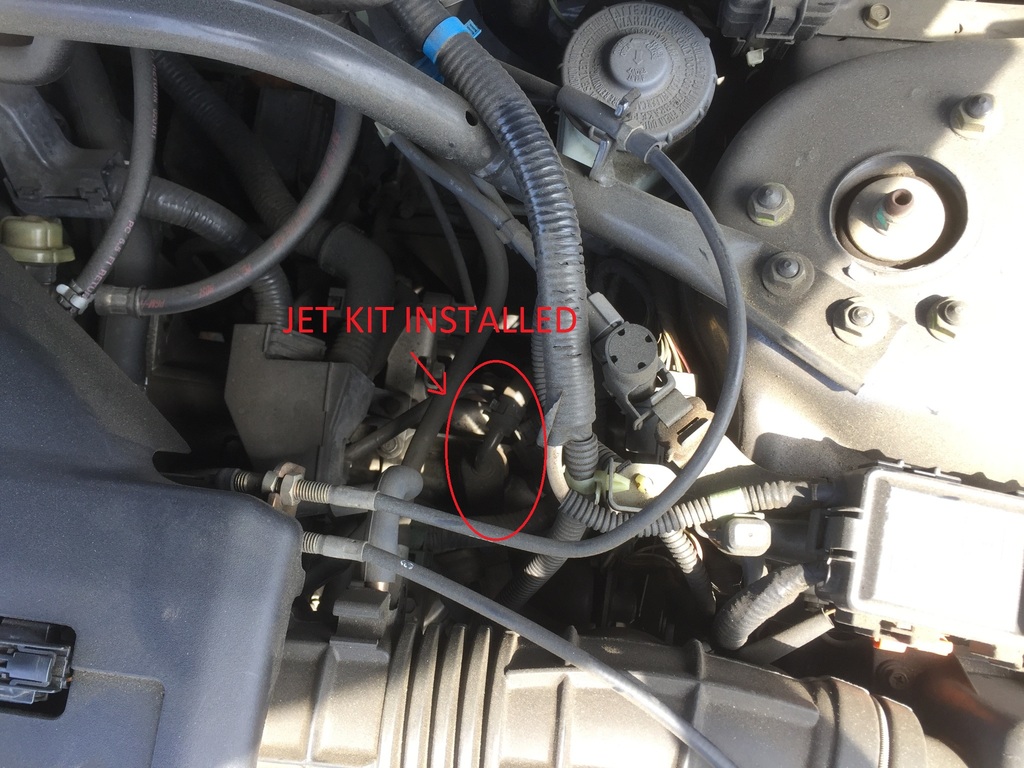
If you have the Jet Kit you will see a rubber tube going inside the trans from the top (Beneath the Air Filter tube) this doesn�t have an ATF Stamp on it but its pretty darn obvious once you see it. You can see it in the red circle in this picture:
With my math, including the oil which is about 25 bucks the 3x3 will end up costing you 300 bucks. Ouch!
ATF drain and fill is simple.
-get the jack from the back of your car
-buy 12 quarts from the local Honda shop
-buy or borrow a 3/8 inch wrench
-jack up car
-remove bolt
-drain into oil pan
-wipe the bolt with a rag
-refill through dip stick or fill bolt
Make sure you check the fluid level to be in the middle of the of the dip stick lines. Then drive a little and repeat until you complete the 3x3 flush.
Total cost: around a hundred bucks
Total Time: Plan on a Saturday afternoon.
^ Just to add
Refill through the dip stick is the worst nightmare imaginable.... I would sincerely do not recommend this to anyone as its first choice, Remove the fill bolt or prepare for some extra intensive work.. What ever you do, DO NOT DRAIN THE TRANS BEFORE HAVING A FILLING METHOD!
Also the Transmission must be Hot for proper level check. Once the engine has reached operating temp the Transmission level must be between the 2 spots in the dipstick. When cold the transmission fluid level will be covering the top spot.
I couldn't get my bolt off so I had to do the dipstick method. I had a funnel so it wasn't too bad, it was just slow.
Skirmich, both pictures are with the air filter removed? The first one to the top right corner (as you face the car/hood), and the second lower - towards middle or further lower?
I didnt see that ATF bolt just popping the hood. Will post pictures later today.
Skirmich, both pictures are with the air filter removed? The first one to the top right corner (as you face the car/hood), and the second lower - towards middle or further lower?
I didnt see that ATF bolt just popping the hood. Will post pictures later today.
You do not need to remove the air intake tubing or the air filter housing to get to the fill bolt. If you look down in the area between the master cylinder and the air intake tubing, you will see what the pictures show.
Locate your brake Master Cyl.. The whole space where you will working is left of the master cyl just after the air intake tube. No need to remove it at all. The jet kit picture is at an odd angle because it was not about the location of the fill plug, I just borrow it from the internet.
Also you can surely fill up from the Dipstick IF you cant the ATF Bolt out (No need if you have the Jet Kit). But you will need something that fits well into the tube and does not drip. My MDX has this problem I could not get the ATF Bolt unstuck so I have to fill through the dip stick hole. What I did is buy a clear tubing that fits snug into the dip stick that way I could glue it to my funnel and now have the quickest (still slow) way to fill the MDX ATF.
For my TL I used a turkey baster. Just remove the bulb and it works perfectly. It was almost as if it was designed to refill our transmissions through the dipstick. hahahahaha. As you said though, very slow.
Filling through the dipstick is so much work when you can get a two foot breaker bar with a couple of long extensions for under 25 bucks. That will break the fill bolt just by looking at it.
You will wonder why you havent done this sooner. It takes 20 seconds to fill the trans with 3 quarts this way.
If you use the jack from the trunk be really careful. Drain and fill is so easy, probably easier than doing the oil. Use a long funnel it will fit right in the filler hole, there is plenty of room. On my wife's Odyssey it's a bit more cramped and I have to use a hose. $75? LOL!
Dunno - after comparing mine with other pictures (both the one Skirmich posted and the other one from the "DIY Tranny Fluid change" thread, I still can't figure it out
Is it a no-jet-kit, the bolt hiding behind the wiring and hoses? Or is it a jetkit with the fillbolt elsewhere?
The jetkit picture appears to show the fillbolt hidden deep down somewhere. *IF* it is indeed a jetkit, do I need to remove any components to get to it? The engine cover, the air-intake housing, or something else?
Nicks2001tl, I think I need a zoomed out and a zoomed in picture with 'X-marks-the-spot'. I can't believe how silly I'm being about this, but there it is.
There is no need to remove anything. The jet kit is held by a single 10mm bolt (Like Nicks2001tl shows), Once its removed you just pull the jet kit out and Fill the ATF with a funnel.
Filling through the dipstick is so much work when you can get a two foot breaker bar with a couple of long extensions for under 25 bucks. That will break the fill bolt just by looking at it.
You will wonder why you havent done this sooner. It takes 20 seconds to fill the trans with 3 quarts this way.
Tell that to my MDX..
After breaking 3 sockets and 2 extensions the ATF Bolt is not going anywhere... I think I will have to heat it up because that thing seems welded into the Trans Housing.
There is no need to remove anything. The jet kit is held by a single 10mm bolt (Like Nicks2001tl shows), Once its removed you just pull the jet kit out and Fill the ATF with a funnel.
Thanks, again Skirmich. I'm going to attempt it (breaking loose the fill hole) today. Will post results if positive.
OK - I found the bolt. I bought a 10 inch extension.
I am not sure if you meant that the bolt itself was 10mm; in my case, the bolt head fit a 12m socket. I tried opening the bolt and here's what my generic "All Kraft" brand 12mm socket looks like now
Onto Osh or Oreilly to get a new 12mm socket and retry. If a 'good quality' one breaks up like that I hope that they will replace it under warranty of some sort....
Yeah that socket was very low quality...
I've seen broken sockets from a single corner but snapping 5 corners? yeah no...
Get a good quality socket, the black ones from "power built" (Autozone cheapo brand) works fine in some applications.
I cant really say, I never buy online at Autozone.com but The Powerbuilt brand is always available on my local Autozones.
Yes its 12mm.. I didn't remember the size but it was 10-12 if the 10mm doesn't fit then its 12mm.. Honda rarely use Odd Sizes.
Success!! Well, the first part at any rate. I stopped at Napa on the way and bought a socket. Forget the name, but they said it had a warranty replacement if it broke.
In any case, I set it up and cracked open the bolt and removed it all the way. The hole is very small, though - not sure if I can find a funnel to fit in it.
Next project, locate the drain bolt. Cracking that open comes after that.
Blue blot circled in red in my case (just to be sure):
You don't fill the trans through that little bolt hole. The main job of that bolt is to hold the oil jet kit in the transmission housing. Now that the bolt is out, you have to pull the oil jet kit out (circled in green) and fill through that hole.
DAMN Man hahaha I am seriously thinking you havent touched a car in like ever....
Just like MBP said that bolt only job is to secure the jet kit.. Now you have to pull the jet kit out of the transmission housing and reveal the Fill Hole.
A couple of more things. Make sure the oil is warm before you drain. Also when pull the drain bolt it has a magnet at the end that needs to be wiped clean before you put it back in.
When refilling the transmission fluid you might find it will take a little more than three quarts. That's normal.
Thank you all. Yes, i havent done this type of work on a car before. Not even an oil change, though that too is about to change.
So going to do both this and (hopefully) spark plugs today. Eventually i have to get to a coolant drain and replacement.(there's green in there that should be replaced with blue)
Success!! This time for real. Multi-success in fact.
1. Did the ATF flush.
This was the easiest of the lot. Some gunk on the plug. Nothing major. The fluid I extracted wasn't looking all that bad either. I think I gouged the plug a bit in the removal, but the slot is deep enough. If it is a problem, I can always change that out during the 2of3. Getting the jetkit bracket under the other bracket was a slight problem although I managed it - does it matter if the other bracket is on the bottom and the jetkit on top? I think not, anyway.
2. Spark Plugs change
This was a bit painful - especially as someone pointed out, the passenger rear one. I did that one first though, so I didn't lose patience. Did a couple and started the motor just to be sure. When I was doing the last one, the rubber washer on the socket that holds on to plug to pull it out was damaged. I had to resort to a cut hose to pull the darned thing out. I guess I'll have to buy a new plug-socket if there's a next time.
3. Coolant flush
I'd posted here a few weeks ago with the fans coming on, and the causes for it. At the time, I wasn't aware of the blue coolant, and since it already held green, I'd topped off with green. However, this time I got the Pepboys version, and flushed the main radiator. It was a bit of a pain with little room to apply pressure, but not too bad in the end. However, I was unable to find the other coolant flush port behind the passenger wheel. I looked at the stock pictures, but mine didn't have that port at all... pictures, for what it is worth. Still I flushed what I could and filled with blue. I guess I have a mix of green and blue now... if I see overheating problems I know what to do.
Went for a quick drive - 2 miles or so. No heating or shifting problems. All seemed good. Smoother, less jerky, more fuel efficient... they're all in the head
Next step tires. How do folks rate Yokohama vs Falken for the same mileage (65K) guarantee? One is about $50 less than the other (because of a special going on at Pep Boys)
I also need an oil change, but planning to take that to the dealer since they offered a special including a carwash, vacuum and multipoint inspection.
Pictures behind the front passenger wheel in my car ... if someone can find the coolant drain port for me.
The jet kit always goes on top.. The other side of the bracket does not move unless you pull it hard and bend it, otherwise you will have to unscrew the other bolt holding the bracket but like I said you will be doing it wrong. The jet kit always goes on top as Nicks2001tl picture shows.
Yes that is the drain plug.. Only the brass fitting must move (The smaller fitting only) DO NOT UNSCREW THE BIG FITTING.. Also draining the radiator is not a flush, that thing holds less than half the capacity of the whole system. The only real way to flush most of the anti-freeze is by the block drain. That + draining the radiator makes up for more than +95% the coolant capacity, The other 5% is in the reservoir.
right now probably you have diluted Anti-freeze.. Draining the radiator and filling it will take less than a gallon. The whole system takes almost 2, That�s how much antifreeze was left inside the car.
You can wait or do it right this time.. If you are draining it and if it has never been done I recommend you do the T-STAT already, Its way easier when you are flushing the anti-freeze.
If your coolant isn't dirty probably no reason to change it. But, if you want to give your car a maintenance starting point do all the fluids, power steering, brake fluid and radiator.
So far it sounds like no real surprises as far as what you have done. Just make sure that the fluids are at there correct capacity and check periodically.
Thank You Skirmich...
Last edited by Nicks2001tl; 05-15-2016 at 07:34 AM.
Thanks - I topped off power steering fluid. The others are within normal capacities. Will do the full coolant flush (and TSTAT? Link?) perhaps next month or next oil change cycle.
T-STAT = Thermostat (Use OEM Only).
YOKOHAMAS YK580s have been of great service to me.. Tons of Thread life and enough grip to VTEK Yo! in the twisties.
The jet kit always goes on top.. The other side of the bracket does not move unless you pull it hard and bend it, otherwise you will have to unscrew the other bolt holding the bracket but like I said you will be doing it wrong. The jet kit always goes on top as Nicks2001tl picture shows.
Yes that is the drain plug.. Only the brass fitting must move (The smaller fitting only) DO NOT UNSCREW THE BIG FITTING.. Also draining the radiator is not a flush, that thing holds less than half the capacity of the whole system. The only real way to flush most of the anti-freeze is by the block drain. That + draining the radiator makes up for more than +95% the coolant capacity, The other 5% is in the reservoir.
When I did my timing belt & coolant pump a fair amount of coolant came out when removing the pump, even though I drained the block, so there's some there too. Also in the heater core if you don't open it properly before starting.
When I did my timing belt & coolant pump a fair amount of coolant came out when removing the pump, even though I drained the block, so there's some there too. Also in the heater core if you don't open it properly before starting.
A step-by-step: Is this good?
* Run engine with heater on full blast for 2 minutes (or whatever)
* drain radiator
* drain plug
* fill with 2 gal distilled water and run engine for 2 mins
* drain radiator and plug again
* fill with new coolant
* 'burp' system
Obviously it doesn't get to the timing belt. Still....
* Run engine with heater on full blast for 2 minutes (or whatever)
* drain radiator
* drain plug
* fill with 2 gal distilled water and run engine for 2 mins
* drain radiator and plug again
* fill with new coolant
* 'burp' system
Obviously it doesn't get to the timing belt. Still....
Sounds good but I don't think you need to run the engine first.
Service manual says turn ignition switch ON, set temp to 90F, turn ignition switch OFF, remove radiator cap drain radiator then block. Don't warm the engine up.
 05-10-2016, 07:01 PM

 Any guide to how to get to the necessary locations if going DIY?