When you click on links to various merchants on this site and make a purchase, this can result in this site earning a commission. Affiliate programs and affiliations include, but are not limited to, the eBay Partner Network.
Well there are pros and a cons to putting them inside the headlamps. Depends on how you look at it.
Inside the headlamps
Pros
1. Looks super cool, as if OE.
2. Should last longer being protected from the elements.
Cons
1.. Impossible to service.
2.. The DIY difficulty would go up astromitcal.
LED strip on the outside.
Pros
1. Looks just as cool bc you can't see the strips when the lights are off. They're recessed inside the gap. The car looks normal, as if bone stock. You would never know they are there.
2. Readily service able. Being as cheap as they are if a LED goes out just pop in a new strip.
3. EZ PZ install. Every Joe, Dick, and Jane can do.
4. EZ to undo if I wanted to remove it.
Con
1. Maybe less reliable but that's a wash really.
Ladies and gentlemens choose your poison.
I wouldnt say astronomical. If you can turn a screwdriver you could diy this. I think its more of a gear issue than anything which it shouldnt be. 10 min in the oven and the lights are open.
Pros to inside
Protected from elements, much more likely to last longer so that you wouldnt have to "service" or pop in a new one, cleaner install, more placement options, every Joe, Dick, and Jane can do it.
^ Come on give me a break... 10 minutes? You make it sound like it's a walk in the park.
If one were to install the LED stips in the HL, it would take at a minimum one full day and then some for someone with experience. Maybe three days for a noob.
Versus me open the hood, cleaning the lights, and sticking them on at a casual pace... one hour.
Your average AZ folks would consider that "Astronomical" if not impossible because you're talking about the following...
Raise the front end
Remove front bumper
Remove upper front bumper tie bar
Remove left HL
Remove right HL
Remove Igniters
Remove ballasts
Preheat oven
Bake
Clean the lamps
Layout the LED strip's pattern
Drill holes for wiring
Install LED stripes
Test the LED
Reassemble the lamps with caulking
Install igniters
Install ballasts
Then reassemble the car.
Wiring not included.
BTW... I'm more interested in the safety aspect of the DRL more than anything. The coolness factor was just an unexpected bonus.
I say i like ur look bro,forget opening ur headlights up bro too much work, i done that that shit and put Morimoto D2s projectors in my Acura TL, cutting and aiming too much work bro, i I still love the car, and my Depo Led taillights, but the car will be sold for a 3rd gen TL soon!
fatty is more than seasoned in disassembling his car... He has so many cocked hours with his car that he probably thinks swapping a motor and transmission is as easy as changing the high beam bulb on the headlight
I did my headlight blackout in an Hour full job with no previous experience.. Just sayin it doesn't take 3'days for a noob.. A full day for that? Would require to be a total non-Car related guy and even for those 3 days is an exaggeration.
YouTube.. Plenty of informational videos.. Damn I almost take all my car related stuff research from YouTube these days, it's killing my writhed DIY business..
LOL So the guy in the video came out and performed the same thing he did to a Golf in my TL? You are being thick here, ANYONE can use YouTube to see the process and now you are adding the time to get the items? you might also want to add the time it takes to breath and sleep before doing the job.. Add also the time it took to being born and get to the age where you can perform the Headlight Blackout..
All in all it took me give or take 27 years to perform the blackout housing then..
What about daylight brightness? are they strong enough?
Def strong enough even during the day. I was testing them the last few days. With these tails they make they regular running tail very dim during the day so it will be VERY clear when the brake lights are engaged. During night they look simply awesome at all times. No safety issues come to mind as it relates to brightness when compared to stock lights.
Thinking about getting them as well, i drive an '01 Nighthawk Black Pearl TL. Any ideas on how they would look, and what else I would need to convert from 2002 to 2001 wiring? Thanks Guys!
Thinking about getting them as well, i drive an '01 Nighthawk Black Pearl TL. Any ideas on how they would look, and what else I would need to convert from 2002 to 2001 wiring? Thanks Guys!
Parts: LED STRIPS, T Taps (power), connectors, and eye loops connector (Ground/negative).
The switched power source is from the engine mount's power wire. No fuse require since it's already fused.
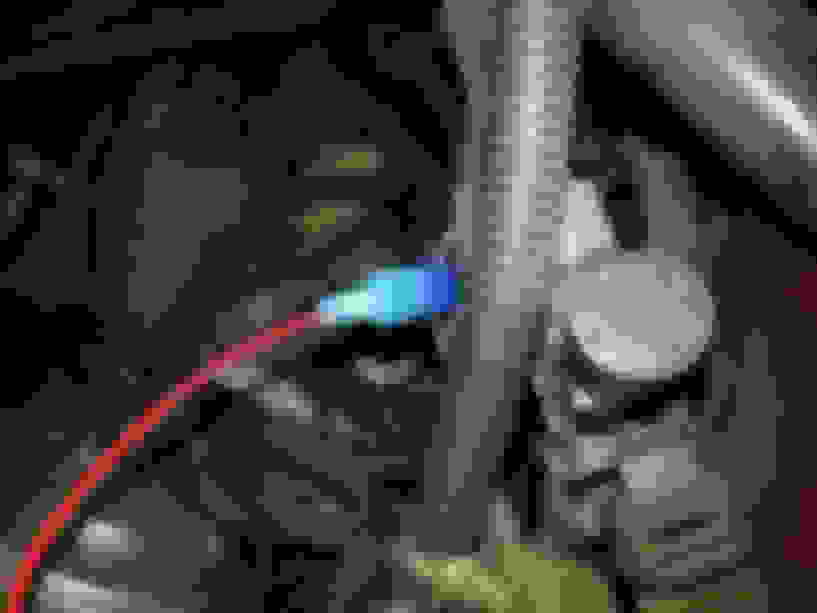
1. Tap into the motor mount's black/yellow/silver (Red circle in the pic) power wire. Near the left front strut tower. Run the power wire by following the cruise control cable and drop down to the headlamps through the headlamp baffle.
2. Attach the LEDs to the headlamps. Be sure to have the LED's wires end up on the inboard side of the headlamps. Run the wires through the radiator baffle and up to the cruise control cable. Inbetween the headlamp and the radiator support/vertical brace- per both sides. Do not run the wires inbetween the radiator and the radiator support/vertical brace. Connect the LED's white/hot wire to the engine mount power wire.
3. Ground/negative wire (Green in the pic). Ground the LED's black wire to the grounding bolts (10mm). The grounding bolts are located behind the headlamps at the front corners of the engine bay. The bolts are bronze in color (lots of black wires attach to it).
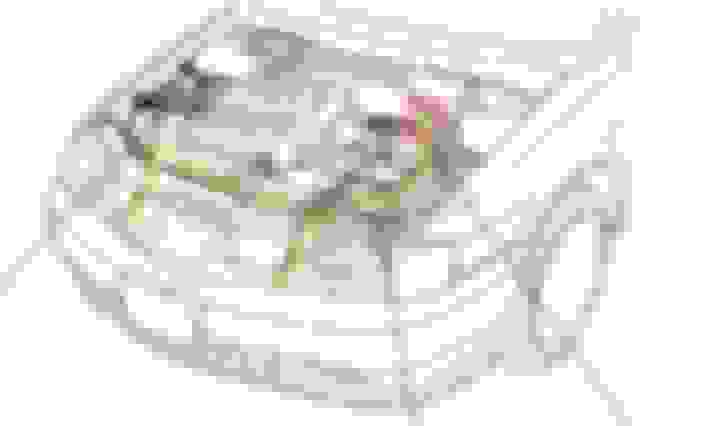
FYI: This DIY is referencing post #31, #34 & #42.
Power Source
Schematic
Red - power source
Green - negative/ground wire
Yellow - positive/hot wire


 Come on give me a break... 10 minutes? You make it sound like it's a walk in the park.