
(DIY) Front Bumper Removal - 2006 OEM

Thread Starter
Instructor
Joined: Mar 2009
Posts: 142
Likes: 2
From: Maine
(DIY) Front Bumper Removal - 2006 OEM
Taking Front Bumper Off with Pics (2006 OEM)
I�m going to post pictures of me detaching the front bumper (2006 OEM). There is no thread with pics here on AZ that I found after search. Its too easy to bother paying the dealership for labor. My dealer wanted to charge me $170 as a base price for taking the bumper off plus additional labor. Anyway, if anyone wants to add anything or refute my method, please do so. It�s welcome. There could be a better way to do it, but this way worked easily for me. Also keep in mind that I�m only detaching half of it in this thread. I didn�t take it off completely because I only had to change fog lights when I took the pics, but if you do, then have an assistant hold it while you remove the last few connection points so it doesn�t fall to the ground. The other half is symmetrical and therefore the same process anyway, so I�ll just show one half.
This thread should especially help out the people who haven�t done it yet because of the details. Also, I just posted my headlight removal for halos DIY thread and wanted to link to this thread on it:
https://acurazine.com/forums/showthr...8#post11050818
First a disclaimer: Do this at your own risk. You are claiming full responsibility for damage/injuries by agreeing to use my instructions.
Tools:
Flathead screw driver (or whatever you use for the clips),
Phillips head screw driver,
Needle-nose pleyers (maybe, if the clips are stubborn),
Wrench or something to remove bolts with,
Dirty Old Blanket (lay down under bumper before starting)
Eye Protection! (sunglasses work fine)
Gloves if you want to protect your hands.
---------
First of all, you have to remove all the screws/bolts/clips. Here is a diagram. Ensure you keep track so that the screws/bolts go back into the same exact holes they came out of. When you put the plastic clips back, make sure the holes get the same sized-clips (indicated by C, D, and E on the picture below) they originally had.
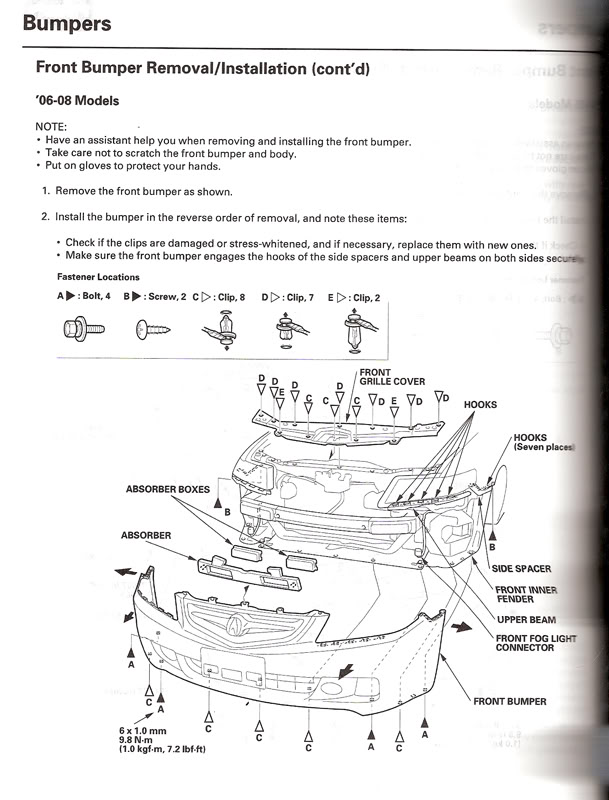
^^I found an AZ thread where MMsTSX posted this pic. Thanks to MMsTSX for posting it for the OP of that thread.
There are 4 bolts on the bottom, and there are 2 screws on the corners by the tire wells.
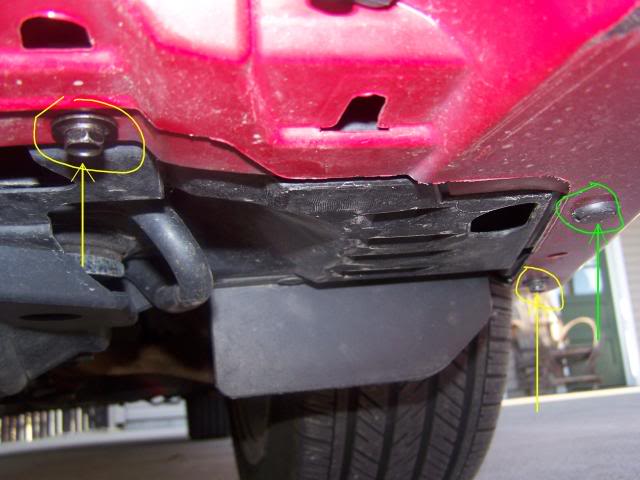
I don�t want to focus on the bolt/screw/clip removal, but here is a pic of the bolts on the bottom (driver side). The bolts are circled in yellow:
To get those clips out, just pry the middle upward with a flathead screwdriver. Some of them will be stubborn, and some of them will break or become mutilated. It�s normal. Just get some more during your next service. Be careful when prying them out. They have a tendency to break shooting small pieces of jagged plastic toward your eyes!!! Wear sunglasses.
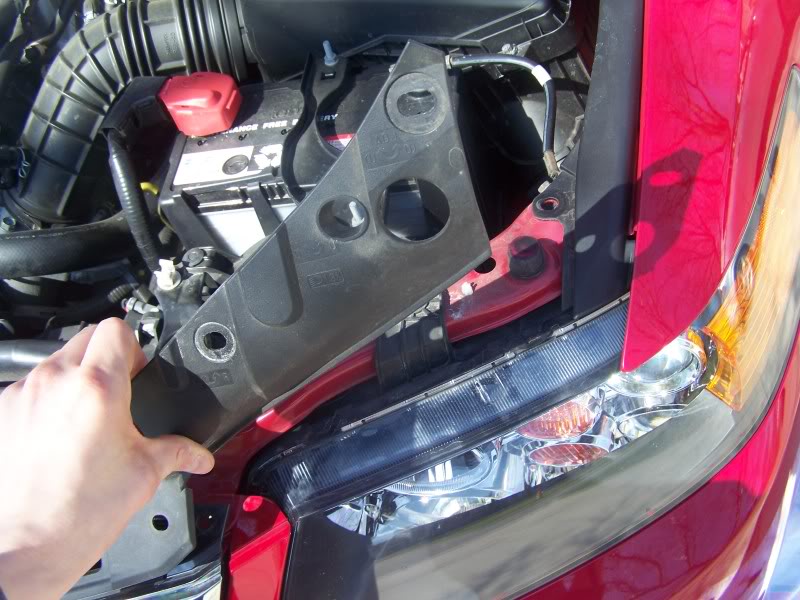
After the clips are out, take the front grill cover off. Below is a picture of it. It slides right off. Be careful while sliding it off the hood release latch:
At this point, the only thing holding the bumper on is what the service manual calls �hooks.� They are actually more like �buttons� because they snap and unsnap. All you have to do now is pull your bumper off.
Start with this part here (below). It�s the top corner of the grill. You�re going to take BOTH of them off now so you don�t forget the other side:
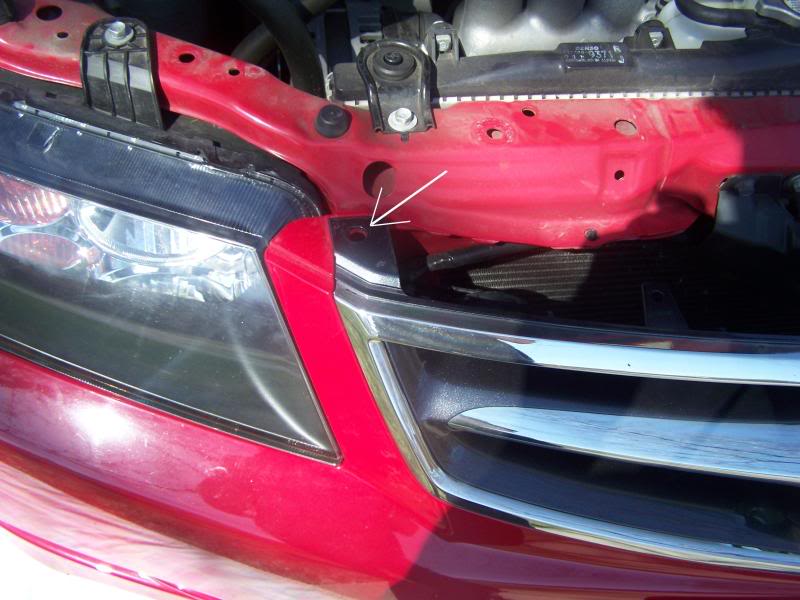
Grab it like this and pull up:
Below is a picture of it after unsnapping. There�s an arrow pointing to the button that holds it on:
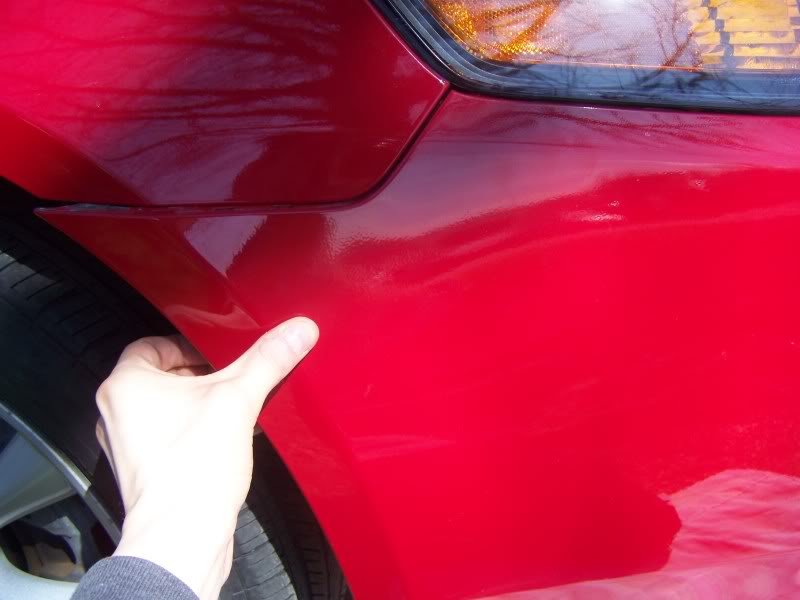
Now, you start on the corner right here:
Put your finger like this and pull outward toward you:
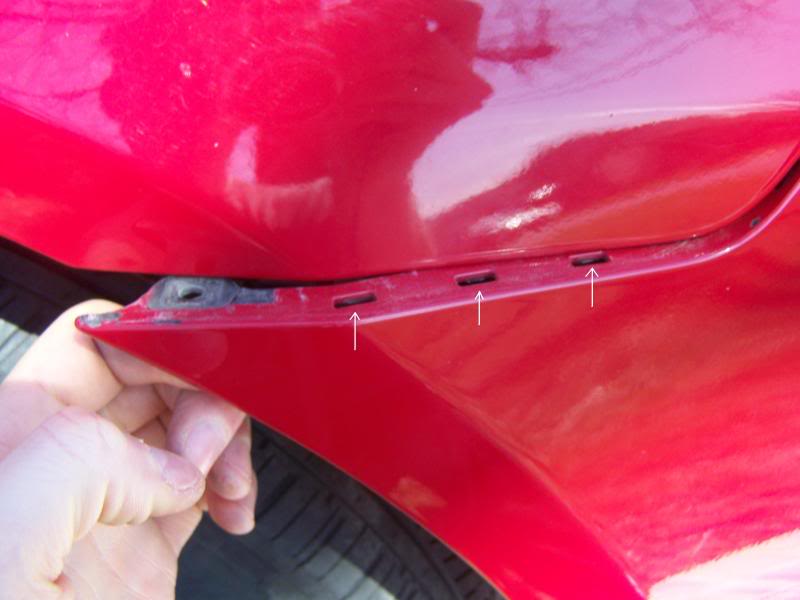
On the pic above, the three hooks with arrows might not come out with the first tug. If not, then pull again until they do come out:
Moving on...
Here�s where the next three hooks you have to undo are:
Hold it like this and push outward and frontwards.
Now, notice the three holes (below). Those are for the hooks you just undone:
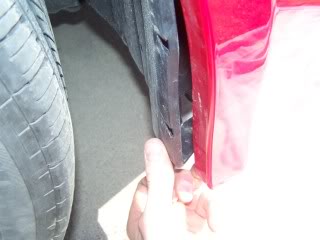
Now make sure you pull the body from the black plastic tire well lining like I did in this pic:
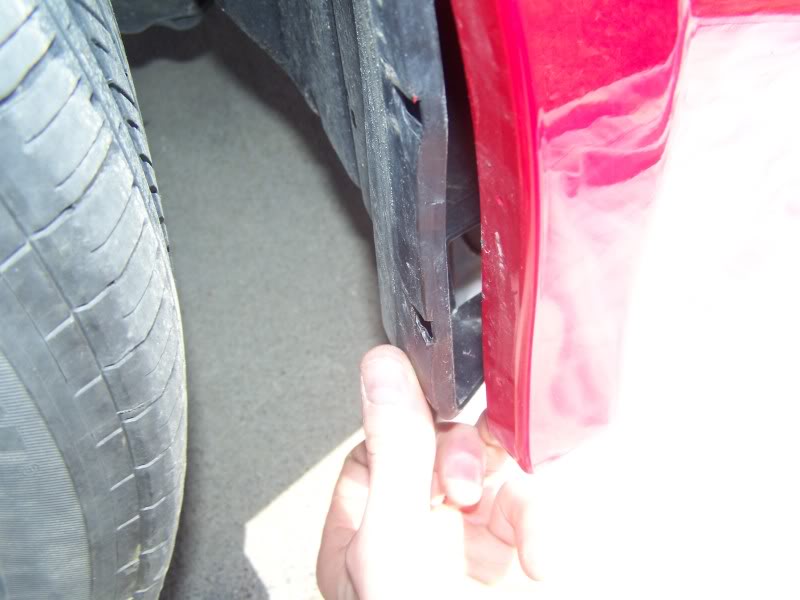
^Make sure the black plastic trim is out of the way near the headlight too.
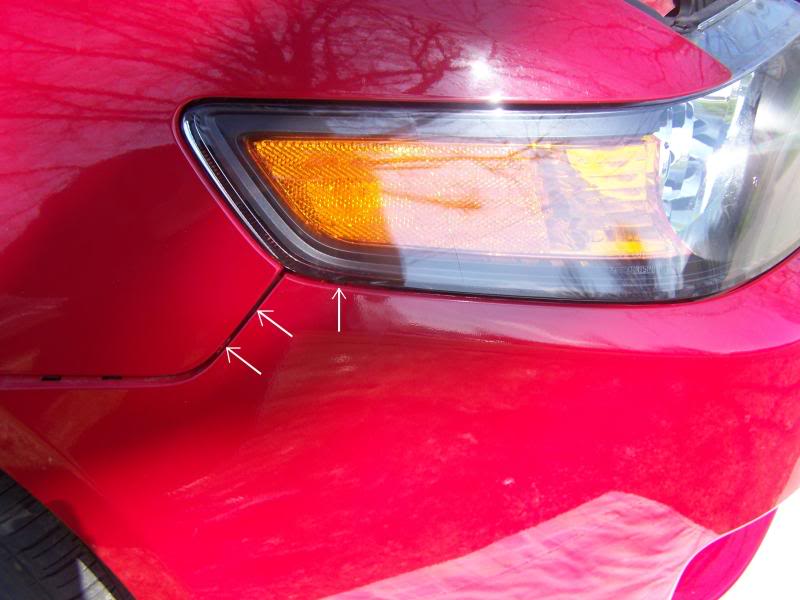
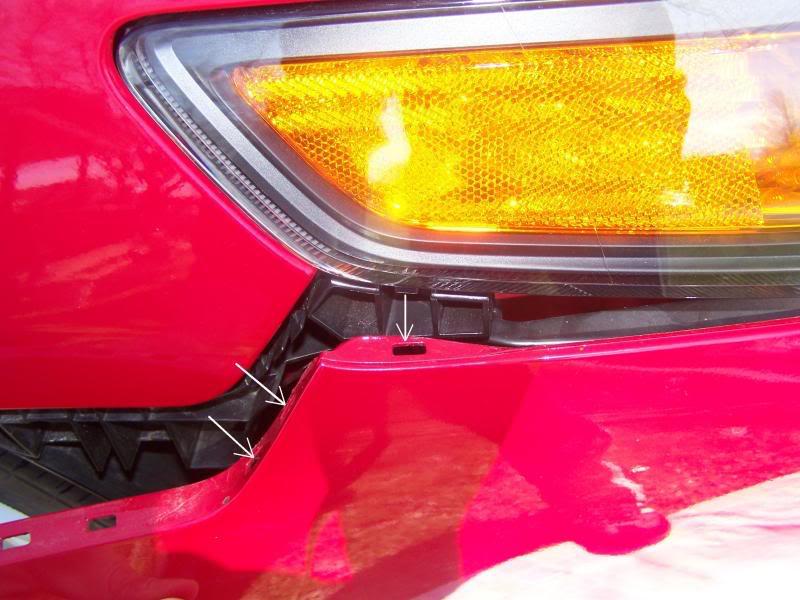
At this point, you should have all the hooks that are pointed in white (below) removed, and the hooks pointed to in green NOT yet removed. Obviously the hooks pointed in green are next:
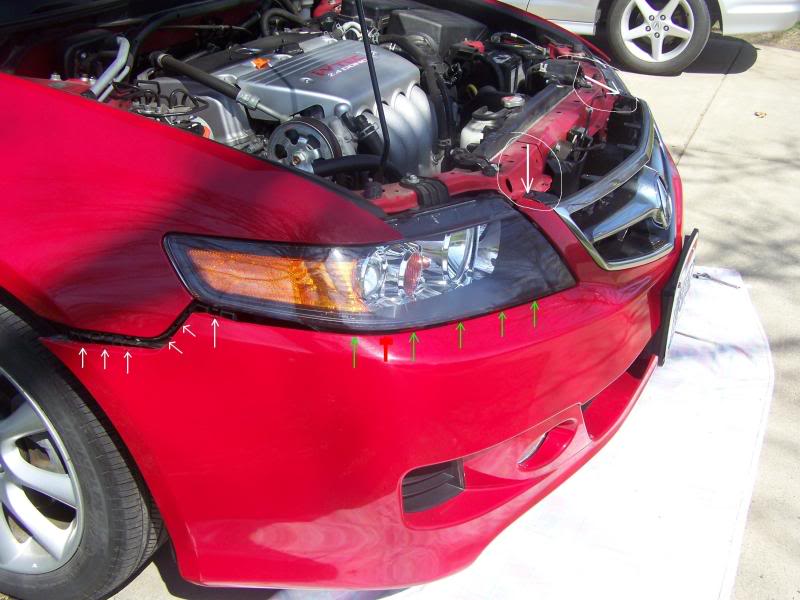
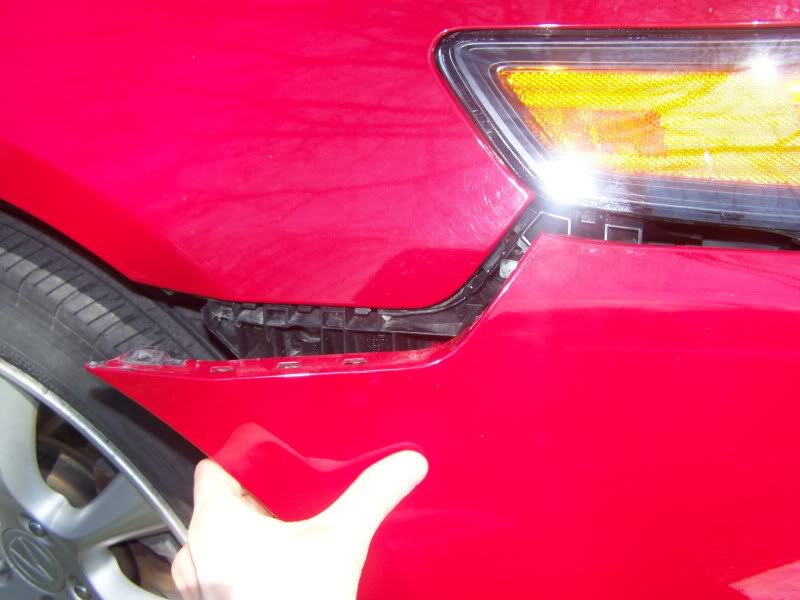
Grab the bumper like this (below) and push it frontward:
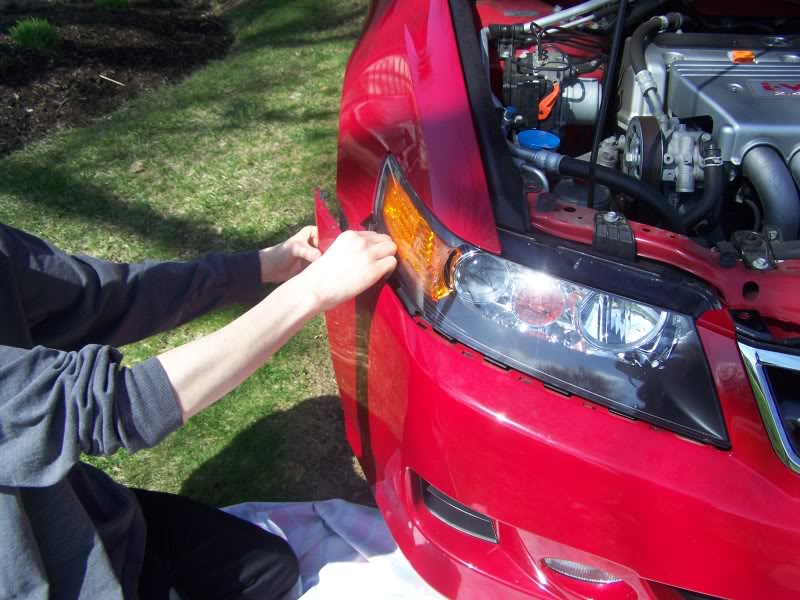
Below is a pic of it after popping it off:

Now you have to unplug the fog light harness because it is still attaching to the bumper to the car. You don�t have to take the bulbs out unless you don�t detach the harness. So you could either take the bulbs out and just leave them connected to the harness (not recommended), or you can just take the harness off leaving the bulbs protected inside the housings on the bumper (recommended). With the second way, you eliminate the risk of scratching them.
It sounds easy, but make sure you push the release lever on the very BOTTOM of the socket where I am pointing in yellow below. Don�t push higher up toward where the blue arrow is pointing. Yes, it makes a big difference in whether or not the socket comes off:

The best way to grip the fog socket is with 2 hands. For my driver-side fog, I stuck my right hand in through the side by the tire, and I stuck my left hand in through the front... reverse symmetrically for the passenger side.
To remove the bumper completely, have someone hold it before you start on the other side. When I removed the headlight housings, I took it completely off. You NEED an assistant for that.
Done!
--------------------------------------------------------
Putting the bumper back on requires attention to things you didn�t pay attention to while taking it off. You have to make sure the edges of the bumper fit in the correct grooves before pushing it back onto the hooks. You have to watch the bottom to make sure the black underpanel goes on TOP of bumper bottom. Here is a pic of my mistake. Notice part of the black underpanel (circled) is mistakenly BELOW the red bumper bottom:
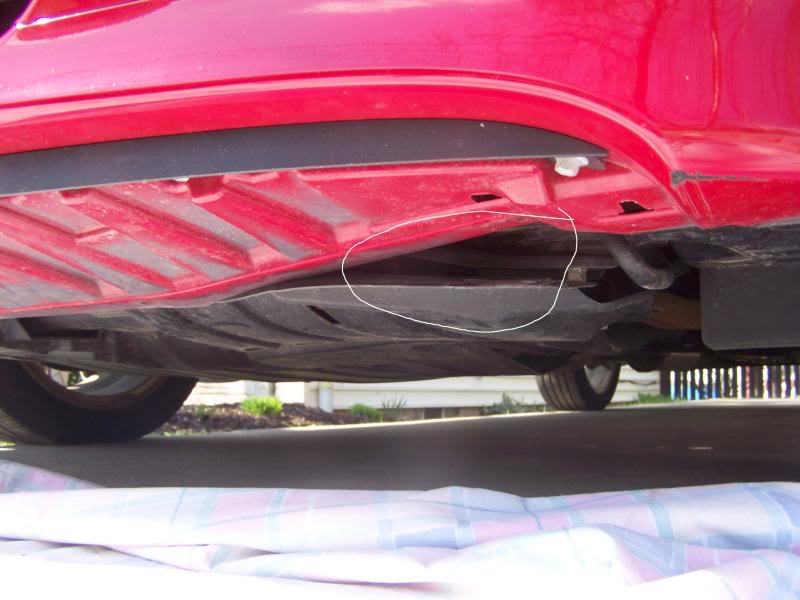
Yea, I had to take it apart again to straighten that out. You�ll notice if its not right when you go to put the clips and bolts back in.
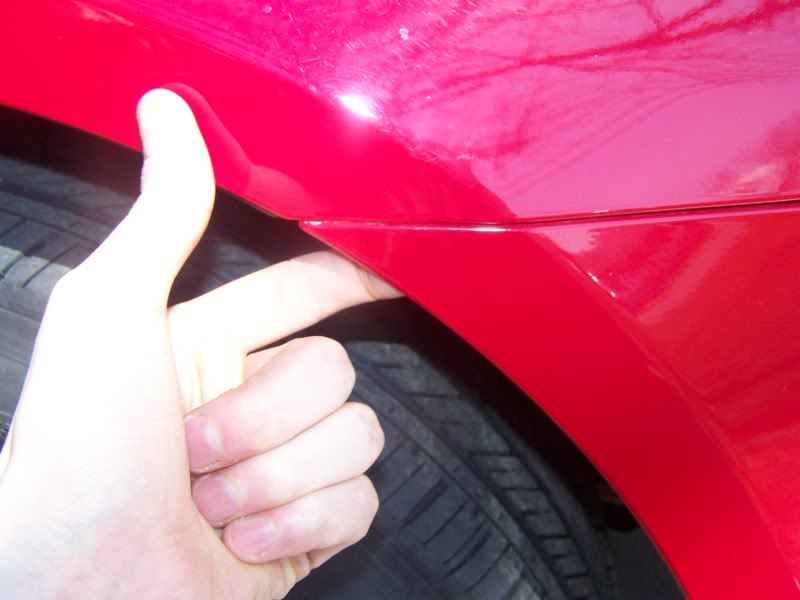
On the sides, make sure the body goes around the black panel that lines the tire well here (repeated picture):
Also, make sure that when you put the plastic clips back into the bottom, you push them all the way up so they sturdily cling the bumper bottom to the ceiling above it. When finished, you should NOT be able to push the bottom of the bumper upward bending the plastic. It should be sturdy.
(!) Double check that the screws and bolts are tightened well (never over-tighten with plastic).
Take a quick drive and listen for rattles.
Hopefully this helps people out.
- Wear glasses/sunglasses when prying up the plastic clips. They have a tendency to break shooting pieces of plastic into the air and toward your eyes. I would stick the screw driver into the groove and then put a towel over the whole thing before prying so it doesn�t fling.
- If any of the clips break but are still useable, then stick them back in until you buy new replacements. I got new ones for 1.29 ea. at the dealership. They upgraded them now, and I don�t think they will break as easily as the old ones.
I�m going to post pictures of me detaching the front bumper (2006 OEM). There is no thread with pics here on AZ that I found after search. Its too easy to bother paying the dealership for labor. My dealer wanted to charge me $170 as a base price for taking the bumper off plus additional labor. Anyway, if anyone wants to add anything or refute my method, please do so. It�s welcome. There could be a better way to do it, but this way worked easily for me. Also keep in mind that I�m only detaching half of it in this thread. I didn�t take it off completely because I only had to change fog lights when I took the pics, but if you do, then have an assistant hold it while you remove the last few connection points so it doesn�t fall to the ground. The other half is symmetrical and therefore the same process anyway, so I�ll just show one half.
This thread should especially help out the people who haven�t done it yet because of the details. Also, I just posted my headlight removal for halos DIY thread and wanted to link to this thread on it:
https://acurazine.com/forums/showthr...8#post11050818
First a disclaimer: Do this at your own risk. You are claiming full responsibility for damage/injuries by agreeing to use my instructions.
Tools:
Flathead screw driver (or whatever you use for the clips),
Phillips head screw driver,
Needle-nose pleyers (maybe, if the clips are stubborn),
Wrench or something to remove bolts with,
Dirty Old Blanket (lay down under bumper before starting)
Eye Protection! (sunglasses work fine)
Gloves if you want to protect your hands.
---------
First of all, you have to remove all the screws/bolts/clips. Here is a diagram. Ensure you keep track so that the screws/bolts go back into the same exact holes they came out of. When you put the plastic clips back, make sure the holes get the same sized-clips (indicated by C, D, and E on the picture below) they originally had.
^^I found an AZ thread where MMsTSX posted this pic. Thanks to MMsTSX for posting it for the OP of that thread.
There are 4 bolts on the bottom, and there are 2 screws on the corners by the tire wells.
I don�t want to focus on the bolt/screw/clip removal, but here is a pic of the bolts on the bottom (driver side). The bolts are circled in yellow:
To get those clips out, just pry the middle upward with a flathead screwdriver. Some of them will be stubborn, and some of them will break or become mutilated. It�s normal. Just get some more during your next service. Be careful when prying them out. They have a tendency to break shooting small pieces of jagged plastic toward your eyes!!! Wear sunglasses.
After the clips are out, take the front grill cover off. Below is a picture of it. It slides right off. Be careful while sliding it off the hood release latch:
At this point, the only thing holding the bumper on is what the service manual calls �hooks.� They are actually more like �buttons� because they snap and unsnap. All you have to do now is pull your bumper off.
Start with this part here (below). It�s the top corner of the grill. You�re going to take BOTH of them off now so you don�t forget the other side:
Grab it like this and pull up:
Below is a picture of it after unsnapping. There�s an arrow pointing to the button that holds it on:
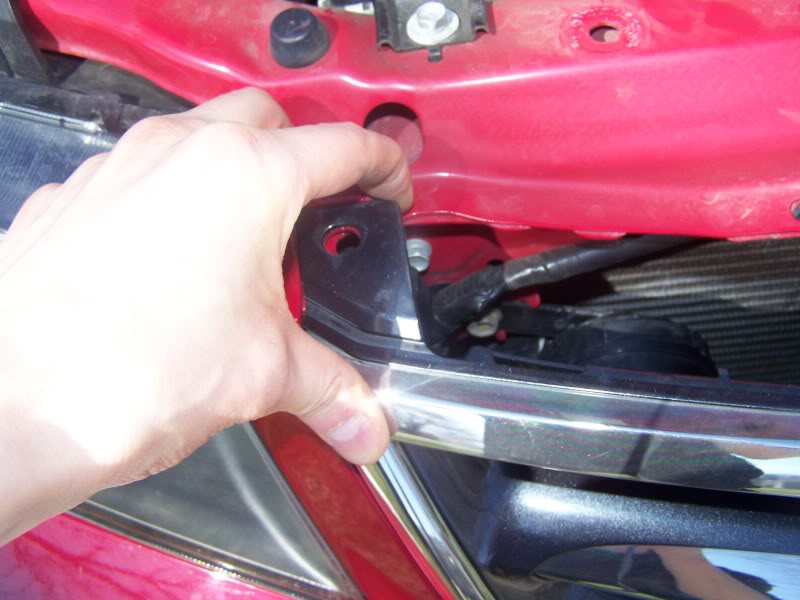
Now, you start on the corner right here:
Put your finger like this and pull outward toward you:
On the pic above, the three hooks with arrows might not come out with the first tug. If not, then pull again until they do come out:
Moving on...
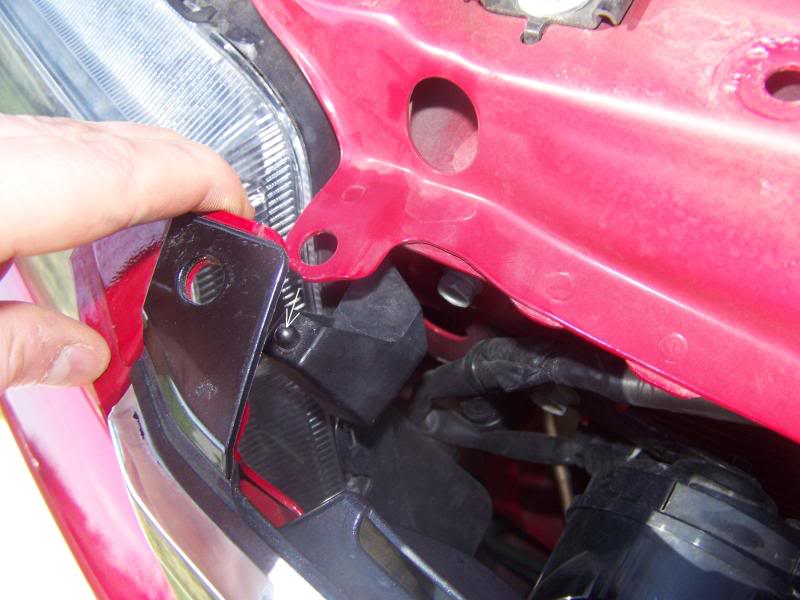
Here�s where the next three hooks you have to undo are:
Hold it like this and push outward and frontwards.
Now, notice the three holes (below). Those are for the hooks you just undone:
Now make sure you pull the body from the black plastic tire well lining like I did in this pic:
^Make sure the black plastic trim is out of the way near the headlight too.
At this point, you should have all the hooks that are pointed in white (below) removed, and the hooks pointed to in green NOT yet removed. Obviously the hooks pointed in green are next:
Grab the bumper like this (below) and push it frontward:
Below is a pic of it after popping it off:
Now you have to unplug the fog light harness because it is still attaching to the bumper to the car. You don�t have to take the bulbs out unless you don�t detach the harness. So you could either take the bulbs out and just leave them connected to the harness (not recommended), or you can just take the harness off leaving the bulbs protected inside the housings on the bumper (recommended). With the second way, you eliminate the risk of scratching them.
It sounds easy, but make sure you push the release lever on the very BOTTOM of the socket where I am pointing in yellow below. Don�t push higher up toward where the blue arrow is pointing. Yes, it makes a big difference in whether or not the socket comes off:
The best way to grip the fog socket is with 2 hands. For my driver-side fog, I stuck my right hand in through the side by the tire, and I stuck my left hand in through the front... reverse symmetrically for the passenger side.
To remove the bumper completely, have someone hold it before you start on the other side. When I removed the headlight housings, I took it completely off. You NEED an assistant for that.
Done!
--------------------------------------------------------
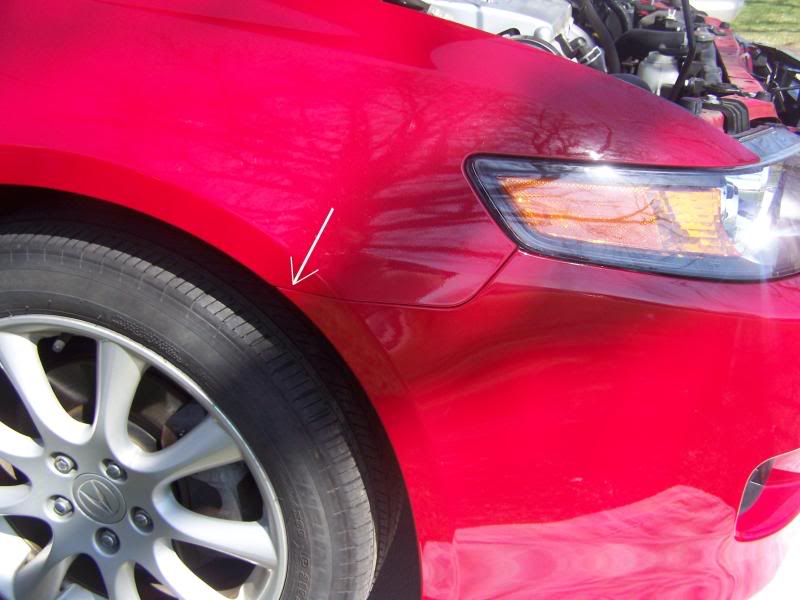
Putting the bumper back on requires attention to things you didn�t pay attention to while taking it off. You have to make sure the edges of the bumper fit in the correct grooves before pushing it back onto the hooks. You have to watch the bottom to make sure the black underpanel goes on TOP of bumper bottom. Here is a pic of my mistake. Notice part of the black underpanel (circled) is mistakenly BELOW the red bumper bottom:
Yea, I had to take it apart again to straighten that out. You�ll notice if its not right when you go to put the clips and bolts back in.
On the sides, make sure the body goes around the black panel that lines the tire well here (repeated picture):
Also, make sure that when you put the plastic clips back into the bottom, you push them all the way up so they sturdily cling the bumper bottom to the ceiling above it. When finished, you should NOT be able to push the bottom of the bumper upward bending the plastic. It should be sturdy.
(!) Double check that the screws and bolts are tightened well (never over-tighten with plastic).
Take a quick drive and listen for rattles.
Hopefully this helps people out.
- Wear glasses/sunglasses when prying up the plastic clips. They have a tendency to break shooting pieces of plastic into the air and toward your eyes. I would stick the screw driver into the groove and then put a towel over the whole thing before prying so it doesn�t fling.
- If any of the clips break but are still useable, then stick them back in until you buy new replacements. I got new ones for 1.29 ea. at the dealership. They upgraded them now, and I don�t think they will break as easily as the old ones.


it's a car-drive it
Joined: Apr 2007
Posts: 5,375
Likes: 262
From: North Carolina
that is a 09 TL LOANER car which I had to use while my car was being serviced. Even tho the work being done on the car would take only about 2 hours or less they let me keep the 09 overnight. I am bringing my car for service again tomorrow-another loaner car for me. As a former resident of Pa, I drop the car off at the Pa acura dealer, get the loaner car, visit with family and friends and do not have to rush back to get my car the same day. works out excellent for me. Actually I loved the way the TL drove and it is not that bad looking (IMO) Now the new mazda's have ugly front grills. My tsx has almost 86,000 miles now.
Thread Starter
Instructor
Joined: Mar 2009
Posts: 142
Likes: 2
From: Maine
here's one I just did too:
https://acurazine.com/forums/showthr...8#post11050818
https://acurazine.com/forums/showthr...8#post11050818
Trending Topics

Cruisin'
Joined: Aug 2008
Posts: 17
Likes: 0
From: MA
Fantastic job ! Thanks for taking the time and all the great photos !
Just had a hub cap roll into my left side foglight and cracked it.
I'm trying to find an HID replacement with a quality lens if they make one for my 2006 TSX.
If I'm going to go thru the trouble and expense of removing my bumper might as well get some good lights to install.
Anyone out there with suggestions ?
Thanks, Kap


10th Gear
Joined: Jun 2014
Posts: 14
Likes: 0
Ive just inherited my wifes hand me down tsx and she has "nudged a few people in her ownership and the bumper never seems to sit right. Its been on and off a few times and I think the "hooks" on the backside are rounded off. When you had the bumper off did it look like those were easily replaceable?
I don't want to pop it off to look since the multiple times on and off is what I believe rounded them out in the first place.
I don't want to pop it off to look since the multiple times on and off is what I believe rounded them out in the first place.

Thread
Thread Starter
Forum
Replies
Last Post
Oakes
Wash & Wax
10
Oct 12, 2015 11:17 AM
Marmbo
4G TL Problems & Fixes
6
Sep 21, 2015 09:39 AM
robowarrio
Car Parts for Sale
2
Sep 1, 2015 09:25 PM