DIY: Headlight Clearing, Clear Lens Swap, & Projector Color Mod. LOS OF PICTURES!
 06-16-2012, 03:02 PM
#1
DIY: Headlight Clearing, Clear Lens Swap, & Projector Color Mod. LOS OF PICTURES!
Alright this DIY didn't turn out as good as I want because I was to focus on the actual mod and didn't want to spend a lot of time taking "good" pictures. But I was able to take enough picture to give anyone who wanted to attempt this a good idea on what to do. Overall this whole process took me ~8hrs but thats because I wanted to take my time. Plus I spend a hr or so testing out the different color mod method for the projector.
Before we start: please note that this is for reference only, if you choose to do this mod and follow my instruction I am not responsible if you injury our self, other, or any property. SO PLEASE DO THIS AT YOUR OWN RISK.
Now the only tools you will need is:
-Flathead screwdriver
-Phillips screwdriver
-Socket wrench
-10mm socket head(a extension will be help, but not necessary)
-oven mitts

IMG_0660 by mista.phuc, on Flickr
Step 1.
Remove your bumper. I found that if you start from where the grill is, it is much easier and less nerve bending then starting from the wheels are.

IMG_0569 by mista.phuc, on Flickr

IMG_0571 by mista.phuc, on Flickr
Step 2
Remove the 4 screws securing the headlight.

IMG_0575 by mista.phuc, on Flickr

IMG_0576 by mista.phuc, on Flickr

IMG_0577 by mista.phuc, on Flickr

IMG_0578 by mista.phuc, on Flickr
Step 3
Remove the highbeam and blinkers bulb and wiring, also remove the clip that attach the wiring onto the headlight.

IMG_0579 by mista.phuc, on Flickr
Here's all the wiring that should be removed.

IMG_0580 by mista.phuc, on Flickr
Give it some shut eyes

IMG_0583 by mista.phuc, on Flickr
Step 5
Now on the bottom of the headlight you will need to remove the 1 screw that is holding the plastic piece. The piece that your bumper lock onto.

IMG_0585 by mista.phuc, on Flickr
Step 6
Remove the 3 screws that is holding the ballast on. And then remove the ballast by detaching this wire.

IMG_0586 by mista.phuc, on Flickr
Step 7
Now there are 4 screws that will be removed, they are located around the headlight.

IMG_0588 by mista.phuc, on Flickr

IMG_0589 by mista.phuc, on Flickr

IMG_0590 by mista.phuc, on Flickr

IMG_0593 by mista.phuc, on Flickr
Below is a picture of all the screws you need to remove: The top 3 is for the ballast
the bottom 4 is for the headlight
the middle is for the plastic piece

IMG_0656 by mista.phuc, on Flickr
Step 8
Now placed the headlight(with no bulb inside) in the oven and bake for 15mins. at 250 degree. I know that many different uses different degree and time. But I always used this and it work out for me.

IMG_0596 by mista.phuc, on Flickr

IMG_0597 by mista.phuc, on Flickr
Step 9
Once the headlight is done baking remove it from the oven and start by lift up all tabs like these

IMG_0602 by mista.phuc, on Flickr
Then using a flat-head, pry open on end of the headlight and from there you should be able to pull the headlight apart. If you're having problem you will have to either rebake it a little more or make sure that a tab is not the reason why. Using a headlight to splice through the sealant does help, just be careful not let the flat-head touches anything inside the headlight

IMG_0603 by mista.phuc, on Flickr

IMG_0604 by mista.phuc, on Flickr

IMG_0605 by mista.phuc, on Flickr
Step 10
Remove the following screws plus 1 or 2 more should be to the left of the picture. This will allow you to remove the housing from the plastic housing.

IMG_0606 by mista.phuc, on Flickr

IMG_0608 by mista.phuc, on Flickr

IMG_0609 by mista.phuc, on Flickr
IMG_0609 by mista.phuc, on Flickr
With a little push this piece should come right out.

IMG_0610 by mista.phuc, on Flickr
Step 11
Now remove the amber piece from the turning signal housing. Just pull the metal tab and slowly pull the amber piece off the metal plate. There is 2 tab that will need to push out to help make removing the amber piece easier.

IMG_0613 by mista.phuc, on Flickr

IMG_0614 by mista.phuc, on Flickr

IMG_0615 by mista.phuc, on Flickr
Step 12
Now onto the removing the projectors. there is 4 screws that will need to be remove. But I found that one of them is a PIA especially when i have really bad luck with it. I always break it when i try to remove it. But no fear, I found a way around not removing it..
Remove these 2 screws

IMG_0616 by mista.phuc, on Flickr
Now remove this screw, IT WILL TAKE SOME TIME SINCE IT IS VERY LONG. This is the screw you need to adjust to adjust how high or low your headlight aim is.
IMG_0617 by mista.phuc, on Flickr
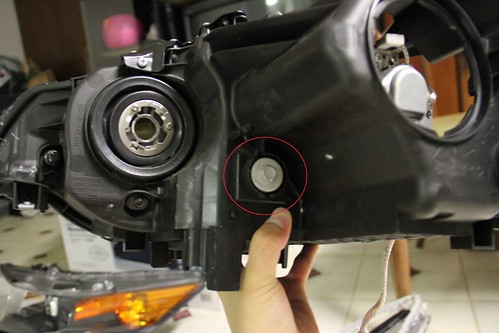
This is the screw that I always have bad luck with

IMG_0622 by mista.phuc, on Flickr
But i found out that you can just turn the piece that is attach to the projecor upside down and you will be able to remove the 3 or 4 screw that will allow you to detach the projector ONLY.
There might be 3 or 4, I don't really remember

IMG_0623 by mista.phuc, on Flickr

IMG_0628 by mista.phuc, on Flickr
Step 13
After removing the projector from the housing there is no screw holding the front and rear part together so be care not to drop anything!

IMG_0630 by mista.phuc, on Flickr
Here is the stock lens, it's a little cloudy

IMG_0634 by mista.phuc, on Flickr

IMG_0635 by mista.phuc, on Flickr
Step 14
To remove the shroud, just use a flathead to lift this metal slip

IMG_0637 by mista.phuc, on Flickr
Everything taken apart

IMG_0638 by mista.phuc, on Flickr
Comparison of the stock lens and the TSX-R lens

IMG_0640 by mista.phuc, on Flickr
Step 14
After swapping the lens put the shroud back on and push the flap bottom to secure it. THIS PART TOOK ME FOREVER, it's really really hard to do it so just be patient. You will have to pull that tab below the metal bump.

IMG_0642 by mista.phuc, on Flickr
Step 15
When you reassemble the projector this is where you add the #8 washers to add more color to your projector. I add 3 #8 washers to the BOTTOM 2 screws. I tried 2 but 3 seem to give me more color.

IMG_0644 by mista.phuc, on Flickr
Now just reverse the above step and reattach everything...

IMG_0648 by mista.phuc, on Flickr

IMG_0653 by mista.phuc, on Flickr
Step 15
Once you put everything back together, place the headlight back into the oven and bake for 15 mins at 250 degree. Once the headlight is done baking, take it out using your hand and try to push the headlight together. A good way to know if it's tight enough is to make sure that those tabs back in step 9 are back in place. Once you done that using clamps to make sure it stay secure.

IMG_0657 by mista.phuc, on Flickr
That is it, now just repeat all the step to work on the other headlight.
Now for some finishing pictures:

IMG_0674 by mista.phuc, on Flickr

IMG_0676 by mista.phuc, on Flickr

IMG_0682 by mista.phuc, on Flickr
Picture below where you can clearly see the color on the cutoff. There are a lot of blue and purple, and with the new clear lens the cutoff is sharper!

IMG_0688 by mista.phuc, on Flickr
Close up

IMG_0690 by mista.phuc, on Flickr
Look at all that color

IMG_0699 by mista.phuc, on Flickr
Finish product

IMG_0700 by mista.phuc, on Flickr
I hope this DIY was helpful to you guys. If you have any questions please feel free to ask me.
Credit to this thread as it help me prepare for my project.
https://acurazine.com/forums/2g-tsx-2009-2014-143/g-009-diy-cleared-headlights-2g-lots-pictures-767424/
Final thought: I think there are a lot more color because of the color mod and because I swap the lens my output is a little brighter and my cutoff is a lot sharper. In all I'm very satisfied with the results, though I was expecting more color but the amount I'm getting is good enough. As for the clear headlight I initially don't like it because it's so blend..., but it's starting to grow on me.
Before we start: please note that this is for reference only, if you choose to do this mod and follow my instruction I am not responsible if you injury our self, other, or any property. SO PLEASE DO THIS AT YOUR OWN RISK.
Now the only tools you will need is:
-Flathead screwdriver
-Phillips screwdriver
-Socket wrench
-10mm socket head(a extension will be help, but not necessary)
-oven mitts
IMG_0660 by mista.phuc, on Flickr
Step 1.
Remove your bumper. I found that if you start from where the grill is, it is much easier and less nerve bending then starting from the wheels are.
IMG_0569 by mista.phuc, on Flickr
IMG_0571 by mista.phuc, on Flickr
Step 2
Remove the 4 screws securing the headlight.
IMG_0575 by mista.phuc, on Flickr
IMG_0576 by mista.phuc, on Flickr
IMG_0577 by mista.phuc, on Flickr
IMG_0578 by mista.phuc, on Flickr
Step 3
Remove the highbeam and blinkers bulb and wiring, also remove the clip that attach the wiring onto the headlight.
IMG_0579 by mista.phuc, on Flickr
Here's all the wiring that should be removed.
IMG_0580 by mista.phuc, on Flickr
Give it some shut eyes
IMG_0583 by mista.phuc, on Flickr
Step 5
Now on the bottom of the headlight you will need to remove the 1 screw that is holding the plastic piece. The piece that your bumper lock onto.
IMG_0585 by mista.phuc, on Flickr
Step 6
Remove the 3 screws that is holding the ballast on. And then remove the ballast by detaching this wire.
IMG_0586 by mista.phuc, on Flickr
Step 7
Now there are 4 screws that will be removed, they are located around the headlight.
IMG_0588 by mista.phuc, on Flickr
IMG_0589 by mista.phuc, on Flickr
IMG_0590 by mista.phuc, on Flickr
IMG_0593 by mista.phuc, on Flickr
Below is a picture of all the screws you need to remove: The top 3 is for the ballast
the bottom 4 is for the headlight
the middle is for the plastic piece
IMG_0656 by mista.phuc, on Flickr
Step 8
Now placed the headlight(with no bulb inside) in the oven and bake for 15mins. at 250 degree. I know that many different uses different degree and time. But I always used this and it work out for me.
IMG_0596 by mista.phuc, on Flickr
IMG_0597 by mista.phuc, on Flickr
Step 9
Once the headlight is done baking remove it from the oven and start by lift up all tabs like these
IMG_0602 by mista.phuc, on Flickr
Then using a flat-head, pry open on end of the headlight and from there you should be able to pull the headlight apart. If you're having problem you will have to either rebake it a little more or make sure that a tab is not the reason why. Using a headlight to splice through the sealant does help, just be careful not let the flat-head touches anything inside the headlight
IMG_0603 by mista.phuc, on Flickr
IMG_0604 by mista.phuc, on Flickr
IMG_0605 by mista.phuc, on Flickr
Step 10
Remove the following screws plus 1 or 2 more should be to the left of the picture. This will allow you to remove the housing from the plastic housing.
IMG_0606 by mista.phuc, on Flickr
IMG_0608 by mista.phuc, on Flickr
IMG_0609 by mista.phuc, on Flickr
IMG_0609 by mista.phuc, on Flickr
With a little push this piece should come right out.
IMG_0610 by mista.phuc, on Flickr
Step 11
Now remove the amber piece from the turning signal housing. Just pull the metal tab and slowly pull the amber piece off the metal plate. There is 2 tab that will need to push out to help make removing the amber piece easier.
IMG_0613 by mista.phuc, on Flickr
IMG_0614 by mista.phuc, on Flickr
IMG_0615 by mista.phuc, on Flickr
Step 12
Now onto the removing the projectors. there is 4 screws that will need to be remove. But I found that one of them is a PIA especially when i have really bad luck with it. I always break it when i try to remove it. But no fear, I found a way around not removing it..
Remove these 2 screws
IMG_0616 by mista.phuc, on Flickr
Now remove this screw, IT WILL TAKE SOME TIME SINCE IT IS VERY LONG. This is the screw you need to adjust to adjust how high or low your headlight aim is.
IMG_0617 by mista.phuc, on Flickr
This is the screw that I always have bad luck with
IMG_0622 by mista.phuc, on Flickr
But i found out that you can just turn the piece that is attach to the projecor upside down and you will be able to remove the 3 or 4 screw that will allow you to detach the projector ONLY.
There might be 3 or 4, I don't really remember
IMG_0623 by mista.phuc, on Flickr
IMG_0628 by mista.phuc, on Flickr
Step 13
After removing the projector from the housing there is no screw holding the front and rear part together so be care not to drop anything!
IMG_0630 by mista.phuc, on Flickr
Here is the stock lens, it's a little cloudy
IMG_0634 by mista.phuc, on Flickr
IMG_0635 by mista.phuc, on Flickr
Step 14
To remove the shroud, just use a flathead to lift this metal slip
IMG_0637 by mista.phuc, on Flickr
Everything taken apart
IMG_0638 by mista.phuc, on Flickr
Comparison of the stock lens and the TSX-R lens
IMG_0640 by mista.phuc, on Flickr
Step 14
After swapping the lens put the shroud back on and push the flap bottom to secure it. THIS PART TOOK ME FOREVER, it's really really hard to do it so just be patient. You will have to pull that tab below the metal bump.
IMG_0642 by mista.phuc, on Flickr
Step 15
When you reassemble the projector this is where you add the #8 washers to add more color to your projector. I add 3 #8 washers to the BOTTOM 2 screws. I tried 2 but 3 seem to give me more color.
IMG_0644 by mista.phuc, on Flickr
Now just reverse the above step and reattach everything...
IMG_0648 by mista.phuc, on Flickr
IMG_0653 by mista.phuc, on Flickr
Step 15
Once you put everything back together, place the headlight back into the oven and bake for 15 mins at 250 degree. Once the headlight is done baking, take it out using your hand and try to push the headlight together. A good way to know if it's tight enough is to make sure that those tabs back in step 9 are back in place. Once you done that using clamps to make sure it stay secure.
IMG_0657 by mista.phuc, on Flickr
That is it, now just repeat all the step to work on the other headlight.
Now for some finishing pictures:
IMG_0674 by mista.phuc, on Flickr
IMG_0676 by mista.phuc, on Flickr
IMG_0682 by mista.phuc, on Flickr
Picture below where you can clearly see the color on the cutoff. There are a lot of blue and purple, and with the new clear lens the cutoff is sharper!
IMG_0688 by mista.phuc, on Flickr
Close up
IMG_0690 by mista.phuc, on Flickr
Look at all that color
IMG_0699 by mista.phuc, on Flickr
Finish product
IMG_0700 by mista.phuc, on Flickr
I hope this DIY was helpful to you guys. If you have any questions please feel free to ask me.
Credit to this thread as it help me prepare for my project.
https://acurazine.com/forums/2g-tsx-2009-2014-143/g-009-diy-cleared-headlights-2g-lots-pictures-767424/
Final thought: I think there are a lot more color because of the color mod and because I swap the lens my output is a little brighter and my cutoff is a lot sharper. In all I'm very satisfied with the results, though I was expecting more color but the amount I'm getting is good enough. As for the clear headlight I initially don't like it because it's so blend..., but it's starting to grow on me.

The following 2 users liked this post by aznpapaya:
w0nd3rlusTL (07-20-2012),
xtcnrice (12-19-2016)
06-16-2012, 03:16 PM
#2
ROTAREDOM
Maybe it's just me, but I don't see the "color" you're talking about
06-16-2012, 05:11 PM
#3
Intermediate
can i ask, did you put any new sealants before closing the headlights?? Also, i assume you bake the headlights again so that the plastics are soft again for us to clip the initial clip back in place??
06-16-2012, 07:39 PM
#4
Before:
http://www.flickr.com/photos/55999657@N04/7382315468/http://www.flickr.com/photos/55999657@N04/7382315468/ by http://www.flickr.com/people/55999657@N04/, on Flickr
After:
http://www.flickr.com/photos/55999657@N04/7381342132/http://www.flickr.com/photos/55999657@N04/7381342132/ by http://www.flickr.com/people/55999657@N04/, on Flickr
Yes I did add more sealant before putting the headlight back together. And yes I did rebake the headlight to reseal it.
06-16-2012, 07:58 PM
#5
That's not more "color" - that's just more glare. You took one of the best headlighting units in the industry and screwed it up. Congrats.
There is a reason that the projector is built the way it is. Honda engineers spent literally millions perfecting that projector and you dumped the lens for some cheap piece of crap and added spacers to screw up the focus.
There is a reason that the projector is built the way it is. Honda engineers spent literally millions perfecting that projector and you dumped the lens for some cheap piece of crap and added spacers to screw up the focus.
Last edited by ceb; 06-16-2012 at 08:04 PM.
06-16-2012, 08:15 PM
#6
That's not more "color" - that's just more glare. You took one of the best headlighting units in the industry and screwed it up. Congrats.
There is a reason that the projector is built the way it is. Honda engineers spent literally millions perfecting that projector and you dumped the lens for some cheap piece of crap and added spacers to screw up the focus.
There is a reason that the projector is built the way it is. Honda engineers spent literally millions perfecting that projector and you dumped the lens for some cheap piece of crap and added spacers to screw up the focus.

Trending Topics
06-17-2012, 02:11 AM
#11

i'll add this to the DIY thread whenever i get a response from ken, though i do agree with ceb, these stock headlights are pretty boss, and i could see how adding spacers produces glare. the light actually refracts more because it has more time to spread prior to hitting the lens. i'd actually bet that you removed some of the distance. like how far ahead of you there is usable light. the RSX lens vs the TSX lens, if it is the same shape, the lack of fogginess might help a bit without a negative. nonetheless, good job, thanks for the DIY
06-17-2012, 10:54 AM
#12
Everyday I'm rofling

 06-17-2012, 03:56 PM
#14
ROTAREDOM
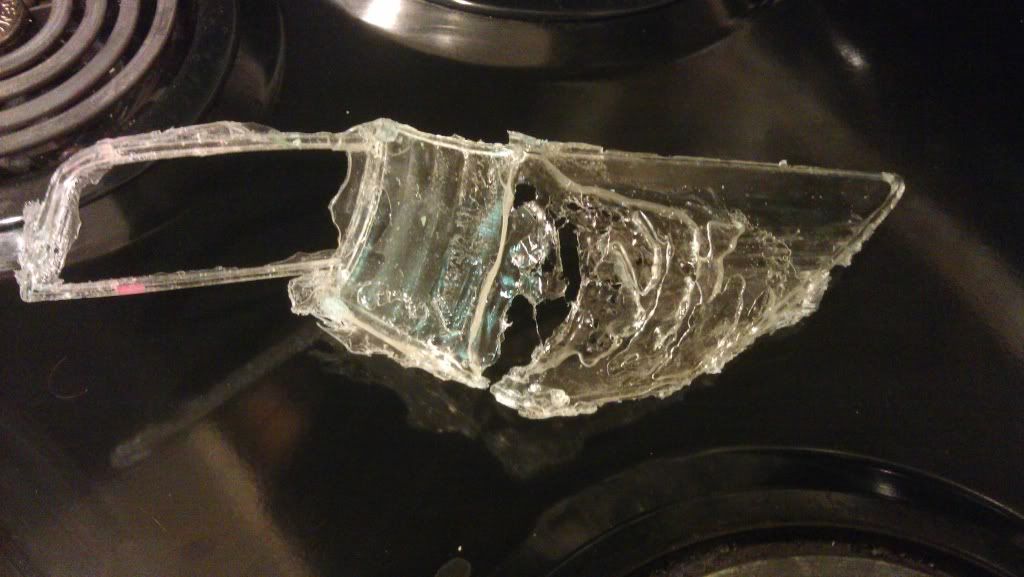
The smaller one came out well, because it was flat. The big one however is WAY harder because of its terrible shape. I also dont think I made the mold as well as I could have. The big one is a result of 3 pours, in which the last one trying to get that rounded part failed. These are untrimmed but I think you can still get the idea. I am about $120 into this failed project and I think I have finally given up on it.
06-17-2012, 05:14 PM
#15
Everyday I'm rofling
If they were flat like the small one it would so easy. My thinking was I would make a mold for it, make like 4 sets, and sell them on here which would pay for the supplies. Little did I know what I was getting myself into.
06-17-2012, 07:15 PM
#16
ROTAREDOM
That's a pretty good attempt though! I'm surprised you were able to get as far as you did. Molds are not easy at all
 07-20-2012, 02:07 AM
#19
Burning Brakes
That's not more "color" - that's just more glare. You took one of the best headlighting units in the industry and screwed it up. Congrats.
There is a reason that the projector is built the way it is. Honda engineers spent literally millions perfecting that projector and you dumped the lens for some cheap piece of crap and added spacers to screw up the focus.
There is a reason that the projector is built the way it is. Honda engineers spent literally millions perfecting that projector and you dumped the lens for some cheap piece of crap and added spacers to screw up the focus.
07-20-2012, 09:00 AM
#20
To each his own. I love my color mod! If it make me rice, then you can call me Mr. Rice Cake....lol
Last edited by aznpapaya; 07-20-2012 at 09:02 AM.
07-20-2012, 12:13 PM
#21
Burning Brakes
It's not necessarily rice (god know what this word means now lol) it's just not the best move. And if anything my green DRL is more rice than this lol. But in your DIY you said adding the washers make more color. Why didn't you try adding washers to the stock lens cause your cut off line is way off now
07-20-2012, 12:29 PM
#22
It's not necessarily rice (god know what this word means now lol) it's just not the best move. And if anything my green DRL is more rice than this lol. But in your DIY you said adding the washers make more color. Why didn't you try adding washers to the stock lens cause your cut off line is way off now
The reason for the clear lens is to make the cut off sharper and increase light output. In my opinion it does just that, if you look closely at my pictures the cut off is a lot sharper then stock lens, and I do notice an increase it light output.

Thread
Thread Starter
Forum
Replies
Last Post
siularbar
1/2G MDX (2001-2013)
2
09-11-2015 10:40 AM