Torque Spec for Shock Assembly 3G Garage #D-091
#1
AZ Community Team
Thread Starter
Join Date: May 2007
Location: N35°03'16.75", W 080°51'0.9"
Posts: 32,488
Received 7,770 Likes
on
4,341 Posts
Torque Spec for Shock Assembly 3G Garage #D-091
Anybody have a Service Manual that can post the Torque Spec for the nut(s) that hold the Front and Rear Shock Assemblies together?
Replacing springs tomorrow (H&R Sports) and we have scans and Torque Specs for the Seats and for the Suspension Connections to the car (Strut Tower, End Links, Thru Bolt, Pinch Bolt, etc).
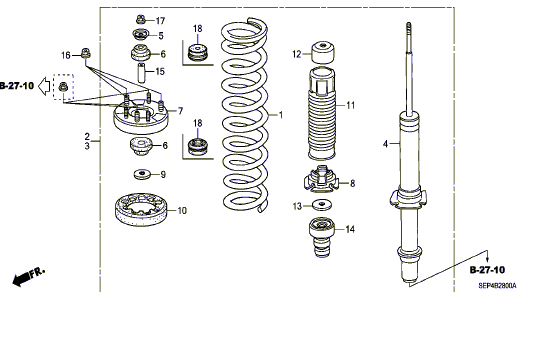
What I don't have are Specs and/or Scans for the the nut(s) that hold the Spring in place to the Damper itself. In the attached parts drawings, I think these are items 19 (Rear) and 17 (Front).
Rear Assy:

Front Assy:

TIA.
Replacing springs tomorrow (H&R Sports) and we have scans and Torque Specs for the Seats and for the Suspension Connections to the car (Strut Tower, End Links, Thru Bolt, Pinch Bolt, etc).
What I don't have are Specs and/or Scans for the the nut(s) that hold the Spring in place to the Damper itself. In the attached parts drawings, I think these are items 19 (Rear) and 17 (Front).
Rear Assy:

Front Assy:

TIA.

#2
You only asked for the torque specs, but I scanned all the pages for the front and rear shock/damper replacement so they would all be in one place.


The following 3 users liked this post by Ron A:
#4
AZ Community Team
Thread Starter
Join Date: May 2007
Location: N35°03'16.75", W 080°51'0.9"
Posts: 32,488
Received 7,770 Likes
on
4,341 Posts
Ron A, you are my hero. 
Used this post throughout the day. All parts torqued to spec. Thanks again.

Used this post throughout the day. All parts torqued to spec. Thanks again.

#7
I was naively thinking I could change the shock aborbers myself to save a little cash on my 04 TL, but after looking through the instructions I overestimated my abilities. Hope the Acura dealership I ordered them from will take them back. I owe you a thanks as well Ron.
Trending Topics
#8
I was naively thinking I could change the shock aborbers myself to save a little cash on my 04 TL, but after looking through the instructions I overestimated my abilities. Hope the Acura dealership I ordered them from will take them back. I owe you a thanks as well Ron.
It's always nice to see an appreciation for my work. Thank you.
#9
Notes for anyone attempting this. I bought the entire front strut assembly so it was fairly easy for me to install. However, I did run into some difficulties trying to insert the bottom pin labeled 'E' on page 18-28 of the print out above. The secret is to use a crow bar & leverage the wheel/rotor at the back of the wheel against the sway bar lower mount bolt. Push down hard or have an assistant do it. I highly recommend having an assistant handy. This will force the bolt holes on the damper fork/wishbone (labeled 'A' on page 18-23) to realign momentarily so that you can reinsert the pin back through the damper fork. If aligned correctly, you can push the pin back in with two fingers. If you're hammering it back in then something is wrong. Also, don't try to get smart & reinsert the pin from the back/rear of the vehicle. It doesn't work that way! Always reinsert the pin in from the front! It was a joke to re install once I figure that out. I hope I helped someone with this info.
Last edited by VanGuy; 08-18-2012 at 08:13 PM.
The following users liked this post:
Bearcat94 (08-18-2012)
#12
Note: If the holes are aligned then you can use just finger pressure to slide the bolt back through.
Last edited by VanGuy; 07-03-2013 at 11:50 PM.
Thread
Thread Starter
Forum
Replies
Last Post
Yumcha
Automotive News
1
09-17-2015 09:01 PM


