Bathroom remodel in progress *Pics*
 02-15-2008, 09:54 PM
#1

Bathroom remodel in progress *Pics*
Here's some photos of a bathroom remodel I'm in the middle of. It's a downstairs half bath about 6'x7'. I did not take any before shots  but I'm hoping I have some I can find from when I bought the house last summer.
Here I'm removing the old sink and vanity. The tiolet is already out. The bottom half of the walls were covered with dark wood paneling with dark wood trim which I removed prior to taking the photos.


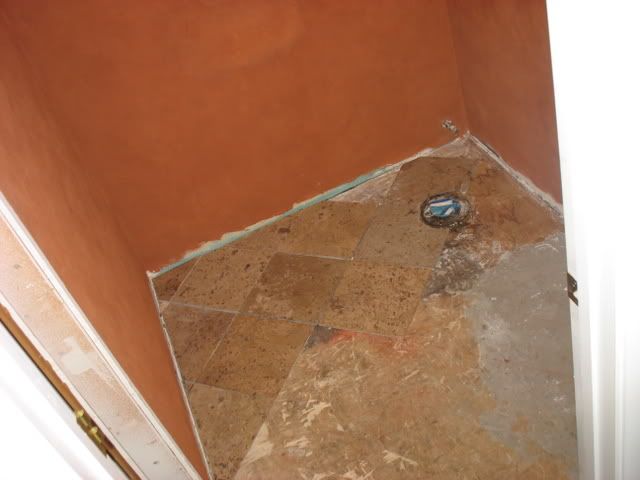
I removed the vanity and here I'm removing the old linoleum floor. Note the mold I discovered on the drywall that was under the wood paneling. This is where the water hook up is for the tiolet and at some point it leaked causing the mold.

So with the linoleum floor removed I cut out the bad drywall.

And patched in green board.

Here I am mudding the new drywall. The rest of the walls were in good shape but I gave them a skim coat as well.

With the drywall repaired I primed the new drywall and used some light tan paint I had lying around and mixed it with a little sand texture to blend the new drywall with the old wall texture. This was also the base for the new paint.

Next my wife started painting using a suede finish Ralph Lauren paint.

With the walls finished...

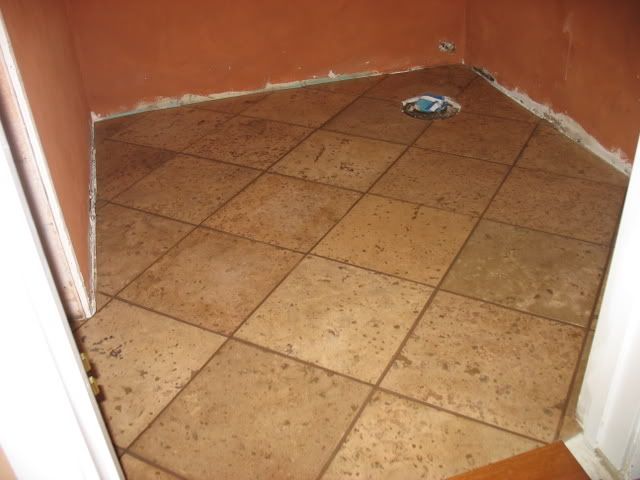
...I layed the new tile. I'm using a hoaned finish 12x12 travertine tile set diagonally. I layed out the tiles and made all of my cuts first before setting them.
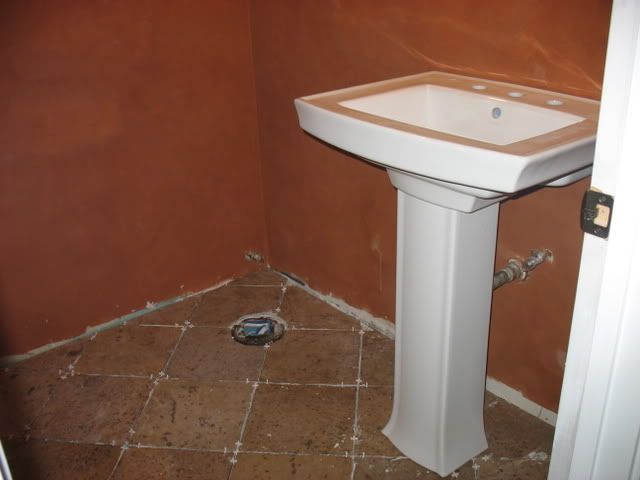
Here the tile is set and for the heck of it I set the new pedestal sink in place to see how it will look. So far so good...
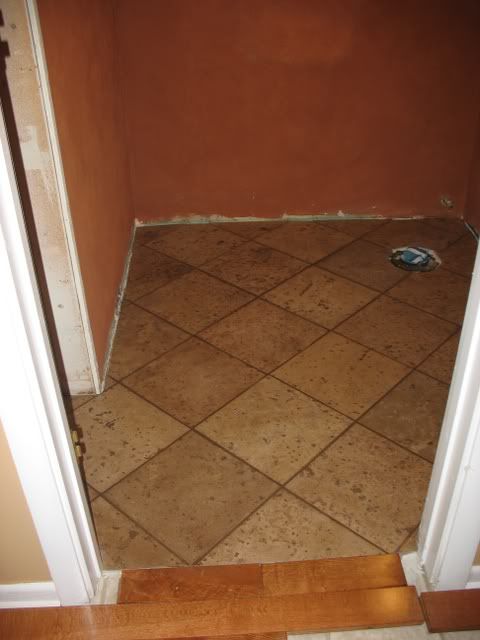
Tomorrow I grout and then I can install the new white base moldings. Once the moldings are in I can install the new tiolet and install the pedestal sink. There is a closet which you can kind of see the opening for in the 2nd to the last picture to the left of the picture. I removed the closet door and casing and will be putting in a built in cabinet and shelves instead which I pick up tomorrow. Also, I have 4" recessed lights to install in the ceiling. That's it for now. Looking forward to getting it all complete. Once this is done I'm redoing the kitchen
but I'm hoping I have some I can find from when I bought the house last summer.Here I'm removing the old sink and vanity. The tiolet is already out. The bottom half of the walls were covered with dark wood paneling with dark wood trim which I removed prior to taking the photos.
I removed the vanity and here I'm removing the old linoleum floor. Note the mold I discovered on the drywall that was under the wood paneling. This is where the water hook up is for the tiolet and at some point it leaked causing the mold.
So with the linoleum floor removed I cut out the bad drywall.
And patched in green board.
Here I am mudding the new drywall. The rest of the walls were in good shape but I gave them a skim coat as well.
With the drywall repaired I primed the new drywall and used some light tan paint I had lying around and mixed it with a little sand texture to blend the new drywall with the old wall texture. This was also the base for the new paint.
Next my wife started painting using a suede finish Ralph Lauren paint.
With the walls finished...
...I layed the new tile. I'm using a hoaned finish 12x12 travertine tile set diagonally. I layed out the tiles and made all of my cuts first before setting them.
Here the tile is set and for the heck of it I set the new pedestal sink in place to see how it will look. So far so good...
Tomorrow I grout and then I can install the new white base moldings. Once the moldings are in I can install the new tiolet and install the pedestal sink. There is a closet which you can kind of see the opening for in the 2nd to the last picture to the left of the picture. I removed the closet door and casing and will be putting in a built in cabinet and shelves instead which I pick up tomorrow. Also, I have 4" recessed lights to install in the ceiling. That's it for now. Looking forward to getting it all complete. Once this is done I'm redoing the kitchen
Last edited by 65 Fury Convert; 02-15-2008 at 09:58 PM.

 02-16-2008, 01:45 PM
#3
I've never tiled before this and it wasn't that hard at all. I grouted this morning - need to wait a day before I can walk on the tile and put the trim up.
02-17-2008, 01:13 AM
#4
Senior Moderator
nice work
02-17-2008, 03:37 AM
#5
Chloe @ 17mo
Very nice job. I love the choice of materials. Looks like your old flooring extended from outside the bathroom, so did you replace all the linoleum or just what was the bathroom?
02-17-2008, 11:30 AM
#6
Originally Posted by AsianRage
Very nice job. I love the choice of materials. Looks like your old flooring extended from outside the bathroom, so did you replace all the linoleum or just what was the bathroom?
 I'm putting down engineered harwood when the kitchen remodel starts.
02-17-2008, 11:37 AM
I'm putting down engineered harwood when the kitchen remodel starts.
02-17-2008, 11:37 AM
#7
I miss my 03 CL-S :(
I used the RL suede finish on my bedroom - looks great, but it was a PITA to apply. I wonder how it'll hold up with the humidity in the bathroom. I've heard people complain about using it in bathrooms and kitchens because it's not easy to clean.
Trending Topics
02-17-2008, 08:33 PM
#9
I made hardly any progress this weekend. I got the grout done but did not even start the trim. I was able to make it Home Depot to buy the trim but that was about it. With a 7 month old baby in the house I had to keep quiet.
By the way, the bottom of this pic you can see the hardwood floor we bought for the rest of the downstairs.
By the way, the bottom of this pic you can see the hardwood floor we bought for the rest of the downstairs.
02-18-2008, 03:39 AM
#10
I feel the need...
Originally Posted by 65 Fury Convert
I'm putting down engineered hardwood when the kitchen remodel starts.
http://www.ambientbp.com/
02-18-2008, 08:39 AM
#11
Three Wheelin'
Join Date: Aug 2003
Location: Winter Park, FL
Age: 43
Posts: 1,742
Likes: 0
Received 0 Likes
on
0 Posts
looks nice. hopefully ill be working on my bathroom this coming weekend. I have the new vanity and counter laying in my living room waiting to be put in...
02-18-2008, 06:31 PM
#13
Scottman111: Looks awesome. The tiling looks great considering it's your first time.
Did you add/remove any electrical stuff?
Did you add/remove any electrical stuff?
RyeCL: looks nice. hopefully ill be working on my bathroom this coming weekend. I have the new vanity and counter laying in my living room waiting to be put in...

Thanks everyone, I'll post some pics when I get the trim installed.
02-18-2008, 07:25 PM
#14
registered pw
Join Date: Aug 2003
Location: south central pa
Age: 49
Posts: 38,821
Received 354 Likes
on
252 Posts
looks great. we are going to tile our bathrooms and replace the countertops also. it looks pretty easy. did you use a tile cutting machine to cut the tile, or did you use an angle grinder or circular saw?
02-19-2008, 08:01 AM
#15
Originally Posted by dallison
looks great. we are going to tile our bathrooms and replace the countertops also. it looks pretty easy. did you use a tile cutting machine to cut the tile, or did you use an angle grinder or circular saw?
FREE SHIPPING � Northern Industrial Wet Tile Saw � 7in. Blade Size
Order Today and Save $6
This Northern Industrial 7in. wet tile saw delivers ample power to cut a variety of wall and floor tile sizes. Can also cut granite tiles. All-metal saw is very sturdy. A great value for residential tile work. $53.99
Order Today and Save $6
This Northern Industrial 7in. wet tile saw delivers ample power to cut a variety of wall and floor tile sizes. Can also cut granite tiles. All-metal saw is very sturdy. A great value for residential tile work. $53.99

 02-24-2008, 10:18 PM
#18
Chloe @ 17mo
Originally Posted by 65 Fury Convert
I made hardly any progress this weekend. I got the grout done but did not even start the trim. I was able to make it Home Depot to buy the trim but that was about it. With a 7 month old baby in the house I had to keep quiet.

By the way, the bottom of this pic you can see the hardwood floor we bought for the rest of the downstairs.

By the way, the bottom of this pic you can see the hardwood floor we bought for the rest of the downstairs.
07-23-2008, 05:01 PM
#19
Along with my hardwood floor thread thought it was about time I updated my bathroom remodel pics with a final video.
Beisdes all of the "before" pics above, here's a shot from when I first moved in. Note the dark paneling and the slab door.

And now the after.

Beisdes all of the "before" pics above, here's a shot from when I first moved in. Note the dark paneling and the slab door.
And now the after.
07-23-2008, 06:30 PM
#22
The sizzle in the Steak
Looks nice
07-23-2008, 07:10 PM
#23
Originally Posted by moeronn
Very nice work. That built-in nook area looks awesome.
07-31-2008, 08:00 AM
#26
Instructor
Join Date: Feb 2008
Location: Virginia
Age: 47
Posts: 232
Likes: 0
Received 0 Likes
on
0 Posts
Things appear to be going good! I guess we could always business expense a trip to your area and add a frameless shower enclosure (what my hubby and I do) to that bathroom.
Oh, don't forget to slope the tile inward toward the shower stall so any drips fall inward not toward main floor. Of course, tub enclosure N/A.
Best of luck!
Oh, don't forget to slope the tile inward toward the shower stall so any drips fall inward not toward main floor. Of course, tub enclosure N/A.
Best of luck!
07-31-2008, 08:55 AM
#28
Originally Posted by Beth for RPGAH
Things appear to be going good! I guess we could always business expense a trip to your area and add a frameless shower enclosure (what my hubby and I do) to that bathroom.
Oh, don't forget to slope the tile inward toward the shower stall so any drips fall inward not toward main floor. Of course, tub enclosure N/A.
Best of luck!
Oh, don't forget to slope the tile inward toward the shower stall so any drips fall inward not toward main floor. Of course, tub enclosure N/A.
Best of luck!

 07-31-2008, 02:09 PM
#30
My video of the final product isn't working....got to look into that...

Thread
Thread Starter
Forum
Replies
Last Post
MrHeeltoe
1G TSX Tires, Wheels, & Suspension
20
02-23-2023 01:54 PM
MrHeeltoe
2G TSX Tires, Wheels & Suspension
3
09-29-2015 10:43 PM
MrHeeltoe
3G TL Tires, Wheels & Suspension
0
09-28-2015 05:43 PM