
My DIY lightbox
 02-08-2009 | 07:25 PM
#1
Thread Starter
Safety Car
Joined: Feb 2004
Posts: 4,388
Likes: 487
From: Houston, Texas
My DIY lightbox
All of my pictures that I took in the Gun Enthusiasts section were taken with a lightbox that I made.
In case you're not a gun enthusiast and have stayed out of the thread, here are the posts with the pics:
https://acurazine.com/forums/showpos...postcount=2163
https://acurazine.com/forums/showpos...postcount=2135
https://acurazine.com/forums/showpos...postcount=2139
https://acurazine.com/forums/showpos...postcount=2145
https://acurazine.com/forums/showpos...postcount=2144
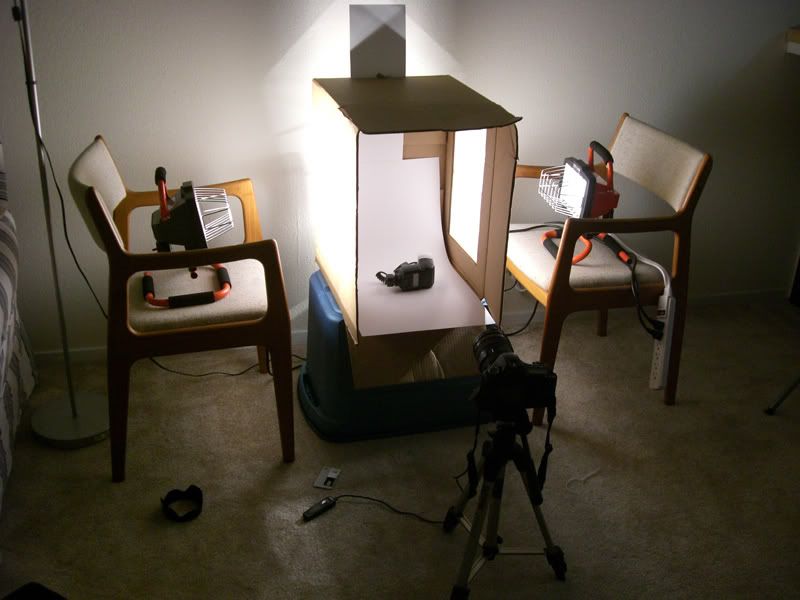
So here is the lightbox:


I took a cardboard box and cut off the flaps. Then I hollowed it out on all sides (except the bottom and one side) and glued some tissue paper that comes with gifts. There's a tradeoff on how thin you should leave the walls intact. Thick walls would be more sturdy, but would cast big shadows inside the box. I would like mine a little thinner, but as you can see, one side of my box is dying.
Inside the box, I glued a piece of posterboard that was cut to fit the box but was long enough to make a gentle curve. Be sure to keep the matte side up. If you use the glossy side, you will probably get nasty hot spots in the photo. The back of the lightbox is what used to be the bottom of the box. (BTW, the posterboard started out white, but gun oil is what all of that nasty dark stuff is).
I coated the inside of the lightbox with computer paper because the brown was casting colored spill.
This lightbox will work with any small object. Normally, I set up outdoors. No additional lighting is needed if I'm outside. The pictures above were done just to give you an idea of how it works. I have a set of strobes, but its a pain to set them up. I try to stay out of direct sunlight.
This is the results straight out of the camera:

Mainly, I have to crop the sides out and adjust the white balance.
To keep the gun standing up, I use a pencil about four inches long. The eraser end goes against the back wall of the lightbox for a little bit of rubber traction. The other end is stuck to the gun by either sticky tack or just wedged into some kind of groove on the gun. I sawed off the sharpened point of the pencil. Since it is directly behind the gun, you can't see it when the picture is taken.
If I can help out, let me know.
In case you're not a gun enthusiast and have stayed out of the thread, here are the posts with the pics:
https://acurazine.com/forums/showpos...postcount=2163
https://acurazine.com/forums/showpos...postcount=2135
https://acurazine.com/forums/showpos...postcount=2139
https://acurazine.com/forums/showpos...postcount=2145
https://acurazine.com/forums/showpos...postcount=2144
So here is the lightbox:
I took a cardboard box and cut off the flaps. Then I hollowed it out on all sides (except the bottom and one side) and glued some tissue paper that comes with gifts. There's a tradeoff on how thin you should leave the walls intact. Thick walls would be more sturdy, but would cast big shadows inside the box. I would like mine a little thinner, but as you can see, one side of my box is dying.
Inside the box, I glued a piece of posterboard that was cut to fit the box but was long enough to make a gentle curve. Be sure to keep the matte side up. If you use the glossy side, you will probably get nasty hot spots in the photo. The back of the lightbox is what used to be the bottom of the box. (BTW, the posterboard started out white, but gun oil is what all of that nasty dark stuff is).
I coated the inside of the lightbox with computer paper because the brown was casting colored spill.
This lightbox will work with any small object. Normally, I set up outdoors. No additional lighting is needed if I'm outside. The pictures above were done just to give you an idea of how it works. I have a set of strobes, but its a pain to set them up. I try to stay out of direct sunlight.
This is the results straight out of the camera:
Mainly, I have to crop the sides out and adjust the white balance.
To keep the gun standing up, I use a pencil about four inches long. The eraser end goes against the back wall of the lightbox for a little bit of rubber traction. The other end is stuck to the gun by either sticky tack or just wedged into some kind of groove on the gun. I sawed off the sharpened point of the pencil. Since it is directly behind the gun, you can't see it when the picture is taken.
If I can help out, let me know.
02-08-2009 | 07:48 PM
#2
Adventurist.
Joined: Jan 2004
Posts: 6,661
Likes: 58
From: Orange County, CA
 02-08-2009 | 09:47 PM
#4
Needs more Lemon Pledge
Joined: Mar 2005
Posts: 52,768
Likes: 2,000
From: Phoenix, AZ
Man, I tried this before, used a plastic container and dremmeled out the sides, covered with a sheet, but didn't have the right stuff for the background... Going to have to try again...
Love the results.
Love the results.
02-09-2009 | 04:35 AM
#5
Drifting
Joined: Sep 2004
Posts: 3,138
Likes: 4
From: 808
funny, on the DIY theme, I made one of these today:
http://super.nova.org/DPR/DIY01/
I think it could be useful. Haven't really given it a try yet except some random pics around the house, but should work better than the tiny built in bounce card.
http://super.nova.org/DPR/DIY01/
I think it could be useful. Haven't really given it a try yet except some random pics around the house, but should work better than the tiny built in bounce card.
02-09-2009 | 07:38 PM
#6
Senior Moderator
Joined: Jul 2002
Posts: 12,005
Likes: 9
From: Bay Area, CA
nice, I have the same kind of setup as well
a few pics I've taken with it
looking at the pics, in the posts you've made, the WB seems inconsistent. Are you using a custom WB or are you handling WB in PP?
I need to build a new box, mine's not big enough and the exposed cardboard messes with my pics
a few pics I've taken with it
looking at the pics, in the posts you've made, the WB seems inconsistent. Are you using a custom WB or are you handling WB in PP?
I need to build a new box, mine's not big enough and the exposed cardboard messes with my pics
Trending Topics
02-09-2009 | 07:55 PM
#8
Senior Moderator
Joined: Jul 2002
Posts: 12,005
Likes: 9
From: Bay Area, CA
yup, I just cut a sheet of poster board and stuck in in there. I cut a little slit at the top and fed it through there. The sides are just plain printer paper. I would suggest using foamboard to build a box to keep everything white.
02-09-2009 | 08:24 PM
#10
Senior Moderator
Joined: Jul 2002
Posts: 12,005
Likes: 9
From: Bay Area, CA
 02-09-2009 | 08:54 PM
#11
Photography Nerd
Joined: Sep 2003
Posts: 21,489
Likes: 11
From: Toronto
I made one about a year ago but I used some 3/4" PVC tubing with a bunch of elbows and T's to make a box. Then I covered it with some white fabric from a fabric store. It's sturdy enough to camp some lights directly to the frame. I glued some sections together, but left others unglued so I can break it down and store it when I don't need it. I think I spent around $30 for everything.
02-09-2009 | 11:22 PM
#14
Thread Starter
Safety Car
Joined: Feb 2004
Posts: 4,388
Likes: 487
From: Houston, Texas
I have a whi-bal (and I shoot in RAW). The problem is that for these gun pics, I was doing it outdoors. I was too lazy to setup my lights.
I started doing them around 5 PM and the lighting was changing every few minutes. Since the light was running out, and I was pretty much just production lining the pics (lotta guns), I didn't bother using the whi-bal. As the lighting changed, it got more and more off. To save time, I was shooting in AV. So settings weren't consistent pic to pic.
I will probably go back and fix the WB with the raw files later.
Also, my poster board is sort of off-white. So I couldn't use it as a reference point for WB.
Last edited by wackjum; 02-09-2009 at 11:24 PM.
02-15-2009 | 02:19 AM
#16
Needs more Lemon Pledge
Joined: Mar 2005
Posts: 52,768
Likes: 2,000
From: Phoenix, AZ
Done!
The two pics OF the setup are with the P+S, sorry about the quality, it had a hard time metering.
<a href="http://www.flickr.com/photos/jefford_e/3280194961/" title="IMG_0604 -jpeg by Jefford_E, on Flickr"><img src="http://farm4.static.flickr.com/3312/3280194961_23b4ece9af_o.jpg" width="800" height="600" alt="IMG_0604 -jpeg" /></a>
<a href="http://www.flickr.com/photos/jefford_e/3280194995/" title="IMG_0606 -jpeg by Jefford_E, on Flickr"><img src="http://farm4.static.flickr.com/3437/3280194995_bc01dd1080_o.jpg" width="800" height="600" alt="IMG_0606 -jpeg" /></a>
<a href="http://www.flickr.com/photos/jefford_e/3280195017/" title="IMG_6698 -jpeg by Jefford_E, on Flickr"><img src="http://farm4.static.flickr.com/3496/3280195017_da92675402_o.jpg" width="900" height="600" alt="IMG_6698 -jpeg" /></a>
<a href="http://www.flickr.com/photos/jefford_e/3281015370/" title="IMG_6704 -jpeg by Jefford_E, on Flickr"><img src="http://farm4.static.flickr.com/3617/3281015370_29d569ee46_o.jpg" width="600" height="900" alt="IMG_6704 -jpeg" /></a>
<a href="http://www.flickr.com/photos/jefford_e/3281015482/" title="IMG_6725 -jpeg by Jefford_E, on Flickr"><img src="http://farm4.static.flickr.com/3424/3281015482_737de958d8_o.jpg" width="528" height="900" alt="IMG_6725 -jpeg" /></a>
As per suggestions, I went to Michael's, spent about $35, and used 20"x"30 foamboard, cut to 20"x20", hat pins to hold it together, a single piece of tissue paper folded over once on itself for the side diffusion material, and posterboard cut to fit for the background.
Also used,and critically important, were two Newcastles, a Liberty Ale, and a Sierra Nevada Anniversary ale.
Off Camera Radio Controlled flash sponsored by EuRTSX
Last edited by stogie1020; 02-15-2009 at 02:22 AM.
02-15-2009 | 11:52 AM
#21
Needs more Lemon Pledge
Joined: Mar 2005
Posts: 52,768
Likes: 2,000
From: Phoenix, AZ
I used the remnant piece of foamboard from cutting the 20x30 down to 20x20, so it was 20x10, and I just freehand placed it in the center of the two panels.
All told it took about an hour to complete.
EuRTSX - worked like a champ! One is consistent while the other is not, but since I only have one flash, it's a perfect tie-over until I get skyports or radiopoppers!
All told it took about an hour to complete.
EuRTSX - worked like a champ! One is consistent while the other is not, but since I only have one flash, it's a perfect tie-over until I get skyports or radiopoppers!


 not much of a reflection...but you get the idea....


 02-17-2009 | 02:06 PM
#31
Senior Moderator
Joined: Jul 2002
Posts: 12,005
Likes: 9
From: Bay Area, CA


 02-18-2009 | 01:57 PM
#36
Senior Moderator
Joined: Jul 2002
Posts: 12,005
Likes: 9
From: Bay Area, CA
02-18-2009 | 05:52 PM
#38
Thread Starter
Safety Car
Joined: Feb 2004
Posts: 4,388
Likes: 487
From: Houston, Texas
But since Drigo shoots in RAW, it really would be a one click deal with artifacts


