TL: Noobs guide to audio.
 11-09-2009, 08:52 PM
#1
99 NBP tl
Thread Starter
iTrader: (1)
Join Date: Aug 2009
Location: Waynesboro, Pennsylvannia
Age: 33
Posts: 240
Likes: 0
Received 4 Likes
on
4 Posts
Noobs guide to audio.
Okay so I recently had to write a paper for my college english class. The point of the paper was to walk someone thorugh how to do something, so I chose the last thing I had done to my car, which was installing a sub. The teacher said to write it like the reader knew absolutely nothing so thats what I did. I thought since I already wrote it I might as well post it up for any noobs that just want a basic overview of how to install a sub. Any comments/criticism or corrections are welcome. But beware its a pretty long read.
Oh I took out the introductory paragraph becuase that is just a bunch of crap because its an english class. Also I would like to thank womey because I could not have done it with his help on the install
Power
The first step to installing a subwoofer is to get a power source. The power you should use is the battery of your car. To do this though, you have to get through one obstacle; the firewall. The firewall is located between the driver of the car and the engine, and separates the driver from the potentially explosive engine in case of a crash. In most cars there is already a small hole for the exact purpose of running wires. If that is so than all you need to do is locate the hole, and run your power line through it directly to the battery. The hole is usually located above your gas and brake petals. Look for a rubber covering a little bigger than a quarter, once you find the cover remove it and behind should be a hole with enough room to fit a wire through. Size and location of the hole my vary with different model cars. If your car does not already have a hole than the only solution will be to drill your own. Once your power wire is through the firewall connect it to the positive terminal on your battery (the red one)(see figures 2 and 3). It is very important that you connect the wire to the positive terminal and not the negative one. If the wire is connected to the negative terminal than your setup will just simply not turn on. Once you have done this it is time to move on to the next step.
Running the wires
Now that you have your power source you need to run the wires to the trunk. The trunk is where the subwoofer will be located. The wires you need the run are a wire for the power and a ground wire for a switch which will turn the subs on and off. If you have an aftermarket radio, a radio that did not come with the car originally, than you will have to run a wire from the radio to the trunk also. The way you run the wires is all a matter of personal preference. In my case I ran all my wires under the seats and trim pieces in my car so there are no wires showing at all(see figures 4 and 5.). Every car will be different. I would suggest looking for the best way to hide the wires; for example, under floor mats, seats, or trim pieces. The setup will still work as long as the power cord gets to the trunk somehow, but if the wires are hidden it will look much nicer. Now that all the wires have been run to the trunk it is time for the most important part.
Setup
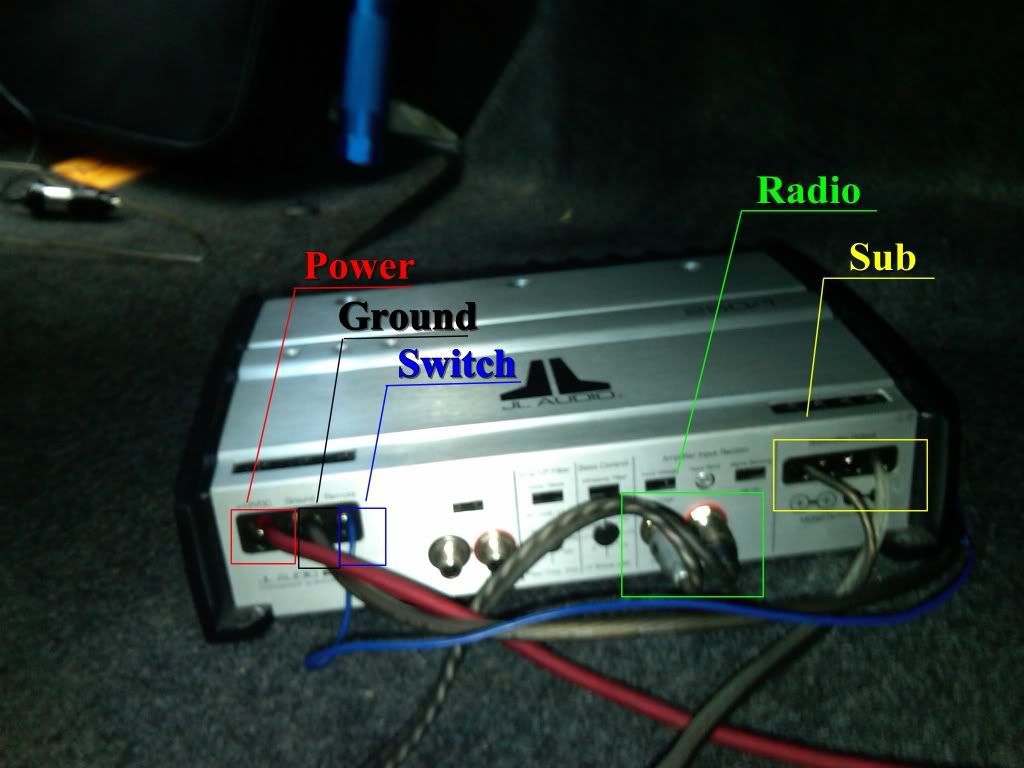
Now that your wires have been run you need to put your sub and your amp in the trunk and begin hooking everything up. On the back of the amp there are seven ports you need to use(see figure 6). Going from left to right, the first two ports are for your power and ground wires that power the amp. The power cable was run from the battery. To install a ground cable all you need to do is attach one end of the wire to the correct port in the amp and attach the other end to a screw or any other metal object. This is because when working with electricity you always need a power and ground wire for the current to work; that is why there are two sides on batteries, or two ports on your car battery. The next port is for the ground wire of your switch. The switch works by toggling the current in the ground wire on or off; if your ground wire current is off, than your power will not work and your sub will turn off. The switch can be located anywhere, it is best if it is located within reach of the driver so the subs can be turned off whenever needed. The next two ports are where you connect your amp to your sub. This is the simplest part; all you need to do is plug them in the sub and the amp. The final two ports on the very right are how you hook up your amp to your radio. What needs to be done in this step depends on what radio you have, and will vary in different cars. If you have an aftermarket radio, than you will just connect the wires directly from the radio to the amp. I do not have an aftermarket radio, so I had to do things differently. I connected the wires from my amp to a device which is connected to my rear speaker. It is called an RC converter; it converts the regular wires into the special wires I needed to connect to the amp. The final step is adjusting the settings. There are two setting that need to be adjusted. The first determines the cutoff of decibels that your sub will play. The higher the setting, the higher decibels the sub will play. Humans can only hear a range of about 0-140 decibels. The decibel setting on the sub can range from 30-200; you set it depending on what kind of music you listen too. If you listen to rap you would set it lower, around 50; but if you listen to rock you would set it around 90. The second setting determines how much bass you want; the higher the setting is, the more bass there will be.
Now your upgrade is complete. All you need to do is test everything out to make sure it all works and the settings are set to your liking. Once that is done just turn the volume up and enjoy your new and improved sound system.
Figure 1 (Supplies)
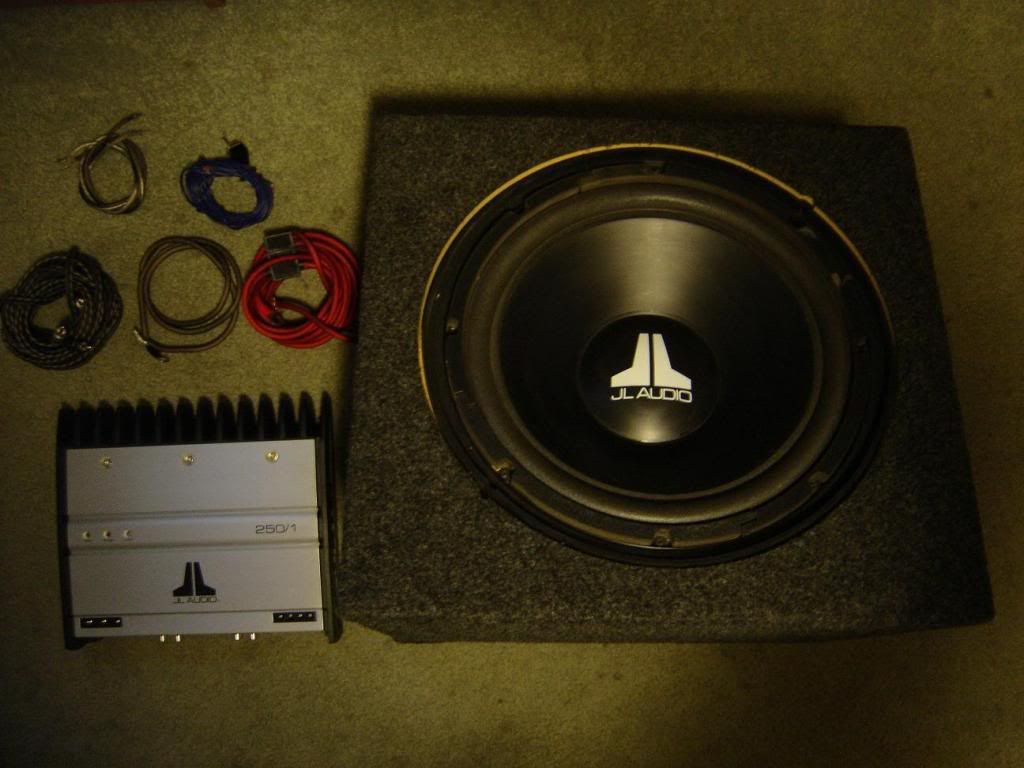
Figure 2 (Connection to battery)
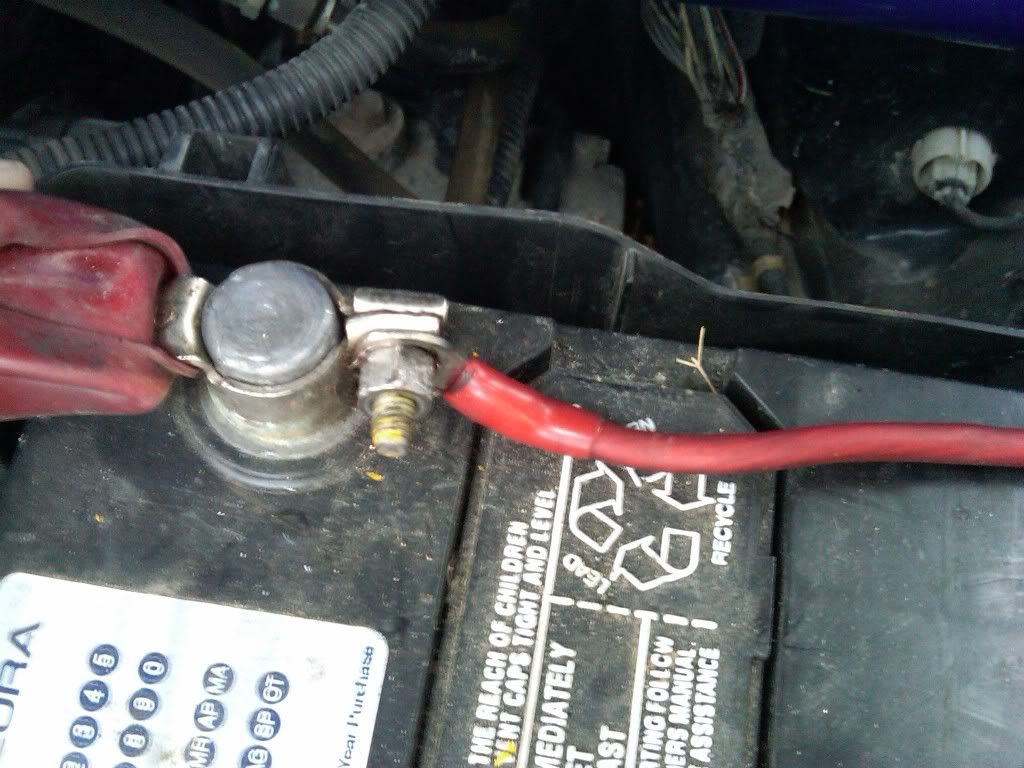
Figure 3(wire through firewall)
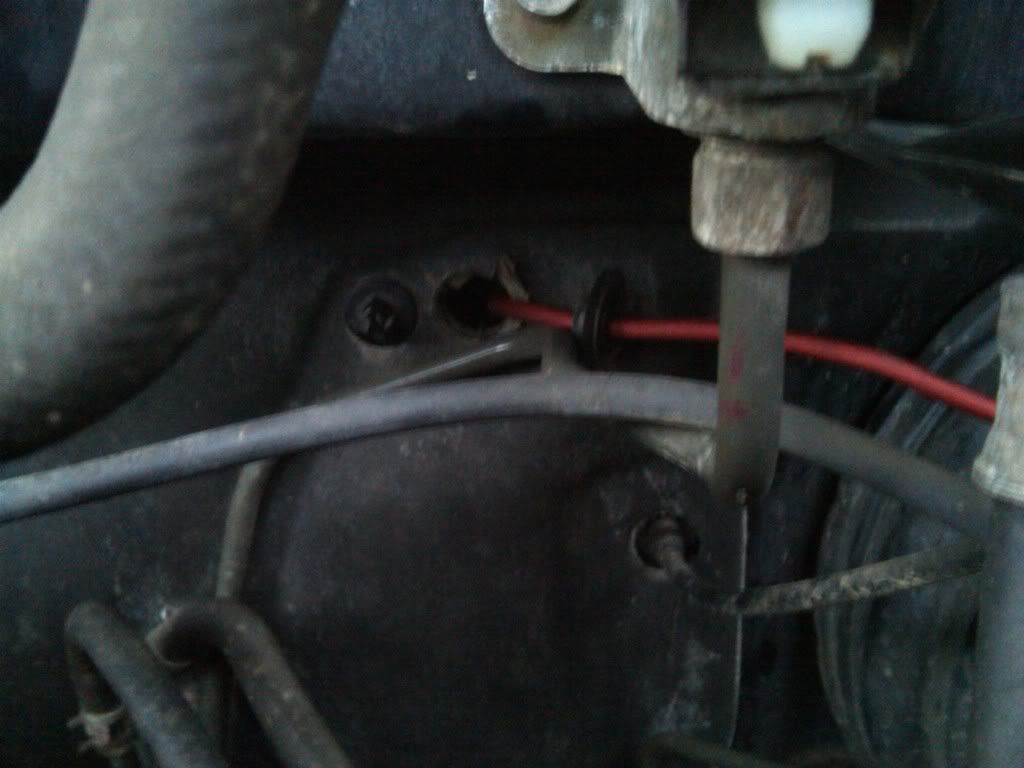
Figure 4(Where wires are hidden)
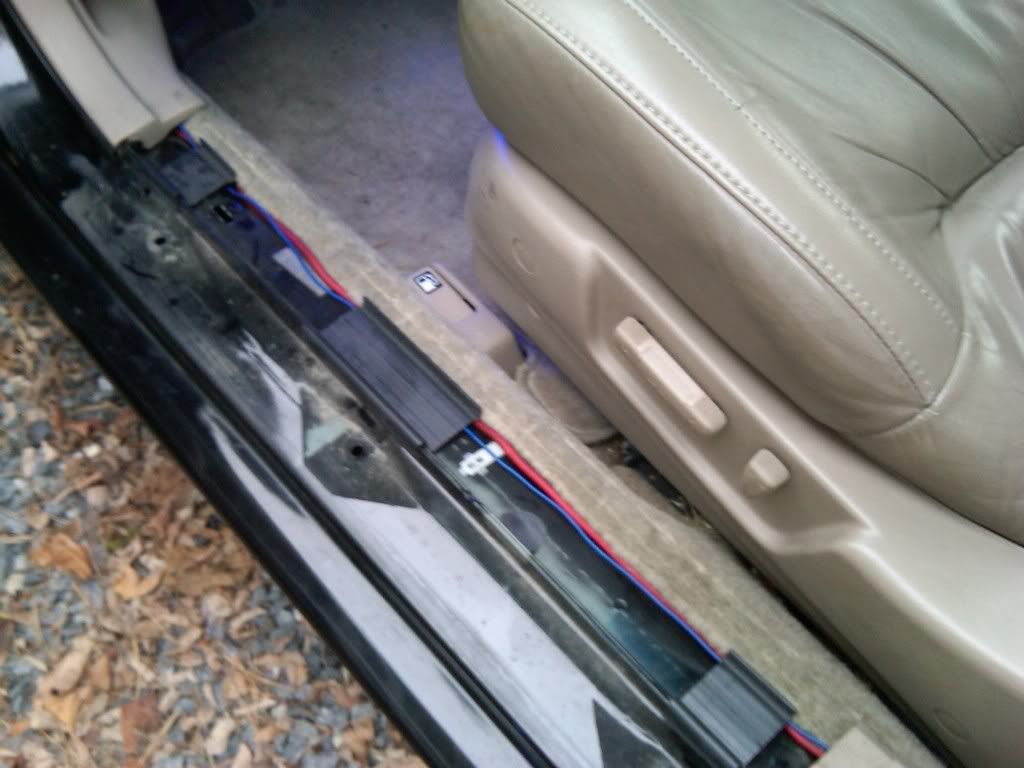
Figure 5(How it looks after)
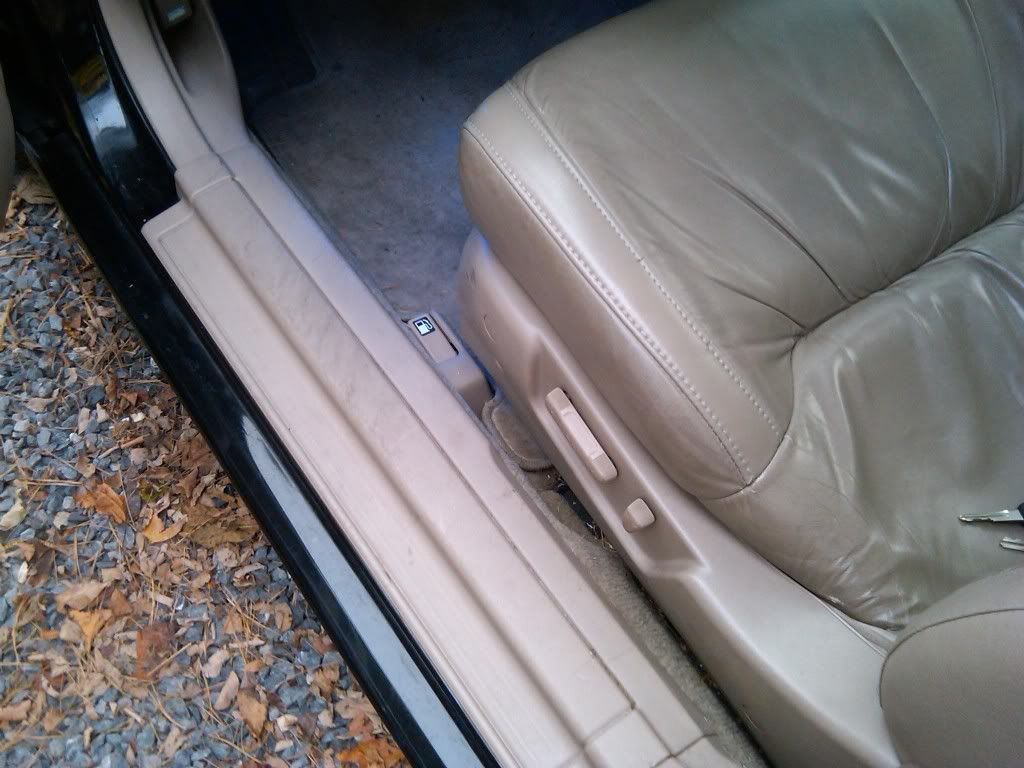
Figure 6
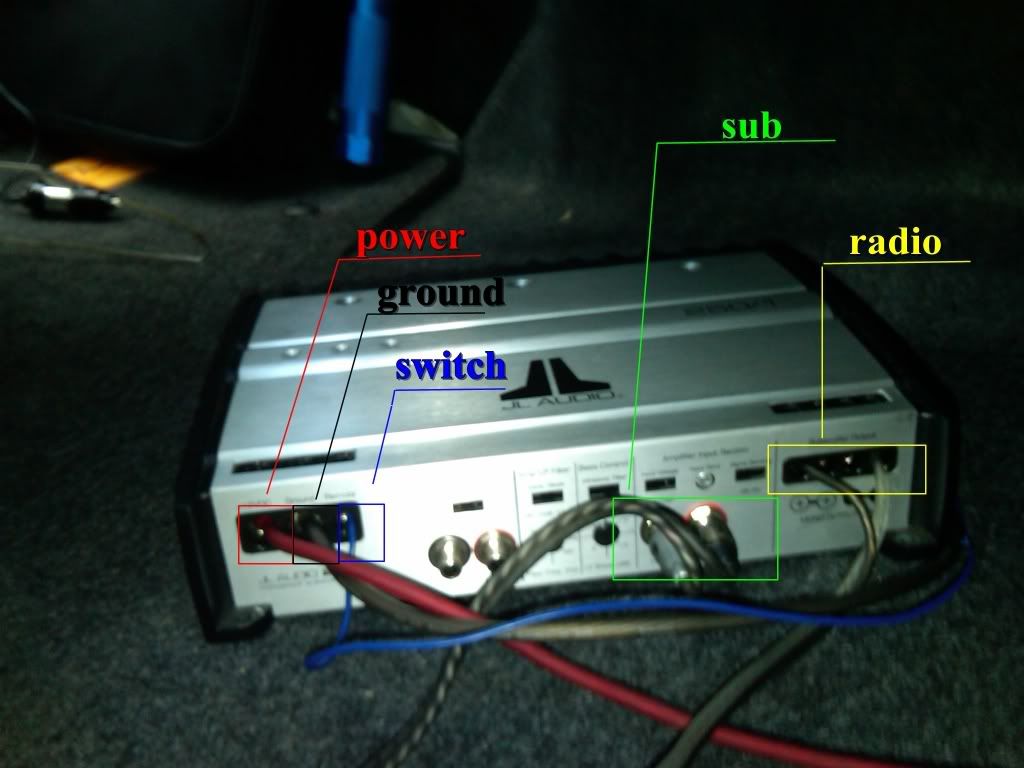
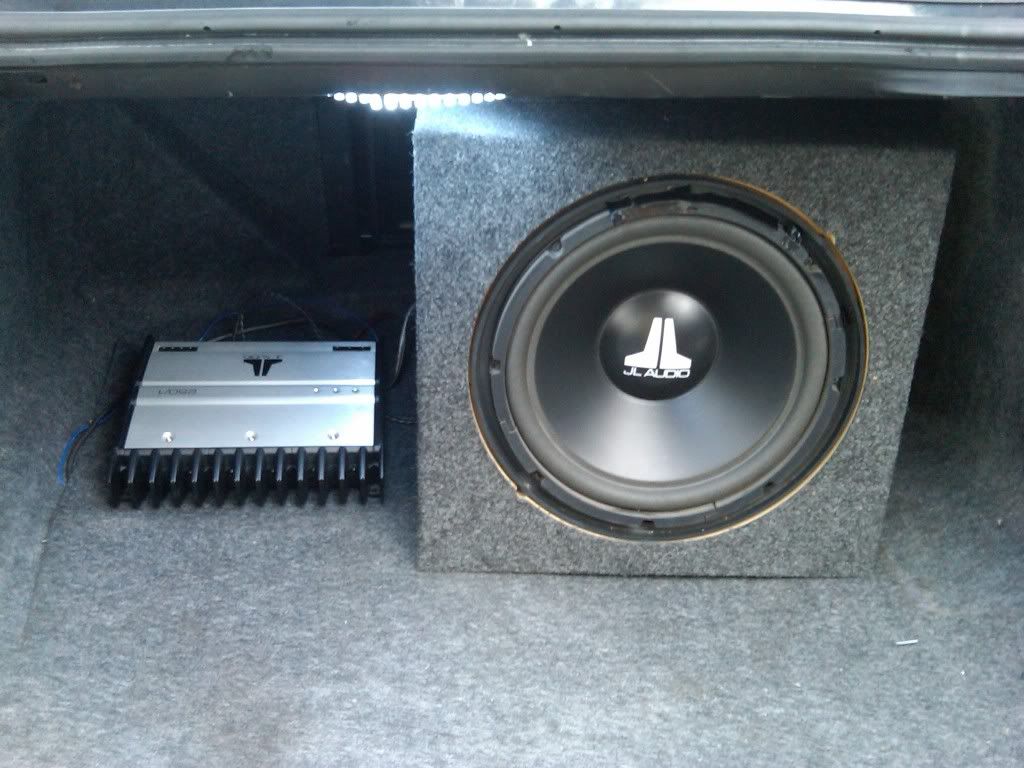
Figure 7(Final Setup)
Oh I took out the introductory paragraph becuase that is just a bunch of crap because its an english class. Also I would like to thank womey because I could not have done it with his help on the install
Power
The first step to installing a subwoofer is to get a power source. The power you should use is the battery of your car. To do this though, you have to get through one obstacle; the firewall. The firewall is located between the driver of the car and the engine, and separates the driver from the potentially explosive engine in case of a crash. In most cars there is already a small hole for the exact purpose of running wires. If that is so than all you need to do is locate the hole, and run your power line through it directly to the battery. The hole is usually located above your gas and brake petals. Look for a rubber covering a little bigger than a quarter, once you find the cover remove it and behind should be a hole with enough room to fit a wire through. Size and location of the hole my vary with different model cars. If your car does not already have a hole than the only solution will be to drill your own. Once your power wire is through the firewall connect it to the positive terminal on your battery (the red one)(see figures 2 and 3). It is very important that you connect the wire to the positive terminal and not the negative one. If the wire is connected to the negative terminal than your setup will just simply not turn on. Once you have done this it is time to move on to the next step.
Running the wires
Now that you have your power source you need to run the wires to the trunk. The trunk is where the subwoofer will be located. The wires you need the run are a wire for the power and a ground wire for a switch which will turn the subs on and off. If you have an aftermarket radio, a radio that did not come with the car originally, than you will have to run a wire from the radio to the trunk also. The way you run the wires is all a matter of personal preference. In my case I ran all my wires under the seats and trim pieces in my car so there are no wires showing at all(see figures 4 and 5.). Every car will be different. I would suggest looking for the best way to hide the wires; for example, under floor mats, seats, or trim pieces. The setup will still work as long as the power cord gets to the trunk somehow, but if the wires are hidden it will look much nicer. Now that all the wires have been run to the trunk it is time for the most important part.
Setup
Now that your wires have been run you need to put your sub and your amp in the trunk and begin hooking everything up. On the back of the amp there are seven ports you need to use(see figure 6). Going from left to right, the first two ports are for your power and ground wires that power the amp. The power cable was run from the battery. To install a ground cable all you need to do is attach one end of the wire to the correct port in the amp and attach the other end to a screw or any other metal object. This is because when working with electricity you always need a power and ground wire for the current to work; that is why there are two sides on batteries, or two ports on your car battery. The next port is for the ground wire of your switch. The switch works by toggling the current in the ground wire on or off; if your ground wire current is off, than your power will not work and your sub will turn off. The switch can be located anywhere, it is best if it is located within reach of the driver so the subs can be turned off whenever needed. The next two ports are where you connect your amp to your sub. This is the simplest part; all you need to do is plug them in the sub and the amp. The final two ports on the very right are how you hook up your amp to your radio. What needs to be done in this step depends on what radio you have, and will vary in different cars. If you have an aftermarket radio, than you will just connect the wires directly from the radio to the amp. I do not have an aftermarket radio, so I had to do things differently. I connected the wires from my amp to a device which is connected to my rear speaker. It is called an RC converter; it converts the regular wires into the special wires I needed to connect to the amp. The final step is adjusting the settings. There are two setting that need to be adjusted. The first determines the cutoff of decibels that your sub will play. The higher the setting, the higher decibels the sub will play. Humans can only hear a range of about 0-140 decibels. The decibel setting on the sub can range from 30-200; you set it depending on what kind of music you listen too. If you listen to rap you would set it lower, around 50; but if you listen to rock you would set it around 90. The second setting determines how much bass you want; the higher the setting is, the more bass there will be.
Now your upgrade is complete. All you need to do is test everything out to make sure it all works and the settings are set to your liking. Once that is done just turn the volume up and enjoy your new and improved sound system.
Figure 1 (Supplies)
Figure 2 (Connection to battery)
Figure 3(wire through firewall)
Figure 4(Where wires are hidden)
Figure 5(How it looks after)
Figure 6
Figure 7(Final Setup)
 11-09-2009, 09:16 PM
#2
Drifting
There are a couple of things wrong with your explanation.
1. You have the signal and speaker wire outputs labeled wrong. Attaching your sub to your RCA's will do nothing... Just a heads up.
2.
Not sure what the hell you're talking about here... There's all kinds of bad info in there, and this could piss some people off if they screw something up, they might come back at you... Just a heads up...
1. You have the signal and speaker wire outputs labeled wrong. Attaching your sub to your RCA's will do nothing... Just a heads up.
2.
There are two setting that need to be adjusted. The first determines the cutoff of decibels that your sub will play. The higher the setting, the higher decibels the sub will play. Humans can only hear a range of about 0-140 decibels. The decibel setting on the sub can range from 30-200; you set it depending on what kind of music you listen too. If you listen to rap you would set it lower, around 50; but if you listen to rock you would set it around 90. The second setting determines how much bass you want; the higher the setting is, the more bass there will be.
 11-10-2009, 01:34 AM
#5
Instructor

Join Date: Mar 2009
Age: 47
Posts: 173
Likes: 0
Received 0 Likes
on
0 Posts
Pretty much everything in your "setup" section is incorrect. I suggest checking out www.bcae1.com and reading through all the sections over there. They explain in detail how car audio works and how to set up the equipment.
11-10-2009, 09:31 AM
#6
Drifting
Steven, while I agree that bcae1 is a good site, you pretty well need an engineering degree to understand what they're saying. Plus there's a huge amount of information in word form with very little visuals. I can never read through more than 1/2 of 1 of the bits of info before I either get bored or tired of reading... That's the only reason I don't like that site...
11-10-2009, 10:10 AM
#7
Instructor
Join Date: Mar 2009
Age: 47
Posts: 173
Likes: 0
Received 0 Likes
on
0 Posts
Really? They offer tons of pictures, flash animations, and other interactive tools to explain the concepts fully. Granted some of the concepts themselves are very advanced, but I thought they did a great job explaining everything along the way to help the layman understand the advanced concepts.
Trending Topics
11-10-2009, 12:11 PM
#8
Senior Moderator
Regional Coordinator
(Mid-Atlantic)
Regional Coordinator
(Mid-Atlantic)
iTrader: (6)
I would go into more detail about how to find a good ground since that's always a problem to find the best ground, also you may want to leave hooking the power wire up to the battery till last since you don't want people working with live wires 
11-10-2009, 01:22 PM
#9
99 NBP tl
Thread Starter
iTrader: (1)
Join Date: Aug 2009
Location: Waynesboro, Pennsylvannia
Age: 33
Posts: 240
Likes: 0
Received 4 Likes
on
4 Posts
Steven, while I agree that bcae1 is a good site, you pretty well need an engineering degree to understand what they're saying. Plus there's a huge amount of information in word form with very little visuals. I can never read through more than 1/2 of 1 of the bits of info before I either get bored or tired of reading... That's the only reason I don't like that site...
11-10-2009, 05:38 PM
#10
Drifting
Steven, you're probably right about the topics being more advanced, rather than the visuals. I haven't been on that site in quite some time, even though it is a great site, if you have time to sit and read through all the info...
11-11-2009, 08:46 AM
#12
99 NBP tl
Thread Starter
iTrader: (1)
Join Date: Aug 2009
Location: Waynesboro, Pennsylvannia
Age: 33
Posts: 240
Likes: 0
Received 4 Likes
on
4 Posts
Im going for mechanical also.
I used leds, heres the thread, I think it will tell you everything you need to know. I think on the second page someone asks me how.
https://acurazine.com/forums/showthr...ht=blue+lights
https://acurazine.com/forums/showthr...ht=blue+lights

Thread
Thread Starter
Forum
Replies
Last Post
tallyrlx
3G RLX Audio, Bluetooth, Electronics & Navigation
12
02-26-2016 03:44 PM
sockr1
Car Parts for Sale
22
10-01-2015 01:31 AM