
LIDATEK LE-30 Laser Echo installation WITH PICTURES

Thread Starter
The Voice of Reason
Joined: Aug 2003
Posts: 879
Likes: 0
LIDATEK LE-30 Laser Echo installation WITH PICTURES
LIDATEK LE-30 Laser Echo installation WITH PICTURES
http://www.lidatek.com/
Lidatek recently began shipping the LE-30 with an increase in the sensitivity over the LE-20 (it's also more selective so as not to false alarm on LED based brake lights as found on some GM products), simpler wiring install thanks to a new plug-in interface module and dual purpose LED which now shows system status (system ready and alarm). The transponder is also physically shorter aiding in an installation location with limited depth.
The LIDAR gun works by timing the reflection of its laser pulse and calculating the distance to the target car from that round-trip time. It then calculates average speed over a pre-determined number of pulses. According to LE-20 patents, Lidatek sends a constant-rate high-frequency (2Mhz) pulse train when a LIDAR gun is detected, thus drowning out the reflection of gun's pulses off your car and preventing it from calculating the distance (and therefore your speed).
For more information see the January 97 issue of BMW Roundel magazine, pg. 44. http://www.bmwcca.org/Roundel/1997/0197oth.htm and Audiworld http://www.audiworld.com/news/03/lidatek/content.shtml
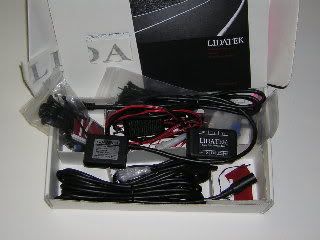
LIDATEK Kit
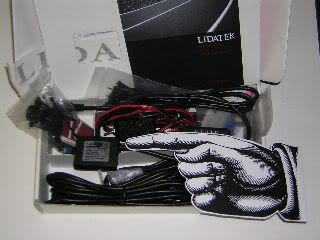
LIDATEK Transponder (about the size of a matchbook.)
I�ve also completed hardwiring my V-1 and mounted both the LIDATEK�s LED and the V-1 hidden display in the space in the console formerly occupied by the fuzzy red coin tray that we in the �Correct� USA get in place of an ashtray. At most this requires sacrifice of the coin holder or ashtray, well worth it IMO. I have EZ Pass, anyway.
Standard dIsclaimer: This is how I did it, I don�t know if your skill level is greater or less than mine, so I don�t necessarily recommend that you attempt this. So if you try this and break something or blow anything up or maim kill or disfigure yourself you�re on your own!
HondaAcura World Dot Com has instructions online for both the Fog Light install (removing the bumper) and the Cassette Player (removing the console, etc.).
Tools:
Thin-blade putty knives
Dremel Moto-Tool
Helms TSX Service Manual (HIGHLY recommended)
Materials:
Lidatek LE-30 kit
3M wire taps
HD Velcro pads
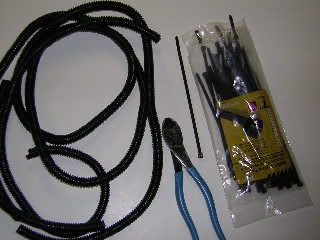
Cable ties
Corregated electrical conduit (Radio Shack or Home Depot)
Electrical Tape
Duct Tape
Masking tape
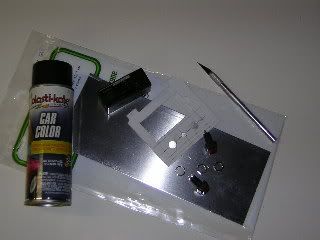
Plastic Sheet Stock (Hobby store)
Aluminum Sheet Stock (Hobby store)
Epoxy
Switches (Radio Shack)
Solder
Acura firewall grommet
Black interior trim paint
1. DISCONNECT BATTERY!!!!
2. Remove battery
3. Remove front bumper
4. Remove glovebox stops.
5. Disconnect glove box damper.
6. Disconnect wires, screws and remove glovebox.
7. Remove screw and pop off side cover of console in passenger�s footwell.
8. CAREFULLY remove console storage box (pulls out), Don�t pull on lid.
9. Unscrew shift knob.
10. CAREFULLY remove console top (pulls up)
11. Disconnect seat heater switches.
12. Remove 4 Phillips screws from coin pocket holder assembly.
13. Disconnect power socket connector. Remove Coin Pocket Holder.
14. Remove the lower dash panels.
15. Pop red felt coin holder out of assembly.
16. Using Dremel, cut out entire back of coin pocket holder.
17. Now is also a good time to cut a cardboard template for the plastic piece to fill the tray. (You may wish to cover the wires visible behind the concealed display.)
18. Fabricate a plastic plug and aluminum bracket to mount the V-1, LE-30 status diode and kill switches for the �Not An Ashtray� holder, and paint it using black interior trim paint.
19. Unwrap electrical tape from power socket wire. Press 3M wire taps into (+) and (-) wires. Insert spade connectors into wire taps, wrap everything in electrical tape.
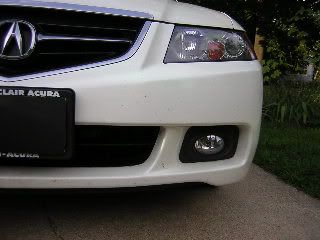
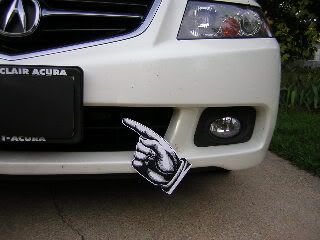
20. I used the supplied L bracket and mounted it to the bumper immediately to the left (driver�s) side of the license plate in the air intake. Mark where you need to drill. Drill mounting holes into plastic bumper, pull longer metric screws or bolts (Home Depot) through. Use supplied perforated mounting brackets to back up screws-bolts.
21. Mount the mating L bracket to the transponder with the back and right edges flush. The supplied 3M double-sided tape is super strong--don't use it until you're certain of the alignment. Screw the two L brackets together with the supplied screw and lock washer. For an extra margin of safety, I used Loctite on all the screws.
22. Fit the corregated conduit around the cable and thread the cable behind the left headlight and in front of the battery. Leave the DIN plug unattached for now.
23. Pull out the plug in the firewall, cut a slit in the plug, pull the second DIN cable through the slit. Fish through the firewall, I found it easiest to fish to the right (driver�s) side, the fish comes out under the gas pedal, and then fish to the other side under the glovebox.
[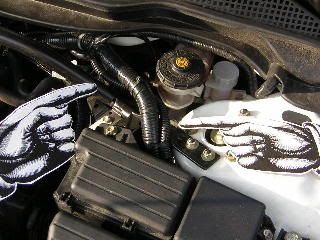
24. Run the second cable, in corregated conduit under the battery the along the existing wiring harness, up and to the firewall. Pull it through using the fish.
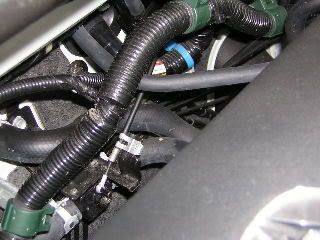
25. Seal the cable to the grommet using silicone seal. Secure the cable with the cable ties and connect the DIN connector.
26. With double-sided tape, mount the LIDTEK warning speaker on a flat surface under the dashboard.
27. Plut together. Stuff the connectors, taped toggle switch, fuse and excess wiring into the console and under the carpet.
28. I mounted the kill-power switches with the Lidatek LED in the �Not An Ashtray� fabricated plastic insert along with the V-1 remote display.
29. Attach HD Velcro to V-1 Concealed Display and coin tray assembly.
30. Replace 4 Phillips head screws for coin pocket holder assembly.
Next, as they say in the Haynes manuals �Reassembly is (simply!) the reverse of disassembly�!
Transponder
Transponder
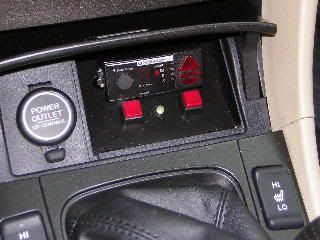
�Not An Ashtray�! (With Valentine-1 remote display.)
Power switch

Lidatek LED
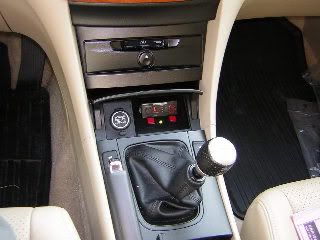
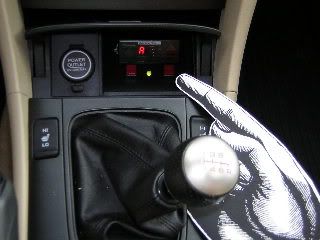
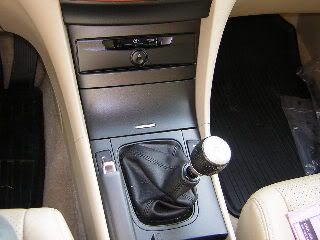
Now you see it...
"Huh? Officer? My car wouldn't register on your laser gun????"
LE-20 diagram (the LE-30 only needs one transponder) but the general idea is the same.
http://www.lidatek.com/
Lidatek recently began shipping the LE-30 with an increase in the sensitivity over the LE-20 (it's also more selective so as not to false alarm on LED based brake lights as found on some GM products), simpler wiring install thanks to a new plug-in interface module and dual purpose LED which now shows system status (system ready and alarm). The transponder is also physically shorter aiding in an installation location with limited depth.
The LIDAR gun works by timing the reflection of its laser pulse and calculating the distance to the target car from that round-trip time. It then calculates average speed over a pre-determined number of pulses. According to LE-20 patents, Lidatek sends a constant-rate high-frequency (2Mhz) pulse train when a LIDAR gun is detected, thus drowning out the reflection of gun's pulses off your car and preventing it from calculating the distance (and therefore your speed).
For more information see the January 97 issue of BMW Roundel magazine, pg. 44. http://www.bmwcca.org/Roundel/1997/0197oth.htm and Audiworld http://www.audiworld.com/news/03/lidatek/content.shtml
LIDATEK Kit
LIDATEK Transponder (about the size of a matchbook.)
I�ve also completed hardwiring my V-1 and mounted both the LIDATEK�s LED and the V-1 hidden display in the space in the console formerly occupied by the fuzzy red coin tray that we in the �Correct� USA get in place of an ashtray. At most this requires sacrifice of the coin holder or ashtray, well worth it IMO. I have EZ Pass, anyway.
Standard dIsclaimer: This is how I did it, I don�t know if your skill level is greater or less than mine, so I don�t necessarily recommend that you attempt this. So if you try this and break something or blow anything up or maim kill or disfigure yourself you�re on your own!
HondaAcura World Dot Com has instructions online for both the Fog Light install (removing the bumper) and the Cassette Player (removing the console, etc.).
Tools:
Thin-blade putty knives
Dremel Moto-Tool
Helms TSX Service Manual (HIGHLY recommended)
Materials:
Lidatek LE-30 kit
3M wire taps
HD Velcro pads
Cable ties
Corregated electrical conduit (Radio Shack or Home Depot)
Electrical Tape
Duct Tape
Masking tape
Plastic Sheet Stock (Hobby store)
Aluminum Sheet Stock (Hobby store)
Epoxy
Switches (Radio Shack)
Solder
Acura firewall grommet
Black interior trim paint
1. DISCONNECT BATTERY!!!!
2. Remove battery
3. Remove front bumper
4. Remove glovebox stops.
5. Disconnect glove box damper.
6. Disconnect wires, screws and remove glovebox.
7. Remove screw and pop off side cover of console in passenger�s footwell.
8. CAREFULLY remove console storage box (pulls out), Don�t pull on lid.
9. Unscrew shift knob.
10. CAREFULLY remove console top (pulls up)
11. Disconnect seat heater switches.
12. Remove 4 Phillips screws from coin pocket holder assembly.
13. Disconnect power socket connector. Remove Coin Pocket Holder.
14. Remove the lower dash panels.
15. Pop red felt coin holder out of assembly.
16. Using Dremel, cut out entire back of coin pocket holder.
17. Now is also a good time to cut a cardboard template for the plastic piece to fill the tray. (You may wish to cover the wires visible behind the concealed display.)
18. Fabricate a plastic plug and aluminum bracket to mount the V-1, LE-30 status diode and kill switches for the �Not An Ashtray� holder, and paint it using black interior trim paint.
19. Unwrap electrical tape from power socket wire. Press 3M wire taps into (+) and (-) wires. Insert spade connectors into wire taps, wrap everything in electrical tape.
20. I used the supplied L bracket and mounted it to the bumper immediately to the left (driver�s) side of the license plate in the air intake. Mark where you need to drill. Drill mounting holes into plastic bumper, pull longer metric screws or bolts (Home Depot) through. Use supplied perforated mounting brackets to back up screws-bolts.
21. Mount the mating L bracket to the transponder with the back and right edges flush. The supplied 3M double-sided tape is super strong--don't use it until you're certain of the alignment. Screw the two L brackets together with the supplied screw and lock washer. For an extra margin of safety, I used Loctite on all the screws.
22. Fit the corregated conduit around the cable and thread the cable behind the left headlight and in front of the battery. Leave the DIN plug unattached for now.
23. Pull out the plug in the firewall, cut a slit in the plug, pull the second DIN cable through the slit. Fish through the firewall, I found it easiest to fish to the right (driver�s) side, the fish comes out under the gas pedal, and then fish to the other side under the glovebox.
[
24. Run the second cable, in corregated conduit under the battery the along the existing wiring harness, up and to the firewall. Pull it through using the fish.
25. Seal the cable to the grommet using silicone seal. Secure the cable with the cable ties and connect the DIN connector.
26. With double-sided tape, mount the LIDTEK warning speaker on a flat surface under the dashboard.
27. Plut together. Stuff the connectors, taped toggle switch, fuse and excess wiring into the console and under the carpet.
28. I mounted the kill-power switches with the Lidatek LED in the �Not An Ashtray� fabricated plastic insert along with the V-1 remote display.
29. Attach HD Velcro to V-1 Concealed Display and coin tray assembly.
30. Replace 4 Phillips head screws for coin pocket holder assembly.
Next, as they say in the Haynes manuals �Reassembly is (simply!) the reverse of disassembly�!
Transponder
Transponder
�Not An Ashtray�! (With Valentine-1 remote display.)
Power switch
Lidatek LED
Now you see it...
"Huh? Officer? My car wouldn't register on your laser gun????"
LE-20 diagram (the LE-30 only needs one transponder) but the general idea is the same.


Thread
Thread Starter
Forum
Replies
Last Post
BoricuaTL
Car Parts for Sale
138
Apr 8, 2016 01:08 PM
Oakes
Wash & Wax
10
Oct 12, 2015 11:17 AM