My new NavTool
#41
Hi everyone, I got my Navtool 3.0 yesterday but it came with no documentation and no label on the unit. Also there is no reference to the unit on Navtool's website. I sent an email to Navtool tech support but have not received a response. I chatted with someone in sales late yesterday who said tech support would email me within 20 minutes but by late last night still nothing.
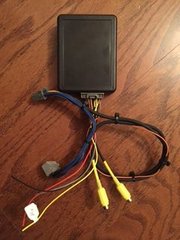
My Navtool came with only a 16 pin adapter with about 5 wires to the side of the adapter that looks like they need to be spliced into other wires. I understand the ground and accessory wires but I need to know what the other wires (yellow, blue, grey) connects to. The blue wire is labeled HA16PTL.
@alexman or @Photojob can you clarify where I need to connect the other color wires. Thanks in advance for your help.
#42


Hi everyone, I got my Navtool 3.0 yesterday but it came with no documentation and no label on the unit. Also there is no reference to the unit on Navtool's website. I sent an email to Navtool tech support but have not received a response. I chatted with someone in sales late yesterday who said tech support would email me within 20 minutes but by late last night still nothing.
My Navtool came with only a 16 pin adapter with about 5 wires to the side of the adapter that looks like they need to be spliced into other wires. I understand the ground and accessory wires but I need to know what the other wires (yellow, blue, grey) connects to. The blue wire is labeled HA16PTL.
@alexman or @Photojob can you clarify where I need to connect the other color wires. Thanks in advance for your help.
My Navtool came with only a 16 pin adapter with about 5 wires to the side of the adapter that looks like they need to be spliced into other wires. I understand the ground and accessory wires but I need to know what the other wires (yellow, blue, grey) connects to. The blue wire is labeled HA16PTL.
@alexman or @Photojob can you clarify where I need to connect the other color wires. Thanks in advance for your help.
I followed this video pretty much for installation
if my memort serves me right
red I connected like in the video so is black
gray I connected to black wire of navtool
orange and yellow no connection
blue I connected to blue wire back of the navigation
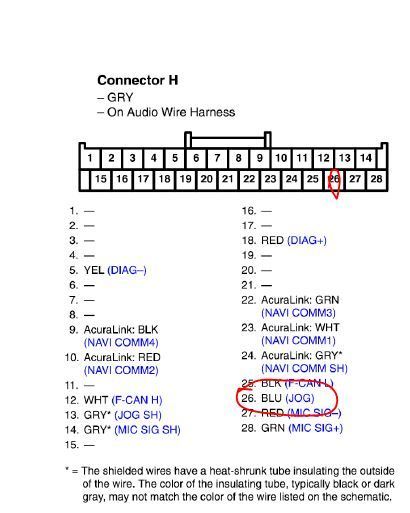
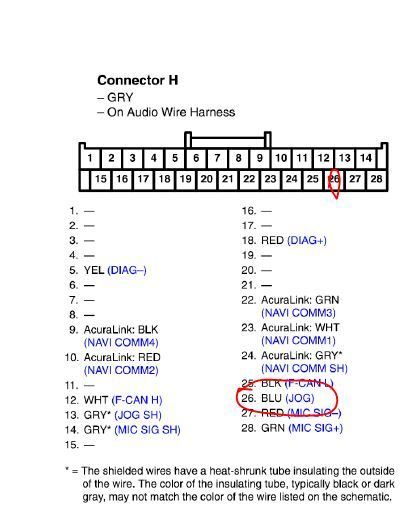
there is a 28 pin connector blue ire is in pin 26
here is diagram navtool sent me
The following users liked this post:
PT_TL (07-04-2015)
#43
i simply used this instructions
Red wire is 12 volt accessory
Black wire is ground
Gray wire is parking brake wire (just connect it to same place where you connect black from navtool)
Orange wire do not connect to anything
Yellow wire do not connect to anything
Micro USB not used
Regular USB is for smartphone charging
2.5 mm audio jack on navtool is audio output, you can connect directly to audio jack inside your vehicle
Blue wire is used to switch inputs utilizing cancel button
Blue wire from NavTool connect to blue wire in pin 26 of 28 pin connector located back of the radio , blue wire in the harness is located in pin 26 of 28 pin connector
placing navtool so that radio goes back in that took some time
The following users liked this post:
PT_TL (07-04-2015)
#44
@Photojob You were not kidding about having a hard time fitting the radio back in. Did you place the NavTool directly behind the radio? The only place that seems like the unit would fit would be directly covering the fan on the back of the radio.
It would have made more sense for Navtool to make the cable going to the NavTool unit longer so that we could place the unit somewhere that could be easily accessible without disassembling the trim and radio whenever we need to access the unit to replace a hdmi or usb cable.
It would have made more sense for Navtool to make the cable going to the NavTool unit longer so that we could place the unit somewhere that could be easily accessible without disassembling the trim and radio whenever we need to access the unit to replace a hdmi or usb cable.
i simply used this instructions
Red wire is 12 volt accessory
Black wire is ground
Gray wire is parking brake wire (just connect it to same place where you connect black from navtool)
Orange wire do not connect to anything
Yellow wire do not connect to anything
Micro USB not used
Regular USB is for smartphone charging
2.5 mm audio jack on navtool is audio output, you can connect directly to audio jack inside your vehicle
Blue wire is used to switch inputs utilizing cancel button
Blue wire from NavTool connect to blue wire in pin 26 of 28 pin connector located back of the radio , blue wire in the harness is located in pin 26 of 28 pin connector
placing navtool so that radio goes back in that took some time
Red wire is 12 volt accessory
Black wire is ground
Gray wire is parking brake wire (just connect it to same place where you connect black from navtool)
Orange wire do not connect to anything
Yellow wire do not connect to anything
Micro USB not used
Regular USB is for smartphone charging
2.5 mm audio jack on navtool is audio output, you can connect directly to audio jack inside your vehicle
Blue wire is used to switch inputs utilizing cancel button
Blue wire from NavTool connect to blue wire in pin 26 of 28 pin connector located back of the radio , blue wire in the harness is located in pin 26 of 28 pin connector
placing navtool so that radio goes back in that took some time
#46
@Photojob You were not kidding about having a hard time fitting the radio back in. Did you place the NavTool directly behind the radio? The only place that seems like the unit would fit would be directly covering the fan on the back of the radio.
It would have made more sense for Navtool to make the cable going to the NavTool unit longer so that we could place the unit somewhere that could be easily accessible without disassembling the trim and radio whenever we need to access the unit to replace a hdmi or usb cable.
It would have made more sense for Navtool to make the cable going to the NavTool unit longer so that we could place the unit somewhere that could be easily accessible without disassembling the trim and radio whenever we need to access the unit to replace a hdmi or usb cable.
#48
The following users liked this post:
rhkingsfan (07-10-2015)
#50
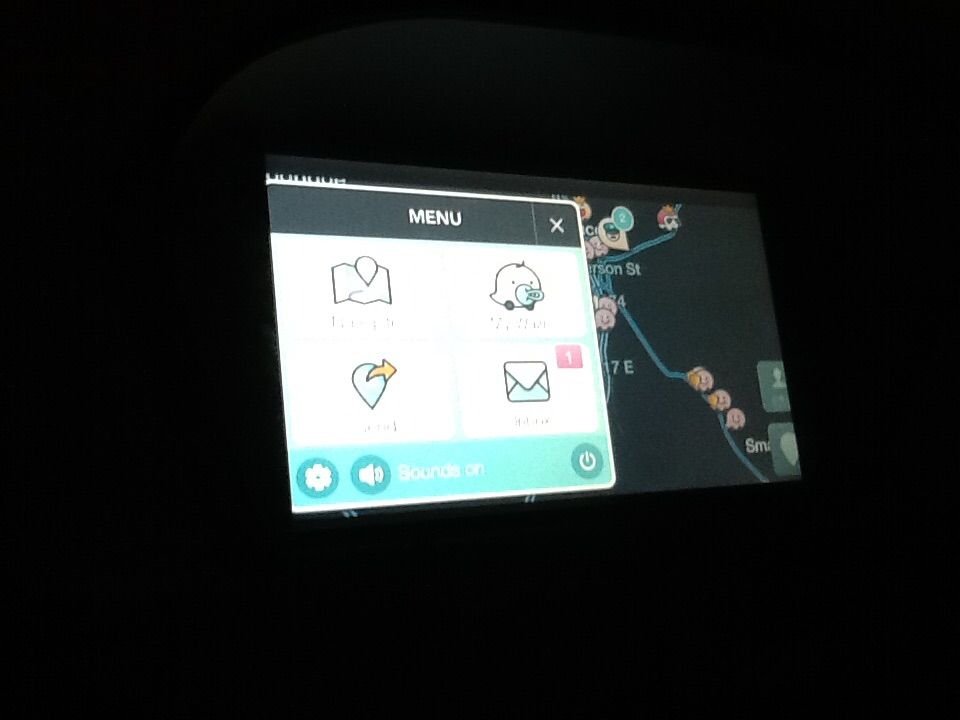
It works perfect, my buddy who used to install car radio helped me install it, I love it, waze is a must for me I drive all the time because of my work and it's great to finally have it on my nav screen
The following users liked this post:
freeurmind69 (07-29-2015)
#52
Since this is HDMI version do I need to connect the Video Input RCA plugs?
Similarly with the Audio Output there is no need to connect right?
How about the small 2.5mm jack? Does it need to be connected? Is this what is being used for audio from the source or will the audio go via HDMI?
Similarly with the Audio Output there is no need to connect right?
How about the small 2.5mm jack? Does it need to be connected? Is this what is being used for audio from the source or will the audio go via HDMI?
#53
Since this is HDMI version do I need to connect the Video Input RCA plugs?
Similarly with the Audio Output there is no need to connect right?
How about the small 2.5mm jack? Does it need to be connected? Is this what is being used for audio from the source or will the audio go via HDMI?
Similarly with the Audio Output there is no need to connect right?
How about the small 2.5mm jack? Does it need to be connected? Is this what is being used for audio from the source or will the audio go via HDMI?
No you would not need to connect anything additional.
#55
After following this thread I decided to get me a NavTool. This morning I went to order NavTool and I was told its 600, so I said I'll get back to them later. After doing some digging all over google I found a way to get it for 400. A started chat and I said that I was out of country and it wasn't possible for me to order it, after 30 minutes of back and fourth someone on the other end got sale price approved
#56
I guess the Salesperson told me the truth when I placed my order. Glad you had good luck getting the lower price. My luck usually isn't that good.
After following this thread I decided to get me a NavTool. This morning I went to order NavTool and I was told its 600, so I said I'll get back to them later. After doing some digging all over google I found a way to get it for 400. A started chat and I said that I was out of country and it wasn't possible for me to order it, after 30 minutes of back and fourth someone on the other end got sale price approved
The following 2 users liked this post by Photojob:
csmeance (07-15-2015),
nikewear19 (07-14-2015)
The following users liked this post:
csmeance (07-15-2015)
#61
#62
I ordered mine last Friday and they said it would ship Monday (with email confirmation). It's Thursday and I still haven't received the notification (it's possible that its been shipped already but they didn't notify me).
#64
#65
#66
#67
#68
Okay, so I have the navtool installed and I'm using my Google chromecast to cast my screen. Let me say that I love it! Audio/video sounds great, but there's a problem when I used my chromecast I can't stream audio through Bluetooth. Any idea or suggestions if there's a company that makes an adapter that only streams video?
#70
Same thing was wrong with mine. Call tech support tomorrow morning and they will walk you through what you need to do. Long story short, they forgot to put the blue cable in to the navtool harness.
Last edited by nikewear19; 07-21-2015 at 10:43 PM. Reason: Updated
#71
Okay, so I have the navtool installed and I'm using my Google chromecast to cast my screen. Let me say that I love it! Audio/video sounds great, but there's a problem when I used my chromecast I can't stream audio through Bluetooth. Any idea or suggestions if there's a company that makes an adapter that only streams video?
#72
Just got mine and missing the blue cable as well.. How tough is the fix?
#73
Now, the other two things that got me were the orange wire that is bundled in the aforementioned harness. If you do not have an aftermarket camera and you are just using the factory backup camera you are going to want to cut that wire. If you don't, when you reverse the navtool will automatically turn on with a shaky backup camera with parking lines scrolling across. I had to remove my whole unit AGAIN just to cut this wire.
Lastly, I had an extremely difficult time mounting the damn thing. After many frustrating hours it dawned on me that there was room underneath the radio unit itself. The only modification is you need to take off the bracket (4 tiny phillips screws) on the bottom and it allows you enough room to mount it. This brackets only purpose is to clip in some of the cables so it is no big deal not having it.I butted mine right up against the small harness (horizontally) under there and electrical taped it to hold it in place. Once I did this the unit slid in with minimal effort.
Sorry for the long post but I'm trying to save future Navtool 3.0 folks some time! Once it's in, it's pretty awesome.
#74
Couple things...I spent like a full day troubleshooting this before I found out I was missing the blue wire. That being said, the fix isn't too difficult if you have some spare wire laying around. If you look at the harness (where the wires go into it) that plugs into the nav tool there should be an empty hole 3 holes in from the end. Each hole on the back has two holes on the front. You will need to strip a spare piece of wire and push the stripped piece half way through the front end of the hole and tuck it into the second hole to hold it into place. Once this is done you can just splice the other end of the wire to the appropriate blue nav wire based on the instructions.
Now, the other two things that got me were the orange wire that is bundled in the aforementioned harness. If you do not have an aftermarket camera and you are just using the factory backup camera you are going to want to cut that wire. If you don't, when you reverse the navtool will automatically turn on with a shaky backup camera with parking lines scrolling across. I had to remove my whole unit AGAIN just to cut this wire.
Lastly, I had an extremely difficult time mounting the damn thing. After many frustrating hours it dawned on me that there was room underneath the radio unit itself. The only modification is you need to take off the bracket (4 tiny phillips screws) on the bottom and it allows you enough room to mount it. This brackets only purpose is to clip in some of the cables so it is no big deal not having it.I butted mine right up against the small harness (horizontally) under there and electrical taped it to hold it in place. Once I did this the unit slid in with minimal effort.
Sorry for the long post but I'm trying to save future Navtool 3.0 folks some time! Once it's in, it's pretty awesome.
I'm personally not happy about the idea of having to jerry rig a wire into this $399 product. I'm very concerned about what they might say to me if heaven forbid the unit goes out or has issues within the 1st year and I've cut wires and chosen to shove that wire in there. Not to mention, the only options I was given to remedy this manufacturing error was for me to foot the bill for shipping it back to them for them to verify that it was in fact a manufacturing error or for me to just buy another harness from them and in both cases I'd just have to wait for them to make a determination then also wait for something to arrive in the mail "If" they accept liability.


Cost is negligible...I'm annoyed over the principle in this situation!
#75
I was missing a blue wire, chatted with them online few days ago, they said will send me pin with a wire, I got the pin today , loosen the black cap at the bottom of the connector slide the pin in the empty cavity and done, just finished my install, best mod ever
#77
Did you cut the orange wire to keep your backup camera working right?
#78
If you do not have an aftermarket backup camera, cutting the orange wire is the only way to have your factory backup camera function properly. Believe me, I witnessed it. I had to take my whole dash apart again to cut that damn wire but it was worth it because my backup camera is back to normal.
#79
If you do not have an aftermarket backup camera, cutting the orange wire is the only way to have your factory backup camera function properly. Believe me, I witnessed it. I had to take my whole dash apart again to cut that damn wire but it was worth it because my backup camera is back to normal.
#80
In the picture of the harness above it is the long orange wire that is zip tied in with the other wires. Because it was zip tied in I didn't cut it the first time but that's the one.


