When you click on links to various merchants on this site and make a purchase, this can result in this site earning a commission. Affiliate programs and affiliations include, but are not limited to, the eBay Partner Network.
So this weekend I decided to re torque my spark plugs and I found this.
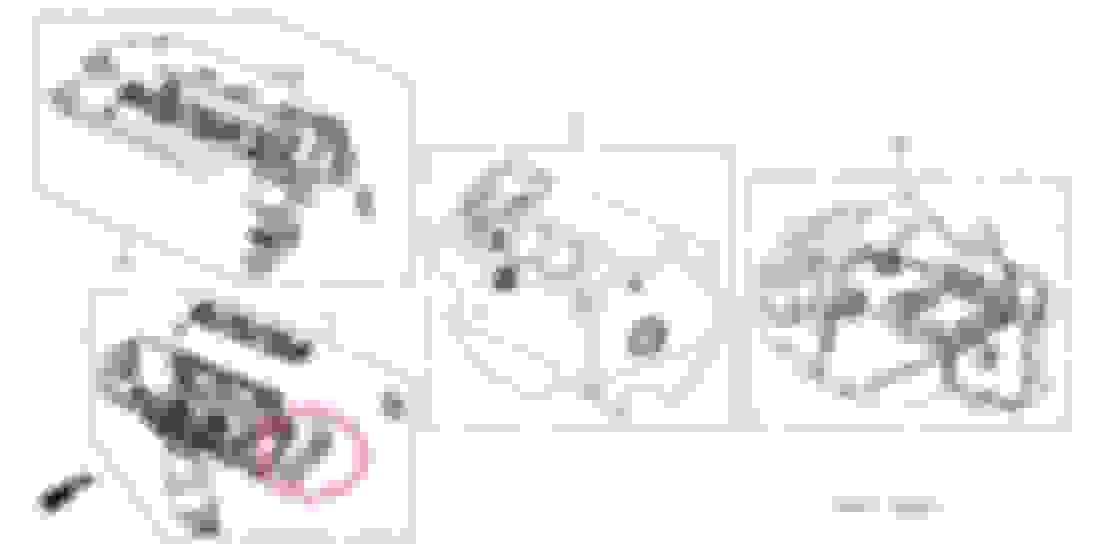
So my question is, what is that and I'm assuming that is a gasket in between there? Thermostat housing?
Anyone else have a leak from this spot before? It must be a pretty slow leak because I've only had to add a little bit of coolant over the last few months.
So this weekend I decided to re torque my spark plugs and I found this.
So my question is, what is that and I'm assuming that is a gasket in between there? Thermostat housing?
Anyone else have a leak from this spot before? It must be a pretty slow leak because I've only had to add a little bit of coolant over the last few months.
Thoughts?
The thermostat housing doesn't use a gasket, the thermostat has a rubber gasket on it that seals everything. I don't think that's your problem. You can tighten the two bolts (10 mm) to make sure the housing is tight. There are two coolant lines in the picture that go from the thermostat housing area to the throttle body that are likely leaking. Many of us have removed the lines going into the throttle body and rerouted them back into the coolant path to keep hot coolant out of the throttle body. If your leak is from one of these hoses, you can do the reroute or buy 6 inches of hose to repair it. Either way pretty easy and quick.
Looking at the throttle body feel the underside and you will feel two hoses, if you follow them you can see where they enter/exit the coolant path. That's where I think your leak is. I posted some good pics of this, but can't remember the thread title. The reroute will give you also keep the car from losing power when the temps get warm outside. The intake air temp sensor is in the throttle body and hot coolant running thru it causes the sensor to heat up and the ECU to pull timing reducing power. The cheapest power making/ preserving mod available since the original hoses are long enough to make the reroute connection.
btw, Honda fluid is blue. I don't remember what green fluid is indicative of.. But I do know that when any hot radiator fluid that I have seen that leaks out, it often will spray because of the pressure.. and where it dries, it's normally dries white.. regardless of the color in the radiator. So it seems a bit odd to see green fluid.. But I have never used green fluid.. maybe it is different? haha no idea.
when you fix it, I would go back to the Honda blue. Maybe some green might be compatible with the blue, I do not know for sure. All I know is that this is the first leak I have ever seen like this and I have been on Azine for 5 yrs. And other fluids like orange are more corrosive.. I would not mix fluid unless you knew for sure what you are mixing together. Some fluids may not be too corrosive, but maybe they don't have as many protectants, like "silica" (?).. So, the end result is a fluid that might not last as long. Either way, you have green fluid and you have a problem. And nobody else has this problem. I would be skeptical of that green stuff. But hey, your car is 10 yrs old, like mine.. Stuff happens when a car gets old!
if I am not mistaken that is your seal running coolant from the front bank to the rear bank that house the EGR unit. I did this in my Accord J30A1 before and its actually a MLS (Multi Layer Steel) gasket hold by rivet. You will have to remove the front and rear to gain access to replace the gasket. Here is the pics of that gasket.
btw, Honda fluid is blue. I don't remember what green fluid is indicative of.. But I do know that when any hot radiator fluid that I have seen that leaks out, it often will spray because of the pressure.. and where it dries, it's normally dries white.. regardless of the color in the radiator. So it seems a bit odd to see green fluid.. But I have never used green fluid.. maybe it is different? haha no idea.
Honda OEM fluid use to be Green and can be mixed with the newer Blue fluid, as they are exactly the same, just a different dye color.
if I am not mistaken that is your seal running coolant from the front bank to the rear bank that house the EGR unit. I did this in my Accord J30A1 before and its actually a MLS (Multi Layer Steel) gasket hold by rivet. You will have to remove the front and rear to gain access to replace the gasket. Here is the pics of that gasket.
I think you are correct, its leaking from the metal gasket right below the egr valve. See below. I'm going to keep it an eye on it and if it continue to leak, I'll have to fix it. Anyone know what is all involved to get it off? If I do have to fix it, I'll drain the whole system and replace it with some new fluid.
they are hold together by one bolt and two nuts on each side might be more (I can't recall right now), the rear is more pain to remove than the front, You will have to disconnect the coolant hose and pull the housing unit apart. At this point I would recommend a flush for coolant system.
Last edited by truonghthe; 07-20-2015 at 07:48 AM.
Never mind, I found the directions in the manual. I do have a couple questions, I'm assuming you only need to replace the O ring on the "connecting pipe" on the water passage end because you shouldn't need to remove the "connecting pipe" from the water pump? Does that sound correct?
If so, I'll order a new o ring, and the three gaskets that will also need to be replaced. Has anyone taken off the water passage before? Any tips on its removal? It looks pretty straight forward but there is a million things that need to be disconnected.
FYI you will need two metal gasket one for the front bank and another one for the rear bank.
I'm a little confused. Why would i need two when in the picture it only shows one?
And can you explain the front/rear bank? Isn't the water passage just a single unit?
P.S. After cleaning the dried coolant away and driving it for a few days, I confirmed that it is leaking right by the bottom bolt as show in my previous pictures. There is now some new fresh coolant there. I tried tightening that bolt a little bit more a few days ago but obviously that didn't work.
I'll get the parts ordered (once I know how many metal gaskets to buy) and get some new Honda blue coolant too. Maybe i'll make a video of the repair with my new HD cam.
Having done a water pipe replacement on My CRX I can say this....
Probably best to get two water pipe o-rings just in case. They can get pretty stuck over time and you never know which one will give way 1st when you pull the aluminum water-passage out. May as well have two handy in case the pipe comes out with it.
Coat them with a light amount of silicone-grease to ease reassembly/reinsertion.
Also be prepared to replace any hoses that might tear when trying to take them off. If you hear any ripping sounds when removing hoses, even if the hose doesn't actually rip, replace them. That sound is the internal support braids tearing, and the hoses will swell & eventually burst once the system has pressure in it again.
Well, I got all of the parts in but unfortunately I already placed the order and only bought one of those O rings. Maybe I'll see if I can find one locally at a honda dealership in case it does give me troubles.
Hopefully I won't have any issues with hoses tearing as I did not buy any replacements.
A couple quick question, so once I remove all of the bolts and nuts, the water passage just pulls out from the water pipe?
When I replace the water passage with the gaskets on I'm assuming I just need both surfaces cleaned up real good, no sealant is required?
If you look at the diagram picture a few posts up, you can see the water-pipe has two hoses attached to it branching off from the side. When you attempt to pull the water-passage off the water-pipe, try to use those attached hoses to brace the water-pipe & keep it from pulling & twisting out of the far end of the engine block. The water-pipe might now want to come out of the water-passage very easily, so expect a struggle. Just depends on how much crud is built up on the old o-ring.
Well its all fixed now. It took about 5hours from start to finish with me taking my time and not rushing.
A couple things to note, the manual doesn't have you remove the throttle body but I found it nearly impossible to remove it with it still in place. You are going to have to remove dozens of connectors and hoses so just make sure you hook them all back up.
Here is a picture of the water passage removed.
Picture of the old gasket versus the new one. You can see where the rubber on the metal gasket is failing and coming off.
This was a small problem I ran into. I don't know if they changed the design of the other smaller gasket that needs to be changed but the one I got did not fit. You can see that the holes all line up but replacement was larger and would hit on something (cant remember what was in the way). I had to trim it down to make it fit.
All in all, it went pretty good. Make sure you support the water pipe when pulling the water passage off. This keeps you from pulling out the water pipe from the water pump. I also put a little bit of grease on the new oring before I pushed the water passage back into the water pipe.
I couldn't find the engine block drain so I just drained from the radiator. Based on how much I lost and how much it took to fill I figured I got about 5.5 quarts of coolant out which is about 80%. Plan on making a huge mess when draining it. I refilled with Honda Type 2 blue coolant as required.
Everything is back to normal, no more coolant leaking.
This was not an "advanced repair" but it is definitely a degree or two higher than a oil change.
Huh? How is this remotely similar to something that takes 12 seconds to remove via 2 nuts and one harness plug (no fluids, no hoses, no intake, no throttle body)?
Huh? How is this remotely similar to something that takes 12 seconds to remove via 2 nuts and one harness plug (no fluids, no hoses, no intake, no throttle body)?
lol, I was kind of thinking the same thing. Taking off the EGR valve, which is only 1 of about 25 things you have to disconnect, took about 30 seconds.
The water passage was not the equivalent of taking a head off but it was no oil change by any means....
Now that I've done it, I would say I could do it in about 3 hours (give or take) start to finish. Again, I took my time so I didn't screw anything up including all of the hoses.

 07-13-2015 | 09:35 AM