
Rotor Stuck; Rotor Hub Cracked - Help
 02-28-2009, 10:52 PM
#1
AZ Community Team
Thread Starter

Join Date: May 2007
Location: N35�03'16.75", W 080�51'0.9"
Posts: 32,488
Received 7,771 Likes
on
4,342 Posts
Rotor Stuck; Rotor Hub Cracked - Help
Removing old rotors. Same old problem - retaining screws won't come out. Well, I know what to do about that: Impact Driver. Broke 2 bits and the screws are still stuck.  Well, I know what to do about that too: Drill 'em out.
Got them drilled out to the point that I thought the remainder of the screw head would pop off when using the "back the rotor off the hub with bolts" method. Just like the '02 a while back. Like this: https://acurazine.com/forums/showthr...or#post9254776 - Post #44
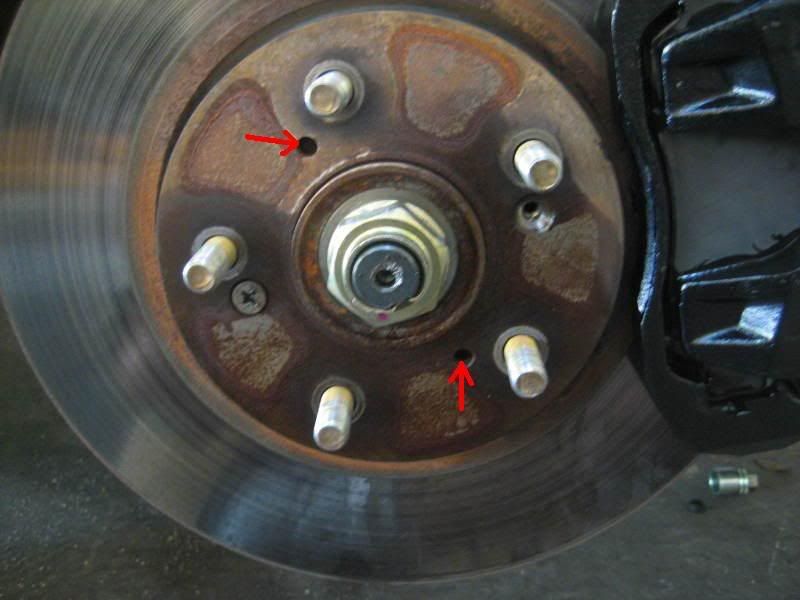
Well, after a few turns, I hear a "POP" and thought, "one down". A few turns on the other bolt and "POP". And then I saw the rotor was cracked. At both bolt holes. Damn!! Obviously I hadn;'t drilled out the screws well enough. Now the bolts won't grab because of the flexing at the crack.
So, now I've got a car on jacks stands with stuck rotor retaining screws, a cracked rotor hub at the bolt holes and no way to get the GD rotor off.
Any ideas greatly appreciated.
Car is stuck and un-usable until I can get the rotor off.
Well, I know what to do about that too: Drill 'em out.Got them drilled out to the point that I thought the remainder of the screw head would pop off when using the "back the rotor off the hub with bolts" method. Just like the '02 a while back. Like this: https://acurazine.com/forums/showthr...or#post9254776 - Post #44
Well, after a few turns, I hear a "POP" and thought, "one down". A few turns on the other bolt and "POP". And then I saw the rotor was cracked. At both bolt holes. Damn!! Obviously I hadn;'t drilled out the screws well enough. Now the bolts won't grab because of the flexing at the crack.
So, now I've got a car on jacks stands with stuck rotor retaining screws, a cracked rotor hub at the bolt holes and no way to get the GD rotor off.
Any ideas greatly appreciated.
Car is stuck and un-usable until I can get the rotor off.
 03-01-2009, 01:35 AM
#3
Team Owner

That sucks. I just pulled a tire off after having my rotor replaced after the collision and they were nice enough to put the partially stipped screws back in for me.  And this was at a dealership.
And this was at a dealership.
03-01-2009, 10:53 AM
#4
AZ Community Team
Thread Starter
Join Date: May 2007
Location: N35�03'16.75", W 080�51'0.9"
Posts: 32,488
Received 7,771 Likes
on
4,342 Posts
It's off.
[RANT]
Fucking pain in the Ass useless fucking rotor retaining screws FTMFL.
Note to the Acura Engineer that designed these PITA screws: Fuck you.
I hope you rot in Hell.
[/RANT]
[RANT]
Fucking pain in the Ass useless fucking rotor retaining screws FTMFL.
Note to the Acura Engineer that designed these PITA screws: Fuck you.
I hope you rot in Hell.
[/RANT]
03-01-2009, 10:59 AM
#5

fyi to others: dont just drill off most of the screw head- get rid of it!!!
And when you do your own brake jobs- anti seize on the threads~
And when you do your own brake jobs- anti seize on the threads~
03-01-2009, 02:42 PM
#6
Instructor
Join Date: Mar 2008
Location: Fort Belvoir, VA
Age: 47
Posts: 111
Likes: 0
Received 0 Likes
on
0 Posts
03-01-2009, 02:46 PM
#7
bearcat-
did you remember to flush the brake fluid before doing the rotor pad swap?
safer to do it before so no crud to gets backwashed as pistons are retracted and nothing to get stirred up as you move the calipers around and out of the way
did you remember to flush the brake fluid before doing the rotor pad swap?
safer to do it before so no crud to gets backwashed as pistons are retracted and nothing to get stirred up as you move the calipers around and out of the way
Trending Topics
03-01-2009, 04:27 PM
#8
Bearcat,
get rid off of the damn screws!! they arent necessary and u DO NOT need them. slap the rotors back on (new ones) put the caliper on and wheel and ur done! i snapped two of those f'ing bolts on the front rt wheel and it was pretty wack. i felt better knowing that these PITA screws were useless tho....lol
g'luck
03-01-2009, 06:41 PM
#9
PCM full of water, yummy
Join Date: Jun 2003
Location: Summerville SC
Posts: 338
Likes: 0
Received 0 Likes
on
0 Posts
any suggestions,
(sorry to crap your thread Bearcat)
03-02-2009, 10:14 AM
#11
first thing to do is flush the brake fluid
Its supposed to be done every year!!!
Then you are at square 1 of diagnosing any new problems
Performance brakes need to be bedded hard
Street brakes require medium use for 500 miles to get bedded -broken in
Its supposed to be done every year!!!
Then you are at square 1 of diagnosing any new problems
Performance brakes need to be bedded hard
Street brakes require medium use for 500 miles to get bedded -broken in
03-02-2009, 01:20 PM
#12
Chapter Leader (Southern Region)
LOL!! I had to go buy out of my way the first time I removed them.. went around for 2 hrs looking for a drive unit.. and I still ended up drilling them out. Question.. once you popped of the head of the retention screws did the remaining screw come right out.. mine did.. I swore up a storm.. lol..
03-02-2009, 01:29 PM
#13
Chapter Leader (Southern Region)
+1 on bedding.. do a couple ABS stops. Did you check the master cylinder after driving a bit and top off? Also check your lines for sanity.
03-02-2009, 03:00 PM
#14
PCM full of water, yummy
Join Date: Jun 2003
Location: Summerville SC
Posts: 338
Likes: 0
Received 0 Likes
on
0 Posts
03-02-2009, 03:03 PM
#15
PCM full of water, yummy
Join Date: Jun 2003
Location: Summerville SC
Posts: 338
Likes: 0
Received 0 Likes
on
0 Posts
Yeah, the brakes work great, just awfully squooshy (is that a word). I bedded them in last night using stoptechs procedure for the rotors (2X10 hard stops with 15 minutes cool down between them). When the car is off and you pump the brakes, I hear the fluid in the distribution box in the passenger fender well, I think I got some air in the lines somehow, I'm going to flush them tomorrow when I put my new rims on.
03-02-2009, 03:12 PM
#16
Chapter Leader (Southern Region)
air is bad news.. make sure you bleed from the front driver side (FD) first and go around - FP - RP - RD..
Do you have stiffer brake feel when you pump the brake? I would drive a while before taking the next step by trying to remove any air. You might want to think about 1-way valves for the bleeder.
Do you have stiffer brake feel when you pump the brake? I would drive a while before taking the next step by trying to remove any air. You might want to think about 1-way valves for the bleeder.
03-02-2009, 03:41 PM
#17
AZ Community Team
Thread Starter
Join Date: May 2007
Location: N35�03'16.75", W 080�51'0.9"
Posts: 32,488
Received 7,771 Likes
on
4,342 Posts
LOL!! I had to go buy out of my way the first time I removed them.. went around for 2 hrs looking for a drive unit.. and I still ended up drilling them out. Question.. once you popped of the head of the retention screws did the remaining screw come right out.. mine did.. I swore up a storm.. lol..
Had to drill out the other side too, but I did right the first time. I F'd the 1st side, but good.
 03-02-2009, 03:52 PM
#18
Chapter Leader (Southern Region)
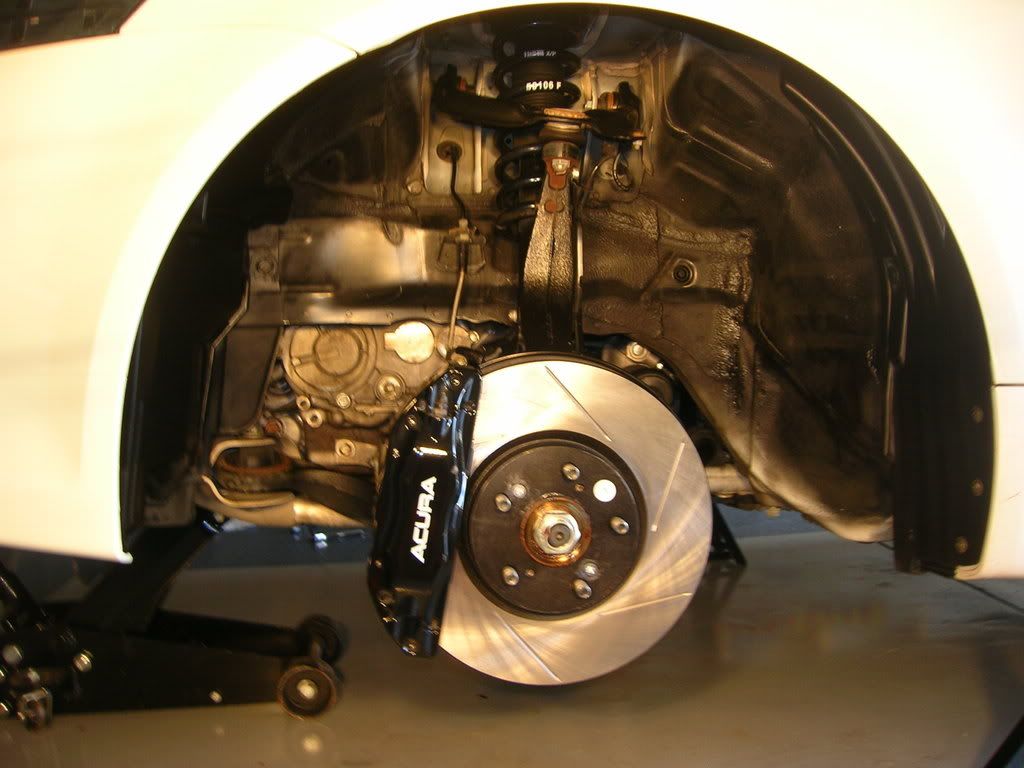
It'll be nice to see the new setup..
03-02-2009, 04:16 PM
#19
AZ Community Team
Thread Starter
Join Date: May 2007
Location: N35�03'16.75", W 080�51'0.9"
Posts: 32,488
Received 7,771 Likes
on
4,342 Posts
https://acurazine.com/forums/3g-tl-photograph-gallery-96/blackd-out-headlights-ii-712769/
Toward the bottom of page 1.
Toward the bottom of page 1.
03-02-2009, 05:15 PM
#20
DO NOT do abs stops on brand new brakes!!!!!
DO 2 abs stops from 45mph if you had lines open to install parts of SS lines- calipers etc.
If the pedal feels better on 2nd time there was air in the abs controller- its now at a caliper waiting for you
flush-bleed order LF driver front then clockwise around the car
LF RF RR LR
DO 2 abs stops from 45mph if you had lines open to install parts of SS lines- calipers etc.
If the pedal feels better on 2nd time there was air in the abs controller- its now at a caliper waiting for you
flush-bleed order LF driver front then clockwise around the car
LF RF RR LR
03-02-2009, 05:22 PM
#21
bedding is more than a 1 time thing on new brakes of the performance variety,
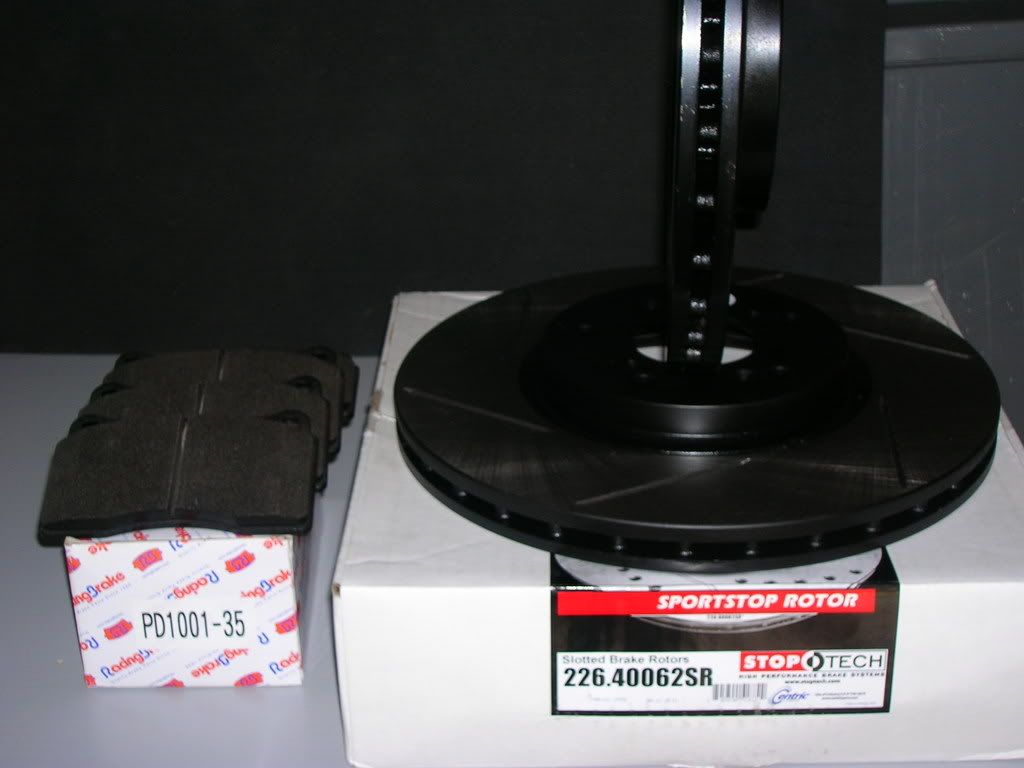
look at the parts, see how the pads and rotors have little mountains and valleys? and swirls on some rotors
Those all have to meet and ~get aquainted~
Once thats done fully you get 100 percent braking effectiveness
look at the parts, see how the pads and rotors have little mountains and valleys? and swirls on some rotors
Those all have to meet and ~get aquainted~
Once thats done fully you get 100 percent braking effectiveness
03-02-2009, 05:36 PM
#22
Chapter Leader (Southern Region)
So you're saying don't bed new pads with abs stops unless you have ss lines? or don't bed performance pads with abs stops? in other words is it the pad composition that's the issue?
03-03-2009, 07:27 PM
#23
Senior Moderator
doing an ABS stop will be useless to the bed in process since bedding in actually takes material from the brake pad and transfers it to the rotor so the rotor won't wear as fast. If you do the abs stop, it will take off the coating you just put on it.
03-03-2009, 08:13 PM
#24
PCM full of water, yummy
Join Date: Jun 2003
Location: Summerville SC
Posts: 338
Likes: 0
Received 0 Likes
on
0 Posts
Well, I flushed the brakes today and then bled them, I think there was a little air in them, also when the brake pedal is pumped, I hear some weird noise up by the abs splitter, I don't know if that is normal. The pedal feels better, but still not as hard as before. It does stop on a dime, with no pulling to either side, but the pedal is still "a little" softer than it was. 
03-03-2009, 08:31 PM
#25
AZ Community Team
Thread Starter
Join Date: May 2007
Location: N35�03'16.75", W 080�51'0.9"
Posts: 32,488
Received 7,771 Likes
on
4,342 Posts
Well, I flushed the brakes today and then bled them, I think there was a little air in them, also when the brake pedal is pumped, I hear some weird noise up by the abs splitter, I don't know if that is normal. The pedal feels better, but still not as hard as before. It does stop on a dime, with no pulling to either side, but the pedal is still "a little" softer than it was.
Flushed it, then took it off of the Jack Stands and bedded the brakes.
Before bedding, the first several basic stops were soft. As time went on they got a little better.
Then bedded them (sparks flying along side the car
 ) and they remained soft for a while (after the 15 - 20 minute cool down), but started to grab a little better after a few more stops.
I too think the pedal feels soft even when the pads bite. IMO, the TL-S pedal has always had a certain amount of "give" before the brakes really started to grab. Maybe this is just the design.
One the '02 (non-Brembo) with a similar rotor/pad setup the pedal is very firm -totally different than the 3G.
Hopefully in a few hundred miles they will "stop like crazy", like the '02 does.
03-03-2009, 09:06 PM
#26
AZ Community Team
Thread Starter
Join Date: May 2007
Location: N35�03'16.75", W 080�51'0.9"
Posts: 32,488
Received 7,771 Likes
on
4,342 Posts
BTW - Pics of the new brakes:

03-03-2009, 10:47 PM
#27
Chapter Leader (Southern Region)
hmm.. never thought of material transfer to the rotor to reduce wear. I thought that was bad since it could leave heavier material in some spots causing uneven heat distribution. What I mean by ABS stops is doing hard / firm stops with consistent pressure slowing the car from 45-5 or 60-10 and ease off.. repeating a couple times, which may / may not engage the ABS pump but will help evenly distribute pressure from the pad to the rotor surface. On my toyota vehicles, getting the ABS to engage was very difficult unless you slammed the brakes.
03-03-2009, 10:50 PM
#28
Chapter Leader (Southern Region)
 03-03-2009, 11:28 PM
#29
you have a serious misunderstand of how the abs works-its got nothing to do with pad pressure
When a wheel is not turning as fast as the others- as determined by speed sensor input, the system begins a series of very rapid on and off pumping/pulsing of the pressure sent to the brake caliper on slow wheel in an attempt to get it moving--thats the abs controllers job
Doing that with hot pads and rotors leaves an uneven coating of pad material as the caliper cycles
Thats why you do some progressivly harder slow downs to heat the pads all the way and the rotors too, then a few medium effort slow downs to do the transfer layer nice and smooth
Then the after drive without coming to a complete stop (that would leave a deposit of hot material in one place on the rotor) cools it all back slowly
It make take a few sessions/days of this to get the pads to outgas the excess glues and resins and start working right
If you had the lines off to install SS lines- there is a good possiblity that air got in and went to the ABS controller to hide. Thats when you need to do the 2 abs stop test to see if there is air in there
Yes you have to stomp the brakes full effort to make the abs work, then the air is moved out and you rebleed the system
The engineers of ABS called it Stomp and Steer, made so poor drivers can lock the brakes and still turn the steering wheel- the car turns and goes around the situation-accident-crap in road,,,instead if going straight in at speed with the brakes locked
03-03-2009, 11:33 PM
#30
the pad material transfer is very important to having great brakes and increased pad life
When 2 same materials contact in a friction situation- they generate more than 2 different material of steel rotor and pad with multiple metals made into it
good bedding cuts down brake noise, and can fix shakes and squeels in some situations (assuming pad/rotor good)
When 2 same materials contact in a friction situation- they generate more than 2 different material of steel rotor and pad with multiple metals made into it
good bedding cuts down brake noise, and can fix shakes and squeels in some situations (assuming pad/rotor good)
03-04-2009, 06:41 AM
#31
AZ Community Team
Thread Starter
Join Date: May 2007
Location: N35�03'16.75", W 080�51'0.9"
Posts: 32,488
Received 7,771 Likes
on
4,342 Posts
Tom - can you re-post the bedding link you and Marcus worked on? Also, I did a goo bed-in last night. I plan to put some street miles on the car to get the brakes "back to normal". Do recommened a 2nd bed-in? If so, when?
03-04-2009, 06:53 AM
#32
AZ Community Team
Thread Starter
Join Date: May 2007
Location: N35�03'16.75", W 080�51'0.9"
Posts: 32,488
Received 7,771 Likes
on
4,342 Posts
03-04-2009, 07:27 AM
#33
PCM full of water, yummy
Join Date: Jun 2003
Location: Summerville SC
Posts: 338
Likes: 0
Received 0 Likes
on
0 Posts
03-04-2009, 09:39 AM
#34
Chapter Leader (Southern Region)
Thanks for the claro Tom, I know how the ABS works but my dumbass skipped the notion of pump engaging leaving uneven brake material distribution. For the bed-in process, I was thinking along the lines of ensuring a uniform pressure from surface of pad to surface of rotor, where say only 90% of pad has uniform pressure but as you start the bed-in process you increase that efficiency.
I'm not so sure that for all brake pads the coefficient of friction between pad material against pad material is better than pad material against rotor material. I couldn't find a resource of 'typical' pad composition or a test of pad composition / bed-in performance. It seems complex to find real pad composition numbers with the added materials in modern pads to reduce noise and vibration while maintaining / increasing performance. Does anyone have a resource of a bed-in pad performance over a non bed-in pad (ie. non pad build-up on rotor)?
I'm not so sure that for all brake pads the coefficient of friction between pad material against pad material is better than pad material against rotor material. I couldn't find a resource of 'typical' pad composition or a test of pad composition / bed-in performance. It seems complex to find real pad composition numbers with the added materials in modern pads to reduce noise and vibration while maintaining / increasing performance. Does anyone have a resource of a bed-in pad performance over a non bed-in pad (ie. non pad build-up on rotor)?
03-04-2009, 10:09 AM
#35
its basic physics
like to like will create better friction
brake pad to rotor contact makes friction which is turned into heat which is then removed--and the car slows
here is the heeltoe bedding method- marcus has shortened it from the original write up,,I guess some think I am to wordy in explaining WHY you do something
http://heeltoeauto.com/httech/YaBB.pl?num=1184261899
Of interest is the section on proper brake use
yes it will take 2-3 sessions of bedding (sparks not required except racingbrake brand rotors) for get them really working 110%
Think of all the material that has to wear together to get a fully mated surface, and remove those swirls from the rotors
Thats when your done- the rotors have some streak heat marks from metal bits in the pads, and they are losing the break in swirls on the rotor
The cross hatch cut is there to give initial bite when brand new and speed the bedding process
Also think of the pads- they are full of resins and glues and what not- all of which get heat conditioned and the excess gets outgassed
03-04-2009, 10:13 AM
#36
flush the brakes again after the bedding--before your track day
ABS stops are defined as the brake pedal pulsing under your foot while you apply max force to the pedal..like someone with no skills would do in an emergency= panic brake
If the pedal is not pulsing, you are not using the abs
Anti Lock brake control
ABS stops are defined as the brake pedal pulsing under your foot while you apply max force to the pedal..like someone with no skills would do in an emergency= panic brake
If the pedal is not pulsing, you are not using the abs
Anti Lock brake control
03-04-2009, 10:16 AM
#37
if your car has sticky tires and is hard to get into abs mode, throw some water on the street, on one side of the cars travel- like left side dry right side tires wet
so the wheels will be at different speeds across the car.
come at it at 45, nail the brakes and feel the pedal doing its thing
so the wheels will be at different speeds across the car.
come at it at 45, nail the brakes and feel the pedal doing its thing
03-04-2009, 10:16 AM
#38
for fun- try turning the steering while in abs and feel the car respond
03-04-2009, 10:24 AM
#39
on the rotor install- a little caliper grease on the center of the hub where it slips over the axle will keep it from siezing.
Dissimilar metals are a haven for corrosion.. as seen in your pic
Dissimilar metals are a haven for corrosion.. as seen in your pic
03-04-2009, 11:51 AM
#40
AZ Community Team
Thread Starter
Join Date: May 2007
Location: N35�03'16.75", W 080�51'0.9"
Posts: 32,488
Received 7,771 Likes
on
4,342 Posts
its basic physics
like to like will create better friction
brake pad to rotor contact makes friction which is turned into heat which is then removed--and the car slows
here is the heeltoe bedding method- marcus has shortened it from the original write up,,I guess some think I am to wordy in explaining WHY you do something
http://heeltoeauto.com/httech/YaBB.pl?num=1184261899
Of interest is the section on proper brake use
yes it will take 2-3 sessions of bedding (sparks not required except racingbrake brand rotors) for get them really working 110%
Think of all the material that has to wear together to get a fully mated surface, and remove those swirls from the rotors
Thats when your done- the rotors have some streak heat marks from metal bits in the pads, and they are losing the break in swirls on the rotor
The cross hatch cut is there to give initial bite when brand new and speed the bedding process
Also think of the pads- they are full of resins and glues and what not- all of which get heat conditioned and the excess gets outgassed
like to like will create better friction
brake pad to rotor contact makes friction which is turned into heat which is then removed--and the car slows
here is the heeltoe bedding method- marcus has shortened it from the original write up,,I guess some think I am to wordy in explaining WHY you do something
http://heeltoeauto.com/httech/YaBB.pl?num=1184261899
Of interest is the section on proper brake use
yes it will take 2-3 sessions of bedding (sparks not required except racingbrake brand rotors) for get them really working 110%
Think of all the material that has to wear together to get a fully mated surface, and remove those swirls from the rotors
Thats when your done- the rotors have some streak heat marks from metal bits in the pads, and they are losing the break in swirls on the rotor
The cross hatch cut is there to give initial bite when brand new and speed the bedding process
Also think of the pads- they are full of resins and glues and what not- all of which get heat conditioned and the excess gets outgassed
Thanks.
