
Question about motor mounts.
 07-07-2015, 06:10 PM
#1
Question about motor mounts.
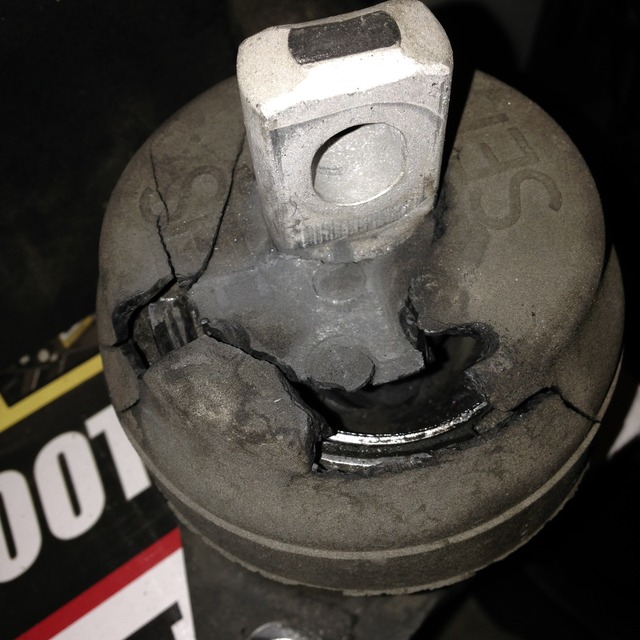
So quite by accident I noticed this today. I'm wondering why my dealer hasn't said something about it. Anyway, should this look like this? Forgive me, I know nothing about motor mounts. Why would the rubber look like that? Is this a sure sign it needs to be replaced?

 07-07-2015, 06:53 PM
#2
Racer
iTrader: (1)

Yes, that is the side motor mount and it is broken. There are also front and rear engine mounts which are harder to inspect, but often also break around 75k-100k miles. The car probably won't fall apart if you use broken mounts, but you'll feel vibrations in the cabin. I replaced my side mount about 5k miles ago, and will do the front and rear soon, but still drive around. A bigger discussion with most of what you'll need is here:
https://acurazine.com/forums/problem...-bumpy-932957/
https://acurazine.com/forums/problem...-bumpy-932957/
The following users liked this post:
VisualEchos (07-07-2015)
07-07-2015, 07:23 PM
#3
Yes, that is the side motor mount and it is broken. There are also front and rear engine mounts which are harder to inspect, but often also break around 75k-100k miles. The car probably won't fall apart if you use broken mounts, but you'll feel vibrations in the cabin. I replaced my side mount about 5k miles ago, and will do the front and rear soon, but still drive around. A bigger discussion with most of what you'll need is here:
https://acurazine.com/forums/problem...-bumpy-932957/
https://acurazine.com/forums/problem...-bumpy-932957/
07-07-2015, 08:34 PM
#4
Registered Bunny
 The OEM mounts are somewhat soft to dampen vibrations but that's at the cost of longevity.
Some companies offer harder mounts, usually made of polyurethane that can/will last longer but they'll transfer more vibrations to the rest of the car.
The following users liked this post:
VisualEchos (07-07-2015)
07-07-2015, 09:06 PM
#5
It happens a lot on the TL. My side mount looks fine but I can see my front mount starting to deteriorate at 94K. Don't make a big fuss out of it, it's a wear item. After all, it's what hold your motor from trashing around under the hood. The OEM mounts are somewhat soft to dampen vibrations but that's at the cost of longevity.
Some companies offer harder mounts, usually made of polyurethane that can/will last longer but they'll transfer more vibrations to the rest of the car.
The OEM mounts are somewhat soft to dampen vibrations but that's at the cost of longevity.Some companies offer harder mounts, usually made of polyurethane that can/will last longer but they'll transfer more vibrations to the rest of the car.
50830-SEP-A04 - front - $115.01
50810-SEP-A04 - rear - $113.31
50820-SEP-A03 - side - $61.82
These prices are from DelRay, which seems to be the place to buy.
What about the trans mounts, I've read about a few people replacing them as well. I have an auto. Would you do them as well at 83,000 miles?
07-07-2015, 09:25 PM
#6
Registered Bunny
I think I'm going back with OEM mounts. The part #'s I've found are:
50830-SEP-A04 - front - $115.01
50810-SEP-A04 - rear - $113.31
50820-SEP-A03 - side - $61.82
These prices are from DelRay, which seems to be the place to buy.
What about the trans mounts, I've read about a few people replacing them as well. I have an auto. Would you do them as well at 83,000 miles?
50830-SEP-A04 - front - $115.01
50810-SEP-A04 - rear - $113.31
50820-SEP-A03 - side - $61.82
These prices are from DelRay, which seems to be the place to buy.
What about the trans mounts, I've read about a few people replacing them as well. I have an auto. Would you do them as well at 83,000 miles?
I'm not sure if you'll be doing the work yourself, but in the case you are...
The side mount is very easy to look at and change.
Next in difficulty would be the front mount although it has a cover so it's hard to see the state of it (it's between the radiator fans and the motor).
The rear mount is the most difficult one to check and work on because of its location and you'll need to remove the strut bar to go at it.
If anything it's likely the side and rear mount that go first due to acceleration and the engine rocking back.
For the upper transmission mount, you need to remove the air box but then it's right there. The lower mount I don't believe anyone changes...
The following users liked this post:
VisualEchos (07-08-2015)
Trending Topics
07-08-2015, 08:17 AM
#8
I recently had to replace my mounts as well. My side mount looked just like yours. The part you see that's cracked is a cover on top of the mount. It cracks because the inside of the mount is broken, detached and moving up and down. Mine was completely detached and once I removed it, it pulled right out of the mount.
My Front mount was completely detached as well. My upper transmission mount had two of the corners broken. I still haven't had a chance to do my rear mount, but I suspect it's also broken.
You can test your mounts by having a friend sit in your car. Have them hold the brakes, put the car in drive and rev the engine up to 2k rpms and down several times. Then have them do the same thing with the car in reverse. If you see excessive movement in the engine, you know you have broken mounts.
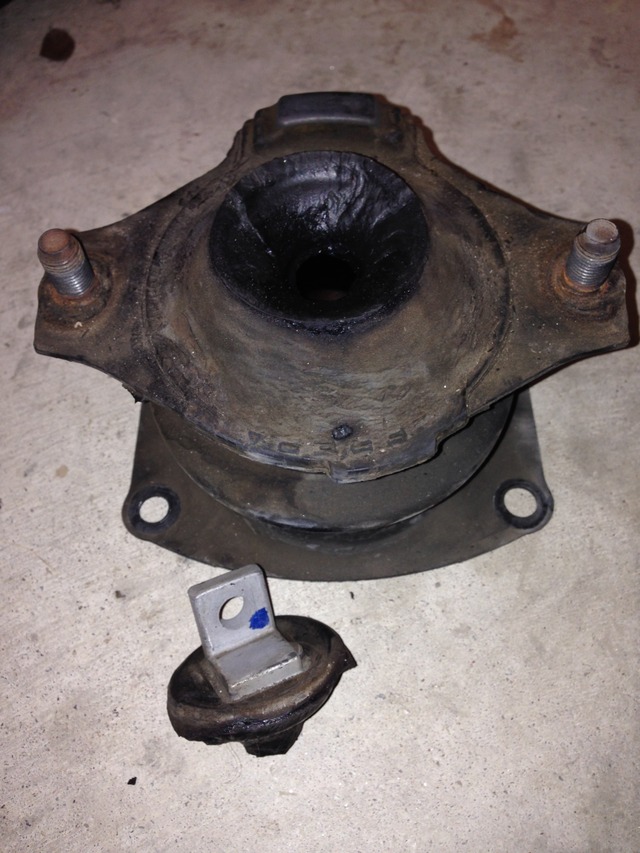
Here's some pictures of my mounts after I took them out. This was at 100,000 miles.
Side Mount
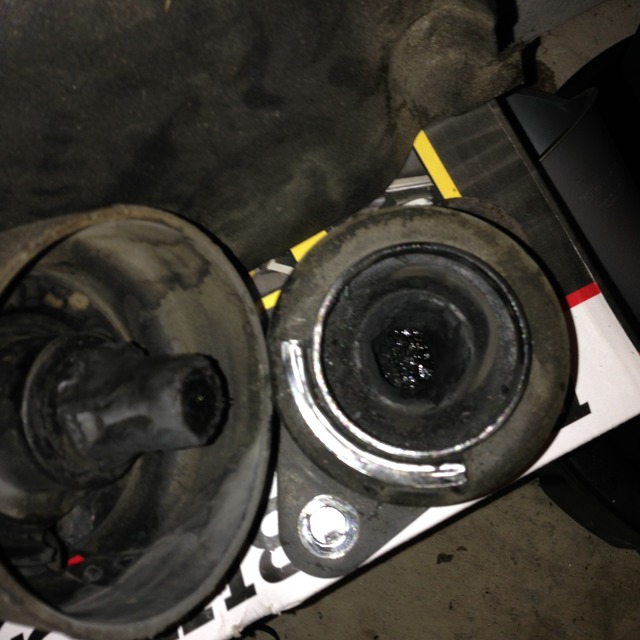
Upper Transmission
Front Mount
My Front mount was completely detached as well. My upper transmission mount had two of the corners broken. I still haven't had a chance to do my rear mount, but I suspect it's also broken.
You can test your mounts by having a friend sit in your car. Have them hold the brakes, put the car in drive and rev the engine up to 2k rpms and down several times. Then have them do the same thing with the car in reverse. If you see excessive movement in the engine, you know you have broken mounts.
Here's some pictures of my mounts after I took them out. This was at 100,000 miles.
Side Mount


Upper Transmission

Front Mount

The following 2 users liked this post by Wharbone:
MonkeyTrucker (07-08-2015),
VisualEchos (07-08-2015)
07-08-2015, 09:14 PM
#11
A bigger discussion with most of what you'll need is here:
https://acurazine.com/forums/problem...-bumpy-932957/
https://acurazine.com/forums/problem...-bumpy-932957/
So, I just ordered the passenger side and said screw helping a community that couldn't help me identify/confirm what others obviously have knowledge. There's an apparent mentality around here for cliques of certain members that LOVE circle jerking one another with garbage posts, not implying anyone in this thread.
There is ZERO posterity considered for this site. A lot of those "good threads" are junk and have expired and broken links to pics and other linked data.
A DIY should be required to be in a document that is uploaded so that others can download indefinitely, with the data belonging to the site until the moderators take the site down.
A lot of "advice" to search is ridiculous. Yeah I love looking at frogs and other images irrelevant to a thread / DIY.
I combined and made a very thorough document for reman/refurb the power steering pump that is leaking, from two threads. Jeez someone should take the lead and clean up and join a lot of those "good threads" and ensure the images are there and/or seek volunteers to update older info, mainly pics. You old timers or post whores on here, not implying any of you in this thread, wonder why people are asking these questions...they DID search. Ironic that when you use Boolean on Google to assist searches a LOT of times a thread with "members" bashing other members to search returns the first result instead of relevance. Only a mod should suggest a member to search, others should get admonished for it for cluttering up search results. A lot of these garbage posts are ruining this site in my opinion and the Third Generation Forums will only be relied upon more since our cars have aged much further.
I've attached the document for the power steering pump I mentioned above as an example for a DIY created for posterity. Folks don't have time to look through 100s of pages of a thread to find ALL the relevant info.
Holy Hell, you seriously can't upload the same file more than once in separate threads. Makes Sense. You can see it here.

Last edited by MonkeyTrucker; 07-08-2015 at 09:23 PM.
The following 2 users liked this post by MonkeyTrucker:
3FIFTY'07TL (01-21-2024),
flwrngls (06-28-2020)
07-08-2015, 09:26 PM
#12
Looks like the bolt was worn from the impression in that pic. Did you replace it or re-use that bolt? Looks evident that that particular mount exerts a lot of pressure elsewhere when it breaks down. Thanks for the pics and contributing to the answers of the OPs inquiry.
Last edited by MonkeyTrucker; 07-08-2015 at 09:29 PM.
07-08-2015, 10:48 PM
#13
Looks like the bolt was worn from the impression in that pic. Did you replace it or re-use that bolt? Looks evident that that particular mount exerts a lot of pressure elsewhere when it breaks down. Thanks for the pics and contributing to the answers of the OPs inquiry.
The following users liked this post:
MonkeyTrucker (07-08-2015)
07-08-2015, 11:40 PM
#14
 07-09-2015, 07:33 AM
#15
I guess I need a factory service manual, I didn't order any bolts with my mounts.
Is there not a thread somewhere that "here's probably what's going to go wrong with your 3rd Gen TL with a list of part numbers and DIY links"?
I wish there were.
Is there not a thread somewhere that "here's probably what's going to go wrong with your 3rd Gen TL with a list of part numbers and DIY links"?
I wish there were.
07-09-2015, 08:13 AM
#16
The FSM is pretty handy, especially for the bolt torque settings. I bought mine as soon as I bought my car. I prefer the actual physical manual instead of a digital version.
Here's some links to a download of the manual I found here on AZ.
https://acurazine.com/forums/third-g...ng-all-926323/
https://acurazine.com/forums/third-g...e-here-913916/
Here's some links to a download of the manual I found here on AZ.
https://acurazine.com/forums/third-g...ng-all-926323/
https://acurazine.com/forums/third-g...e-here-913916/
The following users liked this post:
VisualEchos (07-09-2015)
07-09-2015, 08:58 AM
#18
Registered Bunny
That's going to sound bad but here it goes:
Volunteer yourself and stop expecting everybody to do the legwork for you. Yes some have done the work you're about to do. Yes some have made guides. Yes some pics are broken. That's life man.
There's a ton of searchable information and I agree many pictures are broken because they were hosted externally before Azine had proper photo hosting.
You make it sound like these guides are broken only to spite you or someone else and ignoring the fact some of them were made ages ago in a different context. Don't forget nobody here is paid to help you, it's all volunteering. We're all humans and sometimes we don't know or don't even want to. Mods can't magically recover pics that have disappeared from the internet. Mods also have lives they want to live and many don't have 3G TLs anymore...
The thread you linked to has been hijacked by you to talk about your issues simply because they somewhat relate to the OP issues. It gets confusing for anyone trying to help one or both. In the same day, 5 new "Please help me with my issues" thread have popped up.
The search function on vBulletin is "ok". It's not perfect, it's not as convenient as a crawling algorithm made by Google... but here comes your savior. Google indexes every thread so you can search for them.
Specifying the website you want to search will yield better results.
IE: Acura TL side motor mount DIY site:acurazine.com
This will give you only stuff coming from Azine.
The circle of jerking goes on in every thread. This is the internet. Kick back, relax, try to enjoy your time instead of getting angry over little things. Take the knowledge you want and give some if you can.
The following users liked this post:
VisualEchos (07-09-2015)
07-09-2015, 09:31 AM
#19
Please don't take me wrong, I agree with your post, but I do feel like we could do a better job of preserving the information we have, and making it much easier for people to access. You'll note that in this very thread I wrote part numbers for the mounts...not for me, I already have them, but for anyone searching for this information in the future. In my BC Racing Coilover thread I wrote all the weights for the same reason. It's information that someone can use sometime, but it'll certainly get lost in the mix without someone to put it into a main thread.
I'm not saying I know how to do all of these things, it has been since 2001 that I was a moderator on a very large S2000 board, but at that time I felt compelled to archive a lot of information, and because of that it's still available today, and easily accessed.
07-09-2015, 11:56 PM
#20
I just checked and they don't list the 07 service manual anymore. They have the 07-08 fsm for $170 now. Yikes!
2007-08 TL Service Manual (KA) - Helm Incorporated
What's weird is they also have the 04-06 manual for only $56.50.
2004-06 TL Service Manual - Helm Incorporated
I wonder why there's such a big price difference.
The following users liked this post:
VisualEchos (07-10-2015)
07-10-2015, 04:53 AM
#21
Senior Moderator
you can buy it off ebay for $30, thats what I did!
Make sure you install all the mounts, and then neutralize the mounts so they aren't sitting at an improper location/angle. Finger tighten the mounting bolts to the mounts, repeatedly move between P, R and D and then tighten the bolts.
Make sure you install all the mounts, and then neutralize the mounts so they aren't sitting at an improper location/angle. Finger tighten the mounting bolts to the mounts, repeatedly move between P, R and D and then tighten the bolts.
The following users liked this post:
VisualEchos (07-10-2015)
07-10-2015, 07:24 AM
#22
you can buy it off ebay for $30, thats what I did!
Make sure you install all the mounts, and then neutralize the mounts so they aren't sitting at an improper location/angle. Finger tighten the mounting bolts to the mounts, repeatedly move between P, R and D and then tighten the bolts.
Make sure you install all the mounts, and then neutralize the mounts so they aren't sitting at an improper location/angle. Finger tighten the mounting bolts to the mounts, repeatedly move between P, R and D and then tighten the bolts.
07-10-2015, 11:02 AM
#23
The side engine mount is super easy.
1. Just put a 2x4 under your oil pan and jack the engine ever so slightly. Just jack until the mount moves up a little bit.
2. Then lift the power steering res out of of the way and unbolt the mount.
The upper transmission mount isn't too bad but accessing several of the bolts is a little difficult. The hardest thing for me was removing the battery tray. It's very tight spaces to access the bolts under the tray. A few different lengths of ratchet extensions will help access all the bolts.
1. Again, 2x4 under the oil pan or transmission and jack the engine ever so slightly.
2. Remove battery and battery tray.
3. Remove intake.
4. Unbolt mount.
For the front engine mount I used this DIY to help. The last post in that thread is great and what I did.
https://acurazine.com/forums/problem...-mount-854098/
1. Put the front of the car on jack stands.
2. 2x4 under oil pan and jack engine a bit.
3. Remove underside plastic on the bumper.
4. Remove coolant reservoir bracket and put the res to the side (didn't detach the hose).
5. Unbolt both fans. Unplug all connectors for the passenger side fan. I removed only the passenger side fan and left the driver's side fan in place, loose and unbolted.
6. Unbolt engine mount. You'll need a longer ratchet extension. I used a wobble extension and didn't need flex/swivel socket like the DIY used.
7. Detach engine mount vacuum line. Mine was a bit stuck and took some wiggling to get it to detach.
8. Put a piece of cardboard against the radiator to protect it. Pull mount out where the passenger side fan was. I was able to wiggle it out without damaging my radiator and without disconnecting any coolant hoses.
Hope that helps!
The following users liked this post:
VisualEchos (07-11-2015)
07-10-2015, 02:05 PM
#24
Safety Car
iTrader: (5)
you can buy it off ebay for $30, thats what I did!
Make sure you install all the mounts, and then neutralize the mounts so they aren't sitting at an improper location/angle. Finger tighten the mounting bolts to the mounts, repeatedly move between P, R and D and then tighten the bolts.
Make sure you install all the mounts, and then neutralize the mounts so they aren't sitting at an improper location/angle. Finger tighten the mounting bolts to the mounts, repeatedly move between P, R and D and then tighten the bolts.
07-10-2015, 02:09 PM
#25
Registered Bunny
A bit like when putting your wheels on you're supposed to assume a star pattern while tightening and wiggling everything so it "sits" properly.
The following 2 users liked this post by polobunny:
sockr1 (07-10-2015),
VisualEchos (07-11-2015)
07-10-2015, 02:17 PM
#26
Safety Car
iTrader: (5)
Vehicle on ground (not on the lift!), start the car, rev the engine a few times. Move the car forward a bit, put it in reverse, move it back a bit. You just want the engine to rock a bit to it's neutral position.
A bit like when putting your wheels on you're supposed to assume a star pattern while tightening and wiggling everything so it "sits" properly.
A bit like when putting your wheels on you're supposed to assume a star pattern while tightening and wiggling everything so it "sits" properly.
if i haven't done this and i've done about 5k miles, is it even worth it?
07-10-2015, 02:32 PM
#27
Registered Bunny
5K miles is quite a bit. Do you have vibration in the steering wheel or when stopped at a red light (in gear or not in gear)?
I'd probably forgo it if I was in your situation because the mounts have worn a bit already and the engine and transmission have settled most likely. If you experience any issue or if you want to be more catholic than the pope you can go ahead and do the procedure.
07-10-2015, 02:37 PM
#28
Safety Car
iTrader: (5)
Exactly. Hand tight on the engine, torqued to frame.
5K miles is quite a bit. Do you have vibration in the steering wheel or when stopped at a red light (in gear or not in gear)?
I'd probably forgo it if I was in your situation because the mounts have worn a bit already and the engine and transmission have settled most likely. If you experience any issue or if you want to be more catholic than the pope you can go ahead and do the procedure.
maybe i'll "reinstall" if i ever feel like i'm bored haha. thanks for the info!
07-10-2015, 02:50 PM
#29
Registered Bunny
haha yea i have vibrations but i expected that with the 60 durometer xlr8 mounts. my vibrations were so bad that i put the oem rear one back on, when that ac kicked on it was out of control and embarrassing haha.
maybe i'll "reinstall" if i ever feel like i'm bored haha. thanks for the info!
maybe i'll "reinstall" if i ever feel like i'm bored haha. thanks for the info!
I didn't know you had polyurethane mounts, I was under the impression we were still talking about OEM ones.
They take longer to settle in compared to the softer OEM mounts so the fact you haven't neutralized them may exacerbate the vibrations.
07-10-2015, 03:05 PM
#30
Safety Car
iTrader: (5)
It shouldn't be "too" bad with 60A ones, although more noticeable than stock and that's hard to quantify over the new.
I didn't know you had polyurethane mounts, I was under the impression we were still talking about OEM ones.
They take longer to settle in compared to the softer OEM mounts so the fact you haven't neutralized them may exacerbate the vibrations.
I didn't know you had polyurethane mounts, I was under the impression we were still talking about OEM ones.
They take longer to settle in compared to the softer OEM mounts so the fact you haven't neutralized them may exacerbate the vibrations.
07-18-2015, 12:02 PM
#32

side mount on mine to toasted the two bolts (next to the ground bolt) that connect the motor broke off in the piece thats attached to motor...
that piece these bolts bolt to is obviously a part of the motor does it un bolt from the motor to do i have to reverse drill them out?
that piece these bolts bolt to is obviously a part of the motor does it un bolt from the motor to do i have to reverse drill them out?
07-18-2015, 01:58 PM
#33
side mount on mine to toasted the two bolts (next to the ground bolt) that connect the motor broke off in the piece thats attached to motor...
that piece these bolts bolt to is obviously a part of the motor does it un bolt from the motor to do i have to reverse drill them out?
that piece these bolts bolt to is obviously a part of the motor does it un bolt from the motor to do i have to reverse drill them out?
07-19-2015, 12:14 AM
#34
no the two bolts that connect the side mount to the bracket. already ordered new mount and bracket
07-19-2015, 10:07 AM
#35
Alright guys, just got finished doing the side mount and wanted to add a little bit of info to the step-by-step that I used. Credit for that goes to EagleEye, and Tonyware for the torque specs. My additions are in RED.
Tools needed:
1. factory scissor jack
2. floor jack
3. 17mm socket
4. 3/8 ratchet
5. 12" 3/8 extension
6. 6" 3/8 extension
7. piece of 2x4x12 (6" would be better) (I used a very small piece, basically a block)
8. other pieces of 2x4 to prevent the rear wheels from moving during jacking
9. PB blaster for the front bottom bolt
10. Anti-sieze
11. Wire brush
12. Torque wrench
13. Breaker bar
Procedure:
1(a). Spray some PB blaster on the front bottom bolt the night before
1. pull the brake fluid reservoir up and out (it's sitting on a slider)
2. loosen top mount bolt (12x45) using 17mm socket
3. loosen 2 bottom bolts using 17mm socket and 18" extension (make sure you clear the A/C lines when ratcheting - don't want to bend/crack it)
4. use factory scissor jack to lift the car up enough to get the floor jack and the 2x4 piece of wood under the oil pan
Note: Oil pan is not flat at bottom. Use the rear surface as the jack point as it is flat while the front surface is a bit angled.
5. use the floor jack to slightly lift the engine up and provide support to remove the top bolt on the mount.
Note: Use patience as there's no hurry and constantly check the bolt looseness after one or two pumps on the floor jack.
6. once the engine is firmly supported on the 2x4 and floor jack, go ahead and remove the top bolt (might have to release a bit of pressure or jack the engine up slightly to get the bolt out completely - should slide out with ease)
7. after top bolt is out, use extension and 17mm socket to remove the bottom bolts (2)
8. slightly jack the engine up a bit more so that the engine bracket does not exert any pressure on the mount
9. slide the mount out slowly careful to not brush the metal edges of the mount's base against the belt assembly. Don't want to scrape the belt as it will eventually result in permanent damage
9(a). clean out the front bottom bolt hole with PB Blaster and a paper towel. The only bolt that I think needs to be replaced is the bolt that goes in this hole. For whatever reason it's corroded pretty bad while the others are still nice. I did not buy a new bolt, I wire-brushed the old one and covered it in anti-seize.
10. slide in your mount slowly and with patience right-side up and in the orientation that it should sit
Note: There's a black arrow engraved on the base of the mount. Make sure the arrow is pointing to the front (and arrow is in the top right position)
11. slide in the NEW top bolt to connect the mount with the engine bracket again. Might requires some adjustment using the jack. Don't tighten the bolt just yet
12. Hand thread in the two bottom bolts (use the extension without the ratchet as it's easier to turn and ensure that there's no cross-threading)
13. Start tightening the two bottom bolts but do not apply final torque. Want enough tightness to drop the engine down and remove the floor jack.
14. Lower the car and remove the scissor jack
15. tighten the bottom bolts to 47 ft-lbs, and the top bolt to 40 ft-lbs.
16. slide the brake reservoir back onto the metal bracket
17. finished!
Have fun. And remember, it's VERY easy to do and the most important tool is patience.
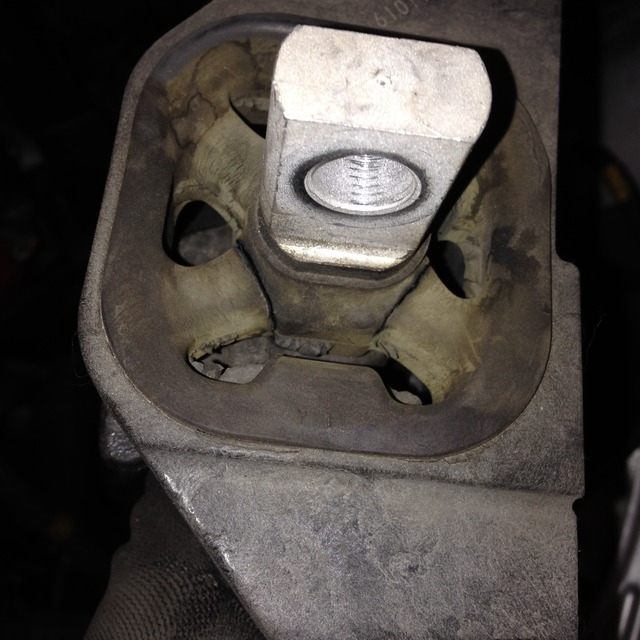
And a few pix for reference.
The top left bolt in the pic is the front bottom bolt on the car, the one closest to the front of the car.

The top hole of the engine mount is smooth, and you can see by the one that I took out that I had the engine jacked up a little too much when I took it out. It's easy to do, and probably why the service manual recommends that you replace the bolts. The bolt still looked good, so I re-used it.

Anti-seize is your best friend, always use it.

This is the problem bolt-hole. It's the one for the base of the mount in front. My car has 83,000 miles on it and has always been clean as a whistle, yet this looks like it's from a '67 Mustang in a junk yard. I'm not sure why this bolt and bolt hole did this, but it certainly surprised me how hard the bolt was to remove, and how bad it had corroded.

Tools needed:
1. factory scissor jack
2. floor jack
3. 17mm socket
4. 3/8 ratchet
5. 12" 3/8 extension
6. 6" 3/8 extension
7. piece of 2x4x12 (6" would be better) (I used a very small piece, basically a block)
8. other pieces of 2x4 to prevent the rear wheels from moving during jacking
9. PB blaster for the front bottom bolt
10. Anti-sieze
11. Wire brush
12. Torque wrench
13. Breaker bar
Procedure:
1(a). Spray some PB blaster on the front bottom bolt the night before
1. pull the brake fluid reservoir up and out (it's sitting on a slider)
2. loosen top mount bolt (12x45) using 17mm socket
3. loosen 2 bottom bolts using 17mm socket and 18" extension (make sure you clear the A/C lines when ratcheting - don't want to bend/crack it)
4. use factory scissor jack to lift the car up enough to get the floor jack and the 2x4 piece of wood under the oil pan
Note: Oil pan is not flat at bottom. Use the rear surface as the jack point as it is flat while the front surface is a bit angled.
5. use the floor jack to slightly lift the engine up and provide support to remove the top bolt on the mount.
Note: Use patience as there's no hurry and constantly check the bolt looseness after one or two pumps on the floor jack.
6. once the engine is firmly supported on the 2x4 and floor jack, go ahead and remove the top bolt (might have to release a bit of pressure or jack the engine up slightly to get the bolt out completely - should slide out with ease)
7. after top bolt is out, use extension and 17mm socket to remove the bottom bolts (2)
8. slightly jack the engine up a bit more so that the engine bracket does not exert any pressure on the mount
9. slide the mount out slowly careful to not brush the metal edges of the mount's base against the belt assembly. Don't want to scrape the belt as it will eventually result in permanent damage
9(a). clean out the front bottom bolt hole with PB Blaster and a paper towel. The only bolt that I think needs to be replaced is the bolt that goes in this hole. For whatever reason it's corroded pretty bad while the others are still nice. I did not buy a new bolt, I wire-brushed the old one and covered it in anti-seize.
10. slide in your mount slowly and with patience right-side up and in the orientation that it should sit
Note: There's a black arrow engraved on the base of the mount. Make sure the arrow is pointing to the front (and arrow is in the top right position)
11. slide in the NEW top bolt to connect the mount with the engine bracket again. Might requires some adjustment using the jack. Don't tighten the bolt just yet
12. Hand thread in the two bottom bolts (use the extension without the ratchet as it's easier to turn and ensure that there's no cross-threading)
13. Start tightening the two bottom bolts but do not apply final torque. Want enough tightness to drop the engine down and remove the floor jack.
14. Lower the car and remove the scissor jack
15. tighten the bottom bolts to 47 ft-lbs, and the top bolt to 40 ft-lbs.
16. slide the brake reservoir back onto the metal bracket
17. finished!
Have fun. And remember, it's VERY easy to do and the most important tool is patience.
And a few pix for reference.
The top left bolt in the pic is the front bottom bolt on the car, the one closest to the front of the car.
The top hole of the engine mount is smooth, and you can see by the one that I took out that I had the engine jacked up a little too much when I took it out. It's easy to do, and probably why the service manual recommends that you replace the bolts. The bolt still looked good, so I re-used it.
Anti-seize is your best friend, always use it.
This is the problem bolt-hole. It's the one for the base of the mount in front. My car has 83,000 miles on it and has always been clean as a whistle, yet this looks like it's from a '67 Mustang in a junk yard. I'm not sure why this bolt and bolt hole did this, but it certainly surprised me how hard the bolt was to remove, and how bad it had corroded.
The following 4 users liked this post by VisualEchos:
07-19-2015, 02:12 PM
#36
07-21-2015, 01:54 AM
#38
Glad you got it done OP! If I remember correctly one of my bolts was also corroded, while the other was fine.
There's only 3 bolts holding the mount. Two on the bottom connecting the mount to the frame and one bolt on top connecting the mount to the bracket. I'm pretty sure the two bolts you're talking about are what connect the bracket to the engine.
There's only 3 bolts holding the mount. Two on the bottom connecting the mount to the frame and one bolt on top connecting the mount to the bracket. I'm pretty sure the two bolts you're talking about are what connect the bracket to the engine.
07-22-2015, 08:38 AM
#39

What do bad engine mounts result in? I saw some youtube videos of cars with bad motor mounts and it showed the entire engine moving when switching gears.
Do bad engine cause vibration? Or do they absorb impact when going over bumps? My car is uncomfortable when going over bumps. It doesn't really make any noise except one fairly loud thud noise for each bump. Sometimes this happens on small imperfections on the road. I recently replaced my sway bar end links, but to no avail. My shocks and struts are also brand new. I haven't had time to check out the motor mounts yet, but just wondering if that really has an impact when going over bumps.
Do bad engine cause vibration? Or do they absorb impact when going over bumps? My car is uncomfortable when going over bumps. It doesn't really make any noise except one fairly loud thud noise for each bump. Sometimes this happens on small imperfections on the road. I recently replaced my sway bar end links, but to no avail. My shocks and struts are also brand new. I haven't had time to check out the motor mounts yet, but just wondering if that really has an impact when going over bumps.