
DIY Front Impact Sensor replacement

Thread Starter
Advanced
Joined: Oct 2013
Posts: 69
Likes: 25
From: DFW
DIY Front Impact Sensor replacement
Since I bought my 07 TL-S about a year and a half ago I've been getting intermittent airbag lights. For me, I usually got them in hot weather. The car would be fine in the morning, but the light would come on after being parked in the sun. I've also heard you can get the same thing from cold weather, but we don't get much cold in Dallas.
When I got these airbag lights, I would just turn the key on and off a few times until the light went away. I got tired of doing this and decided to go ahead and replace the sensor. I replaced the sensor a few weeks ago and no more airbag lights since replacement!!! The replacement sensor is only about $37.
Looking in my Nav messages, it showed me the DTC it was throwing was 42-1. That means "No signal from the right front impact sensor".
This is a pretty easy fix. I followed my 07 factory service manual, took my time, and it took a few hours. I'm sure it could be done much more quickly!
Here are the steps as listed in the FSM:
Removal
1. Disconnect the negative cable from the battery, and wait at least 3 minutes.
2. Disconnect the driver's airbag 4P connector, the front passenger's airbag 4P connector, and both seat belt tensioner 4P connectors.
3. Remove the front bumper
4. On the driver's side, loosen the intake resonator rear mounting bolts to gain access to the impact sensor. (N/A for me since my bad sensor was the passenger side)
5. On the passenger's side, remove the windshield washer reservoir to gain access to the impact sensor. (this wasn't actually necessary for me so I left the reservoir alone)
6. Disconnect the engine compartment wire harness 2P connector, and using a TORX T30 bit, remove the two TORX bolts, then remove the front impact sensor.
Installation:
1. Install the new front impact sensor with new TORX bolts (I reused my bolts), then connect the engine compartment wire harness 2P connector to the front impact sensor
2. Reconnect the driver's airbag 4P connector, the front passenger's airbag 4P connector, and both seat belt tensioner 4P connectors.
3. Reconnect the negative cable to the battery.
4. Install all removed parts.
Here are some pictures:
First remove the negative battery cable for at least 3 minutes. IMPORTANT
Then I removed the front bumper. Not pictured, but you can find DIY's in the forums here.
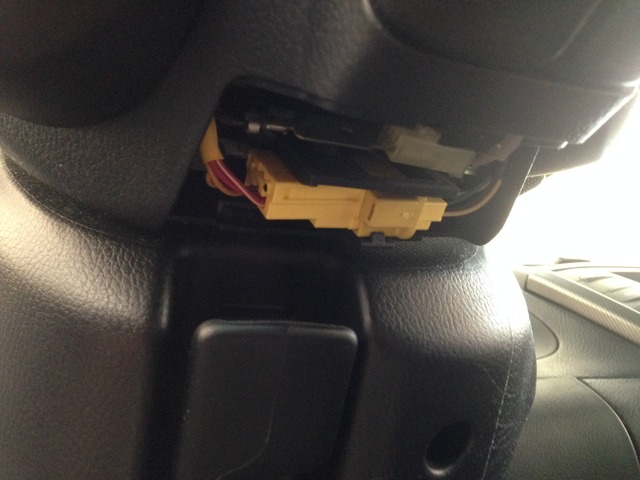
Next remove the driver's airbag 4P connector. There's a cover you have to pop off first and then you'll see the yellow connector. To disconnect all of these connectors you have to slide part of the connector up and then pull apart. It took me a second to figure it out but it's easy.
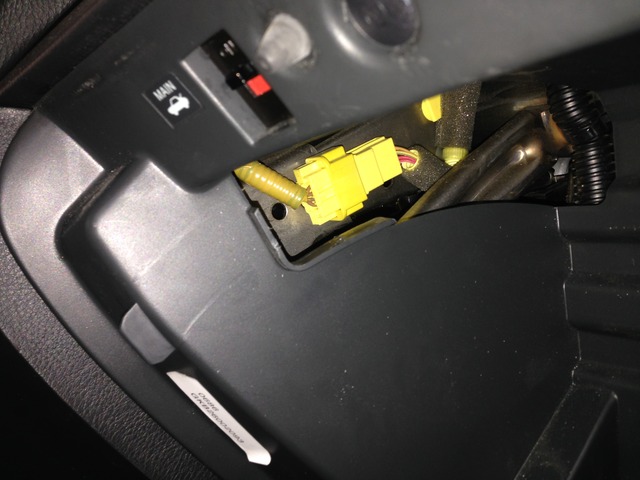
Next remove the glove box to gain access to the passenger's 4P connector.
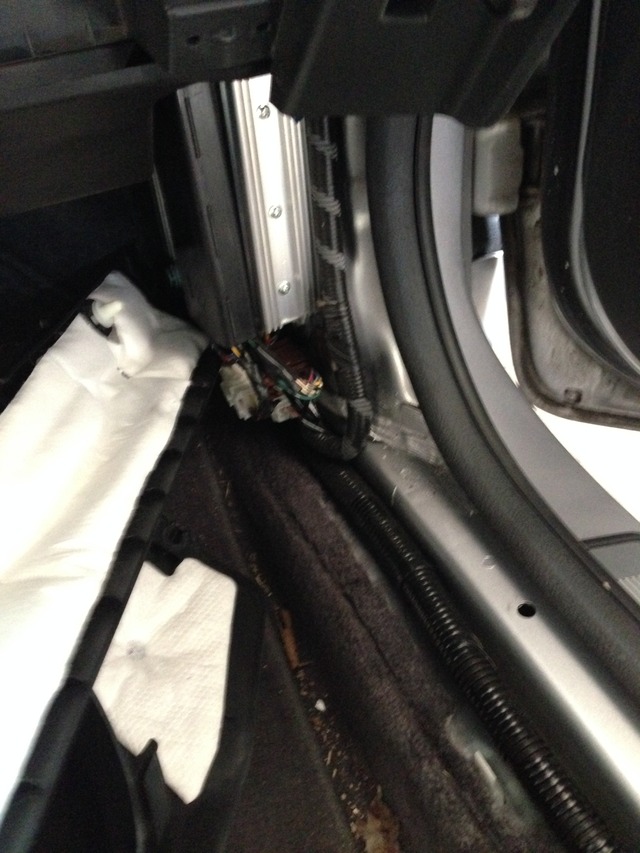
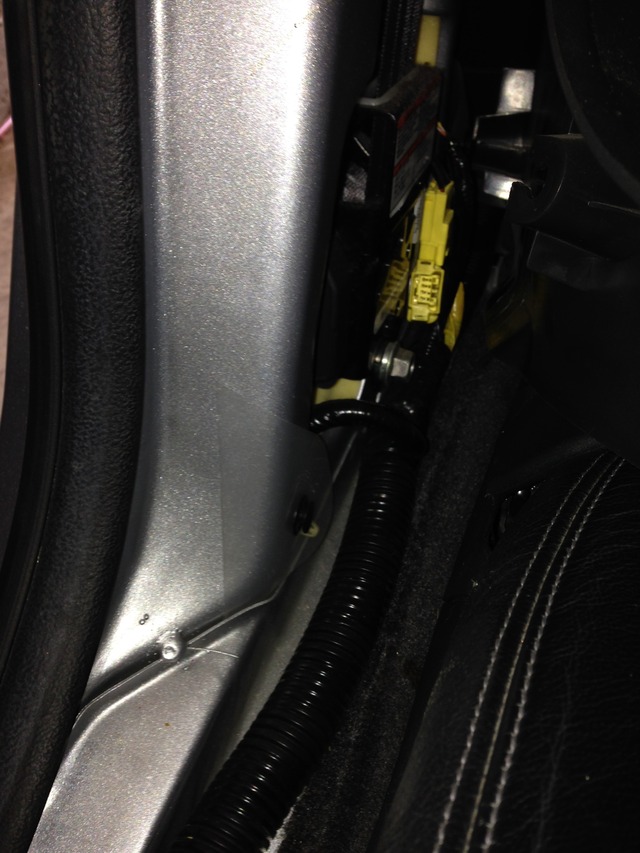
Next remove the B-pillar lower trim to gain access to the seat belt tensioners. You have to remove the Kick panels & front door sill trim to get to them. On the driver's side you also have to remove the footrest to get the kick panel out. I was able to get to the 4P connectors without fully removing the B-pillar lower trim. I just opened it enough to access the connectors.
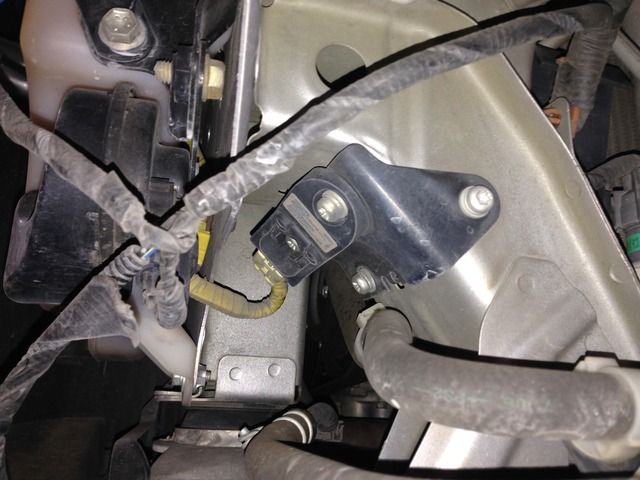
Front bumper removed. The impact sensor is located to the right of the windshield washer fluid reservoir. It has a yellow cable and connector.


Take out the two T30 bolts and unplug the sensor. I didn't need to remove the windshield fluid reservoir like the FSM said. I also reused the TORX bolts. Replace with your new sensor and torque the bolts to 9.8 N-m (1.0 kgf-m, 7.2 lbf-ft)
Re-install everything in reverse order. Re-enter radio/nav codes.
After everything was put back together I erased the DTC code in my nav messages by going into diagnostic mode (Hold "Map/Guide", "Menu" and "Cancel" for 5 seconds). Once in diagnostic mode the place to clear the codes is under XM.
I hope this helps someone! I was looking for a write up on it but couldn't find one before I replaced mine.
When I got these airbag lights, I would just turn the key on and off a few times until the light went away. I got tired of doing this and decided to go ahead and replace the sensor. I replaced the sensor a few weeks ago and no more airbag lights since replacement!!!
The replacement sensor is only about $37. Looking in my Nav messages, it showed me the DTC it was throwing was 42-1. That means "No signal from the right front impact sensor".
This is a pretty easy fix. I followed my 07 factory service manual, took my time, and it took a few hours. I'm sure it could be done much more quickly!
Here are the steps as listed in the FSM:
Removal
1. Disconnect the negative cable from the battery, and wait at least 3 minutes.
2. Disconnect the driver's airbag 4P connector, the front passenger's airbag 4P connector, and both seat belt tensioner 4P connectors.
3. Remove the front bumper
4. On the driver's side, loosen the intake resonator rear mounting bolts to gain access to the impact sensor. (N/A for me since my bad sensor was the passenger side)
5. On the passenger's side, remove the windshield washer reservoir to gain access to the impact sensor. (this wasn't actually necessary for me so I left the reservoir alone)
6. Disconnect the engine compartment wire harness 2P connector, and using a TORX T30 bit, remove the two TORX bolts, then remove the front impact sensor.
Installation:
1. Install the new front impact sensor with new TORX bolts (I reused my bolts), then connect the engine compartment wire harness 2P connector to the front impact sensor
2. Reconnect the driver's airbag 4P connector, the front passenger's airbag 4P connector, and both seat belt tensioner 4P connectors.
3. Reconnect the negative cable to the battery.
4. Install all removed parts.
Here are some pictures:
First remove the negative battery cable for at least 3 minutes. IMPORTANT
Then I removed the front bumper. Not pictured, but you can find DIY's in the forums here.
Next remove the driver's airbag 4P connector. There's a cover you have to pop off first and then you'll see the yellow connector. To disconnect all of these connectors you have to slide part of the connector up and then pull apart. It took me a second to figure it out but it's easy.

Next remove the glove box to gain access to the passenger's 4P connector.

Next remove the B-pillar lower trim to gain access to the seat belt tensioners. You have to remove the Kick panels & front door sill trim to get to them. On the driver's side you also have to remove the footrest to get the kick panel out. I was able to get to the 4P connectors without fully removing the B-pillar lower trim. I just opened it enough to access the connectors.


Front bumper removed. The impact sensor is located to the right of the windshield washer fluid reservoir. It has a yellow cable and connector.


Take out the two T30 bolts and unplug the sensor. I didn't need to remove the windshield fluid reservoir like the FSM said. I also reused the TORX bolts. Replace with your new sensor and torque the bolts to 9.8 N-m (1.0 kgf-m, 7.2 lbf-ft)
Re-install everything in reverse order. Re-enter radio/nav codes.
After everything was put back together I erased the DTC code in my nav messages by going into diagnostic mode (Hold "Map/Guide", "Menu" and "Cancel" for 5 seconds). Once in diagnostic mode the place to clear the codes is under XM.
I hope this helps someone! I was looking for a write up on it but couldn't find one before I replaced mine.

9th Gear
Joined: Sep 2015
Posts: 9
Likes: 0
From: Phoenix Az
Since I bought my 07 TL-S about a year and a half ago I've been getting intermittent airbag lights. For me, I usually got them in hot weather. The car would be fine in the morning, but the light would come on after being parked in the sun. I've also heard you can get the same thing from cold weather, but we don't get much cold in Dallas.
When I got these airbag lights, I would just turn the key on and off a few times until the light went away. I got tired of doing this and decided to go ahead and replace the sensor. I replaced the sensor a few weeks ago and no more airbag lights since replacement!!! The replacement sensor is only about $37.
Looking in my Nav messages, it showed me the DTC it was throwing was 42-1. That means "No signal from the right front impact sensor".
This is a pretty easy fix. I followed my 07 factory service manual, took my time, and it took a few hours. I'm sure it could be done much more quickly!
Here are the steps as listed in the FSM:
Removal
1. Disconnect the negative cable from the battery, and wait at least 3 minutes.
2. Disconnect the driver's airbag 4P connector, the front passenger's airbag 4P connector, and both seat belt tensioner 4P connectors.
3. Remove the front bumper
4. On the driver's side, loosen the intake resonator rear mounting bolts to gain access to the impact sensor. (N/A for me since my bad sensor was the passenger side)
5. On the passenger's side, remove the windshield washer reservoir to gain access to the impact sensor. (this wasn't actually necessary for me so I left the reservoir alone)
6. Disconnect the engine compartment wire harness 2P connector, and using a TORX T30 bit, remove the two TORX bolts, then remove the front impact sensor.
Installation:
1. Install the new front impact sensor with new TORX bolts (I reused my bolts), then connect the engine compartment wire harness 2P connector to the front impact sensor
2. Reconnect the driver's airbag 4P connector, the front passenger's airbag 4P connector, and both seat belt tensioner 4P connectors.
3. Reconnect the negative cable to the battery.
4. Install all removed parts.
Here are some pictures:
First remove the negative battery cable for at least 3 minutes. IMPORTANT
Then I removed the front bumper. Not pictured, but you can find DIY's in the forums here.
Next remove the driver's airbag 4P connector. There's a cover you have to pop off first and then you'll see the yellow connector. To disconnect all of these connectors you have to slide part of the connector up and then pull apart. It took me a second to figure it out but it's easy.

Next remove the glove box to gain access to the passenger's 4P connector.

Next remove the B-pillar lower trim to gain access to the seat belt tensioners. You have to remove the Kick panels & front door sill trim to get to them. On the driver's side you also have to remove the footrest to get the kick panel out. I was able to get to the 4P connectors without fully removing the B-pillar lower trim. I just opened it enough to access the connectors.


Front bumper removed. The impact sensor is located to the right of the windshield washer fluid reservoir. It has a yellow cable and connector.

Take out the two T30 bolts and unplug the sensor. I didn't need to remove the windshield fluid reservoir like the FSM said. I also reused the TORX bolts. Replace with your new sensor and torque the bolts to 9.8 N-m (1.0 kgf-m, 7.2 lbf-ft)
Re-install everything in reverse order. Re-enter radio/nav codes.
After everything was put back together I erased the DTC code in my nav messages by going into diagnostic mode (Hold "Map/Guide", "Menu" and "Cancel" for 5 seconds). Once in diagnostic mode the place to clear the codes is under XM.
I hope this helps someone! I was looking for a write up on it but couldn't find one before I replaced mine.
When I got these airbag lights, I would just turn the key on and off a few times until the light went away. I got tired of doing this and decided to go ahead and replace the sensor. I replaced the sensor a few weeks ago and no more airbag lights since replacement!!!
The replacement sensor is only about $37. Looking in my Nav messages, it showed me the DTC it was throwing was 42-1. That means "No signal from the right front impact sensor".
This is a pretty easy fix. I followed my 07 factory service manual, took my time, and it took a few hours. I'm sure it could be done much more quickly!
Here are the steps as listed in the FSM:
Removal
1. Disconnect the negative cable from the battery, and wait at least 3 minutes.
2. Disconnect the driver's airbag 4P connector, the front passenger's airbag 4P connector, and both seat belt tensioner 4P connectors.
3. Remove the front bumper
4. On the driver's side, loosen the intake resonator rear mounting bolts to gain access to the impact sensor. (N/A for me since my bad sensor was the passenger side)
5. On the passenger's side, remove the windshield washer reservoir to gain access to the impact sensor. (this wasn't actually necessary for me so I left the reservoir alone)
6. Disconnect the engine compartment wire harness 2P connector, and using a TORX T30 bit, remove the two TORX bolts, then remove the front impact sensor.
Installation:
1. Install the new front impact sensor with new TORX bolts (I reused my bolts), then connect the engine compartment wire harness 2P connector to the front impact sensor
2. Reconnect the driver's airbag 4P connector, the front passenger's airbag 4P connector, and both seat belt tensioner 4P connectors.
3. Reconnect the negative cable to the battery.
4. Install all removed parts.
Here are some pictures:
First remove the negative battery cable for at least 3 minutes. IMPORTANT
Then I removed the front bumper. Not pictured, but you can find DIY's in the forums here.
Next remove the driver's airbag 4P connector. There's a cover you have to pop off first and then you'll see the yellow connector. To disconnect all of these connectors you have to slide part of the connector up and then pull apart. It took me a second to figure it out but it's easy.
Next remove the glove box to gain access to the passenger's 4P connector.
Next remove the B-pillar lower trim to gain access to the seat belt tensioners. You have to remove the Kick panels & front door sill trim to get to them. On the driver's side you also have to remove the footrest to get the kick panel out. I was able to get to the 4P connectors without fully removing the B-pillar lower trim. I just opened it enough to access the connectors.
Front bumper removed. The impact sensor is located to the right of the windshield washer fluid reservoir. It has a yellow cable and connector.
Take out the two T30 bolts and unplug the sensor. I didn't need to remove the windshield fluid reservoir like the FSM said. I also reused the TORX bolts. Replace with your new sensor and torque the bolts to 9.8 N-m (1.0 kgf-m, 7.2 lbf-ft)
Re-install everything in reverse order. Re-enter radio/nav codes.
After everything was put back together I erased the DTC code in my nav messages by going into diagnostic mode (Hold "Map/Guide", "Menu" and "Cancel" for 5 seconds). Once in diagnostic mode the place to clear the codes is under XM.
I hope this helps someone! I was looking for a write up on it but couldn't find one before I replaced mine.
Senior Moderator


Joined: Feb 2006
Posts: 21,411
Likes: 2,187
From: Space Coast, FL
Figured you had a TL-S like OP but here's the part, it's #4 for the front right sensor;
SRS UNIT for 2007 Acura TL
SRS UNIT for 2007 Acura TL

Thread
Thread Starter
Forum
Replies
Last Post
mada51589
3G TL Problems & Fixes
80
Jan 9, 2025 04:40 PM