
DIY: 2006 Acura TL - Side Motor Mount Replacement
 08-09-2012, 08:54 PM
#41
i see that this thread has not been talked in for a while. but does any one have all the innovative mounts in? (pass side, front, rear) if so how do you like em? i have a 6 speed tl and id like to know what im looking forward to. and also what do i do about the vac lines that go to the mounts?
 10-15-2012, 07:35 PM
#42
Drifting
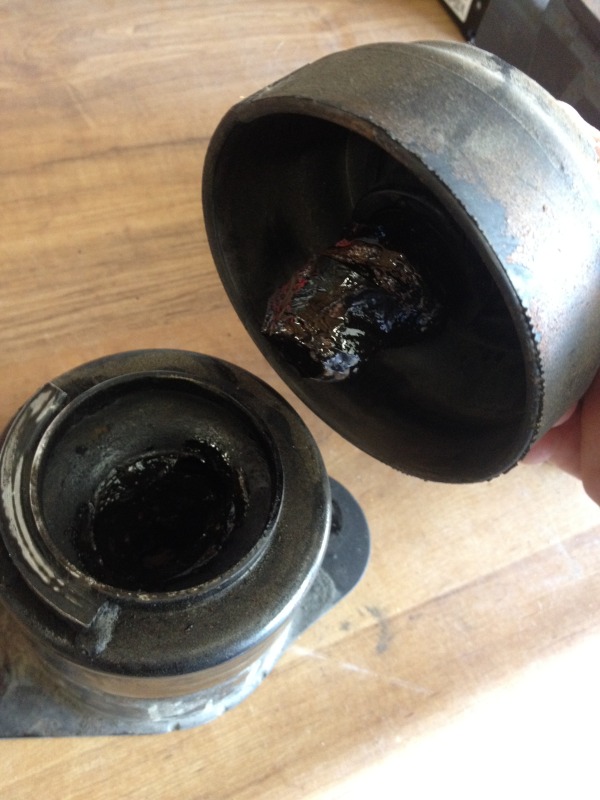
Thanks to the OP for the basic write-up. It took me barely 20 minutes or so to swap out my side mount.


Went for a quick test drive and notice for sure the wobble feeling I had when shifting into 2nd and 3rd is mostly gone. Mine wasn't torn all the way around. I'd say about 40% around it was torn. The dust cover is of a slightly different design between the two mounts. The new one the cover comes off easily, while the old one it tore and the center core is what is left on the post.
I did replace the mount bolt since I happened to see it posted that it should be replaced. My old one looked fine. The two bolts that go into the frame were a real bear to break free. The Honda dealer stated my front and rear mounts are fine, so didn't bother with that at this time.
11-20-2012, 12:50 AM
#43
Instructor
Well some of us are silently reading the very helpful informative write up. I have an 06 TL base/non navi * brains out*, nevertheless I love my 1st car, had it since July '09 32K miles. 55100k I am about to embark on this same DIY, took it to Paragon Acura LIC, NY back in Sep '12 maybe Oct '12 they told me my mounts are cracked and needs replacing. I was determined to not let them screw me out of hundreds for repair. So I waited till I had sufficient help. Which I currently do. My problems have been quite similar like everyone else's. The strong vibration when starting the car, the clunk/thud when shifting while parked not to mention the harsh noise I get from my front end when taking uneven roads. Don't forget NY's Bloomberg roads. I may also do my tranny mounts soon, after reading your OP and others, that shifting noise may be the mounts from the tranny so I guess its now part of the job. Thanks again for the OP. Very anxious to get grease under my nails with the pops.
brains out*, nevertheless I love my 1st car, had it since July '09 32K miles. 55100k I am about to embark on this same DIY, took it to Paragon Acura LIC, NY back in Sep '12 maybe Oct '12 they told me my mounts are cracked and needs replacing. I was determined to not let them screw me out of hundreds for repair. So I waited till I had sufficient help. Which I currently do. My problems have been quite similar like everyone else's. The strong vibration when starting the car, the clunk/thud when shifting while parked not to mention the harsh noise I get from my front end when taking uneven roads. Don't forget NY's Bloomberg roads. I may also do my tranny mounts soon, after reading your OP and others, that shifting noise may be the mounts from the tranny so I guess its now part of the job. Thanks again for the OP. Very anxious to get grease under my nails with the pops.
Last edited by Tebaz06TL; 11-20-2012 at 12:56 AM. Reason: Typos and added info
 03-06-2013, 02:14 PM
#47
takin care of Business in
iTrader: (5)
Join Date: Jan 2008
Location: Kansas City, MO
Age: 40
Posts: 30,994
Received 4,732 Likes
on
4,064 Posts
WOW, my side and rear mount was barely broken but the front was smashed....
03-21-2013, 01:44 PM
#48
Instructor
Thread Starter
Been away for so long
Hey guys,
Really happy to see how useful this is for you guys. One of you, Mike, PM'ed me and asked how to do the front mount that I never wrote up :-( (no excuse but I was busy). Pretty easy, no rocket science here. Just a pain in the ass to get the right bolts in the right place.
Here's my response to Mike with instructions.
Hey man,
Glad it was useful for you. I did do my front mount but didn't do a write up. Call me if you like and I can walk you through it. Relatively simple.
1. Need 2 jacks one for car and one for engine (or 1 if you just put it on jack stands), wooden 2x4 x 6 long, 1/2 ratchet with 24inch extension, might need a universal joint cause the upper left bolt is a bit hard to get too... might not.. I had mine but didn't use it.
2. Remove reservoir
3. Jack up the car onto stands
4. Find the proper support (flat spot) on your oil pan to lift the engine after it's on stands
5. unbolt the 4
6. jack engine up (slowly - 1 or 2 pumps on the jack, check, repeat... don't want to crack anything by going 5 pumps at a time and being impatient), but you will need to get it up about 5 inches to get the mount off of it
7. you do not have to remove the bracket on the engine side
7A. Forgot this, unplug the vacuum line on the bottom)
8. wiggle mount out and put new mount in. remember how you get the old one out, will be how you'll get the new one in
8A. Connect the vacuum line back BEFORE bolting down.
9. use a short screw driver to line up the top bolt hole (stick it through the hole to keep it in place while you get the 4 bottom bolts in)
10. Upper left bolt - biggest fucking pain in the ass... EVER.
11. Learned a trick for the upper left, bolt it from the bottom up to put some threads on it. THEN go top down.
12. The fit is pretty tight, so it'll be a combination of finding just the right height using the jack supporting the engine to get all the holes to line up properly. Patience more than anything. My back got a workout after that.
Call me if you get stuck and have fun man.
And you do not need swivel sockets (or remove the engine bracket - will probably make it easier). You will need 2 extension on it, which will give you enough play at the two joints to get the angle you need to unbolt those two rear ones.
PM me if you need anything. Funny enough, just offered to help a co-worker. So, I am reading this again for myself! haha (small hard drive so I can't remember things anymore).
Last edited by EagleEye; 03-21-2013 at 01:50 PM.
The following 2 users liked this post by EagleEye:
rockstar143 (03-21-2013),
triax37 (05-04-2015)
03-27-2013, 07:46 PM
#50
7th Gear

Join Date: Jun 2012
Posts: 7
Likes: 0
Received 0 Likes
on
0 Posts
Anyone know the difference between the side mount 50820-SEP-A01 and 50820-SEP-A21? Both parts come up when I put my 04 TL into oemacuraparts.com.. not sure which to order.. they are the same price
03-31-2013, 01:28 PM
#54
Resident Dingo
Not really. It's one of those you should just change w/ the side mount. If you have 100k miles on the car, I'd consider changing them out. They're pretty cheap.
07-06-2013, 01:38 PM
#55
Cruisin'

Just did my passenger and front mounts.TL was at 100 k and both mounts were completely gone. It was actually gone around 85k because I felt vibration when I accelerated. The passenger is easy and will only take 30 minutes. Just unbolt some bolts and replace the mount.
The front was actually easy as well. The steps above helped a lot. Only thing I did different was take out the left radiator fan. Actually it was still plugged in with 1 wire buy I was able to just lift and move the fan aside. And the trick for the top left bolt is to hand tighten it. I gained access by removing the front bottom plastic shield/cover. I laid on my stomach and was able to hand tighten that bolt in 1 minute. Took me 3 hours. First hour was just taking out the bottom shield and moving the left fan. Another tip is, you will need a long extension for the ratchet. Long enough to reach the mount bolts. So check that first to make sure your ratchet is long enough.
The front was actually easy as well. The steps above helped a lot. Only thing I did different was take out the left radiator fan. Actually it was still plugged in with 1 wire buy I was able to just lift and move the fan aside. And the trick for the top left bolt is to hand tighten it. I gained access by removing the front bottom plastic shield/cover. I laid on my stomach and was able to hand tighten that bolt in 1 minute. Took me 3 hours. First hour was just taking out the bottom shield and moving the left fan. Another tip is, you will need a long extension for the ratchet. Long enough to reach the mount bolts. So check that first to make sure your ratchet is long enough.
07-17-2013, 11:39 AM
#57
Instructor
Thread Starter
Front Mount - Easier with Experience
Hey guys,
I did the front mount for a friend recently, and the entire thing took me about an hour. The top left bolt wasn't as hard anymore. Yes, hand threading is the key. Basically, did that bolt first by taking the wrench off of my socket extension and just turning it until it was threaded in. Left it loose and thread the rest. Hooked the top bolt back and then tightened everything (did forget the stupid rubber heat shield and had to do it again - which still took about 1 hour).
To the guy doing the side only, if you have to prop up your engine to take the side mount out, then it's likely that your FRONT is bad. I recently replaced the PS and had to take the side mount out to move the serpentine belt. Surprisingly, I did NOT have to prop up the engine. All the weight sat on the front mount. FYI Might as well do the front if the side is bad.
GL and have fun.
I did the front mount for a friend recently, and the entire thing took me about an hour. The top left bolt wasn't as hard anymore. Yes, hand threading is the key. Basically, did that bolt first by taking the wrench off of my socket extension and just turning it until it was threaded in. Left it loose and thread the rest. Hooked the top bolt back and then tightened everything (did forget the stupid rubber heat shield
and had to do it again - which still took about 1 hour).To the guy doing the side only, if you have to prop up your engine to take the side mount out, then it's likely that your FRONT is bad. I recently replaced the PS and had to take the side mount out to move the serpentine belt. Surprisingly, I did NOT have to prop up the engine. All the weight sat on the front mount. FYI
Might as well do the front if the side is bad.GL and have fun.
10-25-2013, 12:33 PM
#58

 pulled the mount out upwards close to the battery side. just had an extra hand to hold the hoses to make way for it.
the mounts are deceiving. mine looked perfectly fine, no visible tears and leaks. car wash shaking pretty bad so i decided to check the side mount. took it out ripped the cover off and voila! yes it was tore and the fluid was still there floating around. then i replaced the front, it was even worse. took the rubber cover off the top was torn apart! then replaced the rear. then the upper tranny mount, this looked ok not till it was off, the crack part was on the bottom side. waiting for the lower tranny mount to come in and will replace it as well
Last edited by bimmer_w; 10-25-2013 at 12:43 PM.
12-17-2013, 09:54 AM
#59
Just did all three mounts this weekend. took 4 hours from start to finish including clean up. here are are few notes from my job
Side moint is extremely straight forward. the power steering reservoir is the only thing only thing that needs to be moved, and that just slides upwards out of way. The bolts holding the mounts down were extremely corroded (the worst compared to all the bolts I saw during the entire job). All the bolts were cleaned up on a wire wheel and had anti-seize applied.
Front mount was also really simple as long as you have the right tools. a good swivel socket will makes the job incredibly easy. We used quite a long chain of extensions with a swivel joint on the end. something like this, but way better quality: http://www.harborfreight.com/2-piece...set-67920.html . We ended up removing both fans, and once they were out, the mount came up with any sort of strange angling or wiggling. its 7 10mm bolts and 2 electrical connectors. and they are all very accessible. it adds almost no time, and makes removing the front mount very simple. If your mount is cracked in half like mine, it also saves you from getting the hydraulic fluid everywhere.
The rear mount was a semi pain, but not too terrible. we removed the strut bar which had a few things mounted to it. after that, I took a ratcheting wrench to take out the bolt that couples the mount to the engine. its slow because there is not alot of room to turn the wrench, but it isnt terrible. I wouldn't do it if I didn't have a ratcheting wrench. The bottom 4 bolts that hold the mount down are identical to the front. You just need a bunch of extensions and a good swivel joint. they came out with no issue. we did have a long breaker bar to break them loose, but getting them out was very easy. the mount was somewhat tricky to remove, but we managed to get it out by the driver side under hood fuse/relay box. You just have to force some things out of the way, but its pretty simple. the vacuum line was a bit stubborn, so we cut the old one to get the old engine mount out. the new mount came with a new vacuum line, so this wasn't an issue. the routing is just a bit tricky.
The biggest thing I think is having the right tools. I would have not been able to do it without a breaker bar, alot of extensions, a good swivel joint, and my 14mm ratcheting wrench. The rest of the job is very simple. Also, if you're not planning on replacing the bolts, be sure to have a wire wheel or some brushes to clean the bolts off. some were in terrible condition, and the wire wheel brought them back a pretty good level. Also a bit of anti-seize would probably do you good in the long run.
Sorry if my post isnt formatted in a easy to read way. but I think there is a bit of useful info in there. Ill be glad to answer any questions about the job if anyone has any.
The following users liked this post:
triax37 (12-18-2013)
12-27-2013, 11:51 AM
#60
Instructor
After doing my own mounts a few mounts I took the car to Paragon (Woodside, NY) they told me two mounts were still bad and need to be changed they changed them with no issues. Then they tell me my other 3 front. side and rear would have been covered by warranty.

Thread
Thread Starter
Forum
Replies
Last Post
nanos
Car Parts for Sale
26
11-12-2015 08:41 PM