
3G Acura TL LED taillight replacement DIY

I've been looking for a thread where someone fixed the LED on the taillight but no one has done anything with regard to that so I decided to do some research and come up with some fix.
Where I ordered them from. I got lucky and only had to order 17 since that's all they had.
http://www.futurelightingsolutions.c...sFLS=true&IM=0
Reference from where I found out about the LED's
http://www.hidplanet.com/forums/show...taillight-PICS
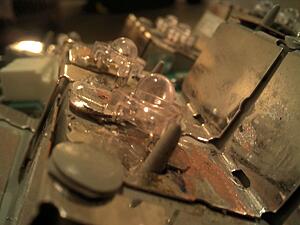
Attachment 108969
That was what it looked like. I didn't take a better pic which was up close. Turns out there was a minor loose connection but, I couldn't fix it without moving the heatsink which doubles as the wiring around so I pulled off the LED's.
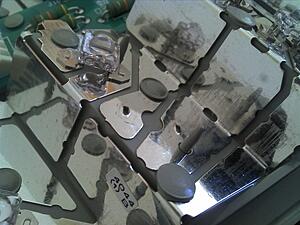
The biggest issue trying to fix this is that you have to order for the LED's in bulk from the manufacturer. I will be putting up a link to all the LED's I bought so I can get rid of the extra's. It gets expensive buying them but is still cheaper than buying the whole board.
The work to secure the LED in place is difficult. Soldering is almost impossible but can be done if you get creative. They use a special tack welding device that mechanically attaches the LED to the board without using heat.
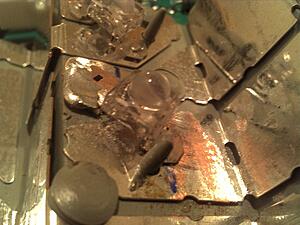
I however used mechanical pressure to hold the LED's in place by wedging them in.
I thought of another way which would be to drill a hole through the pad and into the heatsink to use a tiny screw to secure it in place or stick some wire in so that the solder has something to hold onto. No amount of sanding the pads helped.
The other issue was that I'm more or less electrically challenged. The guys in the cupholder illumination thread would agree wholeheartedly. That being said I believe there is a polarity and anyone who knows better please chime in so this thread can improve.
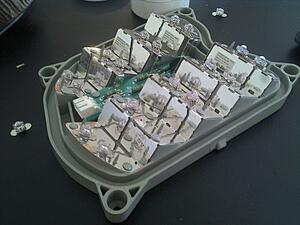
The LED light up depending on which way they were placed. Fortunately since 3 were not working it only took me 6 attempts to figure out how the lights are supposed to sit.
Keep in mind these are not the exact same and the lens is a little bigger and fractionally brighter but is the same color and works just fine.
Any additional info helps. Got it done in about 2 hours.
I'll post up the link when I can get it on Amazon.
Where I ordered them from. I got lucky and only had to order 17 since that's all they had.
http://www.futurelightingsolutions.c...sFLS=true&IM=0
Reference from where I found out about the LED's
http://www.hidplanet.com/forums/show...taillight-PICS
Attachment 108969
That was what it looked like. I didn't take a better pic which was up close. Turns out there was a minor loose connection but, I couldn't fix it without moving the heatsink which doubles as the wiring around so I pulled off the LED's.


The biggest issue trying to fix this is that you have to order for the LED's in bulk from the manufacturer. I will be putting up a link to all the LED's I bought so I can get rid of the extra's. It gets expensive buying them but is still cheaper than buying the whole board.


The work to secure the LED in place is difficult. Soldering is almost impossible but can be done if you get creative. They use a special tack welding device that mechanically attaches the LED to the board without using heat.
I however used mechanical pressure to hold the LED's in place by wedging them in.

I thought of another way which would be to drill a hole through the pad and into the heatsink to use a tiny screw to secure it in place or stick some wire in so that the solder has something to hold onto. No amount of sanding the pads helped.

The other issue was that I'm more or less electrically challenged. The guys in the cupholder illumination thread would agree wholeheartedly. That being said I believe there is a polarity and anyone who knows better please chime in so this thread can improve.
The LED light up depending on which way they were placed. Fortunately since 3 were not working it only took me 6 attempts to figure out how the lights are supposed to sit.
Keep in mind these are not the exact same and the lens is a little bigger and fractionally brighter but is the same color and works just fine.
Any additional info helps. Got it done in about 2 hours.
I'll post up the link when I can get it on Amazon.

Here I come!
Joined: Jan 2008
Posts: 383
Likes: 62
From: H-Town,TX.
2 cents
Question for the OP.... did you check with a jumper first to see which LED/LED's were out? It looks like you replaced more than one LED. It's usually only one LED that burns out and shuts a few others off becuase they are linked together with the metal shims underneath.
The way I did it...
First, I used a jumper to find the burnt LED. Once I found it, I knocked it off with a hammer and flathead screwdriver. Gotta be careful though cause they break easy. Anyways, I knocked a couple of LED's off of an old LED board and I just taped the bulb on using this...
http://www.homedepot.com/p/Nashua-Ta...0#.UnpVNYbnYdU
I just cut some small pieces and taped one on each side of the LED legs and I was done. By the way, LED's ARE polarized. The whole process took about 30 mins and it's been working for more than a year now...
Trending Topics
Question for the OP.... did you check with a jumper first to see which LED/LED's were out? It looks like you replaced more than one LED. It's usually only one LED that burns out and shuts a few others off becuase they are linked together with the metal shims underneath.
The way I did it...
First, I used a jumper to find the burnt LED. Once I found it, I knocked it off with a hammer and flathead screwdriver. Gotta be careful though cause they break easy. Anyways, I knocked a couple of LED's off of an old LED board and I just taped the bulb on using this...
http://www.homedepot.com/p/Nashua-Ta...0#.UnpVNYbnYdU
I just cut some small pieces and taped one on each side of the LED legs and I was done. By the way, LED's ARE polarized. The whole process took about 30 mins and it's been working for more than a year now...
The way I did it...
First, I used a jumper to find the burnt LED. Once I found it, I knocked it off with a hammer and flathead screwdriver. Gotta be careful though cause they break easy. Anyways, I knocked a couple of LED's off of an old LED board and I just taped the bulb on using this...
http://www.homedepot.com/p/Nashua-Ta...0#.UnpVNYbnYdU
I just cut some small pieces and taped one on each side of the LED legs and I was done. By the way, LED's ARE polarized. The whole process took about 30 mins and it's been working for more than a year now...
It was dumb for me to try but I didn't think of anything else to fasten it at the time. Thanks for the link!
If there are other options though that would be really valuable info since I do have a few led's that I'm trying to sell but the minimum order from the website i got it from is 1200. Too expensive to justify buying them.
If something else works it would be a great alternative.


Drifting


Joined: Sep 2008
Posts: 2,602
Likes: 630
From: KCMO Burbs
Or you just need flux to clean the connection to allow for better bonding.


Thread
Thread Starter
Forum
Replies
Last Post
asahrts
Member Cars for Sale
0
Sep 4, 2015 05:55 PM