
I am a genius!! Tail light mod without cutting up tail light! pics inside!

 03-12-2012 | 06:42 PM
#82
Great mod, Im gonna be taking mine apart to tint the reflectors and turn signal covers anyway, so Ill probably go ahead and remove the diffuser on one side and make sure I like it in person. I loke being different though so I will most likely take em out. Thanks for the idea!!
04-16-2012 | 08:05 PM
#85
Moderator
Chapter Leader (South Florida Region)
Chapter Leader (South Florida Region)
iTrader: (6)
Joined: Sep 2008
Posts: 78,016
Likes: 20,031
Maybe one day I'll do the same...does look pretty cool, but I'd like to see it in person. I still am baffled at how you all have been able to cut open and reseal your tails properly. I tried once and hated the outcome.
04-16-2012 | 10:07 PM
#87
Advanced
Joined: Jun 2009
Posts: 50
Likes: 3
From: Texas


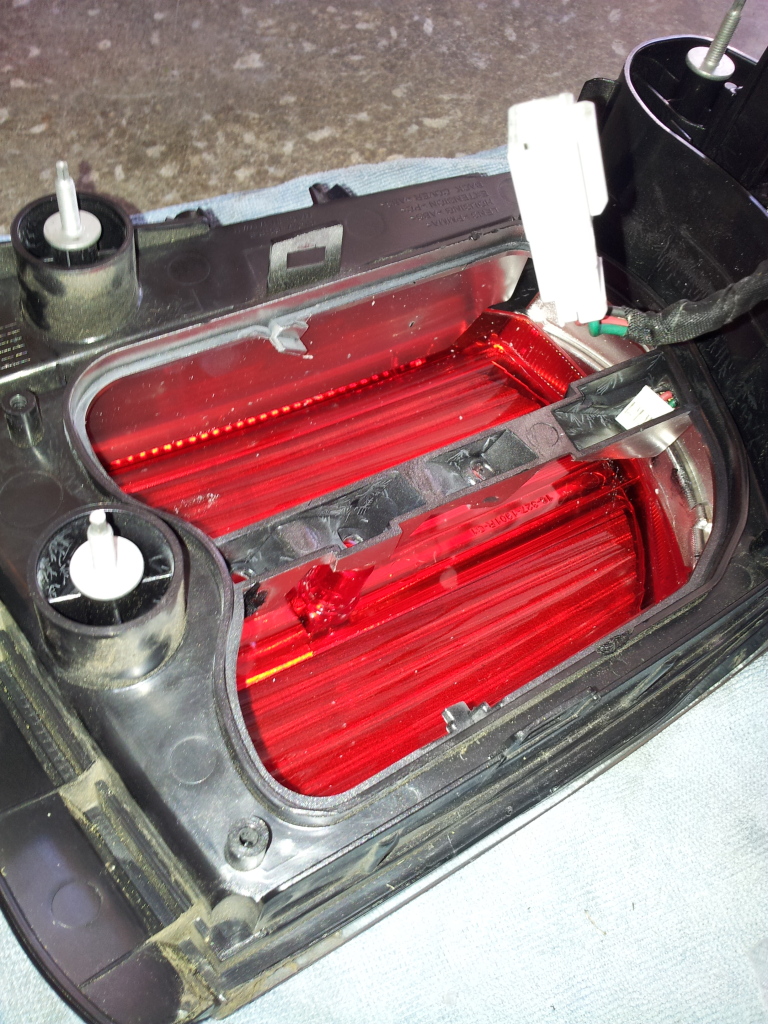
left side diffuser still in.. right side diffuser removed. notice the right is slightly darker but LEDs are more visible

l'll post pics of the tail lights at night when i have someone to step on the brake pedal
one thing. remember to keep tail light up when braking out the diffuser. I made that mistake the first tail light and blowing out the small pieces was a pain in the arse!!
The following users liked this post:
Undying Dreams (04-18-2013)
 04-18-2012 | 08:11 AM
#91
Moderator
Chapter Leader (South Florida Region)
Chapter Leader (South Florida Region)
iTrader: (6)
Joined: Sep 2008
Posts: 78,016
Likes: 20,031
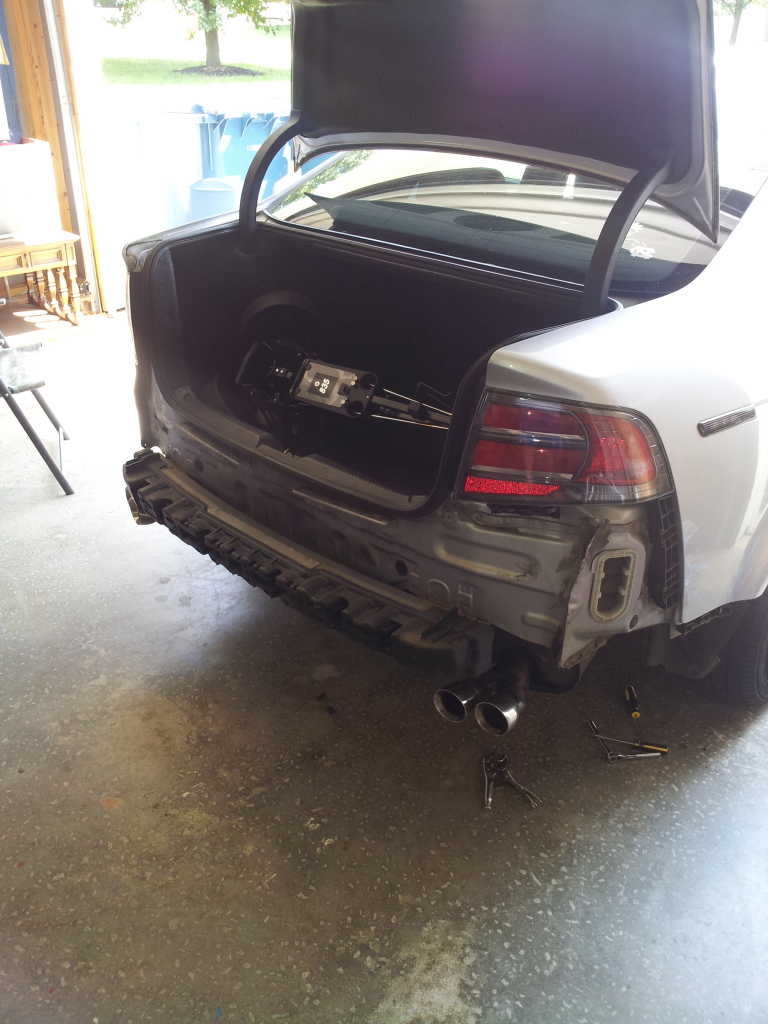
Well, you don't need to remove the whole bumper, just do one side at a time. You do have to drop the bumper enough to get a 10MM socket and long extension in to undo the 2 bolts that hold the light on from the bottom and bumper UP to the light. I have thought about leaving that off, but the bumper won't hold it's itself up without it.
04-18-2012 | 08:45 AM
#92
Holy **** balls how have I missed this thread! This looks fantastic!
Free, easy, why not! I'll be doing this next weekend!
Free, easy, why not! I'll be doing this next weekend!
Last edited by maharajamd; 04-18-2012 at 08:48 AM.
05-23-2012 | 11:50 AM
#93
Night and Day
Joined: Apr 2008
Posts: 135
Likes: 8
From: Everett, WA
I'm glad I stumbled upon this thread as well! Might just be my birthday present to Rocko!
06-09-2012 | 11:25 PM
#94
Intermediate
Joined: Apr 2012
Posts: 44
Likes: 1
From: Modesto CA
Wait I'm a lil confused does this only look good for a 04-05 TL because the 06-08 would show the too much of the housing? Also JTS how much would you charge for this. Just out of curiosity? And lastly my passenger side tail light appears to have 3 LED's blow out on it. I heard you have to change the entire LED unit or board. Acura Want's 170-220 bucks. Is there a secret to changing them out individually or a way to get the LED unit for less? Thanks Acura buddies...
06-09-2012 | 11:39 PM
#95
Intermediate
Joined: Apr 2012
Posts: 44
Likes: 1
From: Modesto CA
Oh and btw...excellent mod! I could tell right away the difference since I'm always staring at my car lol. Every time I arm it and disarm it  Nicely done. I don't have a soldering gun but might just go at it with a knife. A lil afraid to though. Thanks again for the post and help. Seems very easy.
Nicely done. I don't have a soldering gun but might just go at it with a knife. A lil afraid to though. Thanks again for the post and help. Seems very easy.
 GO WHITE SOX !!!!!!
09-06-2012 | 10:52 AM
GO WHITE SOX !!!!!!
09-06-2012 | 10:52 AM
#99

Intermediate
Joined: Sep 2008
Posts: 39
Likes: 0
I have Acura TL 2006. Do I have red or clear LED's on my tail lights?
The dealer says 2005-2006 has clear while the 2007-2008 has red.
I saw on some other threads that 2006 are red. I'm confused , I need to order this today, Also, where can I order the tail light cover assembly that has is smoke with white and red lens. I also saw this on other threads. Please answer ASAP ... thank you
The dealer says 2005-2006 has clear while the 2007-2008 has red.
I saw on some other threads that 2006 are red. I'm confused
, I need to order this today, Also, where can I order the tail light cover assembly that has is smoke with white and red lens. I also saw this on other threads. Please answer ASAP ... thank you
 09-07-2012 | 10:09 PM
#104
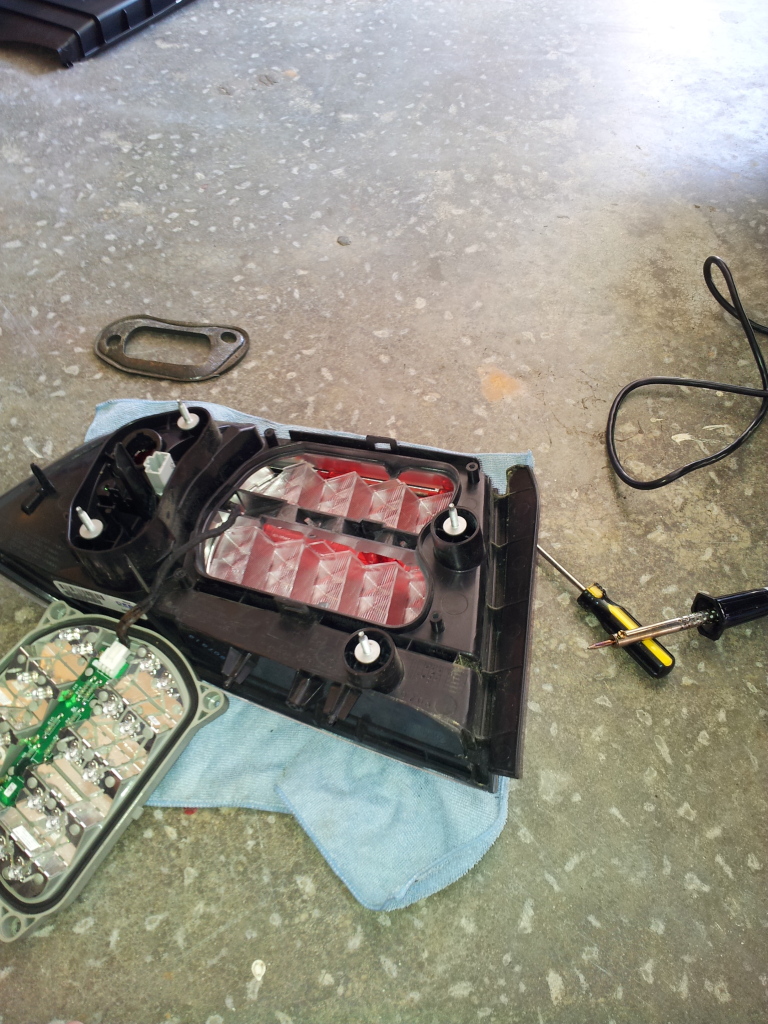
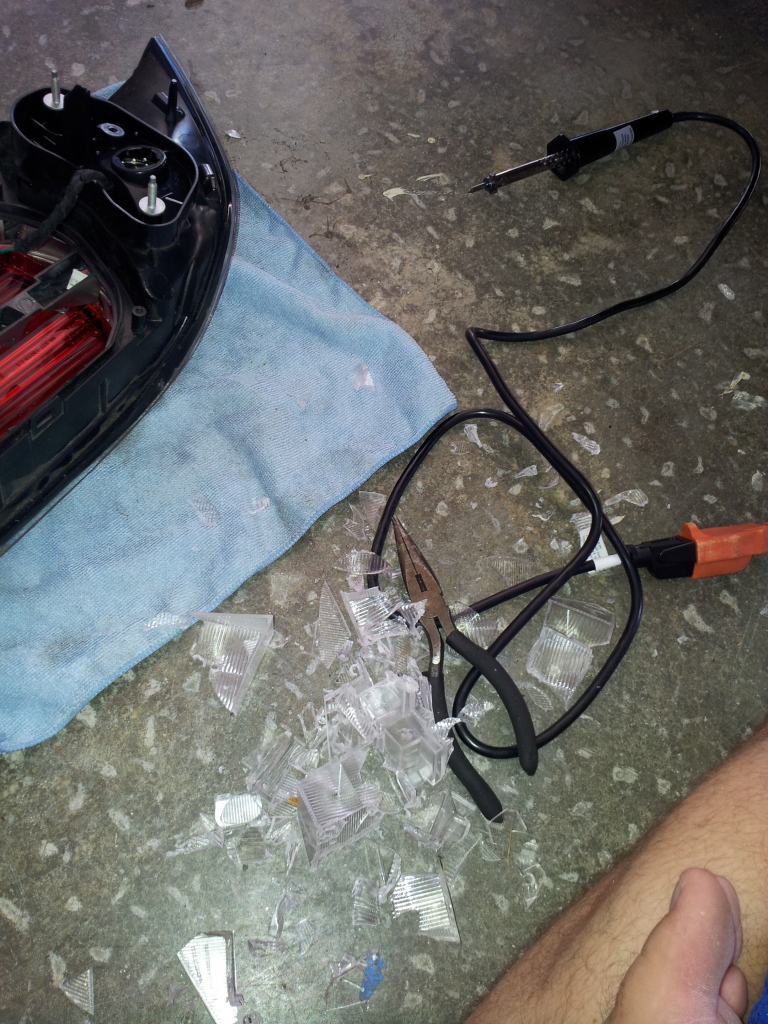
Used a soldering iron to careful melt it in certain spots and then used pliars to break the rest out
Absolutly love it
This is one mod i was worried about because you cant fix it if you dont like it unless you get new tails. Long story short, im glad i did it.
Absolutly love it
This is one mod i was worried about because you cant fix it if you dont like it unless you get new tails. Long story short, im glad i did it.
The following 3 users liked this post by rockstar143:
The following users liked this post:
rockstar143 (12-20-2012)
09-09-2012 | 12:42 AM
#109
Intermediate
Joined: Sep 2008
Posts: 39
Likes: 0
i know, i just miss the previous reply. "Used a soldering iron to careful melt it in certain spots and then used pliars to break the rest out"
So rockstar43, sorry if I offended you...but I would appreciate it if you responded professionally. thanks geeteedan
So rockstar43, sorry if I offended you...but I would appreciate it if you responded professionally. thanks geeteedan
09-09-2012 | 02:53 PM
#110
Bird is the Word
Joined: Nov 2011
Posts: 1,656
Likes: 975
From: Florida
Well, you don't need to remove the whole bumper, just do one side at a time. You do have to drop the bumper enough to get a 10MM socket and long extension in to undo the 2 bolts that hold the light on from the bottom and bumper UP to the light. I have thought about leaving that off, but the bumper won't hold it's itself up without it.
The following users liked this post:
backyardua6 (10-17-2012)
10-07-2012 | 09:51 AM
#111

Drifting
Joined: Jul 2008
Posts: 3,329
Likes: 171
From: Dallas
Alright for those that requested it here is a video I just made of the tail lights after the diffuser mod. I recorded first with the garage door open, then closed it to make it dark. Sorry for the door chime going the entire time lol. Be sure to watch in HD :-)
N/m about HD, for some reason you cant select HD even though I thought I submitted it at 1080. Oh well still looks decent.
http://www.youtube.com/watch?v=e4HAtjAdo08
N/m about HD, for some reason you cant select HD even though I thought I submitted it at 1080. Oh well still looks decent.
http://www.youtube.com/watch?v=e4HAtjAdo08
12-19-2012 | 07:42 PM
#112
Intermediate
Joined: Apr 2012
Posts: 44
Likes: 1
From: Modesto CA
GeeteeDan how easy was it to remove your rear bumper? I was trying to find a video online about how to remove it but wasn't able to find anything. Could you shed some light on this? And maybe some tricks or shortcuts you found out afterwards? I also am worried it might be a little harder for me because I sport the A-spec package. I would appreciate it. Thanks!
12-20-2012 | 08:04 AM
#113
Moderator
Chapter Leader (South Florida Region)
Chapter Leader (South Florida Region)
iTrader: (6)
Joined: Sep 2008
Posts: 78,016
Likes: 20,031
I sent you a PM about this, but I'll post it on here. I installed a new LED board today and when I put the taillight back in and bolted the bracket to the bumper, I then took out the screw that holds the bracket to the taillight. In theory the tails should slide out without taking off the bumper and you still have the bracket bolted in to hold the bumper in place. I haven't taken the tails back out yet to test this, but they should just slide right out now. I did the same to the other side while I was at it. This now bumps new taillights up on my to do list since it should only take 10 min.
GeeteeDan how easy was it to remove your rear bumper? I was trying to find a video online about how to remove it but wasn't able to find anything. Could you shed some light on this? And maybe some tricks or shortcuts you found out afterwards? I also am worried it might be a little harder for me because I sport the A-spec package. I would appreciate it. Thanks!
remove both screws (might be one)from the rear aspec behind the wheel. Use a philips screw head for a drill with channel locks, or a 90 degree screwdriver. Pull aspec away, you MIGHT Have to replace the double sided tape when you're done, although I haven't needed it. My shit is tight, son.
You can now see the bracket...now unscrew the top screw from the bracket
use flathead to remove the plastic clip in middle. Now slide the whole bracket toward the car (there is still one screw at bottom but no need to remove entirely, either don't worry about it, or loosen slightly).
Now you can access the 1 upper screw holding the bumper to the body, it's facing up, you'll see it.
Before you start tugging. Pop trunk open, and use flathead to pry open the 2 little plastic covers on the bottom outside edge that house the 10mm bolt (can only be seen with trunk open).
Remove that, now go back to your side, and pull away from car. You can now slide it down enought to get a 10MM socket on a long extension UNDER the tail light to get the last 2 bolts.
The rest is done inside the car, pull back liner, 4 8MM nuts, unplug, yada yada.
Do one side at a time, you do both, the whole bumper will pop off.
When putting back in place, make sure the side bumper plastic brackets that hold in place are sitting nice tight and flush with the bumper. and especially on the rear, make sure you're sliding that plastic tab INTO the little clamp supports that hold it up and not under or over them.
Good luck!
The following 2 users liked this post by rockstar143:
BryceBam09 (11-17-2013),
ninersfgiantsfan (02-13-2015)
 12-31-2012 | 05:24 PM
#115
Drifting
Joined: Jan 2012
Posts: 3,215
Likes: 604
From: Colorado Springs
When I did it there isn't really certain places to melt. You just go in there and melt away and you slowly remove pieces or sections. When I did it I started by melting as much of the center section as I could where it's attached to the housing. I also used the needle nose to yank parts out and to also crack it apart. The diffuser cracks relatively easily. Sorry I didn't take pics, but either way it's just something you have to mess around with on your own. It's really not that hard, just takes a little time and patience, and is a LOT quicker than having to cut the entire housing.
James
James
The following users liked this post:
rockstar143 (12-31-2012)
12-31-2012 | 07:34 PM
#116
Instructor
Joined: Jan 2011
Posts: 123
Likes: 1
From: Newburgh, NY
12-31-2012 | 07:57 PM
#117
Thread Starter
Safety Car
iTrader: (4)
Joined: Sep 2007
Posts: 4,242
Likes: 946
From: Plainfield, IL
Yes exactly. I wouldnt say they are brighter or dimmer because you arent doing anything to the LED's themselves, but simply removing the diffuser. So now they look a little "fancier" if you want to call it that similar to how most newer cars have cool designs with LED's instead of how the TL uses a diffuser to get rid of that look in a way. For those that cant tell a difference, well it is pretty obvious, but maybe just in person I dont know. I clearly see a difference.
02-04-2013 | 10:46 PM
#119
Moderator
Chapter Leader (South Florida Region)
Chapter Leader (South Florida Region)
iTrader: (6)
Joined: Sep 2008
Posts: 78,016
Likes: 20,031
John, you've seen this for a while now, you're just getting to it.
Ogroncal, just saw your other post, man...sorry. Must have been feeling especially aggressive that day, the repeat post made me think you were trying to stir up shit. My bad...

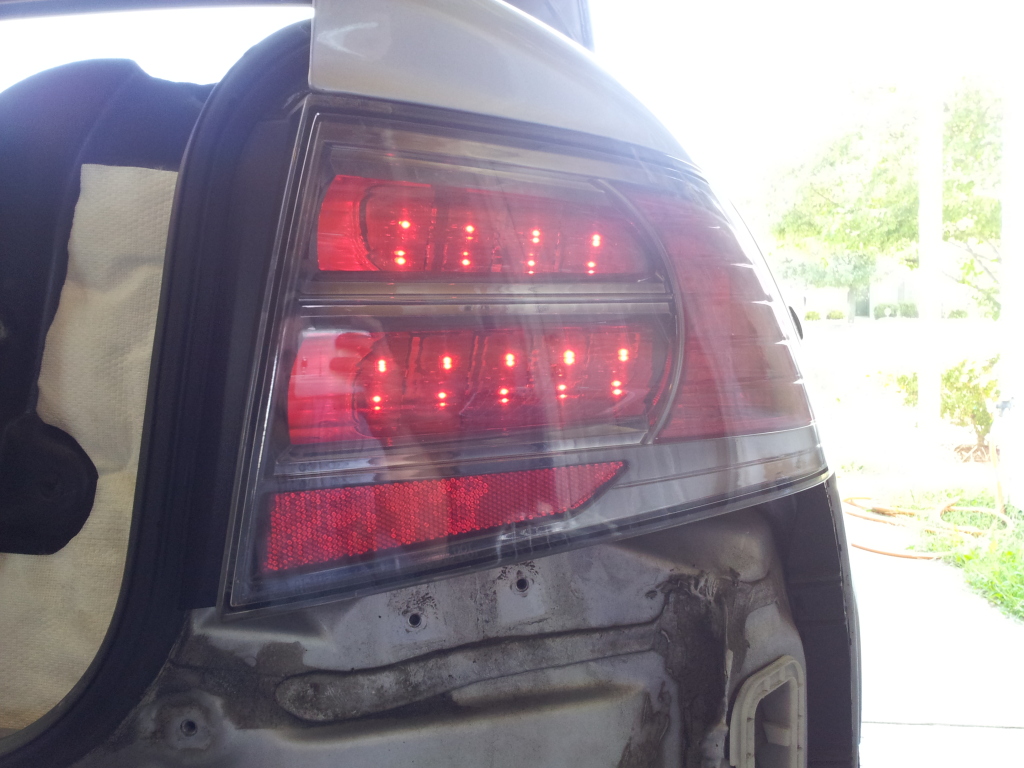
Good example of how these look, turned on
http://www.flickr.com/photos/rockstar143/8439889052/http://www.flickr.com/photos/rockstar143/8439889052/ by http://www.flickr.com/people/rockstar143/, on Flickr
Ogroncal, just saw your other post, man...sorry. Must have been feeling especially aggressive that day, the repeat post made me think you were trying to stir up shit. My bad...
Good example of how these look, turned on
http://www.flickr.com/photos/rockstar143/8439889052/http://www.flickr.com/photos/rockstar143/8439889052/ by http://www.flickr.com/people/rockstar143/, on Flickr
The following 3 users liked this post by rockstar143: