
DarkNite's NBP Progress Updated 9/3/12
 08-07-2012, 10:19 PM
#81
Race Director
iTrader: (8)
Awesome progress!
Moving along pretty quick my friend =)
Removing the BSM looks so much cleaner and less complicated.
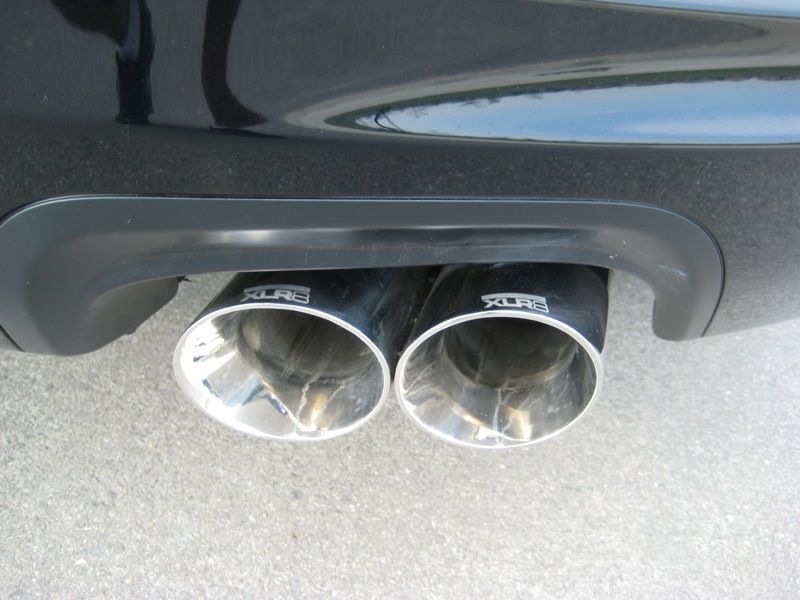
I want those brake rotors (actually, I need them since my current OEMs are warped/rusty).
I also want to do the pressure switches; something I keep procastinating!
Shipping for the rotors cost $115, right?
Moving along pretty quick my friend =)
Removing the BSM looks so much cleaner and less complicated.
I want those brake rotors (actually, I need them since my current OEMs are warped/rusty).
I also want to do the pressure switches; something I keep procastinating!
Shipping for the rotors cost $115, right?
 08-08-2012, 09:05 PM
#82
Thanks man!.. Yea it looks a lot better without the BSM, i just gotta get the ghosting behind them cleaned up.. me and a friend ordered a polisher so im looking forward to using that!.. my nbp needs some paint correction for sure haha
The rotors look/perform really well... unfortunately had to pay the 115 for shipping.. but even 260 for all 4 rotors/pads is a good deal imo!..
I loafted on the pressure switches also.. but glad i did it.. pretty simple to install and made a noticeable difference.. i got them from acktl for like half the price that the acura dealership here was asking for them
 08-10-2012, 04:55 PM
#84
Advanced
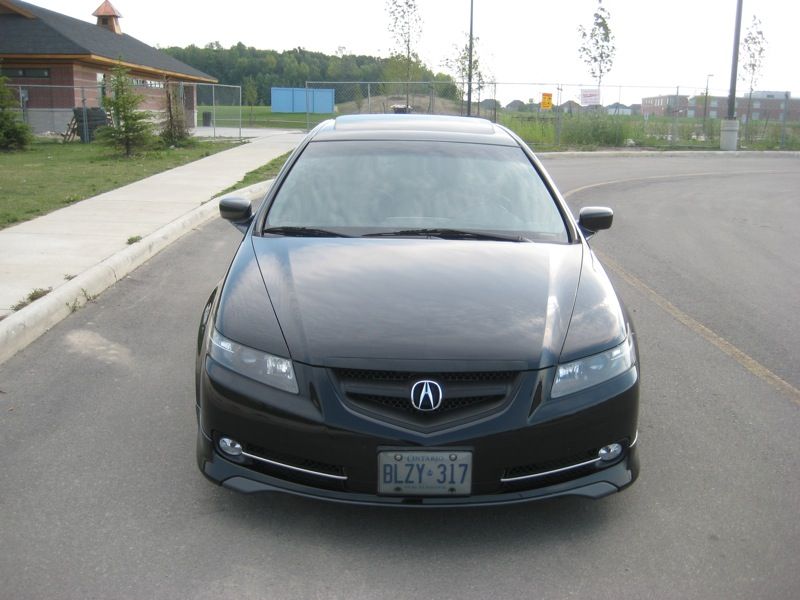
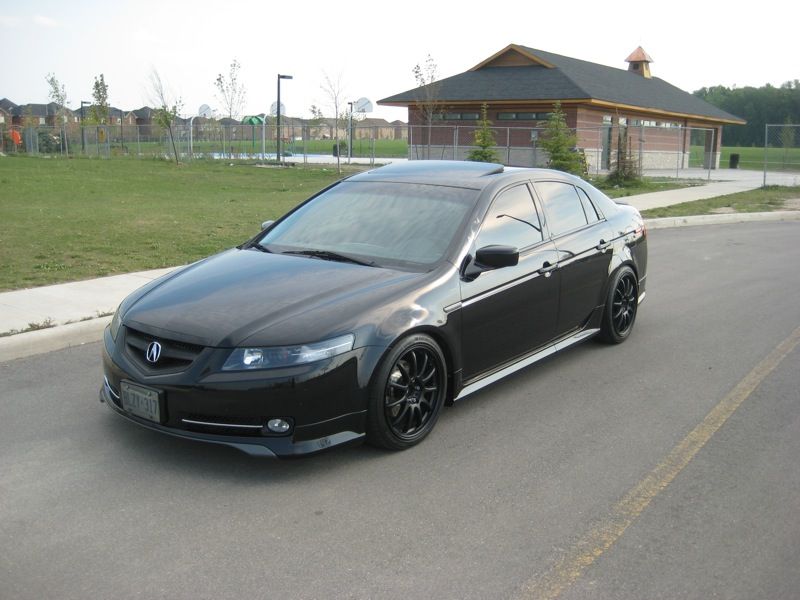
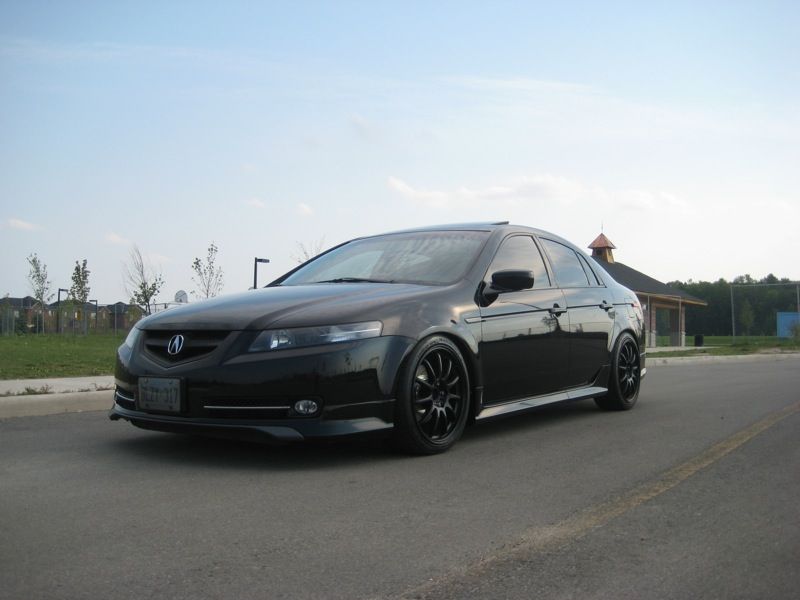
This is an awesome build thread and I am loving every moment of it. The single biggest difference that made your car stood out to me was the spacers for your wheels. That made it look 10000X better.
Now, I am getting anxious to upgrade my TL but I know I have to wait until it's paid off =/
Now, I am getting anxious to upgrade my TL but I know I have to wait until it's paid off =/
08-11-2012, 11:14 AM
#85
This is an awesome build thread and I am loving every moment of it. The single biggest difference that made your car stood out to me was the spacers for your wheels. That made it look 10000X better.
Now, I am getting anxious to upgrade my TL but I know I have to wait until it's paid off =/
Now, I am getting anxious to upgrade my TL but I know I have to wait until it's paid off =/
Yea u should take ur time with the mods it gets Really addictive and Really expensive really fast lol.. Do ur research there's a tonne of info on these forums and a lot of members willing to help.. Just have fun with it and plan it out I'm sure ur TL will come along great
08-12-2012, 11:01 PM
#86
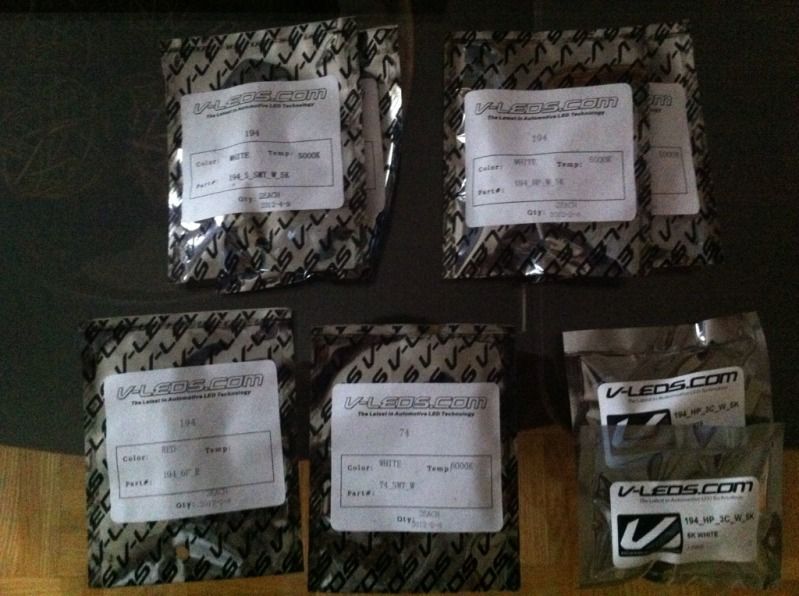
Just a little update:
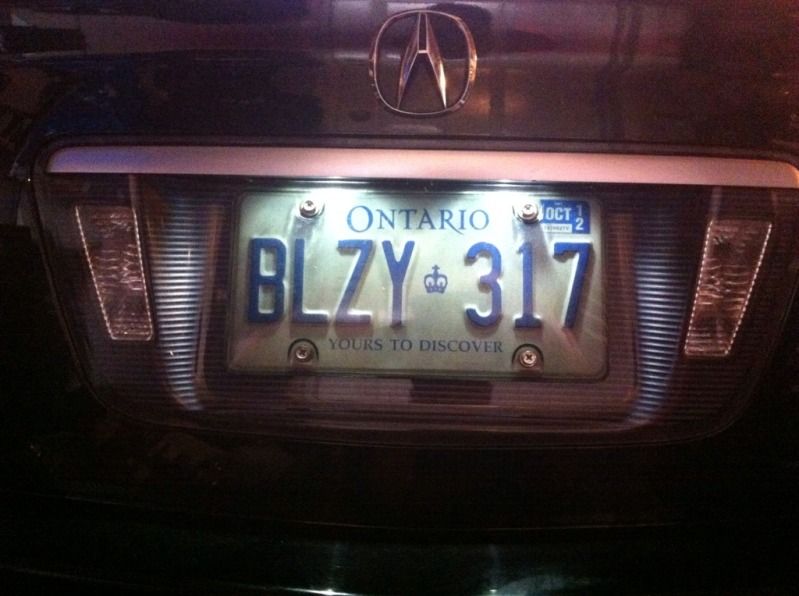
Ordered interior leds from VLEDS and license plate bulbs... got everything at 5000k pure white and red for the doors... hated the stock halogen bulbs but didnt want anything overly bright, im happy with the new look:
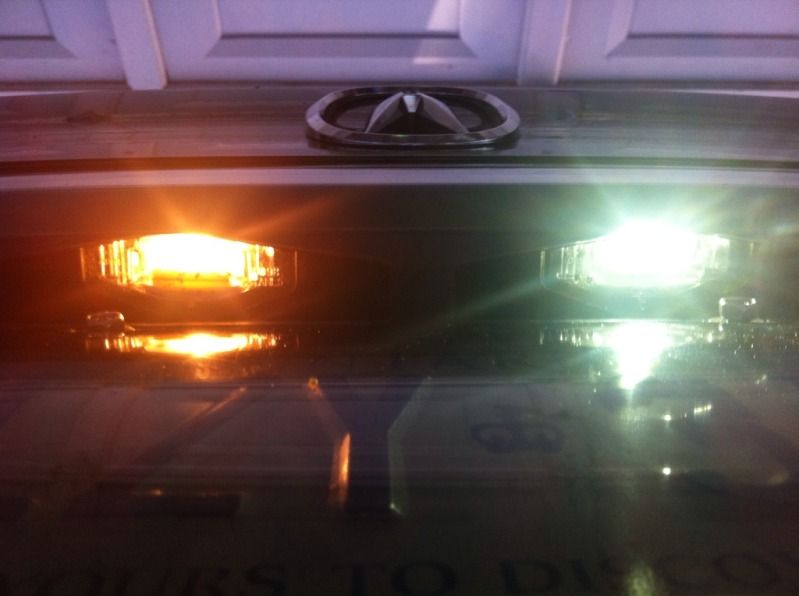

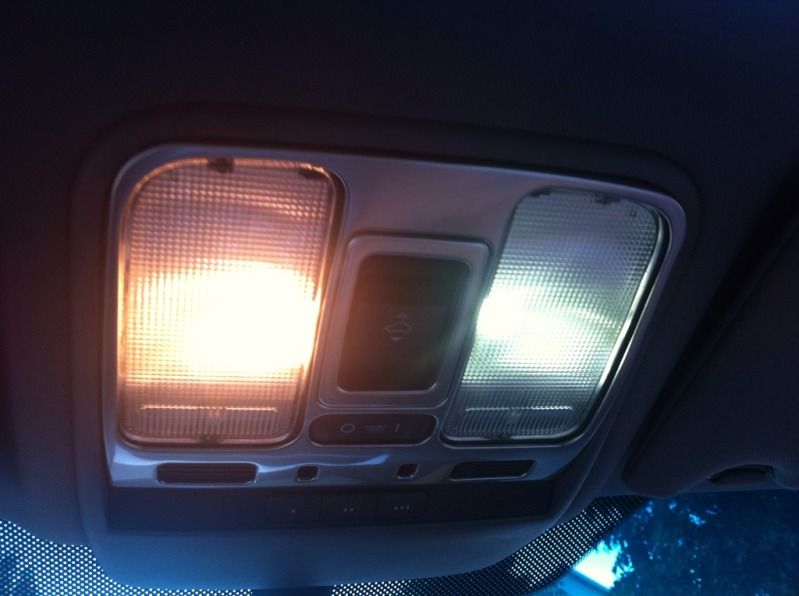

The picture doesn't really capture the red well... in person its a solid red and doesn't look yellow/orangey in the middle like in this pic:

Ordered some 3m cf di-noc for my headlights, decided to test it out on my key fobs... didnt really do a good job bc its kind of wrinkley on the outsides but i guess its good for my first time haha

Just got this in the mail... detail finally coming soon never used a machine polisher before but heard the pc is pretty user friendly.. hopefully i can get rid of all those nasty swirls on my car lol

Ordered interior leds from VLEDS and license plate bulbs... got everything at 5000k pure white and red for the doors... hated the stock halogen bulbs but didnt want anything overly bright, im happy with the new look:
The picture doesn't really capture the red well... in person its a solid red and doesn't look yellow/orangey in the middle like in this pic:
Ordered some 3m cf di-noc for my headlights, decided to test it out on my key fobs... didnt really do a good job bc its kind of wrinkley on the outsides but i guess its good for my first time haha
Just got this in the mail... detail finally coming soon
never used a machine polisher before but heard the pc is pretty user friendly.. hopefully i can get rid of all those nasty swirls on my car lol
The following users liked this post:
DarkNite (08-18-2012)
08-18-2012, 01:55 PM
#88
Team Owner
iTrader: (2)
Join Date: Jan 2008
Location: Kansas City, MO (Overland Park, KS)
Posts: 36,545
Received 6,470 Likes
on
5,162 Posts
Updated the date in the title of your thread.
The following users liked this post:
DarkNite (08-18-2012)
09-03-2012, 10:13 PM
#90
****UPDATE***
**Warning this is a super long post with a lot of pictures and writing lol
So i havent posted in a while but ive done a whole lot lol in the past couple of weeks...
My spoiler was peeling off and i had tried adding new double sided tape to the corners but it would still pop up like this:
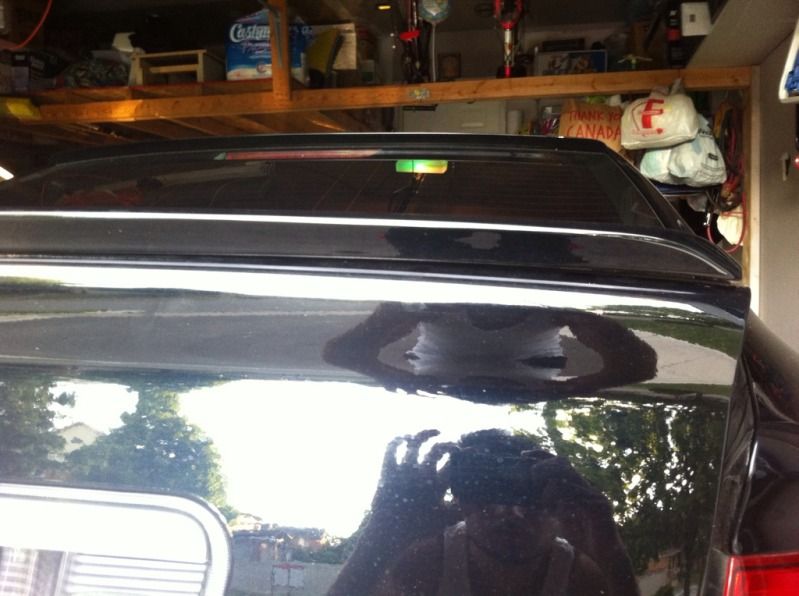
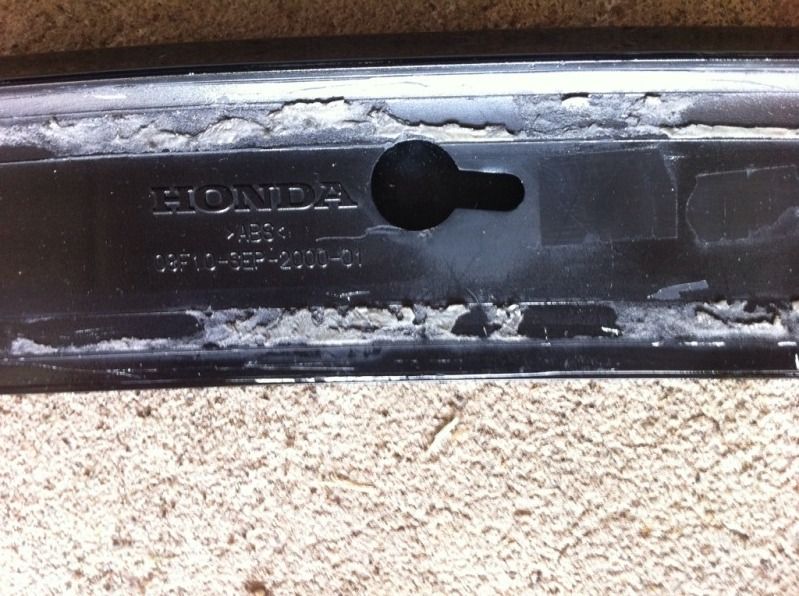
So eventually got the sucker off... peeling the old tape off was a mission, goo gone did nothing, had to revert to heat gun.. atleast now i knw its an oem spoiler lol:
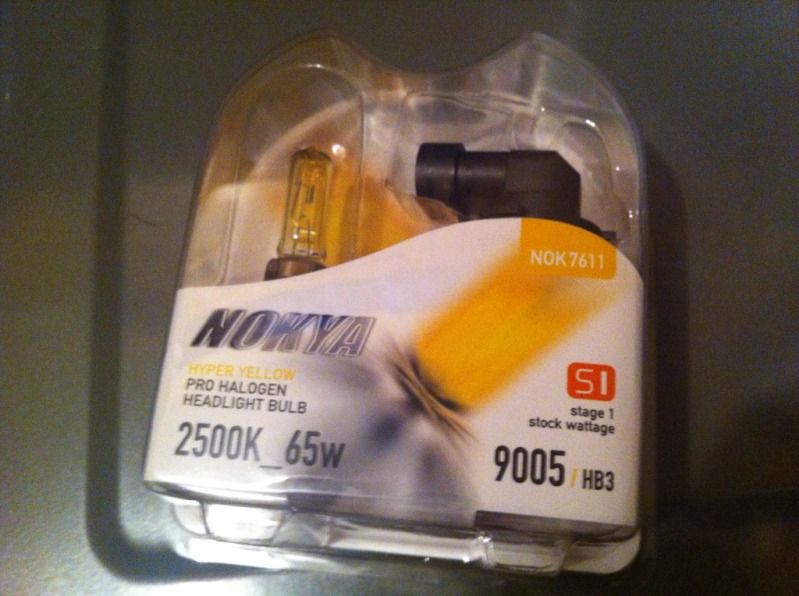
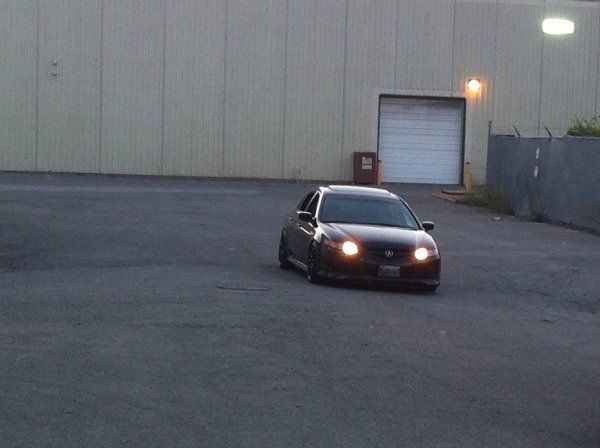
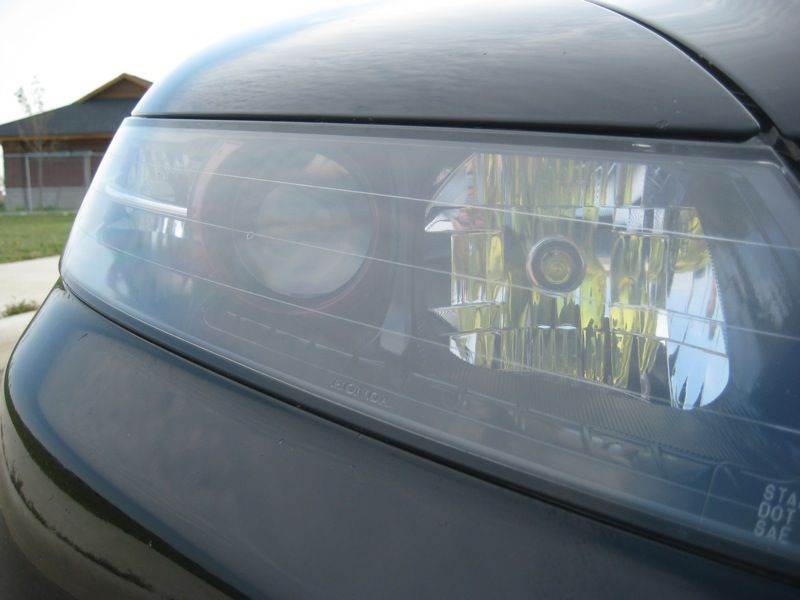
Then i installed Nokya Hyper Yellow DRLs (2500K).. got that nice JDM look now lol:

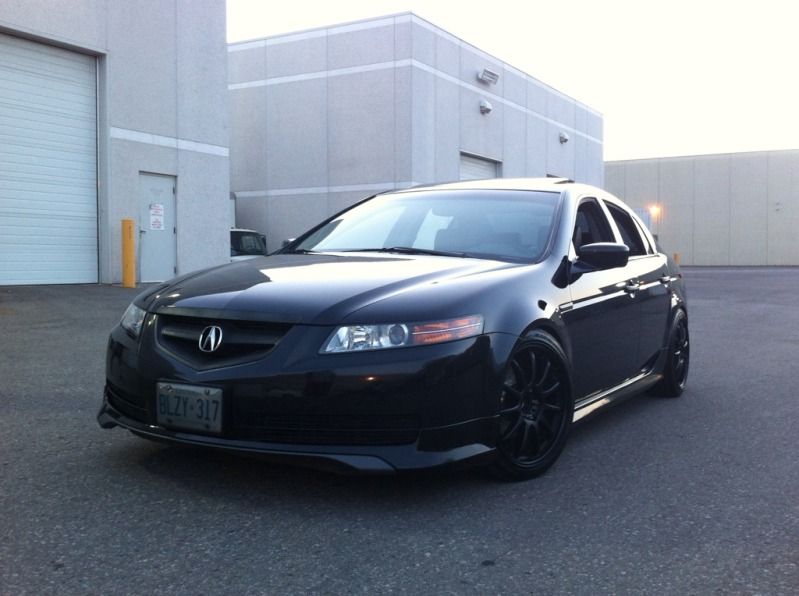
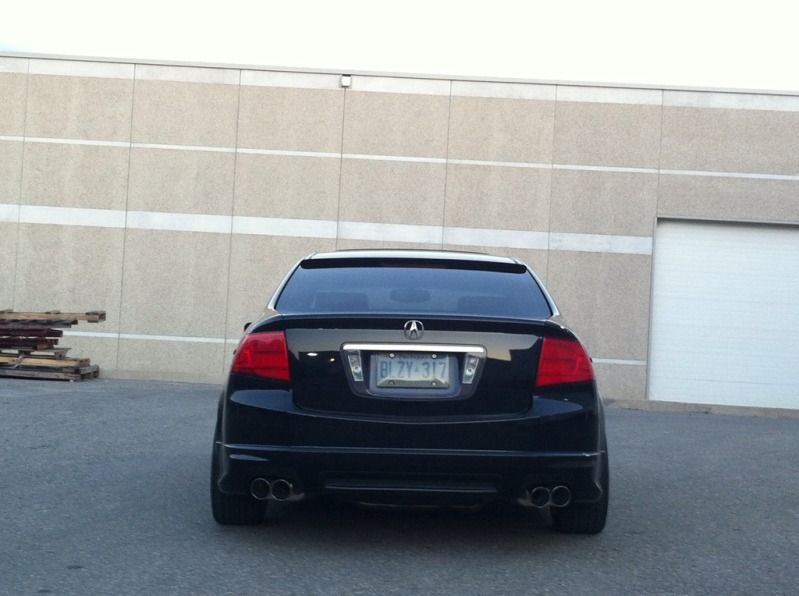
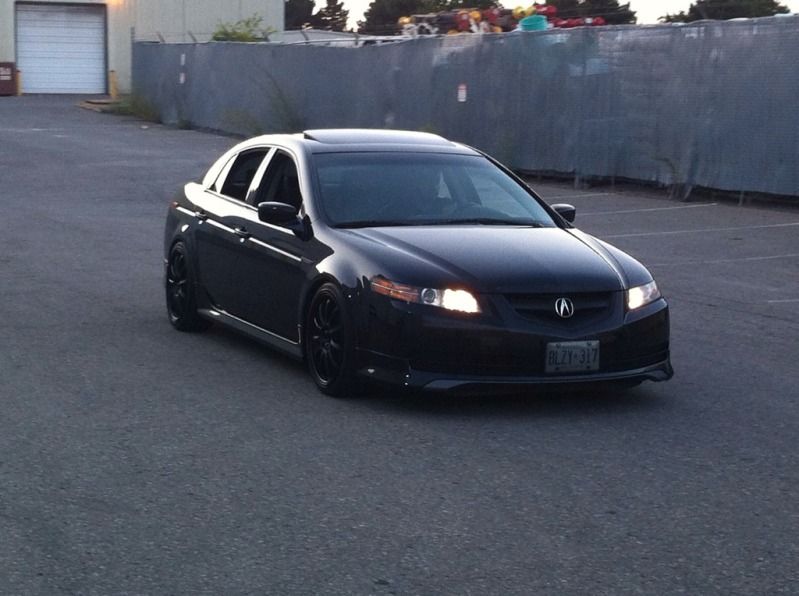
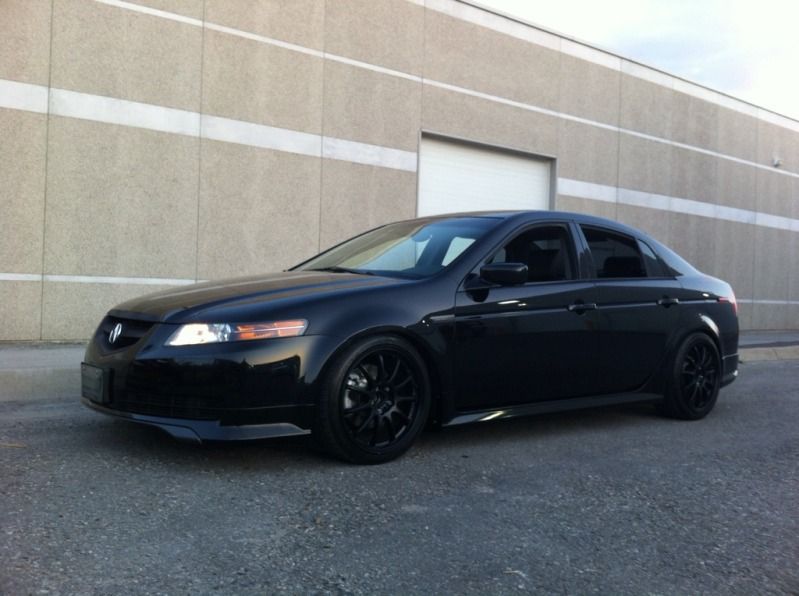
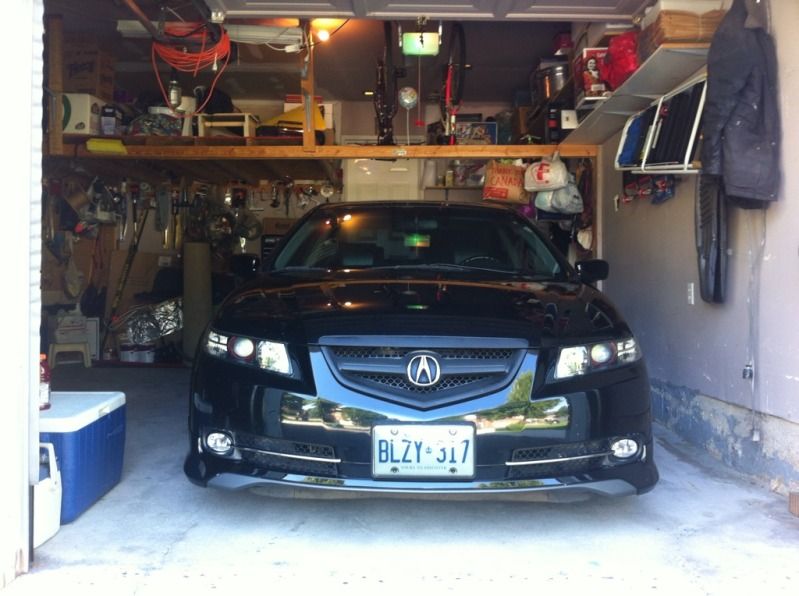
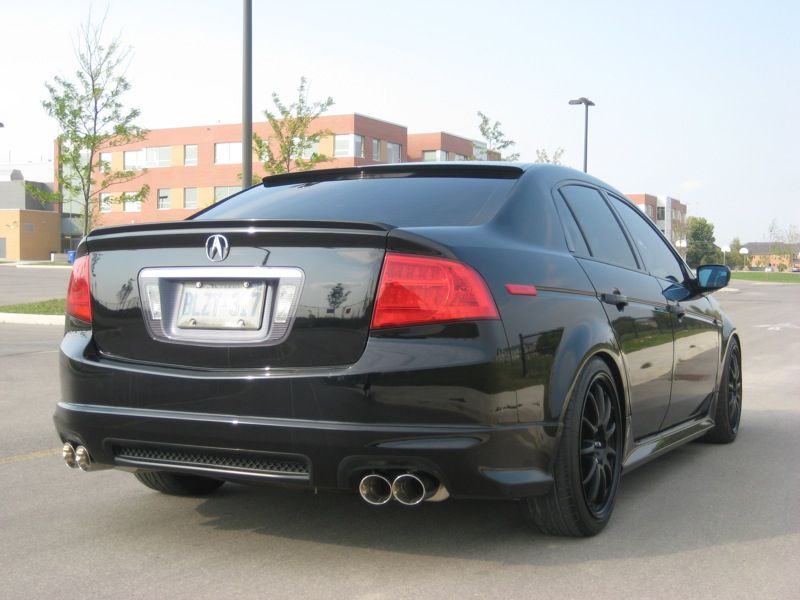
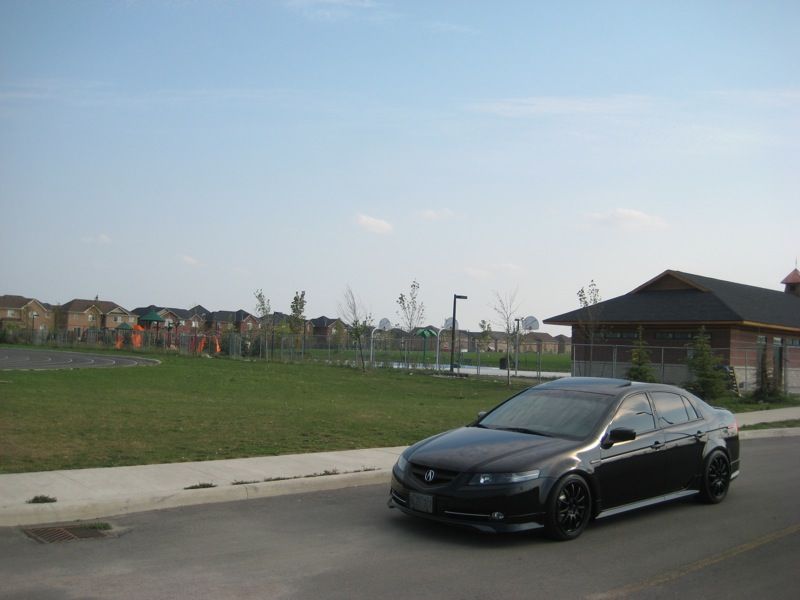
Then i Finally got around to detailing my car!... first time using a porter cable and stunned with the results... paint looks great (minus some of the deeper scratches i cudnt get out).. first i clay barred the whole car followed by meguiers ultimate compound, manzerna power finish 2500, super finish 4500, and opti-seal... then i did a little photoshoot with my phone lol.. i really need a proper camera to show justice of how it looks (and some photo-editing skills lol).. all of these are raw.. but just to give u an idea heres how it came out:


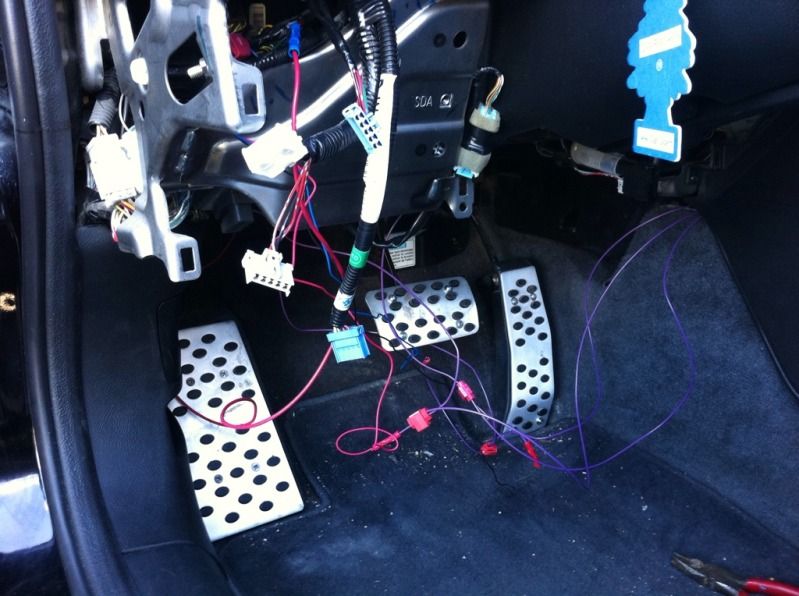
And then came my new front end... spent a super long day with guitarplayer16... thanks so much for ur help again bro!...
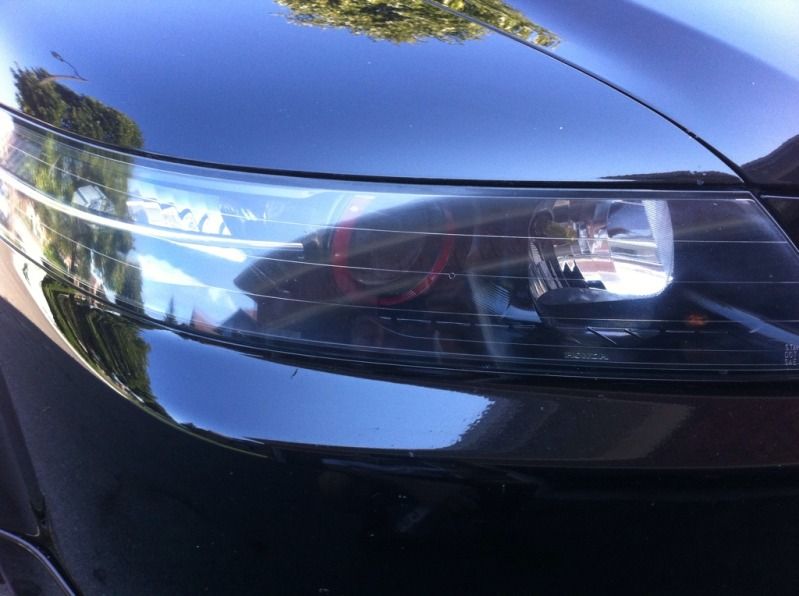
Heres what we did:
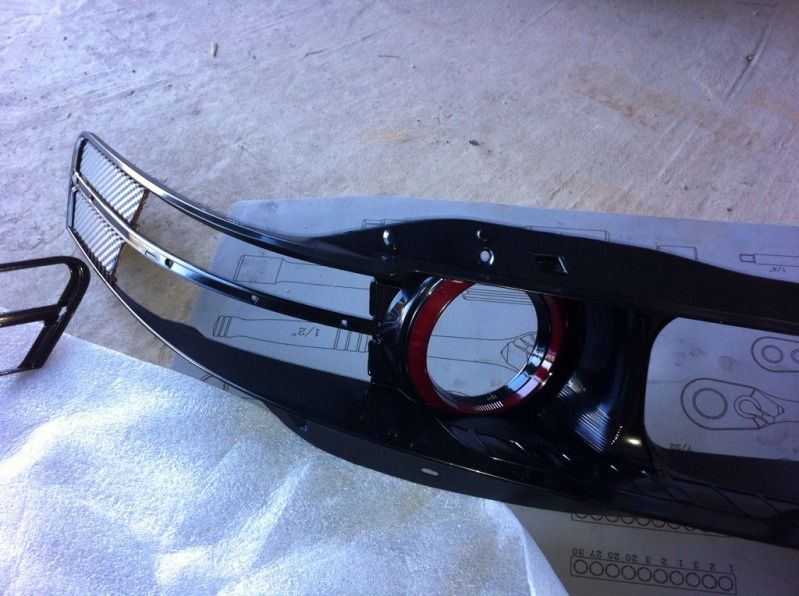
- Blacked-out headlights with Carbon Fiber Inlay and Red Anodized Rings
- 120LED Switchback Turn-Signals with 0.24ohm Resistor Mod to turn signal relay
- 2 Shock Sensors
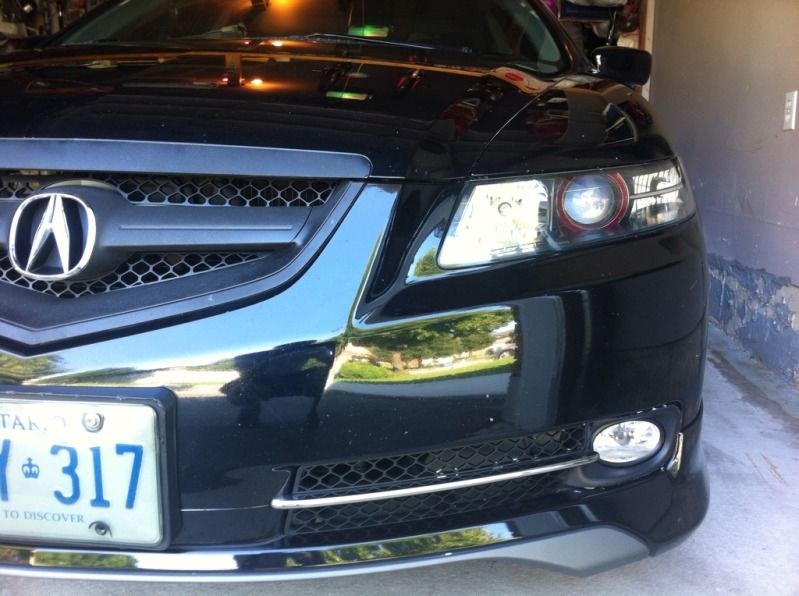
- Accord Fogs with Type-S Grills
Bumper and headlights removed:

So i was painting while GP was doing the wiring for the fogs and shock sensors... Painted the inside of the headlights a glossy black:
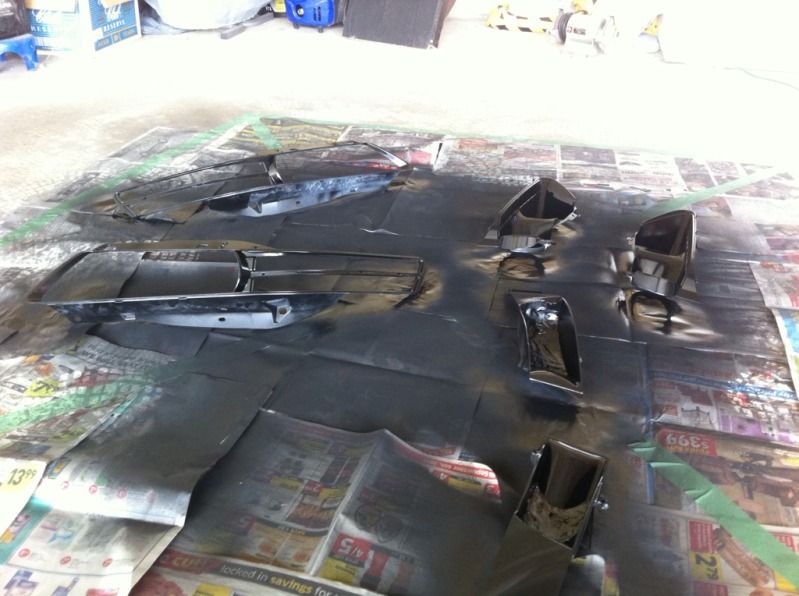
Painting the rings anodized red.. thanks rockstar143 for the idea!... (this was a really last minute idea, we grabbed a can of anodized red when going to the store during lunch lol.. also grabbed a case of beers

Carbon fiber inlay added:

Sealed with NAPA window weld (5/16").. stuff was easy to work with and came with 15feet for like $13 lol..

Fresh outta the oven and ready to go on:

Next was the accord fogs with type-s grills:

I also added 120 LED switchback turn signals, so decided to do the ohm-resistor method to avoid hyper-blink... unfortunately it didnt work out to well that day and i had to drive home with no turn signals lol... but the next day i tried to solder in another 0.24ohm resistor and luckily it all worked out!..
I also wetsanded the headlight lens with 2000grit and polished it again to make it look new:


So the other day i gave my car a washdown and noticed some condensation in my drivers side headlight
 Luckily it cleared up on its own overnight but i hope it doesn't become a big issue... here's my amateur attempt at a photoshoot with a digital camera lol...


 09-03-2012, 10:53 PM
#91
Your detail job looks good, how much did you spend for all those detailing equipment and products?? I don't know nothing about car detailing but I've always wanted to pick it up as a hobby. Was this also your first experience detailing a car?
I have a NBP also and it's so stressing trying to keep the car looking clean. Black shows all the slightest imperfections from water marks to dust/pollen and swirls/scratches! NBP requires high maintenance to keep it looking good and you're doing a hell of a job
I have a NBP also and it's so stressing trying to keep the car looking clean. Black shows all the slightest imperfections from water marks to dust/pollen and swirls/scratches! NBP requires high maintenance to keep it looking good and you're doing a hell of a job
09-04-2012, 08:12 AM
#93
Team Owner
iTrader: (2)
Join Date: Jan 2008
Location: Kansas City, MO (Overland Park, KS)
Posts: 36,545
Received 6,470 Likes
on
5,162 Posts
Damn, that's on hell of an update! Well done.
09-04-2012, 09:22 AM
#94
Suzuka Master
Great update.
For the first month or two after I did my headlights they would get condensation from rain, carwash, etc. but then one day it just stopped and I never had the problem again. Hopefully this happens to you.
For the first month or two after I did my headlights they would get condensation from rain, carwash, etc. but then one day it just stopped and I never had the problem again. Hopefully this happens to you.
09-04-2012, 07:09 PM
#95
Your detail job looks good, how much did you spend for all those detailing equipment and products?? I don't know nothing about car detailing but I've always wanted to pick it up as a hobby. Was this also your first experience detailing a car?
I have a NBP also and it's so stressing trying to keep the car looking clean. Black shows all the slightest imperfections from water marks to dust/pollen and swirls/scratches! NBP requires high maintenance to keep it looking good and you're doing a hell of a job
I have a NBP also and it's so stressing trying to keep the car looking clean. Black shows all the slightest imperfections from water marks to dust/pollen and swirls/scratches! NBP requires high maintenance to keep it looking good and you're doing a hell of a job
I got everything for just over 400 and split it with a friend.. Definitely worth the investment given we polished my car and his 350z and it still looks like we barely used any of the products lol.. Can easily do another dozen cars no problem.. My neighbour came over and asked if I got a new paint job lol made me feel really good
Thanks
Thanks for the update Steven I have been working hard on her!..
It rained again today and the condensation came back lol
09-04-2012, 10:02 PM
#96
Intermediate
hey man where you from? id love to see your ride sometime, im from richmond hill and i got a black on black tl too :P kinda new to this forum tho and barely have time for it
09-09-2012, 06:05 PM
#99
I really appreciate the comments man!.. Trust me nbp is a PITA and gets dusty sitting in my garage overnight after a wash lol.. I actually found one of ur threads in the wash and wax section and ppl posted some good stuff in there needed to detail a nbp.. That article in detailed image by Todd something was really good too.. It was my first time detailing a car.. I just did a lot of research and watched some YouTube videos.. It's actually not as intimidating as it looks.. I actually had a fun time doing it.. There's still some scratches here and there but I'd say over 90% of the swirls and stuff are out.. Plus The pc is basically foolproof and u can't really damage ur paint.
I got everything for just over 400 and split it with a friend.. Definitely worth the investment given we polished my car and his 350z and it still looks like we barely used any of the products lol.. Can easily do another dozen cars no problem.. My neighbour came over and asked if I got a new paint job lol made me feel really good
I got everything for just over 400 and split it with a friend.. Definitely worth the investment given we polished my car and his 350z and it still looks like we barely used any of the products lol.. Can easily do another dozen cars no problem.. My neighbour came over and asked if I got a new paint job lol made me feel really good
Also how many hours did you spend detailing your TL, and about how long for your friends 350z?
09-09-2012, 07:03 PM
#100
Thanks man i appreciate that!..
No im up in canada, got it from some company called eshine. it wasn't a package i bought everything individually..
I don't know exactly how long it took to detail the cars bc we were taking breaks and doing other stuff inbetween... took about a day each but if i could put a number on it id say mine took roughly 6 hours and his took maybe 4
Here's my receipt for reference of the products i got:
-------------------------
Product ID: 1607
Product Name: Optimum Instant Detailer & Gloss Enhancer w/sprayer (17oz)
Quantity: 1
Unit Price: Cdn$10.99
--------------------------
Product ID: 3185
Product Name: 1.Porter Cable 7424XP Swirl Buster Kit 5.5" Pads
Quantity: 1
Unit Price: Cdn$190.26
> > > 1st Pad : Orange Mild Cut
> > > 2nd Pad : White Polishing
> > > 3rd Pad : Black Finishing
> > > Instructional DVD ($13) : No Thanks
> > > Snappy Clean Pad Cleaner : YES!
--------------------------
Product ID: 453
Product Name: The Cookie Monster Buffing Towel V2.0 (Buy One, Get One Free)
Quantity: 1
Unit Price: Cdn$6.89
--------------------------
Product ID: 3080
Product Name: Grit Guard Bucket Insert
Quantity: 1
Unit Price: Cdn$10.99
--------------------------
Product ID: 4011-3
Product Name: 3 Pack YELLOW Riccardo Detailing Clay 4oz SAVE 15%
Quantity: 1
Unit Price: Cdn$30.85
--------------------------
Product ID: 1523
Product Name: Menzerna Power Finish PF 2500 (PO 203) (32oz) 25% Off
Quantity: 1
Unit Price: Cdn$37.49
--------------------------
Product ID: 1504
Product Name: Menzerna Super Finish SI4500 (32oz)
Quantity: 1
Unit Price: Cdn$43.99
--------------------------
Product ID: 1613
Product Name: Optimum Opti-Seal w/sprayer (8oz)
Quantity: 1
Unit Price: Cdn$27.49
--------------------------
Product ID: 400
Product Name: 4" Round Applicator Black Foam Sealant/Carnauba
Quantity: 1
Unit Price: Cdn$4.36
--------------------------
Product ID: 1225YEL
Product Name: Lake Country 5.5" CCS Yellow Cutting Pad
Quantity: 1
Unit Price: Cdn$8.99
--------------------------
Order Total : Cdn$372.30
Shipping : Cdn$0.00
HST : Cdn$48.40
Grand Total : Cdn$420.70

Thread
Thread Starter
Forum
Replies
Last Post
MrHeeltoe
1G TSX Tires, Wheels, & Suspension
20
02-23-2023 01:54 PM
MrHeeltoe
2G TSX Tires, Wheels & Suspension
3
09-29-2015 10:43 PM
MrHeeltoe
3G TL Tires, Wheels & Suspension
0
09-28-2015 05:43 PM