
Carbon Fiber Engine Cover from MB
 07-24-2006, 10:22 AM
#1
Ryan Christopher
Thread Starter
Carbon Fiber Engine Cover from MB
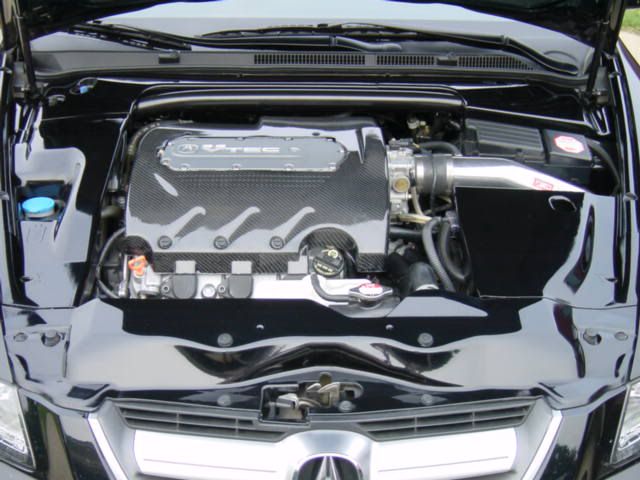
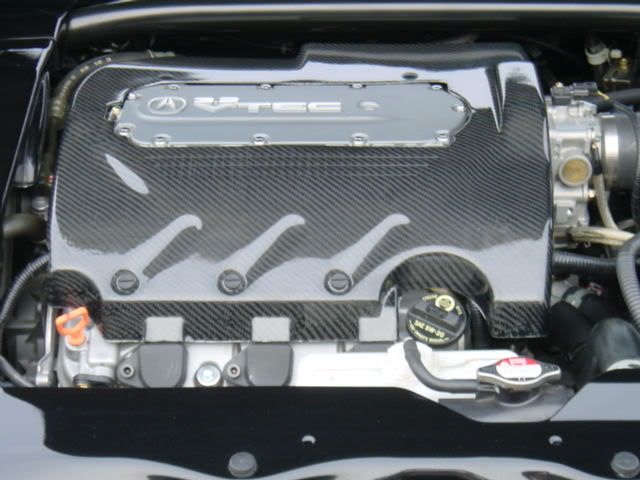
Just thought I would post some pics of the Engine cover installed. Let me know what you guys think. The part turned out great and I am very happy with it. Jason

 07-24-2006, 11:47 AM
#3
Three Wheelin'
Join Date: Jul 2005
Location: Central NJ
Age: 39
Posts: 1,435
Likes: 0
Received 0 Likes
on
0 Posts
Originally Posted by Black_05_TL_6SP
Just thought I would post some pics of the Engine cover installed. Let me know what you guys think. The part turned out great and I am very happy with it. Jason
07-24-2006, 11:50 AM
#4
Ryan Christopher
Thread Starter
Originally Posted by JOES05tl
looks clean! I took all of my engine covers off to try to keep it cooler in there, but if not, id get those- Good Job 
Trending Topics
07-24-2006, 04:46 PM
#8
Originally Posted by RYAN97812
Too bad those covers wont fit with the s/c those look sweet!!!!! Good job michael!
07-24-2006, 05:32 PM
#10
Originally Posted by ussi
Looks awesome!
So has anyone done any testing.. does this actually keep the engine a tad bit cooler?
So has anyone done any testing.. does this actually keep the engine a tad bit cooler?
This is purely an aestetic modification. Any testing would be a colossal waste of time. With that said, i just sent my payment.
 07-24-2006, 11:34 PM
#15
B A N N E D
Join Date: Apr 2006
Location: chicago
Age: 34
Posts: 209
Likes: 0
Received 0 Likes
on
0 Posts
I am currently in the process of having all my shrouds just like yours, painted dark silver metallic, yours looks very nice. good job. nice CB engine cover MB. have a nice day guys.
07-25-2006, 11:59 AM
#17
Instructor

Join Date: Jul 2006
Location: Bay Area
Age: 42
Posts: 225
Likes: 0
Received 0 Likes
on
0 Posts
Originally Posted by keepin_it_clean
that looks sweet
how much?
where did you get it?
how much?
where did you get it?
https://acurazine.com/forums/sponsored-sales-group-buys-10/2004-2006-tl-carbon-fiber-engine-covers-343761/
07-26-2006, 11:38 AM
#18
Ryan Christopher
Thread Starter
Originally Posted by holybear
I am currently in the process of having all my shrouds just like yours, painted dark silver metallic, yours looks very nice. good job. nice CB engine cover MB. have a nice day guys.
08-17-2006, 12:03 PM
#20
Ryan Christopher
Thread Starter
Originally Posted by MichaelBenz
Here is a few pics of the newly finished RED cover that is likely to be a rare find...lol....


Jason
 08-17-2006, 01:28 PM
#23
Team Anthracite Member
Jason,
I think I could use your engine shroud painting trick to paint the plastic grill pieces in the front of the car. I have painted mine black:

But they are constantly chipping and it's a huge headache. I'm looking for the "right" way to paint them. Could you counsel me with a way to paint them that would resist chipping and small debris hitting it?
Sorry to thread hijack, but maybe people are interested in your painting method for the engine shrouds and it'll kill two birds..
I think I could use your engine shroud painting trick to paint the plastic grill pieces in the front of the car. I have painted mine black:
But they are constantly chipping and it's a huge headache. I'm looking for the "right" way to paint them. Could you counsel me with a way to paint them that would resist chipping and small debris hitting it?
Sorry to thread hijack, but maybe people are interested in your painting method for the engine shrouds and it'll kill two birds..
08-17-2006, 01:34 PM
#24
Blazin with your Moms in
Join Date: Aug 2004
Location: Mass Histeria
Age: 51
Posts: 1,340
Likes: 0
Received 0 Likes
on
0 Posts
Quote for a 2nd Gen TL?
Pimpin aint easy but you got in under control!!!  Looks bananas man!!!!!
Any plans for 2nd Generation TL's?
Or how about a CF intake? I would definately buy one of them!!!!
Yes Siiir!
Looks bananas man!!!!! Any plans for 2nd Generation TL's?
Or how about a CF intake? I would definately buy one of them!!!!
Yes Siiir!
08-17-2006, 02:55 PM
#26
Ryan Christopher
Thread Starter
Painting Technique
In order to automotive paint work, you will need a couple of things. First being an air compressor, you will also need a paint gun, preferably a HVLP. This is a top fill gravity feed gun. This gives a better spray then the bottom feed guns. And something that is very important to go along with the gun is a water filter. This goes in between the gun and the air tank and removes the water from the compressed air. You will also need a paint mixing cup, paint strainer and stir stick.
Now for the paint supplies. When ever painting plastic, you will need to use a adhesion promoter, this can be purchased at your local automotive paint supply store. It will come as either a spray paint can, or you can get it in a mixed paint can and spray it with your paint gun. You will also need paint reducer (this is a paint thinner that is directed towards automotive use), but be careful with the reducer, it will eat through paint, so don�t spill it on anything you want to keep looking nice. It works as well as acetone for cleaning up little messes. The other thing will be a paint hardener, this will be used in your clear coat to give it a great shine, depth and durability needed to hold up. You will also need your color matched (or what ever color you choose) base coat. This will be only a base and will be somewhat thin. Then there is the clear that you will need to purchase. I prefer using PPG paints myself, since they provide it for the manufactures, they have the exact paint code.
Cleaning supplies. You might want to purchase a can of acetone, this can be used to clean the gun when you are done and to clean up any areas that you need. The reducer can also be used, but it is a bit more expensive then the acetone. You will also want a bottle of rubbing alcohol.
Now for the painting, you will need to start by pulling what ever part you want to paint off of the car. You will want to prep the part, this means you will want to clean it with the rubbing alcohol. Try to avoid touching the surfaces that you will be painting with your hands. You may want to use some sort of latex glove, one without powder. If you do touch the part this runs the risk of leaving oil on it, which will break the bond of the paint. There really is no need to rough sand the part, the surface is already rough enough to accept the adhesion promoter. With the part clean and in a well ventilated area, you will need to go ahead and spray the adhesion promoter to all the surfaces you will want to paint. This is kind of tricky, as the spray is kind of hard to see. Just make nice even passes when spraying it on. You can do more then one coat with the adhesion promoter, being sure to cover the entire surface. Be careful not to spray it to thick, it will run. Nice thin coats! Give time for the promoter to dry, depending on temp and humidity this time will vary.
Once that has dried, you will need to mix your base coat with the reducer to the specified amount. Normally this is a 1:1 mix, but the paint can label should have it on it. Be sure to shake your base paint well, as most of the Acura paints have pearl or flake in them. Pour the paint and the reducer through the paint strainer and into the mixing cup. Stir with the stir stick and pour back through the strainer into the cup on the paint gun. Be sure to set the pressure on the air compressor, I normally do base around 20-25 psi. You are now ready to spray your parts with the base. Put on very light thin coats, giving plenty of time in between each to dry. The base should dry very quickly. Put on enough coats to where the part is evenly coated with paint.
Once the base is dry, you will be able to then apply the clear coat. First you will want to clean the paint gun with either the acetone or the reducer, getting rid of the base color. You will want to spray some through the gun as well as wiping it down. Now on to the clear, this will require you mix the clear coat paint, the hardener and the reducer. There will be a mix amount on the side of the clear coat can. Some are 4:2:1 and some are 4:1:1. Mix the three together and then pour through the strainer into the paint gun. Set the pressure to 15-20 psi. When spraying clear, be sure to lay it out nice and smooth and not to thick, if it is too thick it will run and you will spend a lot of time sanding. Put these coats on very slowly, taking your time between each one and giving plenty of dry time. Remember to clean your gun after you finish, as the clear will really gunk up the gun.
Give the clear a day or so to really set and harden. If you have any blemishes in the paint, you should be able to sand it out with a 1000 grit sandpaper. You will want to start with the 1000 and work up to a 1500 and then 2000. Once you have finished the sanding you will need a paint finishing polish. This can also be purchased at the automotive paint store.
I hope this helps and if you have any other questions let me know.
Jason


 08-18-2006, 08:17 AM
#28
Team Anthracite Member
Jason,
That was above and beyond the call. WOW! Thank you. I don't have a paint gun though and I doubt I'm going to buy one to paint my emblems, but maybe I can find someone who has one... Holy cow. I'm going to have to read that more thoroughly.
Thank you so much!
Rob
That was above and beyond the call. WOW! Thank you. I don't have a paint gun though and I doubt I'm going to buy one to paint my emblems, but maybe I can find someone who has one... Holy cow. I'm going to have to read that more thoroughly.
Thank you so much!
Rob
08-18-2006, 07:07 PM
#29
All About Trance

Henryk, that looks awesome! It's a much cleaner look than the hack job they did to make the stock engine cover fit with the SC on.
03-20-2007, 07:38 AM
#31
Originally Posted by 02type-s
These look sick! Did you buy these or make them? Are they available for my 02 Type-S?
Yes...I made them. No...I never made any for the 02 model....just the 3G TL model...and since have moved on to EVO and Scoobie parts that we make under contract for some other companies under a private label program.
Thanks for the compliments though.
 Thankfully I got one when they were available. I get soo many compliments on it. Thanks MB!

Thread
Thread Starter
Forum
Replies
Last Post
Yumcha
Automotive News
4
09-15-2015 06:44 PM
Yumcha
Automotive News
3
09-14-2015 10:48 AM
oyayjoe
Member Cars for Sale
1
09-12-2015 04:40 PM