
New Navi video interface w/ extras - Audio i/p + USB charging + iPod ctrl + Remote !?
 07-30-2009 | 09:53 PM
#81
Instructor
Joined: Jun 2008
Posts: 128
Likes: 5
Hey guys, I was organizing my photobucket folder and accidentally deleted the pictures for my instructions...sorry. Below is a repost with the pics reattached for those of you that might need them (Also, I'm going to post more detailed instructions with more pictures soon)...
I have some pics that should help with your install. I plan on doing a more thorough write up with instructions, but here are the basics of how I got mine to work.
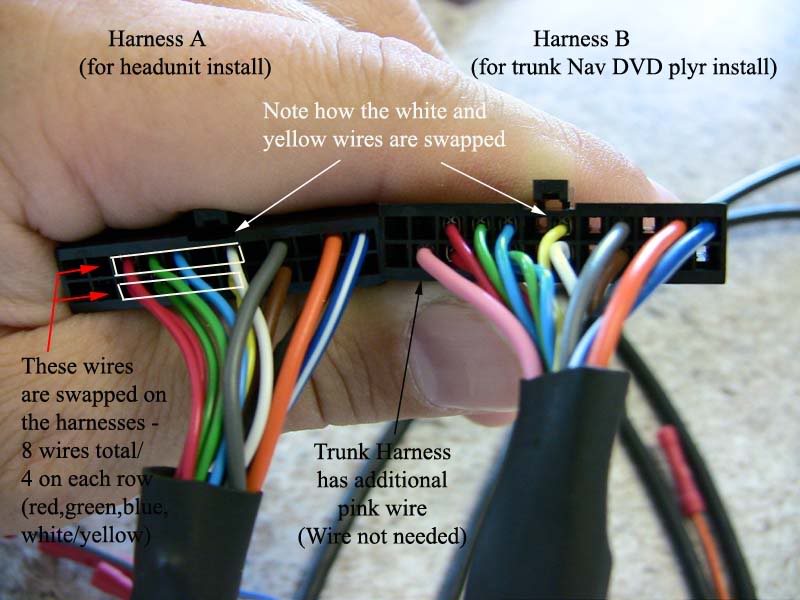
First, you'll want to look at the harness they sent you to determine if it should be installed behind the head unit (although it won't fit) or in the trunk by the Nav DVD player. This picture should point out the differences so if you have the wrong one to install in the trunk, you can splice and swap some wires to make it work.
Next, to get the video harness in the trunk (where the interface is also located), but have the audio harness behind the head unit, you will need to splice the wires right before the connector that plugs into the AUDIO interface in the trunk. (Do not splice the actual Y-cable of the AUDIO harness and DO NOT splice any part of the VIDEO harness)
To do this I bought a 100 foot roll of 22-gauge speaker wire from Radio Shack for about 10 bucks. The wire is in a strand of two wires. You'll need to cut lengths of this wire to run the length of your car. (For me I cut these in 14 foot lengths since I ran the wire under the side doors jams the length of the car and pulled into the trunk.) You'll need to cut enough of these lengths so that you can reconnect all the wires from the pieces of the harness you cut. One other thing you'll want to do while making these cutting these lengths is label each end so that you can be sure you connect the correct wires. I used masking tape and labeled using "1", "2", etc at each end. This will actually help after you have run the wires from the head unit to the trunk.

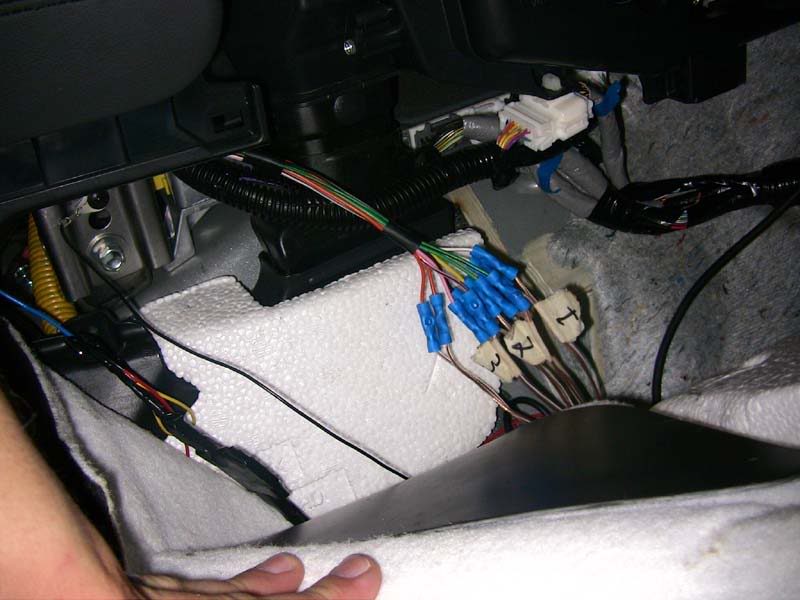
Next, and before you connect the wires to the cut harness, you'll want to run the wires from the head unit to the trunk. I'm not sure how similar my RL is to the TL, but I just removed some of the lower door trim and ran the wire under the carpet. In some tight spots and so I didn't have to take out the back seat, I used a snake (steel fish tape) to pull the wire through. (You'll probably also want to run the wire for the IR eye at the same time. And you'll want to run some RCA cables this same way to extend the input into the interface. I ended up running these through the center armrest, under the carpet, and under the backseat to the trunk since I was more concerned about the lengths of these.)

Once you have the wire run, and after you have connected the audio Y-harness to the back of the head unit, you can now re-wire the Audio harness with the extension you created. Just make sure that you use your labels to correctly match up the wires.
With the audio harness extended and plugged into the interface in the trunk, you'll now want to complete the other connections (i.e. video harness, IR wired eye, and RCA cables from video source) and you should now be set.
Anyways, hope this helps. If you have any questions, let me know.
I have some pics that should help with your install. I plan on doing a more thorough write up with instructions, but here are the basics of how I got mine to work.
First, you'll want to look at the harness they sent you to determine if it should be installed behind the head unit (although it won't fit) or in the trunk by the Nav DVD player. This picture should point out the differences so if you have the wrong one to install in the trunk, you can splice and swap some wires to make it work.
Next, to get the video harness in the trunk (where the interface is also located), but have the audio harness behind the head unit, you will need to splice the wires right before the connector that plugs into the AUDIO interface in the trunk. (Do not splice the actual Y-cable of the AUDIO harness and DO NOT splice any part of the VIDEO harness)
To do this I bought a 100 foot roll of 22-gauge speaker wire from Radio Shack for about 10 bucks. The wire is in a strand of two wires. You'll need to cut lengths of this wire to run the length of your car. (For me I cut these in 14 foot lengths since I ran the wire under the side doors jams the length of the car and pulled into the trunk.) You'll need to cut enough of these lengths so that you can reconnect all the wires from the pieces of the harness you cut. One other thing you'll want to do while making these cutting these lengths is label each end so that you can be sure you connect the correct wires. I used masking tape and labeled using "1", "2", etc at each end. This will actually help after you have run the wires from the head unit to the trunk.
Next, and before you connect the wires to the cut harness, you'll want to run the wires from the head unit to the trunk. I'm not sure how similar my RL is to the TL, but I just removed some of the lower door trim and ran the wire under the carpet. In some tight spots and so I didn't have to take out the back seat, I used a snake (steel fish tape) to pull the wire through. (You'll probably also want to run the wire for the IR eye at the same time. And you'll want to run some RCA cables this same way to extend the input into the interface. I ended up running these through the center armrest, under the carpet, and under the backseat to the trunk since I was more concerned about the lengths of these.)
Once you have the wire run, and after you have connected the audio Y-harness to the back of the head unit, you can now re-wire the Audio harness with the extension you created. Just make sure that you use your labels to correctly match up the wires.
With the audio harness extended and plugged into the interface in the trunk, you'll now want to complete the other connections (i.e. video harness, IR wired eye, and RCA cables from video source) and you should now be set.
Anyways, hope this helps. If you have any questions, let me know.
07-31-2009 | 11:03 PM
#82
Instructor
Joined: Jun 2008
Posts: 128
Likes: 5
Detailed Installation Instructions for my 2005 Acura RL
Hey Guys, I've posted more detailed instructions with more pictures and video at https://acurazine.com/forums/2g-rl-audio-bluetooth-electronics-navigation-90/i-006-diy-autotoys-com-nav-video-interface-both-audio-video-738316/
I hope this is helpful for any of you looking to install the unit.
I hope this is helpful for any of you looking to install the unit.
08-04-2009 | 06:05 PM
#84
TYPE-S KING
Joined: Jun 2008
Posts: 71
Likes: 0
From: upstate NY
i spent over 5 hours trying to make this shit works, i did every thing like i should and still no Video feed. please check this video out and see if you help. im so tired and mad maybe i missed something
http://www.youtube.com/watch?v=UxrAPTMYIfg
http://www.youtube.com/watch?v=UxrAPTMYIfg
Last edited by csmeance; 07-07-2011 at 12:43 PM.
08-05-2009 | 10:57 AM
#85

Intermediate
Joined: May 2006
Posts: 30
Likes: 0
From: Manhattan
Hey guys I am interested in buying this for just the backup camera only. I am not looking to install video or audio.. Would this work? I was first thinking of getting the Navtool but they are asking $300 since they are not doing a group buy.. Thanks in advance
08-11-2009 | 03:10 PM
#87

Intermediate
Joined: Jul 2009
Posts: 42
Likes: 0
i spent over 5 hours trying to make this shit works, i did every thing like i should and still no Video feed. please check this video out and see if you help. im so tired and mad maybe i missed something
http://www.youtube.com/watch?v=UxrAPTMYIfg
http://www.youtube.com/watch?v=UxrAPTMYIfg
Documentation (if any on the dip switches)?
Begin isolating everything - confirm one by one that all devices, cables, and harnesses are operational (in case of harnesses look and try to figure out which is what).
Ipod is a very bad device to use for testing unfortunately (ipod touch more so). Use a device that just throws out a nice clean video signal (like dvd player which you claim to test with).
Rip out everything you have and start fresh and get a computer tech in there - the logic we use is often good for figuring out these kind of things.
Have you considered the temporary black screen you are seeing is a out of sync/range problem (and defaults back to working signal?). Perhaps the LCD is trying to tell you it doesn't like the resolution/etc. of the video signal you are sending.
This sounds like something just waiting for me to tear into

~
irishbloke
Last edited by csmeance; 07-07-2011 at 12:42 PM.
08-19-2009 | 09:26 PM
#88

7th Gear
Joined: May 2009
Posts: 7
Likes: 0
From: Indianapolis, IN
Great write-up jhal! Just to clarify, which kit did you order/what did you request? If one orders/receives the rear kit, does it still come with the 14 pin audio connector? Your method seems pretty straight forward and it looks like as long as you get the 14 pin and 20 pin connectors, it can be made to work no matter whether you receive the front or rear kit.
This will be my first TSX mod and can't wait to get parts ordered and get started!
This will be my first TSX mod and can't wait to get parts ordered and get started!
08-21-2009 | 12:08 PM
#89
Intermediate
Joined: May 2006
Posts: 30
Likes: 0
From: Manhattan
Great write-up jhal! Just to clarify, which kit did you order/what did you request? If one orders/receives the rear kit, does it still come with the 14 pin audio connector? Your method seems pretty straight forward and it looks like as long as you get the 14 pin and 20 pin connectors, it can be made to work no matter whether you receive the front or rear kit.
This will be my first TSX mod and can't wait to get parts ordered and get started!
This will be my first TSX mod and can't wait to get parts ordered and get started!
hey I ordered this for acura Tl 04. I ordered the one that connects in the rear. I received both the audio and video harness. The video harness plugs perfectly behind the NAVI box. The audio harness you just plug into the module and just tap pins 1(12v) and 2(ground). Everything works perfectly and the remote control works as well. I will recommend it
08-21-2009 | 12:34 PM
#90
7th Gear
Joined: May 2009
Posts: 7
Likes: 0
From: Indianapolis, IN
hey I ordered this for acura Tl 04. I ordered the one that connects in the rear. I received both the audio and video harness. The video harness plugs perfectly behind the NAVI box. The audio harness you just plug into the module and just tap pins 1(12v) and 2(ground). Everything works perfectly and the remote control works as well. I will recommend it
Thanks in advance!
08-24-2009 | 04:40 PM
#91
Instructor
Joined: Jun 2008
Posts: 128
Likes: 5
I think Edwardlanti was just using the interface for a backup camera, so he was only needing the video function. And since the power for the interface is supplied via the audio harness, he had to plug the audio harness into the actual interface (not into the XM module or car anywhere), then tap into the power and ground wires of this harness and connect to power and ground of the car.
08-24-2009 | 09:11 PM
#92
7th Gear
Joined: May 2009
Posts: 7
Likes: 0
From: Indianapolis, IN
I think Edwardlanti was just using the interface for a backup camera, so he was only needing the video function. And since the power for the interface is supplied via the audio harness, he had to plug the audio harness into the actual interface (not into the XM module or car anywhere), then tap into the power and ground wires of this harness and connect to power and ground of the car.
08-31-2009 | 07:40 PM
#93

Intermediate
Joined: May 2008
Posts: 36
Likes: 0
dipkat what would you recommend for a set up im trying to have it look reallly smooth all the functions you have but not the hassel of stuff being wrong all the time. Should i just get the autotoys one and just hook it in the back????
09-17-2009 | 10:19 AM
#94
Thread Starter
Booya
Joined: Dec 2005
Posts: 220
Likes: 0
From: Princeton NJ
Too painful experience. Paypal closed my claim. Did not receive any money back from AutoToys. Bad experience.
Also, after 3 months of use, I do not like the sue of a remote. The system resets to the video interface to the navi every time you shut the car. You have to activate the video input every time you want it on. I missing the convenience of a manual switch. Plus, every time there is a law enforcement vehicle around, I have to scramble to reach out and hunt for the remote. Such a pain when you need to change the video source in a rush. The manual / push-button switch is more functional in my opinion, compared to the remote. Go with one of the other video setups if you can and save yourself lots of headaches.
Also, after 3 months of use, I do not like the sue of a remote. The system resets to the video interface to the navi every time you shut the car. You have to activate the video input every time you want it on. I missing the convenience of a manual switch. Plus, every time there is a law enforcement vehicle around, I have to scramble to reach out and hunt for the remote. Such a pain when you need to change the video source in a rush. The manual / push-button switch is more functional in my opinion, compared to the remote. Go with one of the other video setups if you can and save yourself lots of headaches.
 11-27-2009 | 11:30 PM
#97
TYPE-S KING
Joined: Jun 2008
Posts: 71
Likes: 0
From: upstate NY
Too painful experience. Paypal closed my claim. Did not receive any money back from AutoToys. Bad experience.
Also, after 3 months of use, I do not like the sue of a remote. The system resets to the video interface to the navi every time you shut the car. You have to activate the video input every time you want it on. I missing the convenience of a manual switch. Plus, every time there is a law enforcement vehicle around, I have to scramble to reach out and hunt for the remote. Such a pain when you need to change the video source in a rush. The manual / push-button switch is more functional in my opinion, compared to the remote. Go with one of the other video setups if you can and save yourself lots of headaches.
Also, after 3 months of use, I do not like the sue of a remote. The system resets to the video interface to the navi every time you shut the car. You have to activate the video input every time you want it on. I missing the convenience of a manual switch. Plus, every time there is a law enforcement vehicle around, I have to scramble to reach out and hunt for the remote. Such a pain when you need to change the video source in a rush. The manual / push-button switch is more functional in my opinion, compared to the remote. Go with one of the other video setups if you can and save yourself lots of headaches.


 06-27-2011 | 11:29 PM
#101
Intermediate
Joined: Feb 2011
Posts: 26
Likes: 2
From: Houston, TX
They've upgraded it! The girlfriend just bought me the same setup for my birthday, came in yesterday. Hooking up everything took literally <5 minutes. They seem to updated their system or something but I didn't need to hook up the audio wire. Just plug the "black" plug into the back of the dvd navi box, plug in the 12volt red wire and ground the black. Voila done. I didn't need to dissemble my center console or anything. Was a bit relieved after seeing all the posts on here.
07-07-2011 | 10:26 AM
#102
Mistuh DRiiVA
Joined: May 2006
Posts: 582
Likes: 13
From: Queens Village, NY
does the new version still remove XM radio capability? And is the ipod/iphone information displayed on the navi screen? Any pictures of how it looks when music is playing on the navi screen?
11-06-2011 | 07:40 PM
#103

1st Gear
Joined: Nov 2011
Posts: 1
Likes: 0
Hey guys, I just bought a 06 Acura TL and I want to install a rear view camera. It also had NAV unit. I read most of thread abt this and it seemed that autotoys video switch would fit to my need. However Autotoys does not provide much info abt installation (and their installation video is worst at best.)
Thus I hope you could help me here. Please kindly help if you know the answer for:
1. Where does the switch get its power? Do I need to tab into NAV DVD unit? Or the harness had already wired for it?
2.With latest autotoys video switch, do I still need to hook up the audio Y-plug in the front NAV unit? Or everything is hook up in the trunk's NAV DVD?
2. Do I still need to tap into reverse light's wire to activate camera when backup? I found that one (backup) light has 2 wires: green and black. The other has 3: green, black, and green w/ white stripe. So which one should I tap in: Green , black or green w/ white?
Thanks in advance.


Thread
Thread Starter
Forum
Replies
Last Post
BoricuaTL
Car Parts for Sale
138
04-08-2016 01:08 PM
Yumcha
Automotive News
1
09-17-2015 09:01 PM
Vejey Gandier
3G TL Audio, Bluetooth, Electronics & Navigation
4
09-12-2015 08:59 PM
ivegotthenav
1G TSX Performance Parts & Modifications
0
09-11-2015 07:51 PM