
New Navi video interface w/ extras - Audio i/p + USB charging + iPod ctrl + Remote !?

Thread Starter
Booya
Joined: Dec 2005
Posts: 220
Likes: 0
From: Princeton NJ
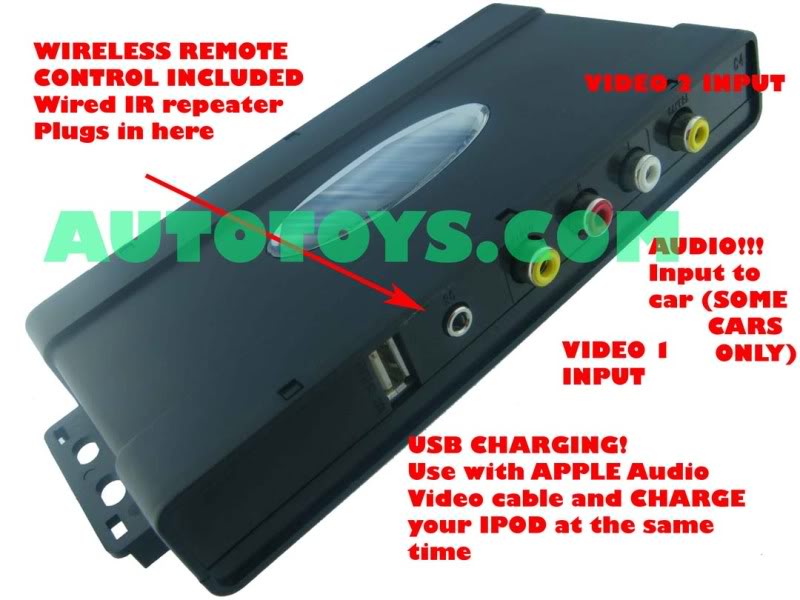
Ok. So I placed my order for the basic video interface module from AutoToys.com, which is functionally similar to those sold by NavTool, TvandNav2go and such. However, instead they will now be shipping a newer module that also has the following extras (from AutoToys.com) -
- USB charging port (for use with APPLE A/V cables which allows you to plug in video and audio and charge your ipod right at the module)
- 2 Video inputs
- Wireless remote control INCLUDED
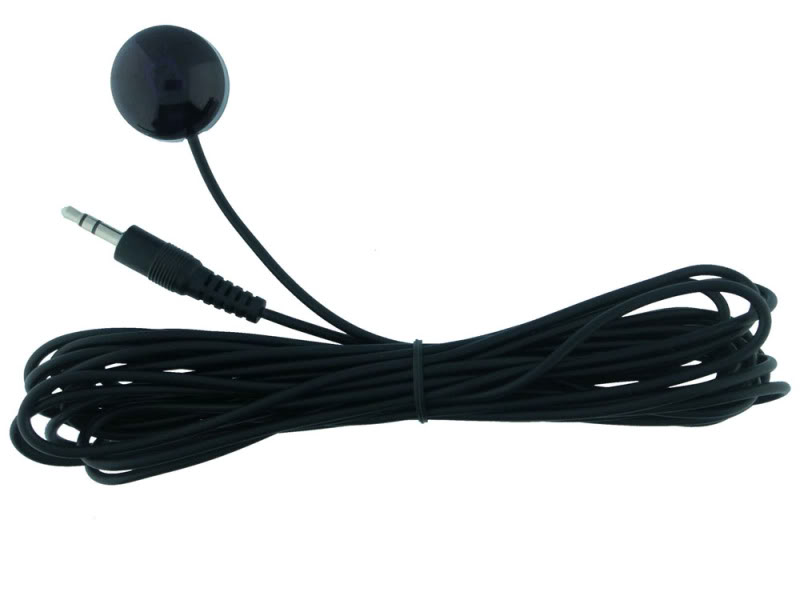
- Wired IR Repeater plugs in and then you run your remote eye to a dash location and aim your wireless remote to the repeater
- IPOD control and AUDIO feed into SOME cars ( not all cars compatible Feeds sound in directly )
Link to product page: (Many pictures provided)
http://www.autotoys.com/x/product.php?productid=9231
I have ordered the product and there is a short ETA.
Let me start by saying that I have no additional information besides what you see on the product page. Also, the sales people at AutoToys.com have no additional information as it is a new product in their catalog (I have been emailing back and forth with them)
All you experts out there, what can you make from the pictures and product information? Initially I was planning to use the PXAMG for the audio aux i/p solution along with the navi video interface to give me full AV integration with my iPhone 3G. Now with this, I may not need an additional solution for audio . I would assume that the audio input into the unit will be output to the navi along with video 1. Again I have no detail's, and I am only speculating.
Also, pics show a USB port for charging. The product page claims that the unit allows for iPod control. Now, wouldn't you need the ipod data port to control the iPod?
Lastly, I wonder what the IR remote is used for. I am assuming that it will be used to switch the video source and not for iPod control.
Any other speculations?
- USB charging port (for use with APPLE A/V cables which allows you to plug in video and audio and charge your ipod right at the module)
- 2 Video inputs
- Wireless remote control INCLUDED
- Wired IR Repeater plugs in and then you run your remote eye to a dash location and aim your wireless remote to the repeater
- IPOD control and AUDIO feed into SOME cars ( not all cars compatible Feeds sound in directly )
Link to product page: (Many pictures provided)
http://www.autotoys.com/x/product.php?productid=9231
I have ordered the product and there is a short ETA.
Let me start by saying that I have no additional information besides what you see on the product page. Also, the sales people at AutoToys.com have no additional information as it is a new product in their catalog (I have been emailing back and forth with them)
All you experts out there, what can you make from the pictures and product information? Initially I was planning to use the PXAMG for the audio aux i/p solution along with the navi video interface to give me full AV integration with my iPhone 3G. Now with this, I may not need an additional solution for audio
. I would assume that the audio input into the unit will be output to the navi along with video 1. Again I have no detail's, and I am only speculating. Also, pics show a USB port for charging. The product page claims that the unit allows for iPod control. Now, wouldn't you need the ipod data port to control the iPod?
Lastly, I wonder what the IR remote is used for. I am assuming that it will be used to switch the video source and not for iPod control.
Any other speculations?

Thread Starter
Booya
Joined: Dec 2005
Posts: 220
Likes: 0
From: Princeton NJ
. I will see if I can get the installer to pull some pics.
Thread Starter
Booya
Joined: Dec 2005
Posts: 220
Likes: 0
From: Princeton NJ
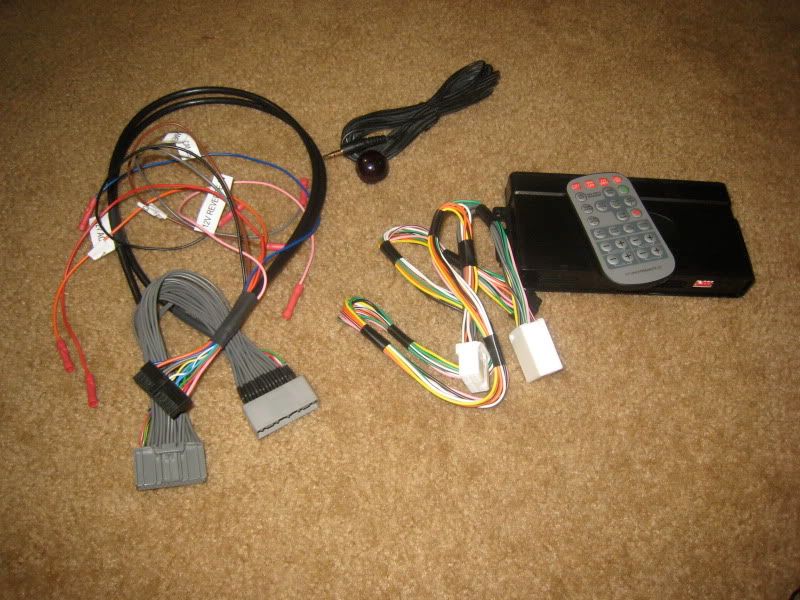
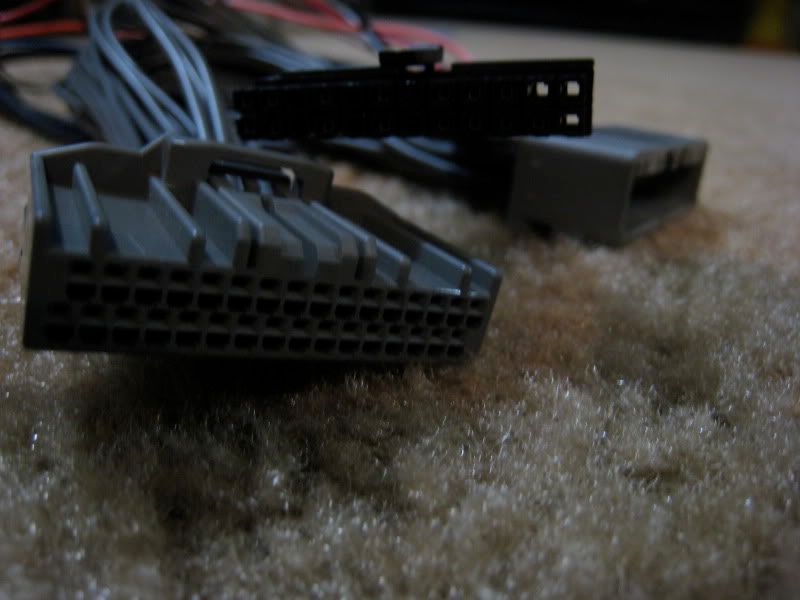
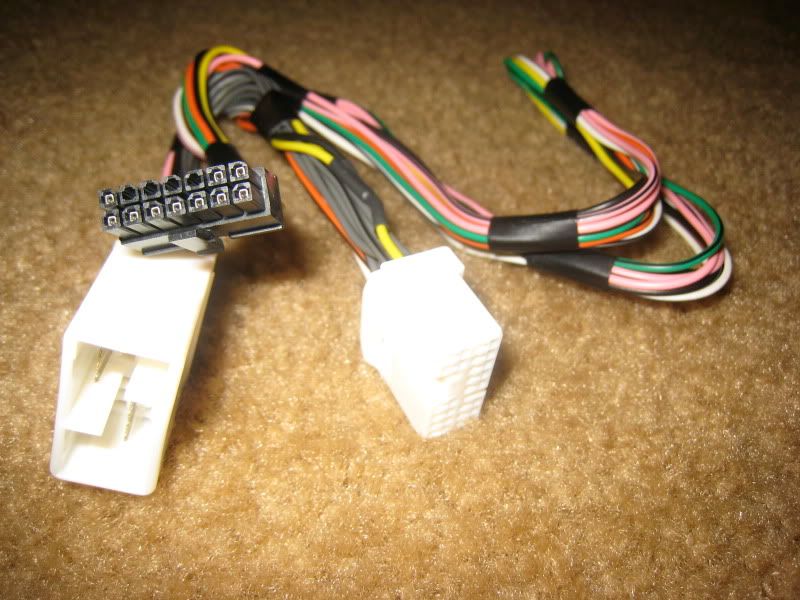
Ok, here's the situation. I have received the product as described. The only problem is that since the product is so new, there is no installation help available either online or from Autotoys tech support. The product looks very promising and rather than return the product, I still want to go ahead and install it. Here are some pictures of the product ...
Unit unboxed
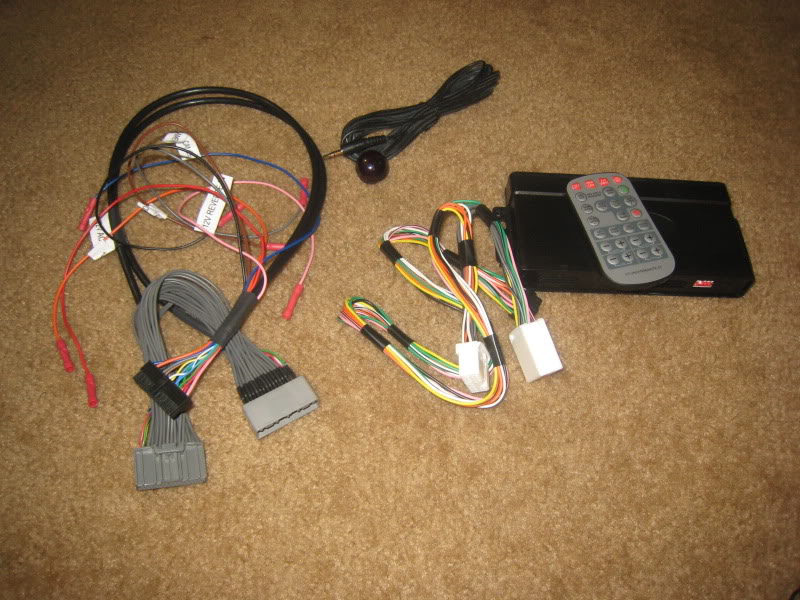
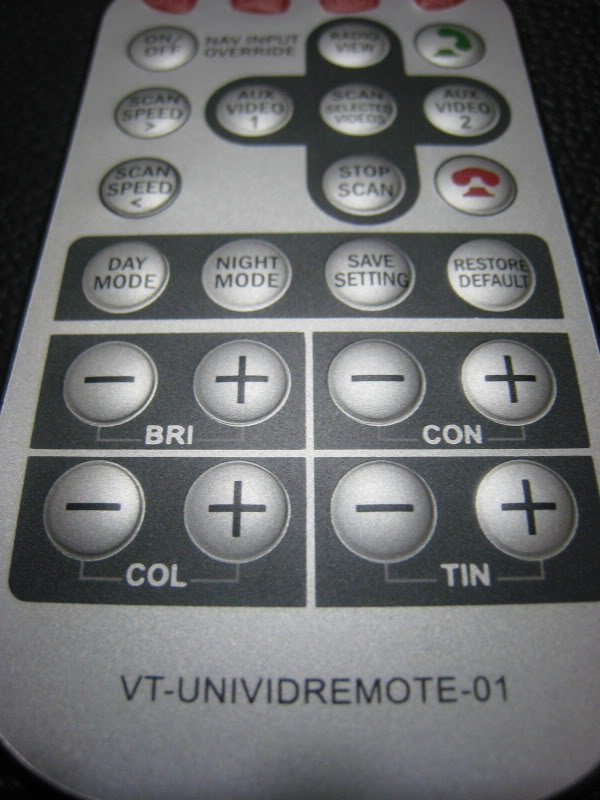
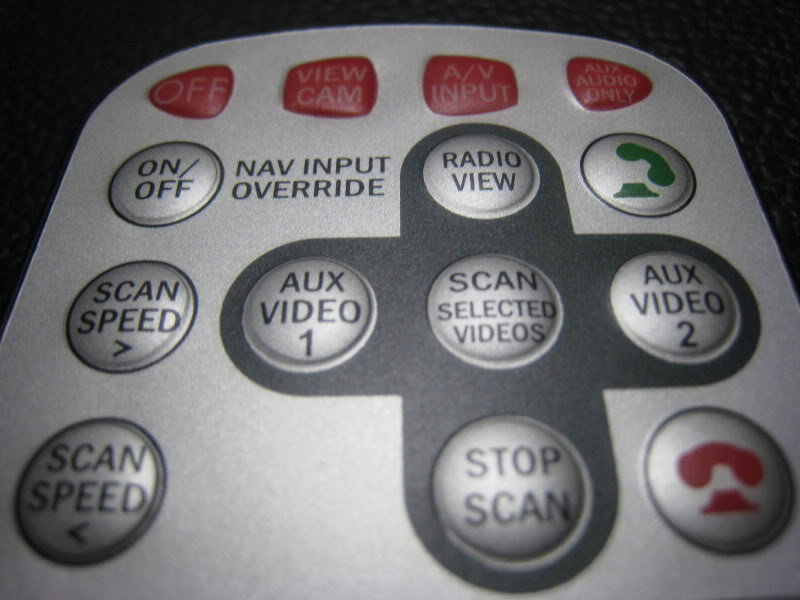
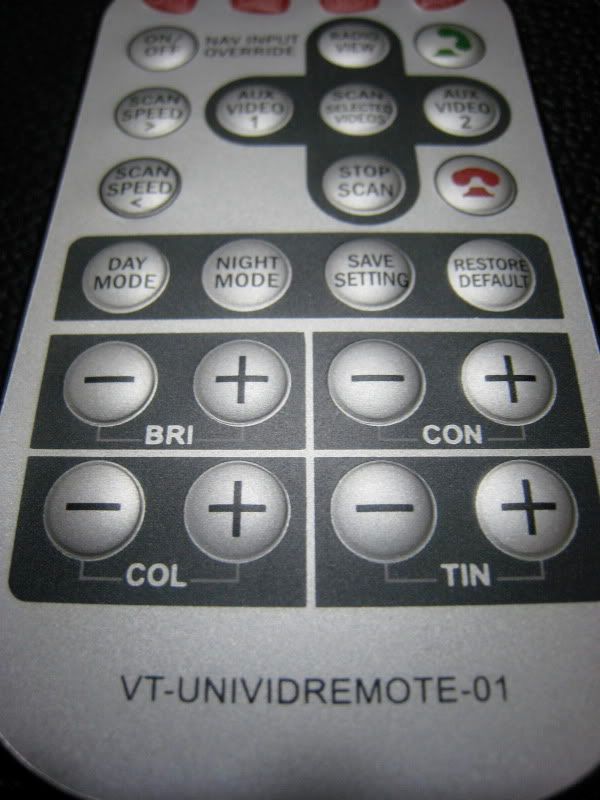
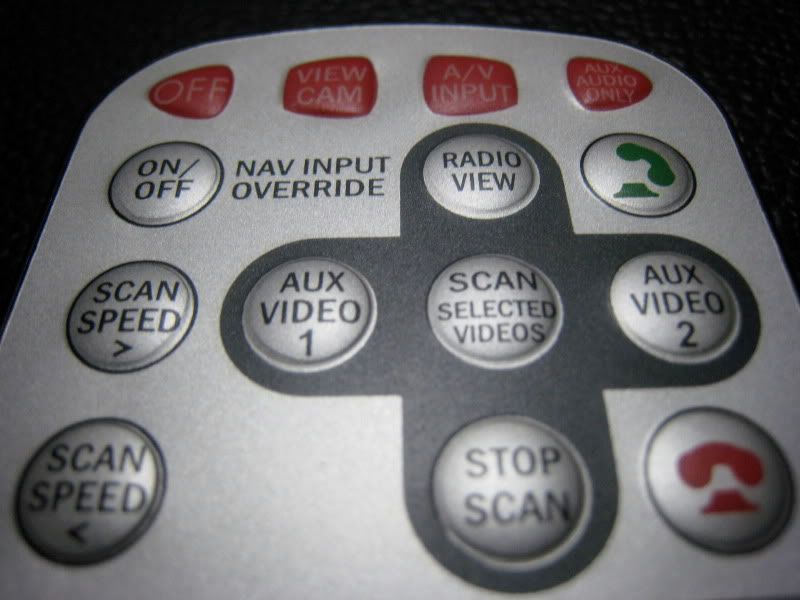
Remote
(functions for OFF, VIEW CAM, AV INPUT, AUX AUDIO ONLY, ON OFF FOR NAV OVERRIDE, RADIO VIEW, AUX VIDEO 1, SCAN SELECT VIDEO, AUX VIDEO 2, STOP SCAN, SCAN SPEED, SCAN SPEED +, DAY MODE, NIGHT MODE, SAVE SETTING, RESTORE DEFAULT, CONTROLS with - and + for BRIGHTNESS, CONTRAST, COLOR and TINT)
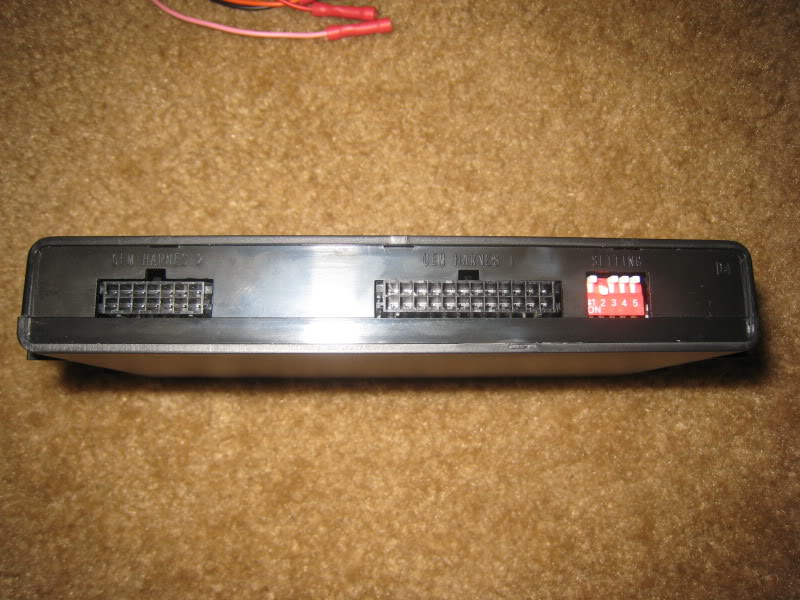
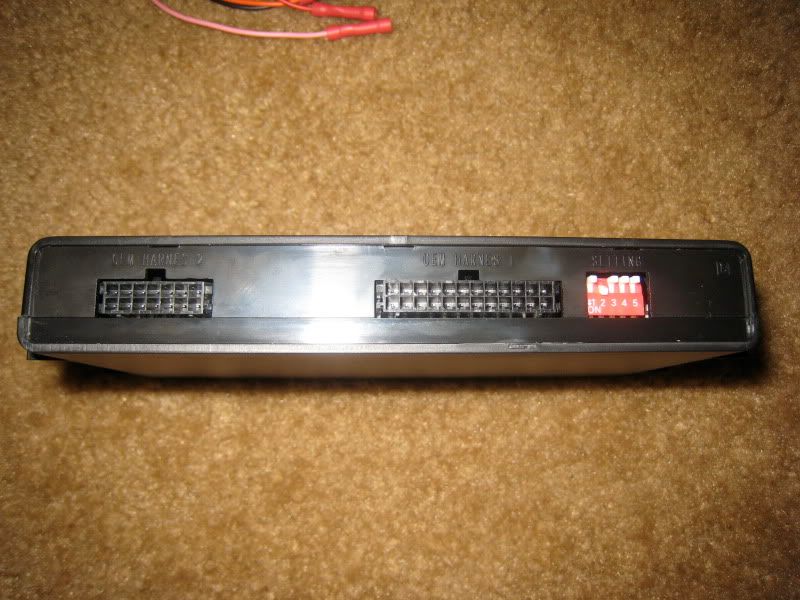
Back of the Unit ( OEM Harness 1 , OEM Harness 2 , Dip switch)
20 pin adapter
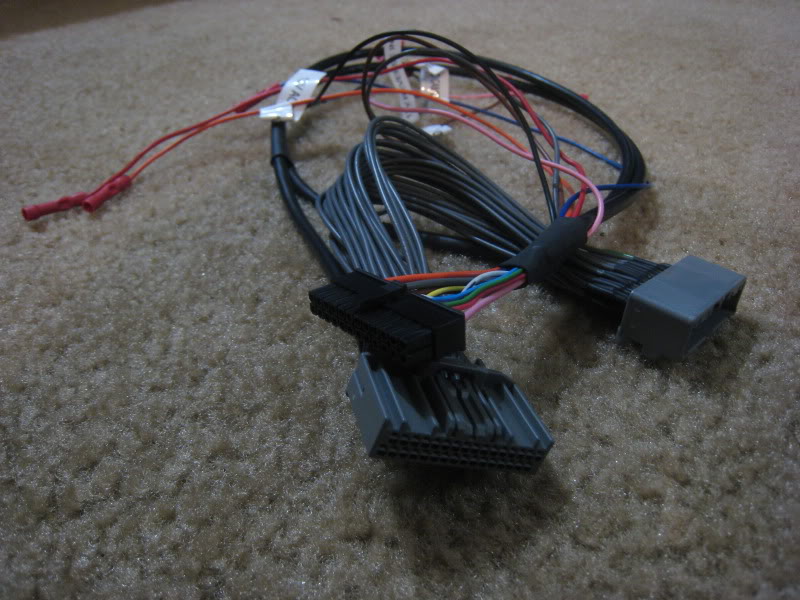
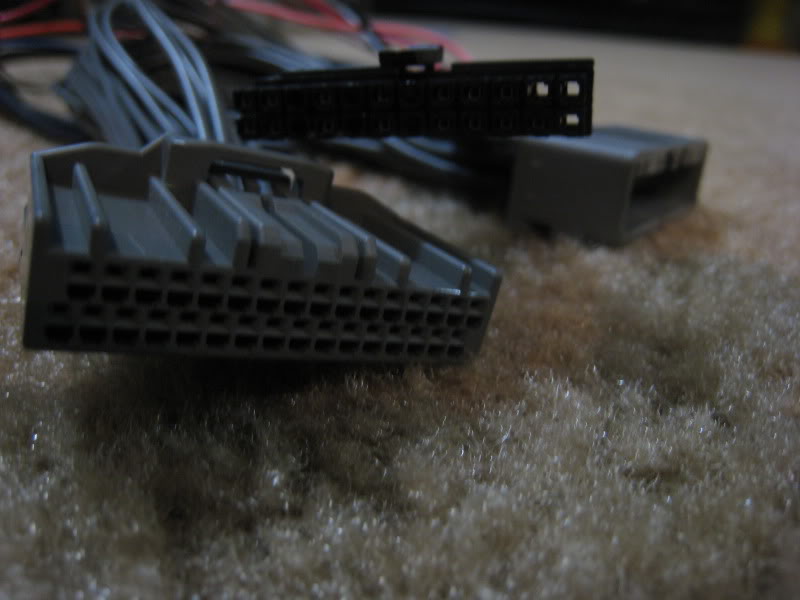
14 pin adapter

Pictures of the front of the unit and the IR receiver at the beginning of the thread.
The biggest question is whether the product is installed in the trunk at the navi module or in the front behind the radio unit. Autotoys.com themselves are not sure where it is installed - The product page mentions the navi unit in the trunk , the tech support thinks it is behind the radio unit in the dash. I tend to think the latter is true, but I am not sure.
First I need to understand the cables. Clearly included is the 20 pin Navi Y adapter for the video interface.
Then there is another 14 pin Y adapter. I assume it is for the audio interface. Is this the Y adapter for the XM unit or is it some other audio interface? Can someone who has knowledge of the interface on the navi / XM receiver in the trunk and / or on the back of the radio unit look into the pictures and guess what these cables are and where they could fit?
Also, any speculations on how the installation should be done? It looks pretty straight forward plug-n-play, except I am clueless where to plug the cables in the TL.
I am sold on the product, as this one unit adds both a video and audio interface. Additionally it is very feature-full as is evident from the product information available - I just want to make it work. The USB charging and the remote is another additional benefit .
Any help is appreciated.
Unit unboxed
Remote
(functions for OFF, VIEW CAM, AV INPUT, AUX AUDIO ONLY, ON OFF FOR NAV OVERRIDE, RADIO VIEW, AUX VIDEO 1, SCAN SELECT VIDEO, AUX VIDEO 2, STOP SCAN, SCAN SPEED, SCAN SPEED +, DAY MODE, NIGHT MODE, SAVE SETTING, RESTORE DEFAULT, CONTROLS with - and + for BRIGHTNESS, CONTRAST, COLOR and TINT)
Back of the Unit ( OEM Harness 1 , OEM Harness 2 , Dip switch)
20 pin adapter
14 pin adapter
Pictures of the front of the unit and the IR receiver at the beginning of the thread.
The biggest question is whether the product is installed in the trunk at the navi module or in the front behind the radio unit. Autotoys.com themselves are not sure where it is installed - The product page mentions the navi unit in the trunk , the tech support thinks it is behind the radio unit in the dash. I tend to think the latter is true, but I am not sure.
First I need to understand the cables. Clearly included is the 20 pin Navi Y adapter for the video interface.
Then there is another 14 pin Y adapter. I assume it is for the audio interface. Is this the Y adapter for the XM unit or is it some other audio interface? Can someone who has knowledge of the interface on the navi / XM receiver in the trunk and / or on the back of the radio unit look into the pictures and guess what these cables are and where they could fit?
Also, any speculations on how the installation should be done? It looks pretty straight forward plug-n-play, except I am clueless where to plug the cables in the TL.
I am sold on the product, as this one unit adds both a video and audio interface. Additionally it is very feature-full as is evident from the product information available - I just want to make it work. The USB charging and the remote is another additional benefit .
Any help is appreciated.
Trending Topics
Ok, here's the situation. I have received the product as described. The only problem is that since the product is so new, there is no installation help available either online or from Autotoys tech support. The product looks very promising and rather than return the product, I still want to go ahead and install it. Here are some pictures of the product ...
Unit unboxed
Remote
(functions for OFF, VIEW CAM, AV INPUT, AUX AUDIO ONLY, ON OFF FOR NAV OVERRIDE, RADIO VIEW, AUX VIDEO 1, SCAN SELECT VIDEO, AUX VIDEO 2, STOP SCAN, SCAN SPEED, SCAN SPEED +, DAY MODE, NIGHT MODE, SAVE SETTING, RESTORE DEFAULT, CONTROLS with - and + for BRIGHTNESS, CONTRAST, COLOR and TINT)
Back of the Unit ( OEM Harness 1 , OEM Harness 2 , Dip switch)
20 pin adapter

14 pin adapter
Pictures of the front of the unit and the IR receiver at the beginning of the thread.
The biggest question is whether the product is installed in the trunk at the navi module or in the front behind the radio unit. Autotoys.com themselves are not sure where it is installed - The product page mentions the navi unit in the trunk , the tech support thinks it is behind the radio unit in the dash. I tend to think the latter is true, but I am not sure.
First I need to understand the cables. Clearly included is the 20 pin Navi Y adapter for the video interface.
Then there is another 14 pin Y adapter. I assume it is for the audio interface. Is this the Y adapter for the XM unit or is it some other audio interface? Can someone who has knowledge of the interface on the navi / XM receiver in the trunk and / or on the back of the radio unit look into the pictures and guess what these cables are and where they could fit?
Also, any speculations on how the installation should be done? It looks pretty straight forward plug-n-play, except I am clueless where to plug the cables in the TL.
I am sold on the product, as this one unit adds both a video and audio interface. Additionally it is very feature-full as is evident from the product information available - I just want to make it work. The USB charging and the remote is another additional benefit .
Any help is appreciated.
Unit unboxed
Remote
(functions for OFF, VIEW CAM, AV INPUT, AUX AUDIO ONLY, ON OFF FOR NAV OVERRIDE, RADIO VIEW, AUX VIDEO 1, SCAN SELECT VIDEO, AUX VIDEO 2, STOP SCAN, SCAN SPEED, SCAN SPEED +, DAY MODE, NIGHT MODE, SAVE SETTING, RESTORE DEFAULT, CONTROLS with - and + for BRIGHTNESS, CONTRAST, COLOR and TINT)
Back of the Unit ( OEM Harness 1 , OEM Harness 2 , Dip switch)
20 pin adapter
14 pin adapter
Pictures of the front of the unit and the IR receiver at the beginning of the thread.
The biggest question is whether the product is installed in the trunk at the navi module or in the front behind the radio unit. Autotoys.com themselves are not sure where it is installed - The product page mentions the navi unit in the trunk , the tech support thinks it is behind the radio unit in the dash. I tend to think the latter is true, but I am not sure.
First I need to understand the cables. Clearly included is the 20 pin Navi Y adapter for the video interface.
Then there is another 14 pin Y adapter. I assume it is for the audio interface. Is this the Y adapter for the XM unit or is it some other audio interface? Can someone who has knowledge of the interface on the navi / XM receiver in the trunk and / or on the back of the radio unit look into the pictures and guess what these cables are and where they could fit?
Also, any speculations on how the installation should be done? It looks pretty straight forward plug-n-play, except I am clueless where to plug the cables in the TL.
I am sold on the product, as this one unit adds both a video and audio interface. Additionally it is very feature-full as is evident from the product information available - I just want to make it work. The USB charging and the remote is another additional benefit .
Any help is appreciated.
The 20 pin looks like the adapter I used to tap the navi unit in the trunk with my NavTool. How you are supposed to get them to where they need to go may be a problem.
There MAY be a connector behind the Navi in the dash that you could tap just like you would in the trunk, but I am not sure about that. If there is, installation would all be done in the dash and you may have to pull the radio to do it. There is a thread on converting your Navi to a CarPC that may have pics of the back of the headunit for you to look. I was able to access the audio cables for my Blitzsafe without pulling the radio, but it was REAL tight.
I like the unit and especially like the remote control feature.
Thread Starter
Booya
Joined: Dec 2005
Posts: 220
Likes: 0
From: Princeton NJ
dwb993 - Thanks for the confirmation on the 14 pin Y adapter. I think I will look into the thread you mentioned earlier to see if the 20 pin Y- adapter can fit behind the dash, just like the navi unit interface in the trunk.

Cruisin'
Joined: May 2004
Posts: 15
Likes: 0
From: Seattle, WA.
05 TL Head Unit
I just had to buy a new Head Unit for my 05 TL W/Nav.
I can send a picture if you want to supply an email? I just tried to insert a picture and looks like I have to find a host website or something.
While I have my Head Unit out I was going to install a quick and easy way for an ipod. Any suggestions. I will poke around on this site too.
Thanks
I can send a picture if you want to supply an email? I just tried to insert a picture and looks like I have to find a host website or something.
While I have my Head Unit out I was going to install a quick and easy way for an ipod. Any suggestions. I will poke around on this site too.
Thanks
Thread Starter
Booya
Joined: Dec 2005
Posts: 220
Likes: 0
From: Princeton NJ
I just had to buy a new Head Unit for my 05 TL W/Nav.
I can send a picture if you want to supply an email? I just tried to insert a picture and looks like I have to find a host website or something.
While I have my Head Unit out I was going to install a quick and easy way for an ipod. Any suggestions. I will poke around on this site too.
Thanks
I can send a picture if you want to supply an email? I just tried to insert a picture and looks like I have to find a host website or something.
While I have my Head Unit out I was going to install a quick and easy way for an ipod. Any suggestions. I will poke around on this site too.
Thanks
Look here in the 3G TL Garage for options.
https://acurazine.com/forums/3g-tl-2004-2008-93/3g-tl-garage-faq-3g-tl-newbies-553554/
Thread Starter
Booya
Joined: Dec 2005
Posts: 220
Likes: 0
From: Princeton NJ
Picture of back of radio unit with navi
try this one:
https://acurazine.com/forums/showthr...ighlight=CarPC
https://acurazine.com/forums/showthr...ighlight=CarPC
Radio unit back side - picture copied here
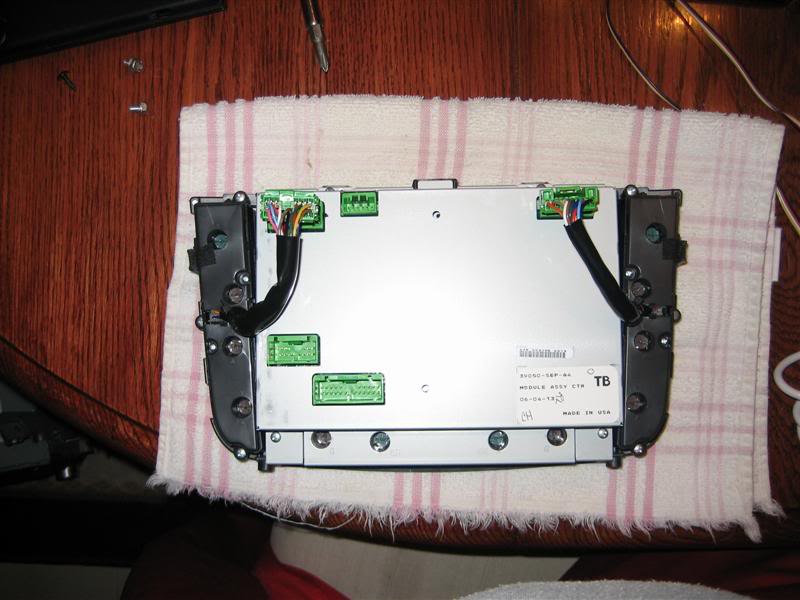
Starting clockwise, can anyone with the knowledge tell me what ports are for which interface (XM, NAVI, etc ...)?
Thread Starter
Booya
Joined: Dec 2005
Posts: 220
Likes: 0
From: Princeton NJ
Random thoughts
So I have been evaluating the options that I have based on the unit and the interface cables I have;
I think this unit is very versatile .. so here are my options.
Assumption 1: The audio interface plug is the same for XM adapter and the navi DVD unit in the trunk and on the back of the in-dash radio unit
Assumption 2: The video interface plug is the same for both the navi DVD unit in the trunk and on the back of the in-dash radio unit
Assumption 3: The XM adapter and the navi unit in the trunk are co-located such that the wires from A/V interface unit can be physically connected to both.
Location Option 1: Install A/V unit in the trunk
Pros: Easier install, bcoz no need to remove radio head unit
Cons: Need to run composite A/V cables and USB cable 15 ft. from the iphone installed at the head unit, all the way back into the trunk.
Location Option 2: Install A/V unit at in-dash radio unit
Pros: Shorter cables from iPhone to A/V unit.
Cons: Difficult install, bcoz no need to remove radio head unit
Connection Option 1: Navi video interface + Navi audio interface
Pros: Keeps XM intact, if using XM ( I dont need XM)
Cons: Navi Audio lost if routing to destination and playing music from iPhone
Connection Option 2: Navi video interface + XM audio interface
Pros: Navi audio intact, if listening to audio and routing to destination and playing music.
Cons: XM interface lost. Will have to source XM for listening audio from iPhone
Again, I am postulating these based on my assumptions and the pictures I have seen of the interfaces on the navi-dvd unit, the XML adapter and the head unit. I may also be speaking through my rear end and I would'nt know.
Any opinion on the above? Can someone validate my assumptions?
This will be last straw in my planning effort before I have the vehicle opened up by my installer tomorrow morning. I want to go to him with answers and do not want to make this into a R&D project for him. (He charges by the hour).
BTW ... seriously I do not need XM -> I have Pandora, AOL radio and many other options available from my iPhone 3G ...
[QUOTE=dipkat;11002774]So I have been evaluating the options that I have based on the unit and the interface cables I have;
I think this unit is very versatile .. so here are my options.
Assumption 1: The audio interface plug is the same for XM adapter and the navi DVD unit in the trunk and on the back of the in-dash radio unit
AGREED
Assumption 2: The video interface plug is the same for both the navi DVD unit in the trunk and on the back of the in-dash radio unit
AGREED
Assumption 3: The XM adapter and the navi unit in the trunk are co-located such that the wires from A/V interface unit can be physically connected to both.
AGREED
Location Option 1: Install A/V unit in the trunk
Pros: Easier install, bcoz no need to remove radio head unit
Cons: Need to run composite A/V cables and USB cable 15 ft. from the iphone installed at the head unit, all the way back into the trunk.
Don't forget power. Also, if you want to add a rearview camera, it will be easier to do. This is where my NavTool is located. Yes, you will have to run cables, but there are quite a few routing options for you and it really shouldn't be too bad.
Location Option 2: Install A/V unit at in-dash radio unit
Pros: Shorter cables from iPhone to A/V unit.
Cons: Difficult install, bcoz no need to remove radio head unit
This option will most likely involve removing the radio. Not that big of a deal, but definitely more work than Option 1.
Connection Option 1: Navi video interface + Navi audio interface
Pros: Keeps XM intact, if using XM ( I dont need XM)
Cons: Navi Audio lost if routing to destination and playing music from iPhone
The stock radio will mute the music for Navi instructions and HFL. However, it cannot pause the playback which is controlled by the iPod.
Connection Option 2: Navi video interface + XM audio interface
Pros: Navi audio intact, if listening to audio and routing to destination and playing music.
Cons: XM interface lost. Will have to source XM for listening audio from iPhone
Probably your best option, given what you want it to do for you. Good Luck!
Again, I am postulating these based on my assumptions and the pictures I have seen of the interfaces on the navi-dvd unit, the XML adapter and the head unit. I may also be speaking through my rear end and I would'nt know.
Any opinion on the above? Can someone validate my assumptions?
This will be last straw in my planning effort before I have the vehicle opened up by my installer tomorrow morning. I want to go to him with answers and do not want to make this into a R&D project for him. (He charges by the hour).
BTW ... seriously I do not need XM -> I have Pandora, AOL radio and many
Thread Starter
Booya
Joined: Dec 2005
Posts: 220
Likes: 0
From: Princeton NJ
Firstly, I talked to the tech support last night and I was informed that the new unit only attaches at the dash and not in the trunk. This is the Connection Option #1 in my earlier post. So, once the install was on with the dash open, I find myself in a fix when we find that the video harness is incorrect. We also looked at the navi DVD-vide unit in the trunk to check if this can be hooked there and it does not fit.
Now either I can board up the dash and go for broke (I still have to pay the installer 3 hrs of labor for trying the install and also getting the rearview backup cam installed) or leave the car with the dash and install open at the installer's place until I receive an unconfirmed replacement harness from Autotoys.com.
After the nightmarish experience I have had dealing with Autotoys.com tech and sales support over the past month, there's no way I am dealing with them for the unverified replacement harness. Also, I am not ready to go for broke either.
Fortunately, I had a third option available - So, rather than go for broke I took a spot decision to go with my original plan for ElegantType S 's iPhone 3g with P.I.E X3 mod.
The only difference is that instead of using P.I.E X3 as the aux port solution, I went for the PXAMG.
https://acurazine.com/forums/3g-tl-audio-bluetooth-electronics-navigation-94/my-iphone-3g-integrations-setup-lots-pics-even-videos-704403/
The install shop had one in stock (brand new) with the Honda/Acura harness (PGHD1). I am now hooking up my iPhone 3G to the AUX port of the PXAMG. I have a iPod classic at home which I will connect to the iPod harness of the PXAMG.
The only difference is that instead of the PXAMG being connected at the SAT tuner interface of the XM adapter in the trunk, it is now connected at the head unit and this works.
This will complete the audio part of the install. The video interface and rearview camera connections still remains incomplete. This will now be connected via NavTool when I have the funds to buy one.
Being into mods and not being a DIY person is a severe handicap when things go wrong as is evident here. But, I take pride in giving this mod a honest try.
I hope someone who has more balls than me and the technical aptitude and patience to deal with Autotoys.com can complete this mod using the right video interface harness. I resign myself from trying to make it work with this unit.
Although, I must admit that I am still fascinated and attracted by the potential this unit holds if it can be made to work.
I have taken some clear pictures of the harness provided and also at the back of head unit which I will post later tonight. In the meanwhile, it is back to dealing with Autotoys.com to get a refund for this unit ($189) if I can get it.
Thanks to all of you for your help and advice. I really appreciate it. I am deeply saddened for not being able complete this and provide my regrets to those who are tracking the mod.
Thread Starter
Booya
Joined: Dec 2005
Posts: 220
Likes: 0
From: Princeton NJ
Debugging the whole screw up, I find that the a**holes gave me the 32-pin navi video interface cables (I believe for the new 4G TL's) instead of the 20-pin for the 3G TL.
I feel stupid for not catching that earlier. .
.
I feel stupid for not catching that earlier.
.
Instructor

Joined: Jun 2008
Posts: 128
Likes: 6
Hi dipkat, I purchased this unit also to install in my 2005 RL. I was hoping to install it last week, but I'm also having trouble getting timely responses from autotoys, so I probably won't attempt until this weekend. One question for which I'm waiting for a response from autotoys is "The pink wire is unlabeled, to what should this be wired?"
When you received your unit, was the pink wire labeled? From your pictures, it doesn't look like it was. When you went to install it, did you our your installers figure out how the pink wire should be wired? I'm guessing it is for the parking brake, but want to be sure before I hook it up so I don't ruin it.
When you received your unit, was the pink wire labeled? From your pictures, it doesn't look like it was. When you went to install it, did you our your installers figure out how the pink wire should be wired? I'm guessing it is for the parking brake, but want to be sure before I hook it up so I don't ruin it.
TYPE-S KING
Joined: Jun 2008
Posts: 71
Likes: 0
From: upstate NY
since i'm still in iraq, im in no ruch to get the system, i will be home in 3 weeks
Thread Starter
Booya
Joined: Dec 2005
Posts: 220
Likes: 0
From: Princeton NJ
Installation Diagram
I have been emailing back and forth with them and they have provided me with the installation diagram. Here's the link ...
http://www.autotoys.com/pics/VTech_U...lation_Diagram[1].pdf
http://www.autotoys.com/pics/VTech_U...lation_Diagram[1].pdf
Thread Starter
Booya
Joined: Dec 2005
Posts: 220
Likes: 0
From: Princeton NJ
Additional installation information
I have an email channel open with Autotoys.com tech support and here's some important installation sound bytes I have from them;
- The harness MUST be wired at the radio, since the pins are reversed, if you wire at the nav-DVD, it will burn out the unit, the dvd player or worse.
- The Telephone red & green buttons and the scan buttons on the remote are for future expansion. They are not unsupported for now.
- The audio adapter works ONLY at the radio location. You cannot plug it in at any other place. It replaces the XM plug at the back of the radio unit. The XM functionality is not lost and you can switch between XM and the audio input on the unit using the remote. The audio switching works for non-XM traffic navi radio's. (No information on whether it works with XM traffic)
- The DIP switch settings on the unit for the Acura TL are - put switch 2 in ON and 1,3,4,5 in OFF
- The unmarked wires are;
--The Red Wire is one 12 VOLT ACC OUTPUT for some external device.
--The Black wire is the GND ( ground ) INPUT. (GROUND THIS)
--The Pink has one special function: Connect to GND to Activate the video of the REVERSE Jack and the AUDIO input of the interface. This can be used for some special installations (No idea what this means)
- 12 Volt / 12 volt ACCESSORY power - You should FUSE this wire with a 3-5 amp fuse for protection of 12 volt switch when car is on.
Hope this helps.
I have the installation rescheduled for this Saturday with my Installer. I hope everything works this time around.
TYPE-S KING
Joined: Jun 2008
Posts: 71
Likes: 0
From: upstate NY
what i was really wondering , when i connect the USB for my IPod is that going to be the audio and video source ? or i will have to connect my ipod with the AV cable ? please note i wont be adding a DVD player at this time, i will only use my IPod for video and audio .
Thanks
Thanks
Thread Starter
Booya
Joined: Dec 2005
Posts: 220
Likes: 0
From: Princeton NJ
Peripheral IS 710 - 12 V to 5 V iPhone 3G charging cable
The Autotoys.com unit has a 12 V USB port for optional charging of an iPod. Since my A/V source is a iPhone 3G, the 12 V needs to be converted to 5V for charging. Fortunately, Peripheral electronics has a extension cable which does just that;
http://www.peripheralelectronics.com/?ProductId=463
The IS 710 will connect the Apple composite A/V cable to my ProClip iPhone 3G holder. The composite end of the Apple cable will plug into the A/V inputs while the USB end goes into the USB charging port of the Autotoys.com unit . The IS 710 will provide the following advantages ...
1. Saves the 12V ACC power in the center console/arm-rest from being used.
2. The black color of the cable blends better with the interior compared to the white Apple A/V cable which sticks out like a sore thumb.
Additionally, I have purchased a Boyo VTL 405 backup camera which will be connected to the 12V optional ACC power of the unit.
http://www.amazon.com/Boyo-VTL405-Ch...6889194&sr=8-1
I thought I will pass on this information to the few who have this planned.
This should make the installation more simpler and cleaner.
Keeping my fingers crossed, hoping things go as planned this time around
TYPE-S KING
Joined: Jun 2008
Posts: 71
Likes: 0
From: upstate NY
I have the installation rescheduled for this Saturday with my Installer. I hope everything works this time around.[/QUOTE]
so i guess you are going to keep it after all, sorry i didn't read this part before. good im glad. also, i see that you are in NJ, Im in NY and i don't mind driving 5 or 6 hours to your guy if he get it right. keep us updated.
Thanks
so i guess you are going to keep it after all, sorry i didn't read this part before. good im glad. also, i see that you are in NJ, Im in NY and i don't mind driving 5 or 6 hours to your guy if he get it right. keep us updated.
Thanks
Thread Starter
Booya
Joined: Dec 2005
Posts: 220
Likes: 0
From: Princeton NJ
what i was really wondering , when i connect the USB for my IPod is that going to be the audio and video source ? or i will have to connect my ipod with the AV cable ? please note i wont be adding a DVD player at this time, i will only use my IPod for video and audio .
Thanks
Thanks
TYPE-S KING
Joined: Jun 2008
Posts: 71
Likes: 0
From: upstate NY
The Autotoys.com unit has a 12 V USB port for optional charging of an iPod. Since my A/V source is a iPhone 3G, the 12 V needs to be converted to 5V for charging. Fortunately, Peripheral electronics has a extension cable which does just that;
http://www.peripheralelectronics.com/?ProductId=463
The IS 710 will connect the Apple composite A/V cable to my ProClip iPhone 3G holder. The composite end of the Apple cable will plug into the A/V inputs while the USB end goes into the USB charging port of the Autotoys.com unit . The IS 710 will provide the following advantages ...
1. Saves the 12V ACC power in the center console/arm-rest from being used.
2. The black color of the cable blends better with the interior compared to the white Apple A/V cable which sticks out like a sore thumb.
Additionally, I have purchased a Boyo VTL 405 backup camera which will be connected to the 12V optional ACC power of the unit.
http://www.amazon.com/Boyo-VTL405-Ch...6889194&sr=8-1
I thought I will pass on this information to the few who have this planned.
This should make the installation more simpler and cleaner.
Keeping my fingers crossed, hoping things go as planned this time around
http://www.peripheralelectronics.com/?ProductId=463
The IS 710 will connect the Apple composite A/V cable to my ProClip iPhone 3G holder. The composite end of the Apple cable will plug into the A/V inputs while the USB end goes into the USB charging port of the Autotoys.com unit . The IS 710 will provide the following advantages ...
1. Saves the 12V ACC power in the center console/arm-rest from being used.
2. The black color of the cable blends better with the interior compared to the white Apple A/V cable which sticks out like a sore thumb.
Additionally, I have purchased a Boyo VTL 405 backup camera which will be connected to the 12V optional ACC power of the unit.
http://www.amazon.com/Boyo-VTL405-Ch...6889194&sr=8-1
I thought I will pass on this information to the few who have this planned.
This should make the installation more simpler and cleaner.
Keeping my fingers crossed, hoping things go as planned this time around
Thread Starter
Booya
Joined: Dec 2005
Posts: 220
Likes: 0
From: Princeton NJ
Thread Starter
Booya
Joined: Dec 2005
Posts: 220
Likes: 0
From: Princeton NJ
The female side of the firewire end attaches to the male firewire pin of the Apple composite A/V cable and extends it. Now the male side of the IS 710 plugs into the iPod/iPhone.
You are simply extending the Apple cable.
Instructor
Joined: Jun 2008
Posts: 128
Likes: 6
I have been emailing back and forth with them and they have provided me with the installation diagram. Here's the link ...
http://www.autotoys.com/pics/VTech_U...lation_Diagram[1].pdf
http://www.autotoys.com/pics/VTech_U...lation_Diagram[1].pdf
BTW, thanks for all the info! This will greatly help me in my install!!

Thread Starter
Booya
Joined: Dec 2005
Posts: 220
Likes: 0
From: Princeton NJ
Installation Diagram's - pics
I converted the PDF to JPEG's
(the PDF is buried deep inside the site and requires a tech support login)
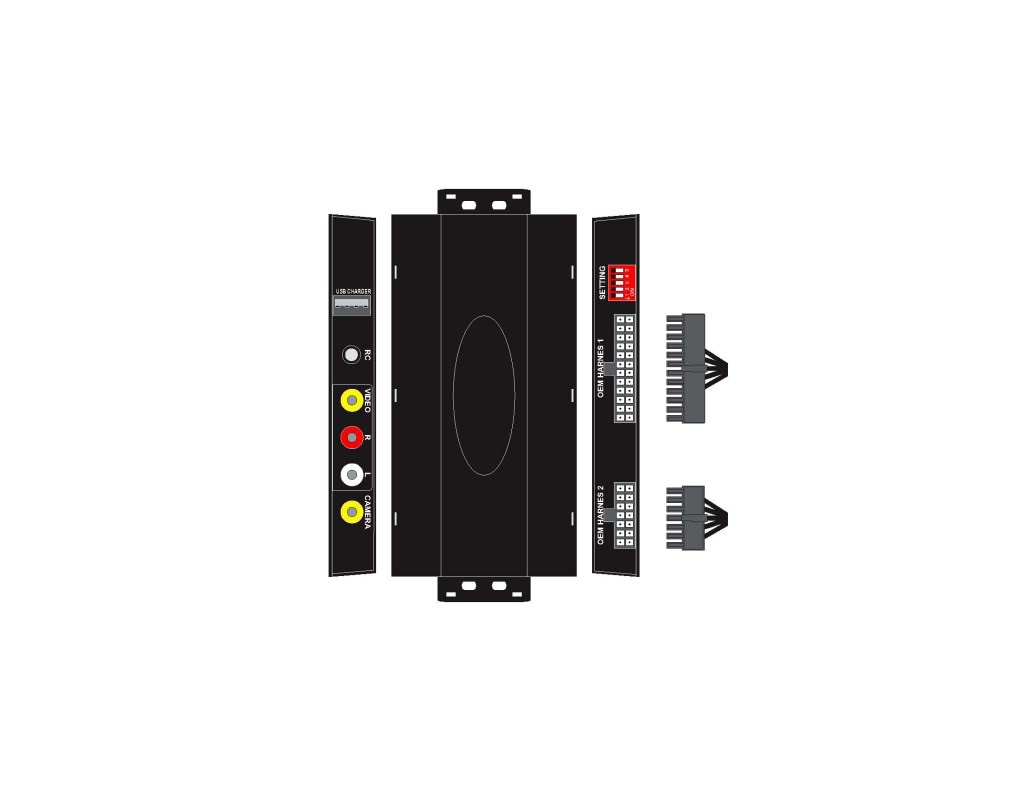

Can someone look at the pin-out diagram's and validate if the harness/pins will work? I do not trust these a******s ! Once bitten twice shy !
(the PDF is buried deep inside the site and requires a tech support login)
Can someone look at the pin-out diagram's and validate if the harness/pins will work? I do not trust these a******s ! Once bitten twice shy !
Thread Starter
Booya
Joined: Dec 2005
Posts: 220
Likes: 0
From: Princeton NJ
When and where are you getting your install done? Thx.
TYPE-S KING
Joined: Jun 2008
Posts: 71
Likes: 0
From: upstate NY
wow Dude thats nice thanks a lot


TYPE-S KING
Joined: Jun 2008
Posts: 71
Likes: 0
From: upstate NY
Apple composite A/V cable has a firewire pin that connects to the iPhone/iPod firewire data port.
The female side of the firewire end attaches to the male firewire pin of the Apple composite A/V cable and extends it. Now the male side of the IS 710 plugs into the iPod/iPhone.
You are simply extending the Apple cable.
The female side of the firewire end attaches to the male firewire pin of the Apple composite A/V cable and extends it. Now the male side of the IS 710 plugs into the iPod/iPhone.
You are simply extending the Apple cable.
what do you think of this cable instead of using 2 cables, the Ipod and the converter. this one plugs directly into your rca audio/video (usually red/white/yellow) input. It also had a red (12 volts) and black (ground) wire on it so you can charge your iPhone/iPod wia the Apple Dock Connector. You will need to hard wire the red/black wire to enable this cable to charge. It comes with installation instructions for this. The red wire should go to a switched 12v (ignition) source and the black wire to chasis ground.
Instructor
Joined: Jun 2008
Posts: 128
Likes: 6