
Mild Grade Fever!!


Three Wheelin'
Joined: Jun 2009
Posts: 1,360
Likes: 47
From: NYC
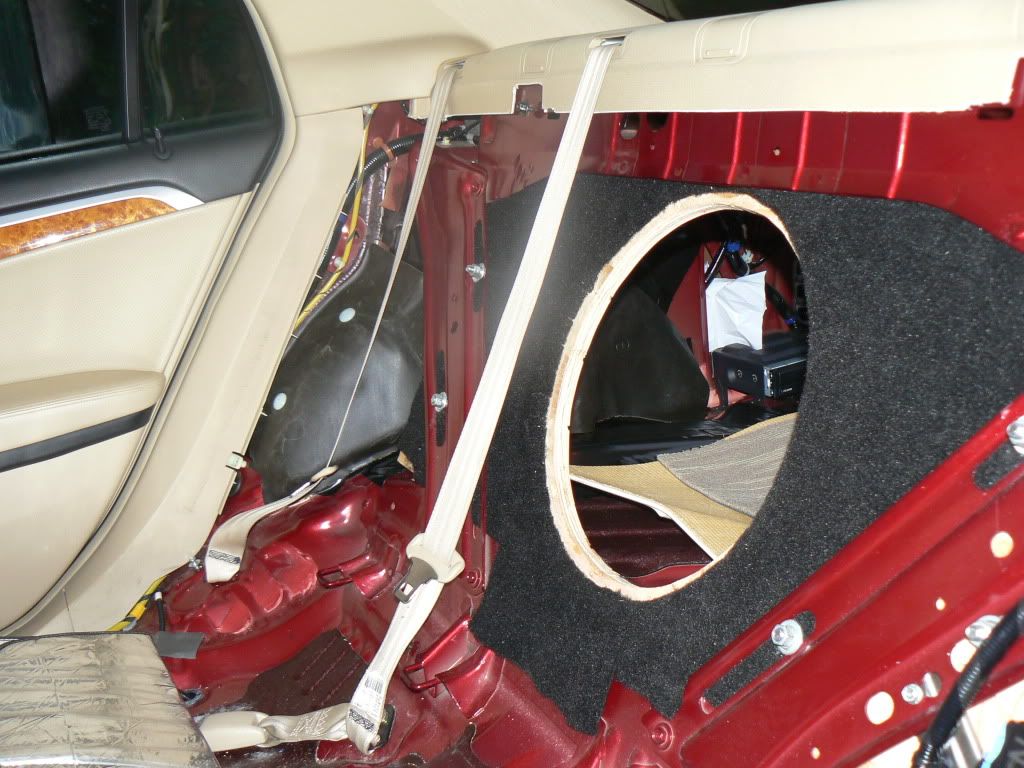
Trunk! Baffle is 1.5" plywood and is very stiff,but vibrations will be present.
Had it looked at by the person that will be responsible for the amp install, and we looked at the seat location and decided to stay with that. He ultimately recommended that location to avoid the baffle vibrations and trunk heat. He wasnt to worried about the amp on the baffle, but was a no go for sure on the crossovers goin there.
So plan is back to the original ........amp under drivers seat and crossovers under passenger seat. He said he would put the amp on a sliding piece of aluminum if I was really concerned about getting to the controls easy.
I used 2 -3/4" pieces of birch, they weight half of the same size MDF
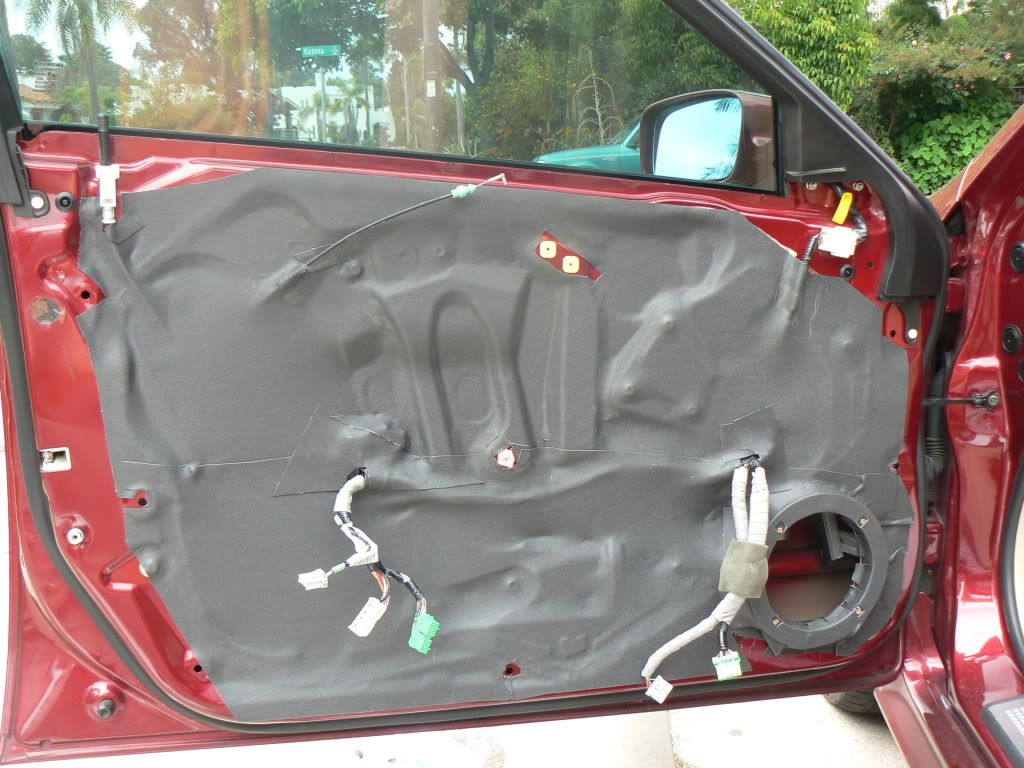
I think I may have read somewhere from multiple sources that Xovers should be installed as close to speakers as possible, meaning wire from xovers to speakers to be as short as possible.I didn't really go to extremes with that, so I didn't exactly go with that in mind, But I tucked mine right next the to stock amp on top of the panel under the glove box.
Seems like it would be a pain to jump wires from one side to the other, back and forth....maybe because I like to get stuff done by disassembling as less as possible by fishing wires, despite having ripped the interior of the car to pieces many times, but im just tired of it lol
....But can't wait to hear your reviews.
Maybe I've missed it but, you got your sub and your amp only so far?
Comps, line driver and/or processor yet?
Thread Starter
Suzuka Master
Joined: Sep 2006
Posts: 5,071
Likes: 596
From: San Diego, CA
Opal! I used (2) 3/4" pieces as well! 1.5" Overall same as yours. Agree its half the weight as the MDF. Is your baffle tight to the back of the diagonal braces? Is there clearance for the cone behind the seat? I just dont know how far the excursion is?
IHC only attached to the braces I hope I dont get much noise from movement, but a 1.5" shear diaphragm across those lateral braces is gonna stiffen it nicely.
I am not sure about the distance to driver correlation on the crossovers, but it does not make much sense to me that there is much of a distance issue. The guy doing the actual wiring said absolutely not in the doors. Prefers not to really go behind the dash because typically they end up being placed very close to large bundles of wiring and he feels that the crossovers are susceptible to the EMF. He like to keep them away from those issues so I think under the seat is a great choice.
I wouldnt wait for my reviews as I dont have much to compare it against, or really feel like I know what to listen for. This build has been entirely put together with quality components (excuse the sub) that I believe are appropriate for their use (there's the sub), good values and work well with each other so hopefully it will be a success!.
Three Wheelin'
Joined: Jun 2009
Posts: 1,360
Likes: 47
From: NYC
Baffle's mounted to the braces...
And there's a crapload of fatmat lol...only because I had plenty.
If clearance becomes an issue, You can always use some washers on the top bolts to tilt the seat a bit forward from the top, but i doubt you'll have to do that. Since you're mounting one sub and centered, you should see and take out the plastic trim/frame from the arm rest. i didn't take mine out yet, or if I will at all, but I'm still messing around with my car.
Last edited by Opel; May 19, 2012 at 10:04 PM.
Three Wheelin'
Joined: Jun 2009
Posts: 1,360
Likes: 47
From: NYC
I'm not too picky about certain things...but some people pick at the way it installs but it was fine for me. I haven't really used any other brand, or even sound deadening at all before this, so i can't really say much about it against another brand. Many use dynamat, secondskin, etc...some use ebay knockoffs.
Its a sound deadener not a rocket, so personally I don't care how much better each brand claims their technology to be...its just that, a sound deadener. As long as it doesn't melt during the summer, or fall off during the winter and does 80-90% of its intention, its acceptable by me. Now, if anyone is looking for the best of the best SQ, they're gonna have to do the entire car. But, for my baffle, trunk and front doors, this is fine for me, as far as I'm concerned. I also almost never drive with windows closed, especially driver's side, so i'm always exposed to outside noise while listening to music no matter what lol
I'm pretty positive that if I ripped this out and tried another brand, i will not hear the difference. Most reviews on more than one brand from the same person are usually based on 2 or more different installs on 2 or more cars with different sound systems. Each car is different.
Other pros with much more experience can chime in this
Fatmat CEO stated their product is "a rubber mastic with an asphalt base & that it works better than butyl because of its super adhesive properties". Now there's no way in hell I'm giving my money to that guy. Don from SDS & Second Skin owner/reps have proven it's mostly asphalt and called out the guy. Said it was that Peel n' Seal garbage without the Fatmat logo printed on lol.
What the hell is "rubber mastic" by the way haha
You're right, acoustic properties might not be rocket science, but they sure aren't easy to grasp like we think. Only in the last 5-6 years has this started to really take off as far as knowledge and good products. With a product that actually reduces/kills reverberations, you don't have to lay it down on the entire car. Don usually states that it's like 30% of the car which are the flat surfaces. Curved surfaces do not resonate near as much. Then you need to worry about other properties besides just deadening. So overall, it can get pretty deep and I sure won't discredit any of their findings as I just don't have the knowledge they do on this subject.
What most people don't realize is that every product isnt the same. Fatmat and Peel n' Seal, etc aren't the same thickness as CLD tiles, Alpha mat, Damp Pro, etc. Their properties are also based on mass loading, which is a lose lose when you have a thin product that you need a lot of. If you'd notice a difference depends on multiple things. If you use $200 worth of Fatmat and have to double it up and lay it literally everywhere...and it ends up costing the same or $30 less, I'll take the easy job of less product, no possible smell, less weight, etc.
Last edited by Trunk Monkey; May 20, 2012 at 04:51 PM.

Team Owner
Joined: Mar 2006
Posts: 20,172
Likes: 1,818
From: Bakersfield
Fatmat CEO stated their product is "a rubber mastic with an asphalt base & that it works better than butyl because of its super adhesive properties". Now there's no way in hell I'm giving my money to that guy. Don from SDS & Second Skin owner/reps have proven it's mostly asphalt and called out the guy. Said it was that Peel n' Seal garbage without the Fatmat logo printed on lol.
What the hell is "rubber mastic" by the way haha
You're right, acoustic properties might not be rocket science, but they sure aren't easy to grasp like we think. Only in the last 5-6 years has this started to really take off as far as knowledge and good products. With a product that actually reduces/kills reverberations, you don't have to lay it down on the entire car. Don usually states that it's like 30% of the car which are the flat surfaces. Curved surfaces do not resonate near as much. Then you need to worry about other properties besides just deadening. So overall, it can get pretty deep and I sure won't discredit any of their findings as I just don't have the knowledge they do on this subject.
What most people don't realize is that every product isnt the same. Fatmat and Peel n' Seal, etc aren't the same thickness as CLD tiles, Alpha mat, Damp Pro, etc. Their properties are also based on mass loading, which is a lose lose when you have a thin product that you need a lot of. If you'd notice a difference depends on multiple things. If you use $200 worth of Fatmat and have to double it up and lay it literally everywhere...and it ends up costing the same or $30 less, I'll take the easy job of less product, no possible smell, less weight, etc.
What the hell is "rubber mastic" by the way haha
You're right, acoustic properties might not be rocket science, but they sure aren't easy to grasp like we think. Only in the last 5-6 years has this started to really take off as far as knowledge and good products. With a product that actually reduces/kills reverberations, you don't have to lay it down on the entire car. Don usually states that it's like 30% of the car which are the flat surfaces. Curved surfaces do not resonate near as much. Then you need to worry about other properties besides just deadening. So overall, it can get pretty deep and I sure won't discredit any of their findings as I just don't have the knowledge they do on this subject.
What most people don't realize is that every product isnt the same. Fatmat and Peel n' Seal, etc aren't the same thickness as CLD tiles, Alpha mat, Damp Pro, etc. Their properties are also based on mass loading, which is a lose lose when you have a thin product that you need a lot of. If you'd notice a difference depends on multiple things. If you use $200 worth of Fatmat and have to double it up and lay it literally everywhere...and it ends up costing the same or $30 less, I'll take the easy job of less product, no possible smell, less weight, etc.
There were tests done on Fatmat and similar products against popular products, I think Second Skin was one of them. They coated a panel with different products and measured the SPL of the panel with each product. It was found that Fatmat-like products deadened 50% and more less than the good products. Doubling up on Fatmat helped but it still helped less than Second Skin's thinner Damilifier, not Damplifier Pro. Interestingly enough, the effectiveness per lb was like 5:1 in favor of the popular dampers. $$/effectivness went toward the good products as well when you figure you must use 100% coverage with the cheap stuff vs 25% to 50% in most cases with the good stuff.
I've had very good luck with Second Skin's thin Damplifier. No need to double up except right around the midbasses. It's on my trunk lid, trunk floor, floorboard, doors, and rear deck, along with the door card, sunroof shade, and the top console (which really helped). Just a single layer of the stuff made an amazing difference. People always comment at the lack of rattles when the system is cranked. I only applied 25-50% coverage except on the doors and trunk lid. With this much deadener throughout the car along with the Luxury Liner Pro on the floorboard, the effectiveness per lb is very important. You could easily end up with 200lbs or more of deadener if you had to use the thicker stuff, use 100% coverage everywhere, or even double up.
Team Owner
Joined: Mar 2006
Posts: 20,172
Likes: 1,818
From: Bakersfield
Once in a while Second Skin sells their reject product for a deep discount, when they have production problems and thickness isn't quite thick enough or it's inconsistent. I keep an eye out for those once in a while especially for doing the non critical areas.
Jerry (niebur3) on here also sells a very good brand but I can't remember the name right now. Cascade maybe...
Three Wheelin'
Joined: Jun 2009
Posts: 1,360
Likes: 47
From: NYC
Thanks Matt,
Then I'll leave the baffle alone, and do the doors over once I get better comps (giving myself a break for a while). I also did the top and under the rear deck with fatmat. The trunk lid I have not done yet. I dont think I'm gonna touch the floor.
As far as caring for performance...while I haven't completely lost interest, I no longer have the need like I used to...gotten kind of tired of being a grease monkey lol
OP: discussion on the past 4 post should help you decide on what to buy.
Blame me for getting these 2 guys fired up lol
Thread Starter
Suzuka Master
Joined: Sep 2006
Posts: 5,071
Likes: 596
From: San Diego, CA
Ok! I am in rare form! This is coming from the craft beer capitol! 25 awesome breweries in way to few of hours! This sound dampening concept has many perspectives and has got me thinkin! Once again "overthinking the simple".
CLD tiles with 25% coverage I am all onboard for that treatment of the outer door skin. But as far as skinning over large holes in your doors with some self adhesive sound deadener material while the other school of thought is to sandwiching some MLV and maybe some foam between door and door panel and not really trying to "seal" the door has been a bit of an eye opener!
I mean really! there are necessary weep holes allowing drainage of water from these areas, so the thought of ever having a sealed area is not desired in the most basic of terms.
So to me it seems like the best approach is to get some CLD tiles at 25% coverage adhered to the outer door skin. Provide a mass barrier and a foam layer between the door card and door and not really worry about a "sealed" atmosphere in the door by cutting metal/masonite pieces to fill those larger openings. Pros?cons
How important is actually "sealing" these large openings? Spanning with a deadner skin material or actually infilling the opening? I would think that some sealant between the components, spacer ring and door structure is required, its just how much further do you need to go?
Last edited by pohljm; May 20, 2012 at 08:40 PM.
Team Owner
Joined: Mar 2006
Posts: 20,172
Likes: 1,818
From: Bakersfield
Sealing the large openings is very important. You're not trying to make the door a sealed enclosure, for all intents and purposes, the door speakers are IB. But just like the subs, the rear wave has to be separated from the front wave or you get cancellation and lose midbass. You don't have to get them airtight but the big holes at least need to be covered with something. It doesn't rain much here but I made sure to keep the drain holes open.

Burning Brakes
Joined: Aug 2010
Posts: 750
Likes: 69
FWIW, I love using Cascade Audio DK-1 Door kits. They are a 1-piece cut to fit and then use a heat gun or hair dryer to conform to all the contours of the metal. It is also thick enough to cover any holes (even large) without having to use anything else like wood or steel.
FWIW, I have some kits at a REALLY good price and with our cars, 1 kit is enough to do both front doors and the package shelf.
BTW, if you ever need to remove it or get to say a window motor, just apply a little heat and whatever you want will remove very easily leaving little to no residue (although it can't be re-used), but it withstands temp up to 300+ degrees. Hard to beat this stuff.
Team Owner
Joined: Mar 2006
Posts: 20,172
Likes: 1,818
From: Bakersfield
FWIW, I love using Cascade Audio DK-1 Door kits. They are a 1-piece cut to fit and then use a heat gun or hair dryer to conform to all the contours of the metal. It is also thick enough to cover any holes (even large) without having to use anything else like wood or steel.
FWIW, I have some kits at a REALLY good price and with our cars, 1 kit is enough to do both front doors and the package shelf.
BTW, if you ever need to remove it or get to say a window motor, just apply a little heat and whatever you want will remove very easily leaving little to no residue (although it can't be re-used), but it withstands temp up to 300+ degrees. Hard to beat this stuff.
FWIW, I have some kits at a REALLY good price and with our cars, 1 kit is enough to do both front doors and the package shelf.
BTW, if you ever need to remove it or get to say a window motor, just apply a little heat and whatever you want will remove very easily leaving little to no residue (although it can't be re-used), but it withstands temp up to 300+ degrees. Hard to beat this stuff.
I wish I would have known about this stuff before I grossly overestimated how much Damplifier I needed. Sounds like it's easy to apply but what I really like is how it will conform to the contours and how you can actually remove it. If I ever need anymore, I'll definitely be in contact with you.
Burning Brakes
Joined: Aug 2010
Posts: 750
Likes: 69
I do. I mean, that is what I did in my car. It worked VERY well. All you need is this VB-2. Don't waste your money with CLD tiles over the top, if that is your thought....won't dampen any more then it will already be. Use some tiles inside the door to deaden the inside, but the panel where you mount the speaker will be as dead as can be.
Thread Starter
Suzuka Master
Joined: Sep 2006
Posts: 5,071
Likes: 596
From: San Diego, CA
^^ Yes it was my intent that the CLD tiles would only be used for the outer door skin (inside the door) The cascade would be to cover the large openings and seal/dampen the inner door skin adjacent to the door card.
Ok! I am in rare form! This is coming from the craft beer capitol! 25 awesome breweries in way to few of hours! This sound dampening concept has many perspectives and has got me thinkin! Once again "overthinking the simple".
CLD tiles with 25% coverage I am all onboard for that treatment of the outer door skin. But as far as skinning over large holes in your doors with some self adhesive sound deadener material while the other school of thought is to sandwiching some MLV and maybe some foam between door and door panel and not really trying to "seal" the door has been a bit of an eye opener!
I mean really! there are necessary weep holes allowing drainage of water from these areas, so the thought of ever having a sealed area is not desired in the most basic of terms.
So to me it seems like the best approach is to get some CLD tiles at 25% coverage adhered to the outer door skin. Provide a mass barrier and a foam layer between the door card and door and not really worry about a "sealed" atmosphere in the door by cutting metal/masonite pieces to fill those larger openings. Pros?cons
How important is actually "sealing" these large openings? Spanning with a deadner skin material or actually infilling the opening? I would think that some sealant between the components, spacer ring and door structure is required, its just how much further do you need to go?
CLD tiles with 25% coverage I am all onboard for that treatment of the outer door skin. But as far as skinning over large holes in your doors with some self adhesive sound deadener material while the other school of thought is to sandwiching some MLV and maybe some foam between door and door panel and not really trying to "seal" the door has been a bit of an eye opener!
I mean really! there are necessary weep holes allowing drainage of water from these areas, so the thought of ever having a sealed area is not desired in the most basic of terms.
So to me it seems like the best approach is to get some CLD tiles at 25% coverage adhered to the outer door skin. Provide a mass barrier and a foam layer between the door card and door and not really worry about a "sealed" atmosphere in the door by cutting metal/masonite pieces to fill those larger openings. Pros?cons
How important is actually "sealing" these large openings? Spanning with a deadner skin material or actually infilling the opening? I would think that some sealant between the components, spacer ring and door structure is required, its just how much further do you need to go?
You're getting in to mechanical properties/specs of the driver now. Some like to be used IB, some are set up for leaky sealed, some are set up for sealed, and some for ported.
If you go with MLV, then it basically acts as if you have sealed up those larger openings. You could also do it the other way around and attach some sheet metal to the larger openings, deadening them and then decouple the door card and sheet metal/deadener with some CCF.
*Note, must be Closed-cell and not open-cell foam or you'll get mold, etc.
Thread Starter
Suzuka Master
Joined: Sep 2006
Posts: 5,071
Likes: 596
From: San Diego, CA
Don's CLD tiles are on the way! Along with the cascade that I just ordered from Jerry I think I have the deadening most of the way there. ID CXSv2's are also on the way as well. Isimple has arrived. so its about to all come together slowly but surely.
I have a couple outside the box options to take the place of a MLV and foam barrier if I decide that i want to install that.
I have a couple outside the box options to take the place of a MLV and foam barrier if I decide that i want to install that.
Thread Starter
Suzuka Master
Joined: Sep 2006
Posts: 5,071
Likes: 596
From: San Diego, CA
Baffle is in and in the process of being sealed!

About to set the sub in place.
Did you guys use any sealant material between the rim of the sub and the recessed wood surface when you mounted the sub?
About to set the sub in place.
Did you guys use any sealant material between the rim of the sub and the recessed wood surface when you mounted the sub?

Racer
Joined: Feb 2012
Posts: 330
Likes: 34
From: Longview (East Texas)
There are just four screws. Two under the panel behind the door handle, one on the underside of the armrest and the one with the rubber grommet attached to it. Then just pull on the panel starting at the bottom to pop the clips out and lift up and off. Disconnect the wiring harnesses and door lever connector. That's it!
Thread Starter
Suzuka Master
Joined: Sep 2006
Posts: 5,071
Likes: 596
From: San Diego, CA
OK! makin progress! Baffle sealed, panels deadened, sub mounted and connected, trunk back in. Just need a little beauty board now and the trunk is done.

700/5 installed, ID crossovers installed, all in a nice cool spot thats fully accessible when needed with room for a processor if desired.

Now its on to the doors! fit and seal drivers, deaden panels, and seal up inner door. This project is coming close to being completed.
Happy Memorial Day!!! Thanks to all who have served.
700/5 installed, ID crossovers installed, all in a nice cool spot thats fully accessible when needed with room for a processor if desired.
Now its on to the doors! fit and seal drivers, deaden panels, and seal up inner door. This project is coming close to being completed.
Happy Memorial Day!!! Thanks to all who have served.

Thread Starter
Suzuka Master
Joined: Sep 2006
Posts: 5,071
Likes: 596
From: San Diego, CA
Woooohooooo! Everything is back together! Still need to deaden the front doors this weekend. I had bridged the channels wrong, amp is now configured correctly thanks to Jerry. Everything sounds great! System is completely discrete. You can only see something unusual if you pull the armrest down. I have not noticed much difference with the armrest up or down!
How can you fit 15" in a 6 inch space? IB
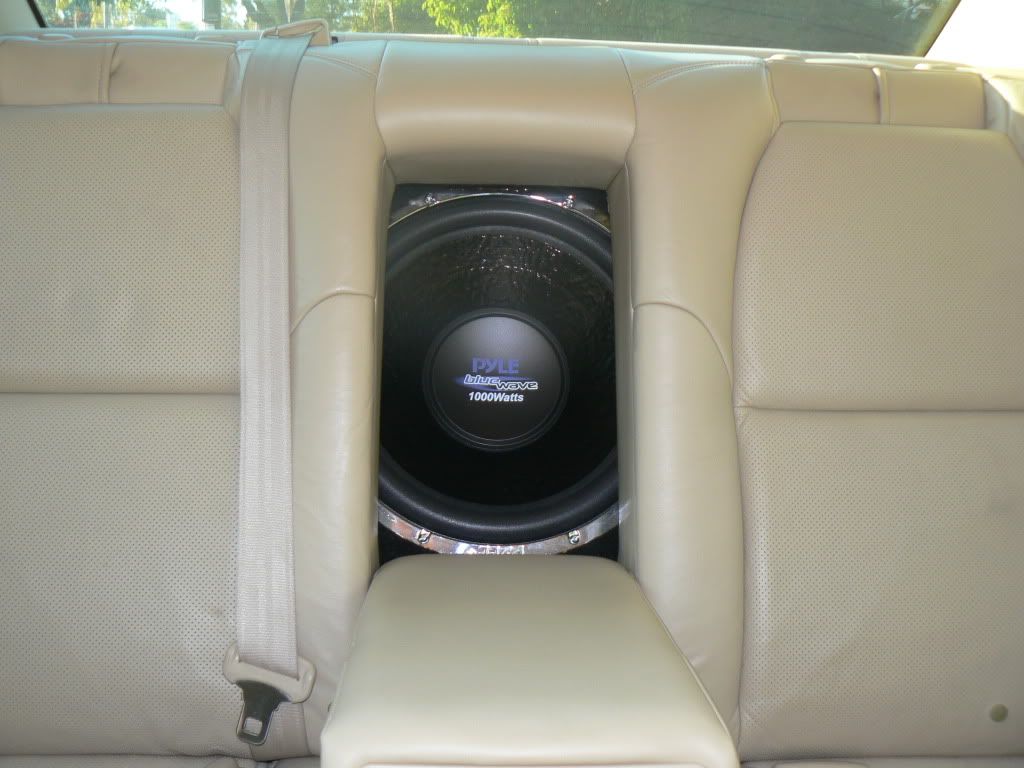
Just noticed I forgot the headrests!
How can you fit 15" in a 6 inch space? IB
Just noticed I forgot the headrests!
Thread Starter
Suzuka Master
Joined: Sep 2006
Posts: 5,071
Likes: 596
From: San Diego, CA
I never used my skis once I started to snowboard, and they never fit thru that damn thing anyway! This is my way of making the most out of having seats that dont fold down!

Banned
Joined: Aug 2011
Posts: 865
Likes: 46
So you went without processing, did you go preamp? If so, how's it sound compared to the stock amps processing?
Thread Starter
Suzuka Master
Joined: Sep 2006
Posts: 5,071
Likes: 596
From: San Diego, CA
No processor. No line driver. preamp straight into the 700/5. Using the ID crossovers. I really like the way it sounds currently. That being said I think at low volumes the stock system sounded very good as well.
But now I can listen with the window/sunroof open on the freeway. The ID tweeter is pretty amazing. The sub now plays notes that the stock sub could never, and the stock processing would not allow. And I didnt really loose any trunk space. I have been trying all sorts of music and it has continued to impress.
Choosing good quality components that work well with each other and work well with the stock HU has been a success!
Thread Starter
Suzuka Master
Joined: Sep 2006
Posts: 5,071
Likes: 596
From: San Diego, CA
Power wires down the drivers sill to under seat. Ground under seat. RCA's down center console to under seat. front component speaker wires across hump to crossovers under passenger seat. separate runs to doors and dash for components. Sub wire to trunk. Thats it! OEM rears and center maintained on factory harness.
Thread Starter
Suzuka Master
Joined: Sep 2006
Posts: 5,071
Likes: 596
From: San Diego, CA
1 door deadened and sealed! This Cascade material is awesome. Hit it with a heat gun and mold it and you end up with like a vacuum formed fit that when cooled is nice and rigid across the openings. can even seal the MDF rings in. Will be interesting to see if I can notice any difference with one door deadened till I get the time to do the other side.
nice build...i plan on going with the same setup. it will be a few months before i start my build but this thread has definately giving me a headstart in my building process.
Thanks to all that have contributed (pohljm, neibur3, iHatecars, Opel,TrunkMonkey, etc. )
Thanks to all that have contributed (pohljm, neibur3, iHatecars, Opel,TrunkMonkey, etc. )
Thread Starter
Suzuka Master
Joined: Sep 2006
Posts: 5,071
Likes: 596
From: San Diego, CA
Tuning and future improvements!
So after I am nearing "completion" with my upgrade, I started to realize that what I really enjoyed was the actual research and determining what would be the best equipment and configuration of devices into the OEM system to work with its nuances and achieve my goals. The actual install and fabrication was also very rewarding. Now that it is nearly complete, I totally feel a bit of a letdown. It sounds really good to me and I am really satisfied!
Everything was selected for a reason and has performed just as expected, and I am pretty happy that with all of the research there has been no OOOOPS or surprises. I started to realize that although it sounds great to me, I really have no basis for comparison. No one I know has really anything other than OEM or maybe OEM with a sub added, so I wa really starting to wonder.............Did I assemble what a professional would think was "great sounding"
So I decided I should get an opinion............during my research phase I visited many car audio shops and really did not get a warm fuzzy feeling from any of them. I put out some feelers and decided to stop by a well known high end shop just to ask a few questions. This shop LA Jolla Audio is primarily known for working on vehicles that are more expensive than most peoples homes.
The experience was really enlightening. Its a shop that you really need to seek out in an industrial complex, far from the "retail" experience. The person I dealt with was the "new guy" it was his 5th year anniversary that day. I told him my dilema..........I embarked upon this mid life crisis of an upgrade (according to my wife) and now wanted a professional opinion on what I had achieved!
He was both curious and interested as he grabbed his test disc and we proceeded to my car. I kind of felt like a new dad about to show of a newborn. There was never any discussion about what I had done, or what equipment I had used, For the next 15 minutes with his disc playing in the background he just questioned me about my goals and listening tendencies and musical likes. he then made a few checks to see where my audio was set. set it flat and then began some critical listening to a few tracks on the disc.
In the end he suggested a few options. He mentioned that all of the guys there have a little different idea of what is "best" Most all of the criticism of the system revolved around image and staging location. He is not a fan of the bass coming from behind. He is a salesperson and there is only one "tuner", but he obviously was well versed. he is running Dyns by the way.
Option 1 would be let them tune what I had for about 1 - 1.5 hours to achieve what he described as a significant improvement in the stage.
Option 2. Install a Bit10 and have them tune.
Option 3. Install the Bit10 and also install at least (1) 8" sub under the dash playing only 60 -150hz.
It was not until we were complete with the listening did we discuss what was actually installed in the vehicle. I felt a little bit proud and also embarrassed when I dropped the armrest to unveil my $58 Pyle sub! He was completely understanding of using the best product regardless of price. The 8" sub they recommend for the underdash application is a shallow mount Pioneer.
Overall I felt validated that what I installed was really only criticized for image/stage and that sonically he was happy given the OEM HU as the source.
Its funny! Just the simple act of favoring the balance one or two clicks to the passenger side has moved the stage nicely to the middle for me and I have kept it that way. It doesnt sound so outside windshield corner favored as when the balance is centered. The last thing he said as I departed was to flip the polarity on the drivers side midbass if I wanted some immediate improvement.
Overall I left very content with what I had achieved and also that I believe I had found a very reputable shop that I would not have any issues with giving them a shot at tuning!