
GPS Antenna Installation

Thread Starter
Instructor
Joined: Oct 2007
Posts: 161
Likes: 10
From: TORONTO
GPS Antenna Installation
GPS Antenna Installation

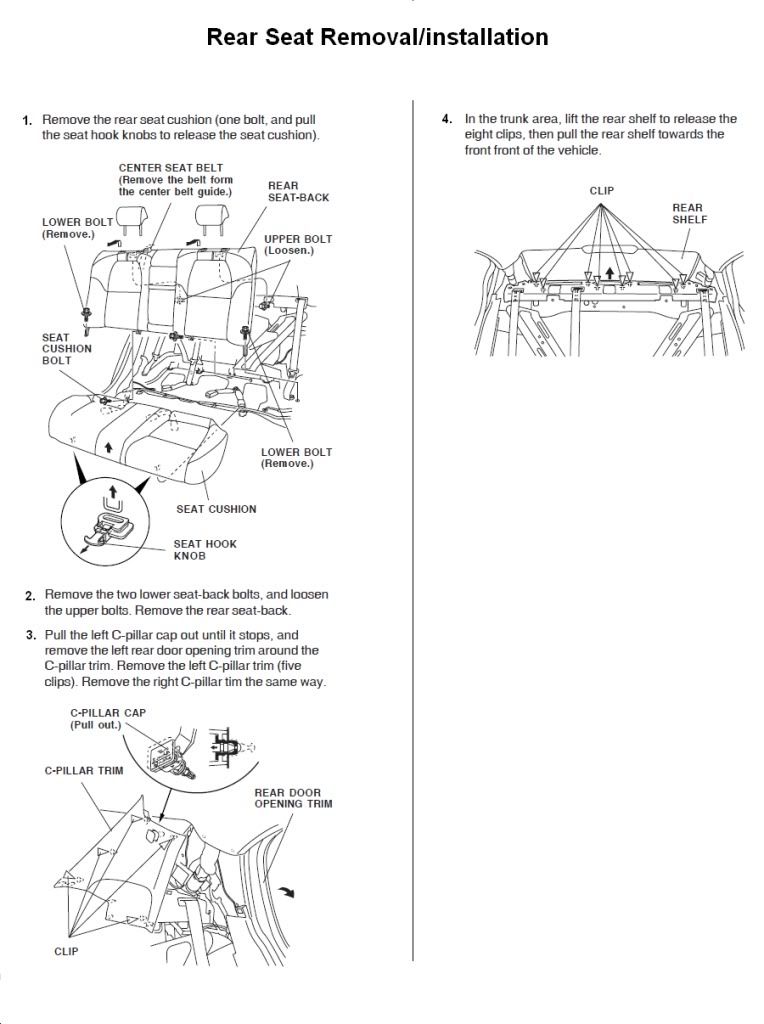
1. Release the �C pillar caps of both side
If the side curtain air bag deployed, be sure to check the removed trim pieces for damage before
Reinstallation, and if necessary, replace them and the trim clips with new ones.
If the side curtain airbags have not deployed, remove trim pieces should still be checked for damage,
And replaced with new ones if necessary.
Make sure the top of the trim overlaps with the headliner correctly. Push the cap and clips into place securely.

2. Remove the rear shelf (see pic�s for details)
Replace any damage clips
When installing the rear shelf, slip the rear seat belts and centre seat belt through the slits in the rear shelf.
Push the clips into place securely.

3. Remove the trunk trim (see pic�s for details)
Replace any damage clips
When installing the trunk side trim panel, slip the trunk lid hinge through the slits in the trim panel.
Push the clips into place securely.

4. Remove the rear seat (see pic�s for details)
Note: Take care not to scratch the body or tear the seat covers.
1. Remove the seat cushion bolt (A), then pull the seat hook knobs (B) to the seat cushion.
2. Loosen the upper bolts (C�, then remove the lower bolts (D)
3. Install the seat in the reverse order of removal, and note these items:
Guide the belts over the front of the seat-back as you install it.
Before attaching the rear seat-back and cushion, make sure there are no twists or kinks in the seat belts.
When installing the seat cushion, slip the seat belt buckles through the slits in the seat cushion.
1. Release the �C pillar caps of both side
If the side curtain air bag deployed, be sure to check the removed trim pieces for damage before
Reinstallation, and if necessary, replace them and the trim clips with new ones.
If the side curtain airbags have not deployed, remove trim pieces should still be checked for damage,
And replaced with new ones if necessary.
Make sure the top of the trim overlaps with the headliner correctly. Push the cap and clips into place securely.
2. Remove the rear shelf (see pic�s for details)
Replace any damage clips
When installing the rear shelf, slip the rear seat belts and centre seat belt through the slits in the rear shelf.
Push the clips into place securely.
3. Remove the trunk trim (see pic�s for details)
Replace any damage clips
When installing the trunk side trim panel, slip the trunk lid hinge through the slits in the trim panel.
Push the clips into place securely.
4. Remove the rear seat (see pic�s for details)
Note: Take care not to scratch the body or tear the seat covers.
1. Remove the seat cushion bolt (A), then pull the seat hook knobs (B) to the seat cushion.
2. Loosen the upper bolts (C�, then remove the lower bolts (D)
3. Install the seat in the reverse order of removal, and note these items:
Guide the belts over the front of the seat-back as you install it.
Before attaching the rear seat-back and cushion, make sure there are no twists or kinks in the seat belts.
When installing the seat cushion, slip the seat belt buckles through the slits in the seat cushion.

Thread
Thread Starter
Forum
Replies
Last Post
rockyboy
2G RDX (2013-2018)
46
Jan 25, 2016 06:00 PM
oyayjoe
Member Cars for Sale
1
Sep 12, 2015 04:40 PM
andysinnh
2G RDX Audio, Bluetooth, Electronics & Navigation
1
Sep 5, 2015 11:38 PM